車輛識別(特徵提取+svm分類器)
以下為udacity的SDCND的一個專案
ps:這裡使用的是用opencv進行特徵提取+svm分類器的方法實現物體檢測,是在深度學習流行前比較經典的實現方法
專案描述:
使用openCV提取圖片特徵,訓練svm分類器,分類車輛與非車輛。用訓練好的模型識別汽車前置攝像頭記錄視訊中的車輛。
實現步驟:
- 分析訓練資料,提取圖片HOG特徵。
- 訓練分類器
- 應用滑動視窗(sliding windows)實現車輛檢測
- 應用熱力圖(heatMap)過濾錯誤檢測(false positive)
分析訓練資料,提取圖片HOG特徵
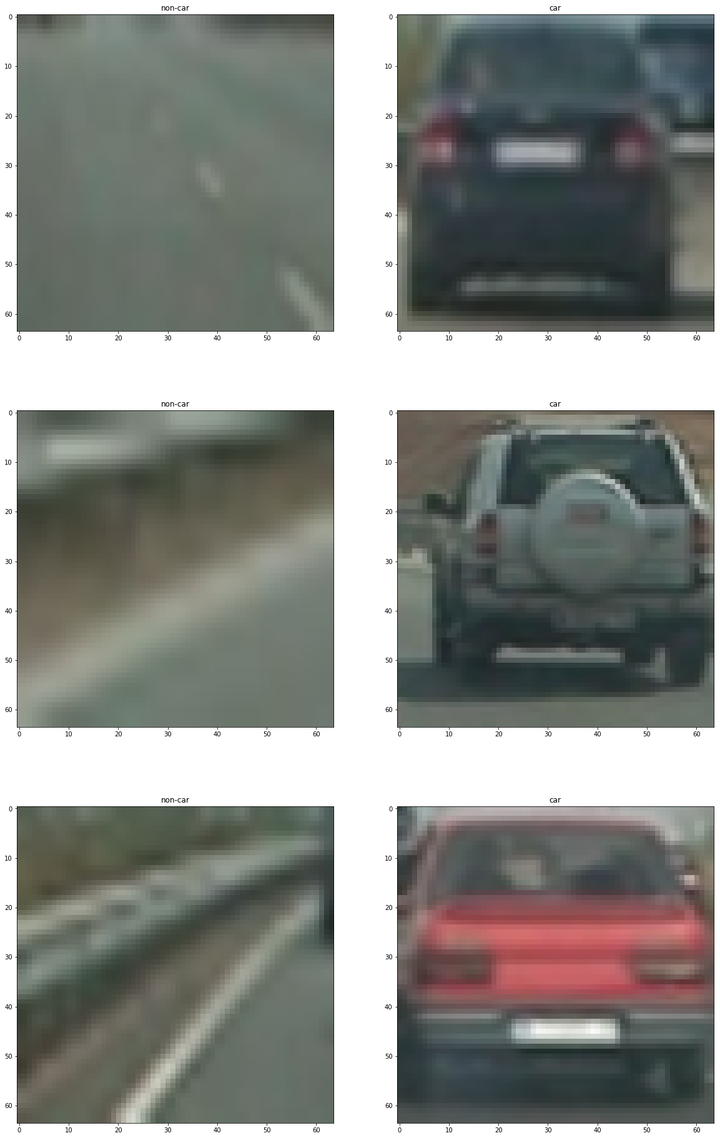
訓練資料為64x64x3的RBG圖片,包含車輛與非車輛圖片兩類,車輛圖片8792張,非車輛圖片8968張。 以下為車輛,非車輛圖片樣例:
提取HOG特徵,以下為實現方法:
# Define a function to return HOG features and visualization
def get_hog_features(img, orient, pix_per_cell, cell_per_block, vis=False, feature_vec=True):
    if vis == True:
        features, hog_image = hog(img, orientations=orient, pixels_per_cell=(pix_per_cell, pix_per_cell),
                                  cells_per_block=(cell_per_block, cell_per_block), transform_sqrt=False,
                                  visualise=True, feature_vector=False)
        return features, hog_image
    else:
        features = hog(img, orientations=orient, pixels_per_cell=(pix_per_cell, pix_per_cell),
                       cells_per_block=(cell_per_block, cell_per_block), transform_sqrt=False,
                       visualise=False, feature_vector=feature_vec)
        return features
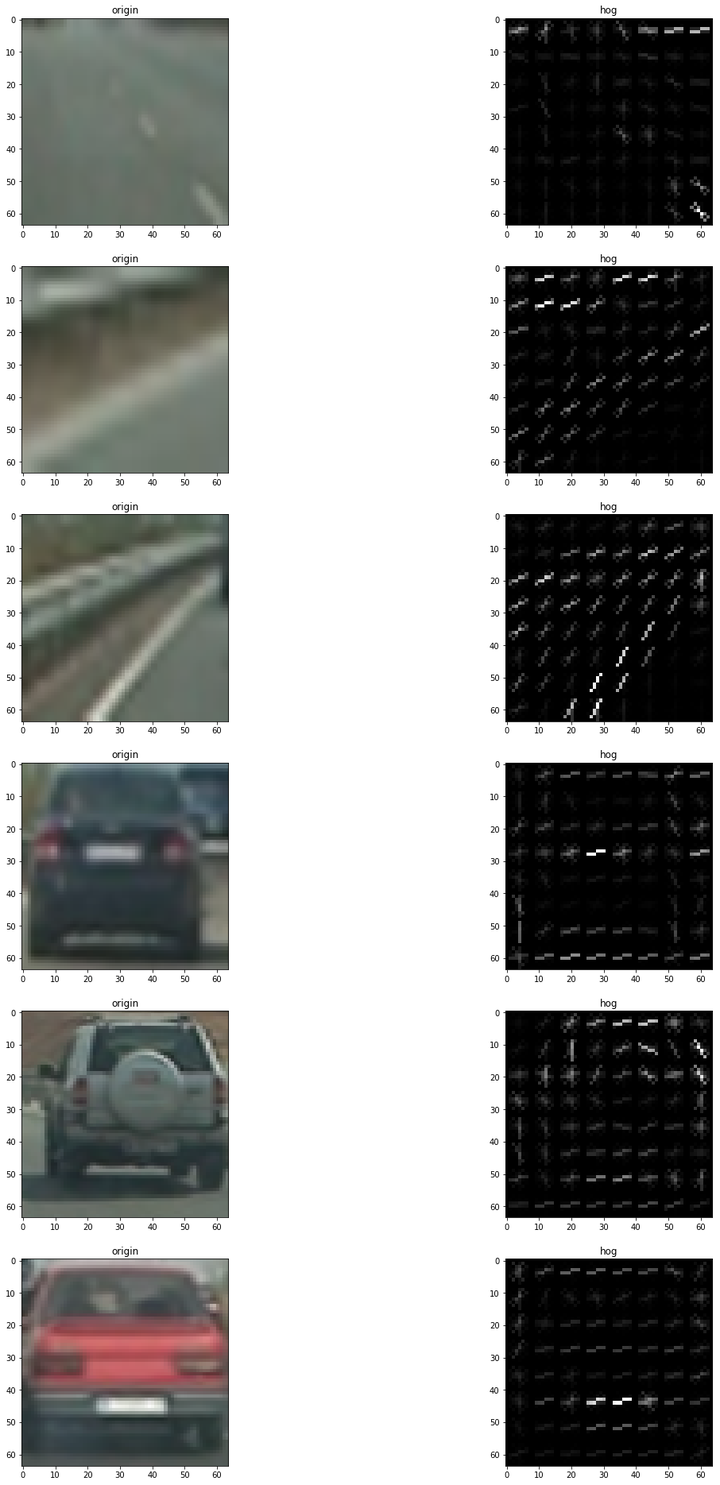
以下為原圖與提取的HOG特徵圖對比:
訓練分類器
這裡使用SVM分類器,以下為程式碼:
t = time.time()
car_features = utils.extract_features(cars, cspace=colorspace, orient=orient,
                        pix_per_cell=pix_per_cell, cell_per_block=cell_per_block,
                        hog_channel=hog_channel)
notcar_features = utils.extract_features(notcars, cspace=colorspace, orient=orient,
                        pix_per_cell=pix_per_cell, cell_per_block=cell_per_block,
                        hog_channel=hog_channel)

t2 = time.time()
print(round(t2-t, 2), 'Seconds to extract features...')

# Create an array stack of feature vectors
X = np.vstack((car_features, notcar_features))
X = X.astype(np.float64)
# Fit a per-column scaler
# X_scaler = StandardScaler().fit(X)
# Apply the scaler to X
# scaled_X = X_scaler.transform(X)

# Define the labels vector
y = np.hstack((np.ones(len(car_features)), np.zeros(len(notcar_features))))


# Split up data into randomized training and test sets
rand_state = np.random.randint(0, 100)
X_train, X_test, y_train, y_test = train_test_split(
    X, y, test_size=0.2, random_state=rand_state)


print('Feature vector length:', len(X_train[0]))
# Use a linear SVC
svc = LinearSVC()
# Check the training time for the SVC
t = time.time()
svc.fit(X_train, y_train)
t2 = time.time()
t2 = time.time()
print(round(t2-t, 2), 'Seconds to train classfier...')
# Check the score of the SVC
print('Test Accuracy of classfier = ', round(svc.score(X_test, y_test), 4))
# Check the prediction time for a single sample
t=time.time()
n_predict = 10
print('My classfier predicts: ', svc.predict(X_test[0:n_predict]))
print('For these',n_predict, 'labels: ', y_test[0:n_predict])
t2 = time.time()
print(round(t2-t, 5), 'Seconds to predict', n_predict,'labels with classfier')
最終訓練的分類器在測試資料集得到98.0%準確率
應用滑動視窗(sliding windows)實現車輛檢測
由於提取HOG特徵比較耗時,先直接提取整張圖片的HOG特徵,然後獲取每個視窗所屬的那部分HOG特徵,這樣效率會更高,以下為滑動視窗搜尋的程式碼實現:
# Define a single function that can extract features using hog sub-sampling and make predictions
def find_cars(img, ystart, ystop, scale, cspace, hog_channel, svc, X_scaler, orient,
              pix_per_cell, cell_per_block, spatial_size, hist_bins, show_all_rectangles=False):
    # array of rectangles where cars were detected
    windows = []

    img = img.astype(np.float32) / 255

    img_tosearch = img[ystart:ystop, :, :]

    # apply color conversion if other than 'RGB'
    if cspace != 'RGB':
        if cspace == 'HSV':
            ctrans_tosearch = cv2.cvtColor(img_tosearch, cv2.COLOR_RGB2HSV)
        elif cspace == 'LUV':
            ctrans_tosearch = cv2.cvtColor(img_tosearch, cv2.COLOR_RGB2LUV)
        elif cspace == 'HLS':
            ctrans_tosearch = cv2.cvtColor(img_tosearch, cv2.COLOR_RGB2HLS)
        elif cspace == 'YUV':
            ctrans_tosearch = cv2.cvtColor(img_tosearch, cv2.COLOR_RGB2YUV)
        elif cspace == 'YCrCb':
            ctrans_tosearch = cv2.cvtColor(img_tosearch, cv2.COLOR_RGB2YCrCb)
    else:
        ctrans_tosearch = np.copy(img)

    # rescale image if other than 1.0 scale
    if scale != 1:
        imshape = ctrans_tosearch.shape
        ctrans_tosearch = cv2.resize(ctrans_tosearch, (np.int(imshape[1] / scale), np.int(imshape[0] / scale)))

    # select colorspace channel for HOG
    if hog_channel == 'ALL':
        ch1 = ctrans_tosearch[:, :, 0]
        ch2 = ctrans_tosearch[:, :, 1]
        ch3 = ctrans_tosearch[:, :, 2]
    else:
        ch1 = ctrans_tosearch[:, :, hog_channel]

    # Define blocks and steps as above
    nxblocks = (ch1.shape[1] // pix_per_cell) + 1  # -1
    nyblocks = (ch1.shape[0] // pix_per_cell) + 1  # -1
    nfeat_per_block = orient * cell_per_block ** 2
    # 64 was the orginal sampling rate, with 8 cells and 8 pix per cell
    window = 64
    nblocks_per_window = (window // pix_per_cell) - 1
    cells_per_step = 2  # Instead of overlap, define how many cells to step
    nxsteps = (nxblocks - nblocks_per_window) // cells_per_step
    nysteps = (nyblocks - nblocks_per_window) // cells_per_step

    # Compute individual channel HOG features for the entire image
    hog1 = utils.get_hog_features(ch1, orient, pix_per_cell, cell_per_block, feature_vec=False)
    if hog_channel == 'ALL':
        hog2 = utils.get_hog_features(ch2, orient, pix_per_cell, cell_per_block, feature_vec=False)
        hog3 = utils.get_hog_features(ch3, orient, pix_per_cell, cell_per_block, feature_vec=False)

    for xb in range(nxsteps):
        for yb in range(nysteps):
            ypos = yb * cells_per_step
            xpos = xb * cells_per_step
            # Extract HOG for this patch
            hog_feat1 = hog1[ypos:ypos + nblocks_per_window, xpos:xpos + nblocks_per_window].ravel()
            if hog_channel == 'ALL':
                hog_feat2 = hog2[ypos:ypos + nblocks_per_window, xpos:xpos + nblocks_per_window].ravel()
                hog_feat3 = hog3[ypos:ypos + nblocks_per_window, xpos:xpos + nblocks_per_window].ravel()
                hog_features = np.hstack((hog_feat1, hog_feat2, hog_feat3))
            else:
                hog_features = hog_feat1

            xleft = xpos * pix_per_cell
            ytop = ypos * pix_per_cell


            test_prediction = svc.predict(hog_features)

            if test_prediction == 1 or show_all_rectangles:
                xbox_left = np.int(xleft * scale)
                ytop_draw = np.int(ytop * scale)
                win_draw = np.int(window * scale)
                windows.append(
                    ((xbox_left, ytop_draw + ystart), (xbox_left + win_draw, ytop_draw + win_draw + ystart)))

    return windows
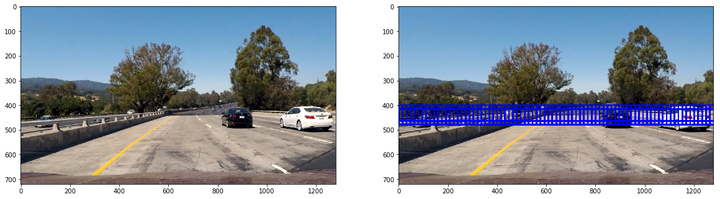
車輛由於距離遠近不同會在視訊呈現的不一樣的大小且出現的位置也會各異,這裡使用4類不同大小的滑動視窗對圖片中的車輛進行搜尋:
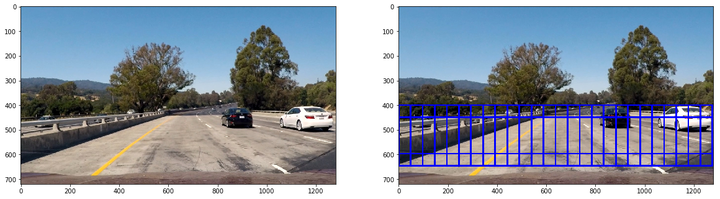
第一類大小為64x64,重疊率(overlap)為0.75,用來檢測距離較遠的車輛:
第二類大小為96x96,重疊率(overlap)為0.75,用來檢測中距離車輛:

第三類大小為128x128,重疊率(overlap)為0.75,用來檢測近距離車輛:
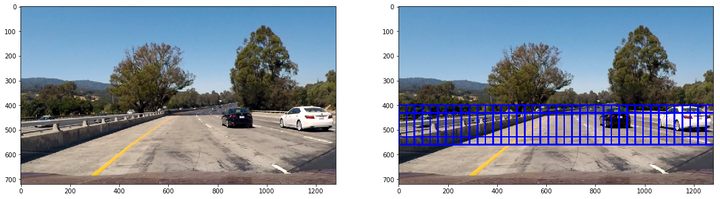
第四類大小為224x224,重疊率(overlap)為0.75,用來檢測極近距離車輛:
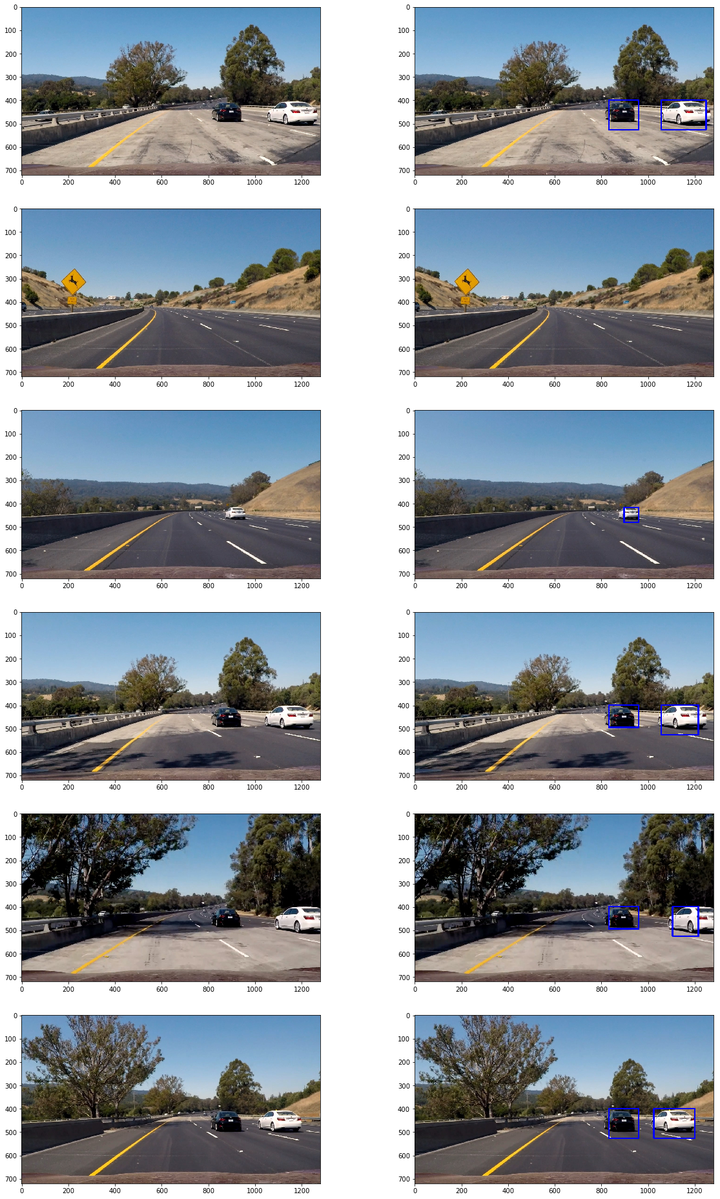
應用在測試圖片得到的下列結果:
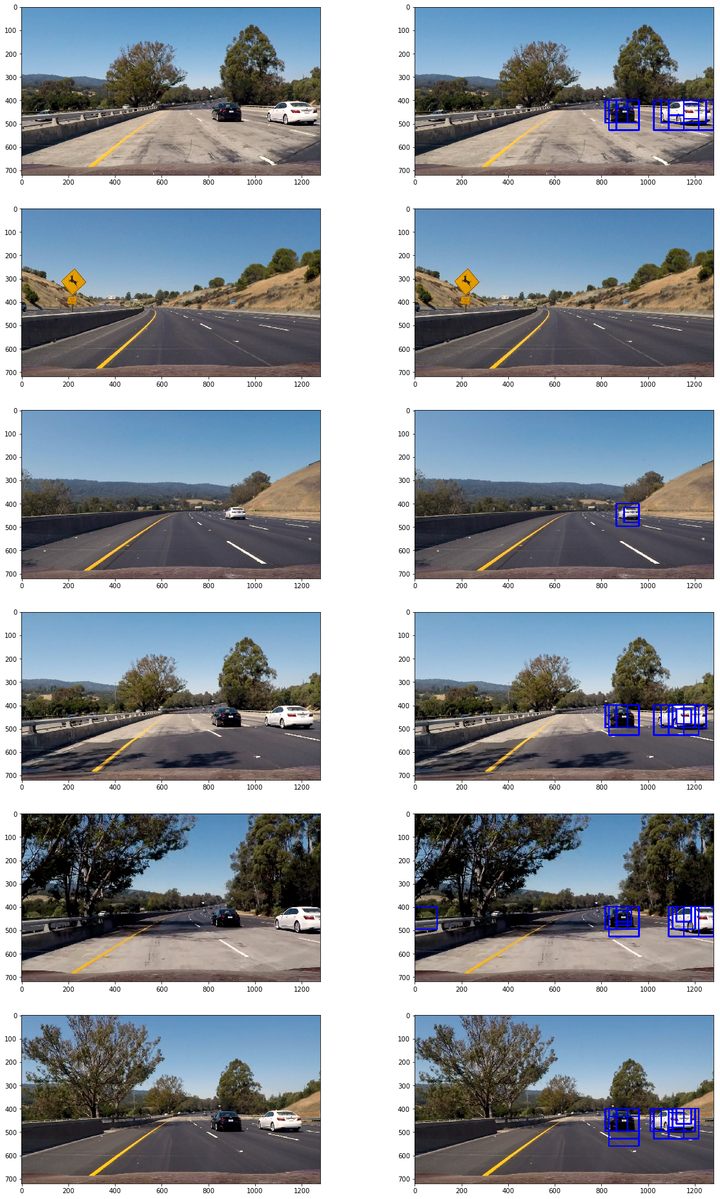
可以看到存在一些多視窗重合及錯誤檢測(false positive)現象
應用熱圖(heatMap)過濾錯誤檢測(false positive)
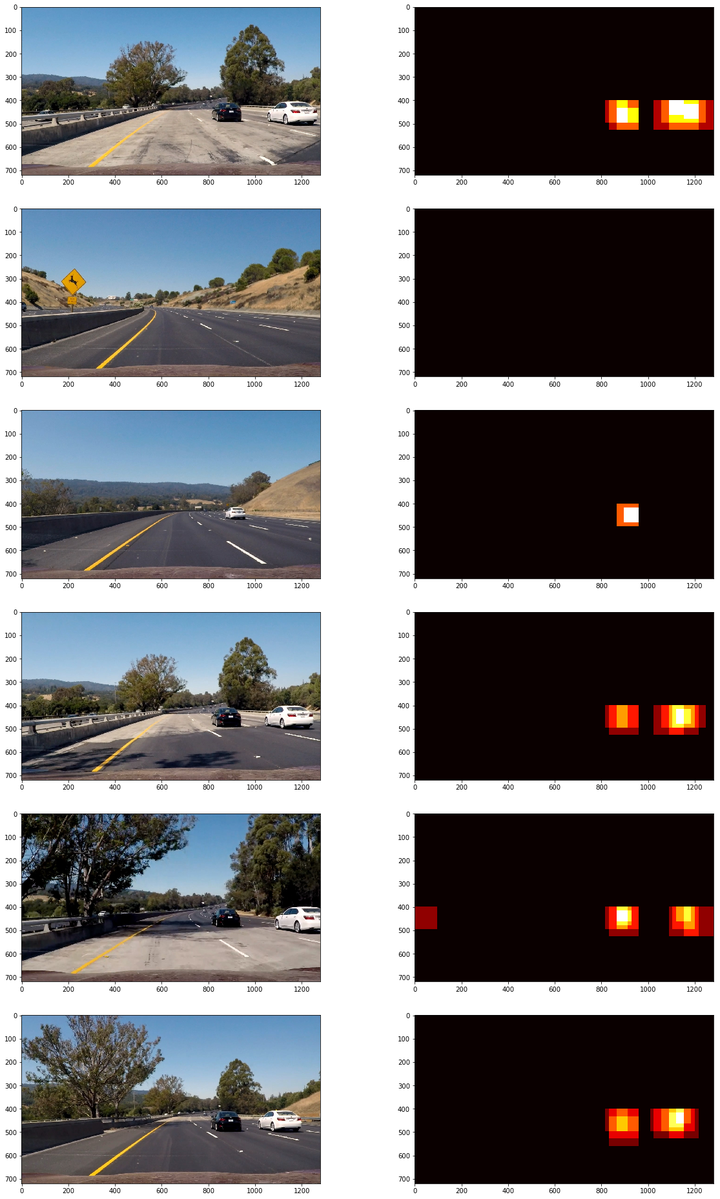
由於使用多個大小不一滑動視窗,且視窗存在重疊,單個車輛影象會被多個視窗捕捉檢測。使用這個現象可以過濾錯誤檢測。
記錄一張圖片上所有positive detections,使用記錄的positive detections形成一個檢測熱圖:
def add_heat(heatmap, bbox_list):
    # Iterate through list of bboxes
    for box in bbox_list:
        # Add += 1 for all pixels inside each bbox
        # Assuming each "box" takes the form ((x1, y1), (x2, y2))
        heatmap[box[0][1]:box[1][1], box[0][0]:box[1][0]] += 1
以下應用在測試圖片得到的檢測熱圖:
然後對熱圖進行閾值過濾,過濾錯誤檢測,以下為閾值過濾實現程式碼:
def apply_threshold(heatmap, threshold):
    # Zero out pixels below the threshold
    heatmap[heatmap <= threshold] = 0
    # Return thresholded map
    return heatmap
以下為整個pipeline應用在測試圖片的效果: