
人臉檢測之MTCNN程式碼實現
上一篇部落格介紹了MTCNN網路的原理,這篇部落格介紹一個程式碼的實現。
對應的MTCNN網路目前也有寫好的程式碼,大家可以在程式碼連結 上下載程式碼,然後進行識別。對於下載後的程式碼主要有以下的說明。
1. 該程式碼中的包含了已經訓練好的模型,模型的資料儲存在.npy檔案中。
2. 程式碼工程中主要關注detect_face.py和facedetect_mtcnn.py即可,其中detect_face.py中包含了所有關於MTCNN網路結構的實現方式。
3. detect_face.py中實現了PNet,RNet,ONet構造了所需要的網路結構。creat_mtcnn中通過load儲存的.npy到對應的網路模型中恢復網路中的引數。
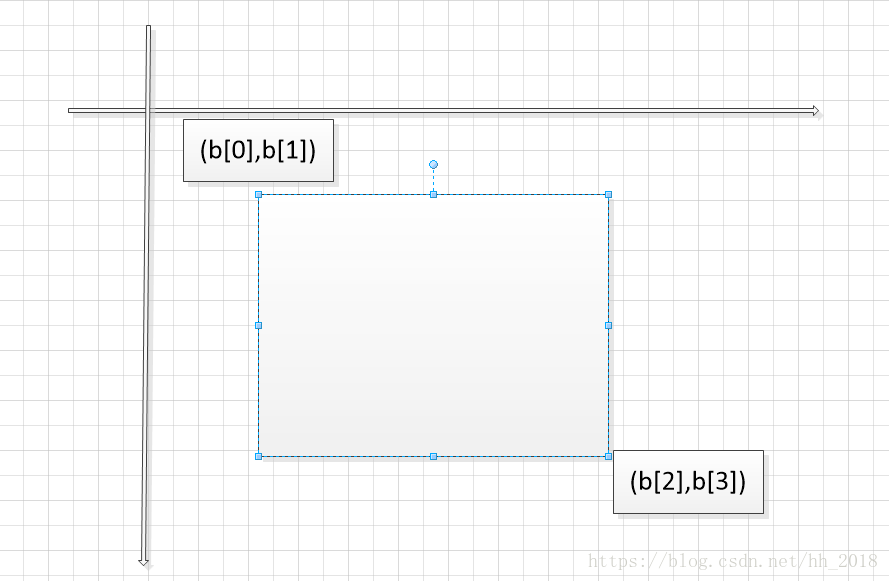
4. detect_face是對圖片的具體識別。最終生成的box是一個n行5列的資料,n表示識別出的人臉個數,第5列表示人臉的可能性。1——4列分別表示人臉框的左上角和右下角座標。具體如下圖:
point是一個n行10列的座標。其中n表示人臉的個數。point的前5列分別表示眼睛鼻子嘴的橫座標,後5列表示其對應的縱座標。
5. 模型使用,facedetect_mtcnn.py展示瞭如何使用模型,即在使用時必須先呼叫detect_facec的creat_mtcnn方法匯入網路結構,此時在建立時又需要寫出對應的網路結構然後通過.npy進行資料恢復然後再使用。
上述過程主要是對下載下來的程式碼進行說明,這樣大家在使用過程中可以只看與自己相關的部分程式碼不需要看所有的程式碼,因為許多程式碼和自己需要的無關,花大量的時間瞭解完全是時間上的浪費。接下來主要介紹一下自己對模型的從新儲存。
由於在移動端使用時我們往往需要的是.pb檔案,並且常見的模型載入方式也是.pb載入,因為這種方法可以讓自己在實現模型時不需要手寫模型的網路結構。對於上述程式碼我在他的基礎上也進行了改進,讓其變成了對應的.pb檔案。具體如下:
model_path = None
sess = tf.InteractiveSession()

with tf.variable_scope('pnet'):
    data = tf.placeholder(tf.float32, (None, None, None, 3), 'input')
    pnet = detect_face.PNet({'data': data})
    pnet.load('det1.npy', sess)
with tf.variable_scope('rnet'):
    data = tf.placeholder(tf.float32, (None, 24, 24, 3), 'input')
    rnet = detect_face.RNet({'data': data})
    rnet.load('det2.npy', sess)
with tf.variable_scope('onet'):
    data = tf.placeholder(tf.float32, (None, 48, 48, 3), 'input')
    onet = detect_face.ONet({'data': data})
    onet.load('det3.npy', sess)

constant_graph = graph_util.convert_variables_to_constants(sess, sess.graph_def, ["pnet/input", "rnet/input", "onet/input"
                                                                                  , "pnet/conv4-2/BiasAdd", "pnet/prob1"
                                                                                  , "rnet/conv5-2/conv5-2", "rnet/prob1"
                                                                                  , "onet/conv6-2/conv6-2", "onet/conv6-3/conv6-3"
                                                                                  , "onet/prob1"])
with tf.gfile.FastGFile('face_detect.pb', mode='wb') as f:
    f.write(constant_graph.SerializeToString())
sess.close()
對於上述的.pb檔案,我們通過以下程式碼進行測試:
detection_graph = tf.Graph()
with detection_graph.as_default():
    od_graph_def = tf.GraphDef()
    with tf.gfile.GFile('model/face_detect.pb', 'rb') as fid:
        serialized_graph = fid.read()
        od_graph_def.ParseFromString(serialized_graph)
        tf.import_graph_def(od_graph_def, name='')


def creat_net(sess):
    pnet_fun = lambda img: sess.run(('pnet/conv4-2/BiasAdd:0', 'pnet/prob1:0'), feed_dict={'pnet/input:0': img})
    rnet_fun = lambda img: sess.run(('rnet/conv5-2/conv5-2:0', 'rnet/prob1:0'), feed_dict={'rnet/input:0': img})
    onet_fun = lambda img: sess.run(('onet/conv6-2/conv6-2:0', 'onet/conv6-3/conv6-3:0', 'onet/prob1:0'),
                                            feed_dict={'onet/input:0': img})
    return pnet_fun, rnet_fun, onet_fun


with detection_graph.as_default():
    with tf.Session(graph=detection_graph) as sess:
        pnet, rnet, onet = creat_net(sess)

        bounding_boxes, points = detect_face.detect_face(img, minsize, pnet, rnet, onet, threshold, factor)
他跟原始碼中facecdetect_mtcnn.py中的實現相比完全不用手寫網路結構。並且通過驗證在用該方式將程式碼該為C++版的,呼叫介面實現網路後就可以用於移動端的識別。