
OkHttp解析大總結
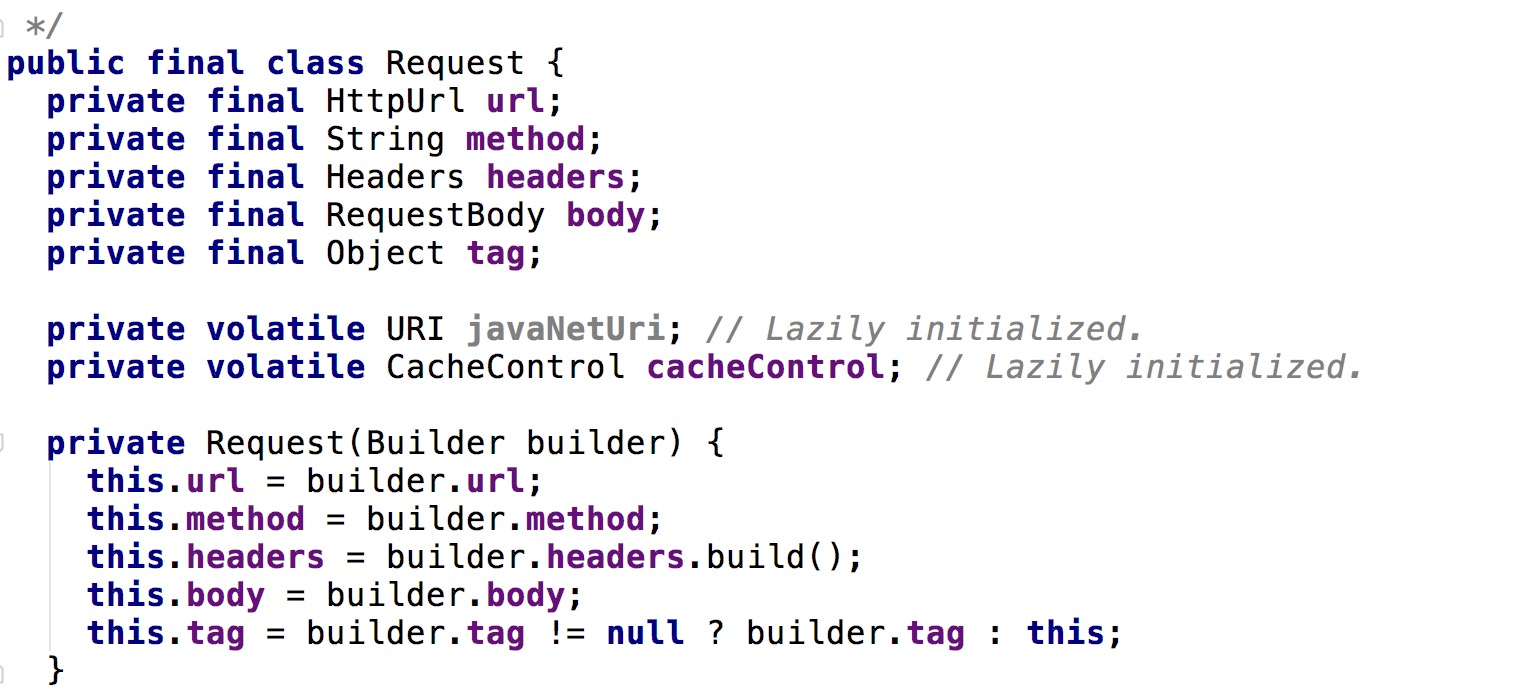
先來看一下Request這個類,此類還是比較簡單的,沒有太多複雜的程式碼,內部就是對一些url、method、body等變數的封裝。在整個OkHttp的網路請求流程中有一大部分的程式碼就是用來對這幾個變數進行二次修改。原始碼如下:
接著再來看Call這個類,在 OkHttp面試之–OkHttp的整個非同步請求流程這一節中我們瞭解到真正的Call物件應該是RealCall型別,那我們就來看一下這個RealCall
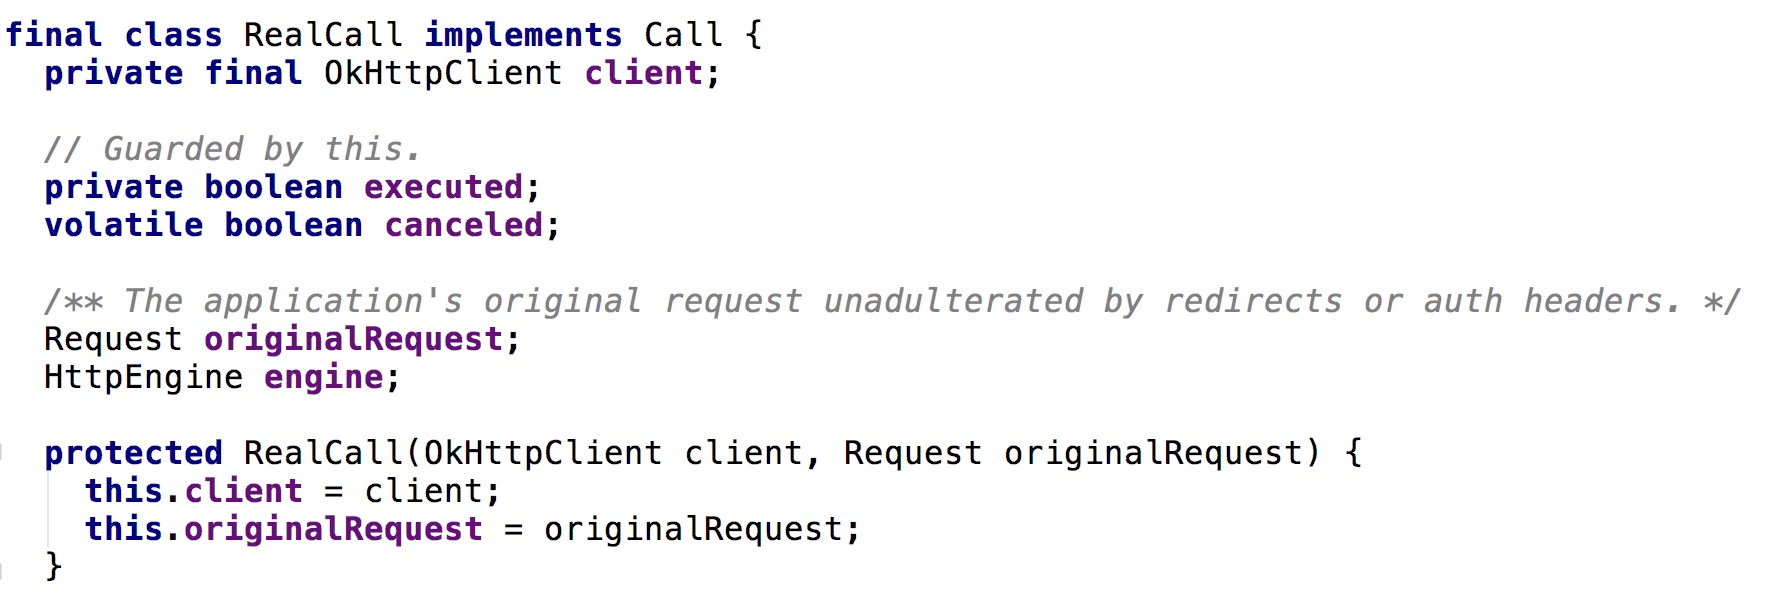
從上面的構造器中我們能看出,其內部也儲存以一個OkHttpClient和一個Request物件的例項。並且內部還有一個HttpEngine的全域性變數,對於HttpEngine目前階段我們可以將其理解為網路訪問的入口—通過HttpEngine進行網路訪問操作並返回請求結果.
那在RealCall中是如何使用HttpEngine進行網路訪問的呢? 繼續分析程式碼看到在RealCall.enqueue(Callback)方法執行後續流程

繼續
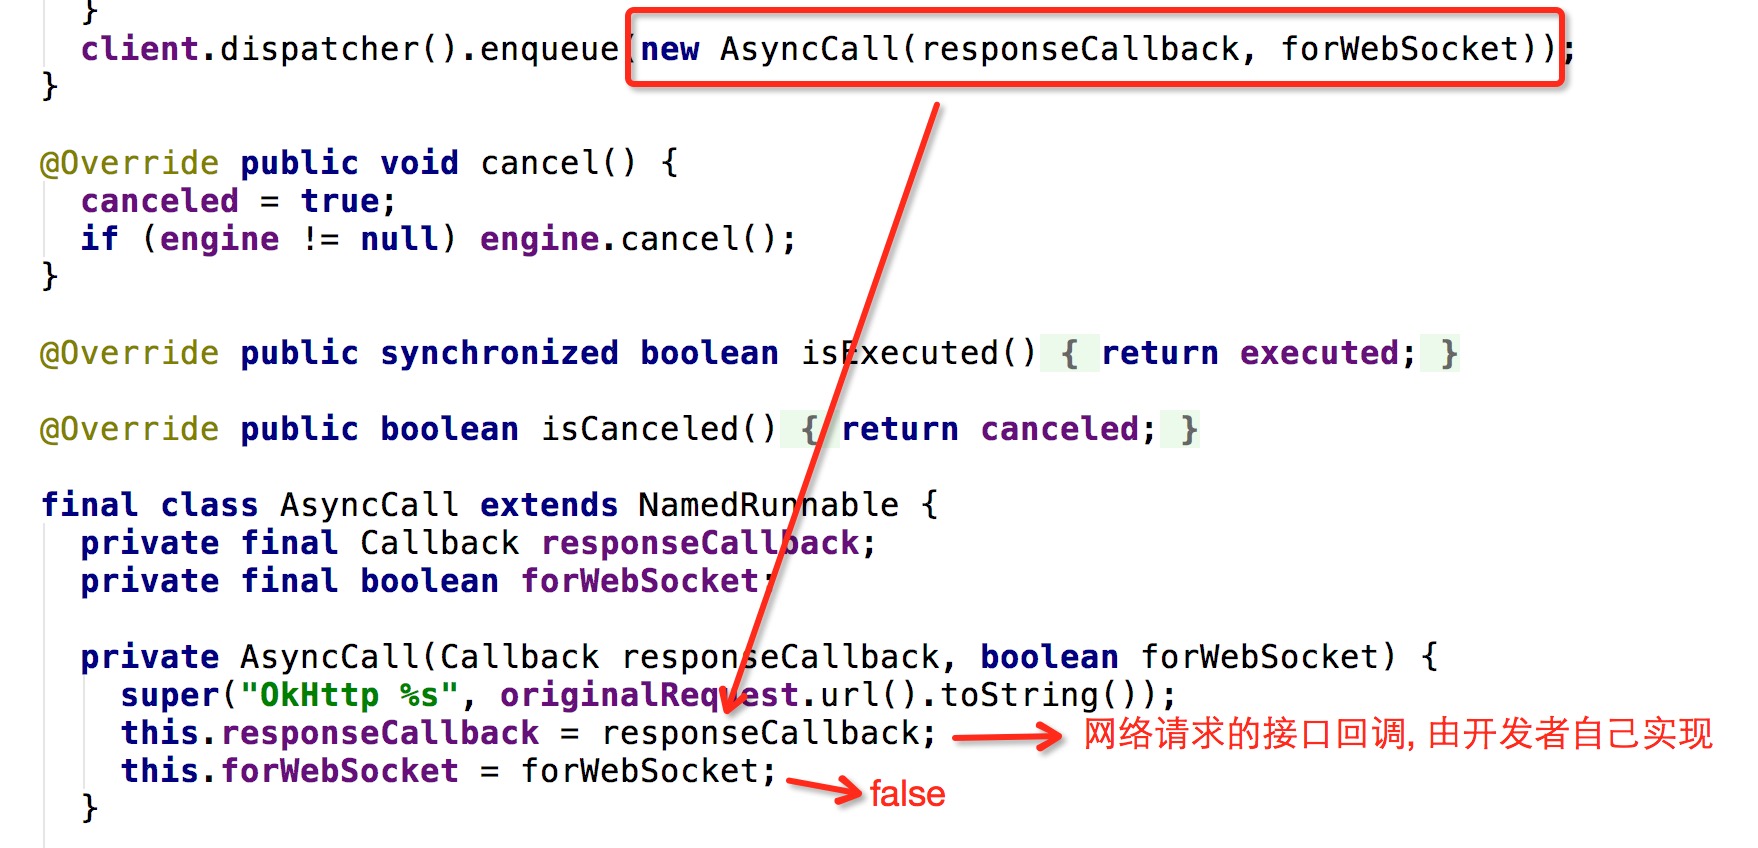
AsyncCall是RealCall中的一個內部類,它就是一個執行緒我們跟蹤其run方法發現其內部最終呼叫了自身的execute方法,程式碼如下:
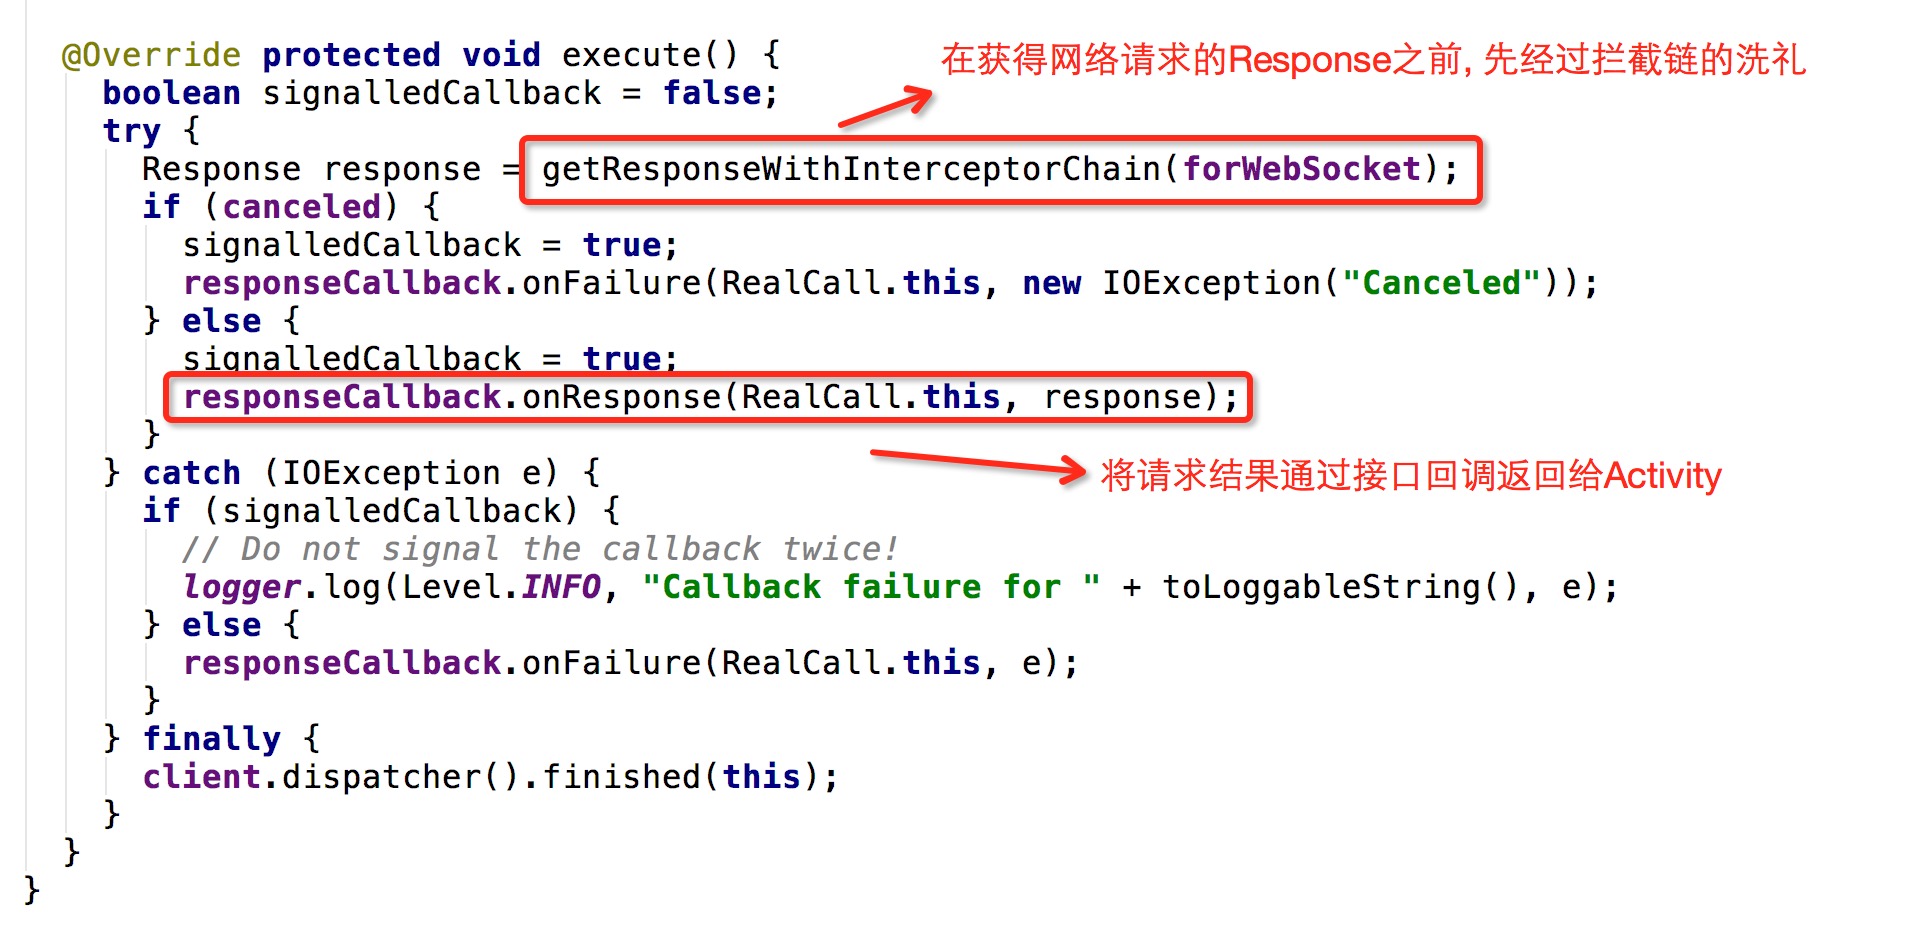
用腳後跟想了一下關鍵的程式碼肯定是在getResponseWithInterceptorChain這個方法中了吧,繼續跟下去吧。。順便看下這個攔截器”揪淨”有幾根頭髮!
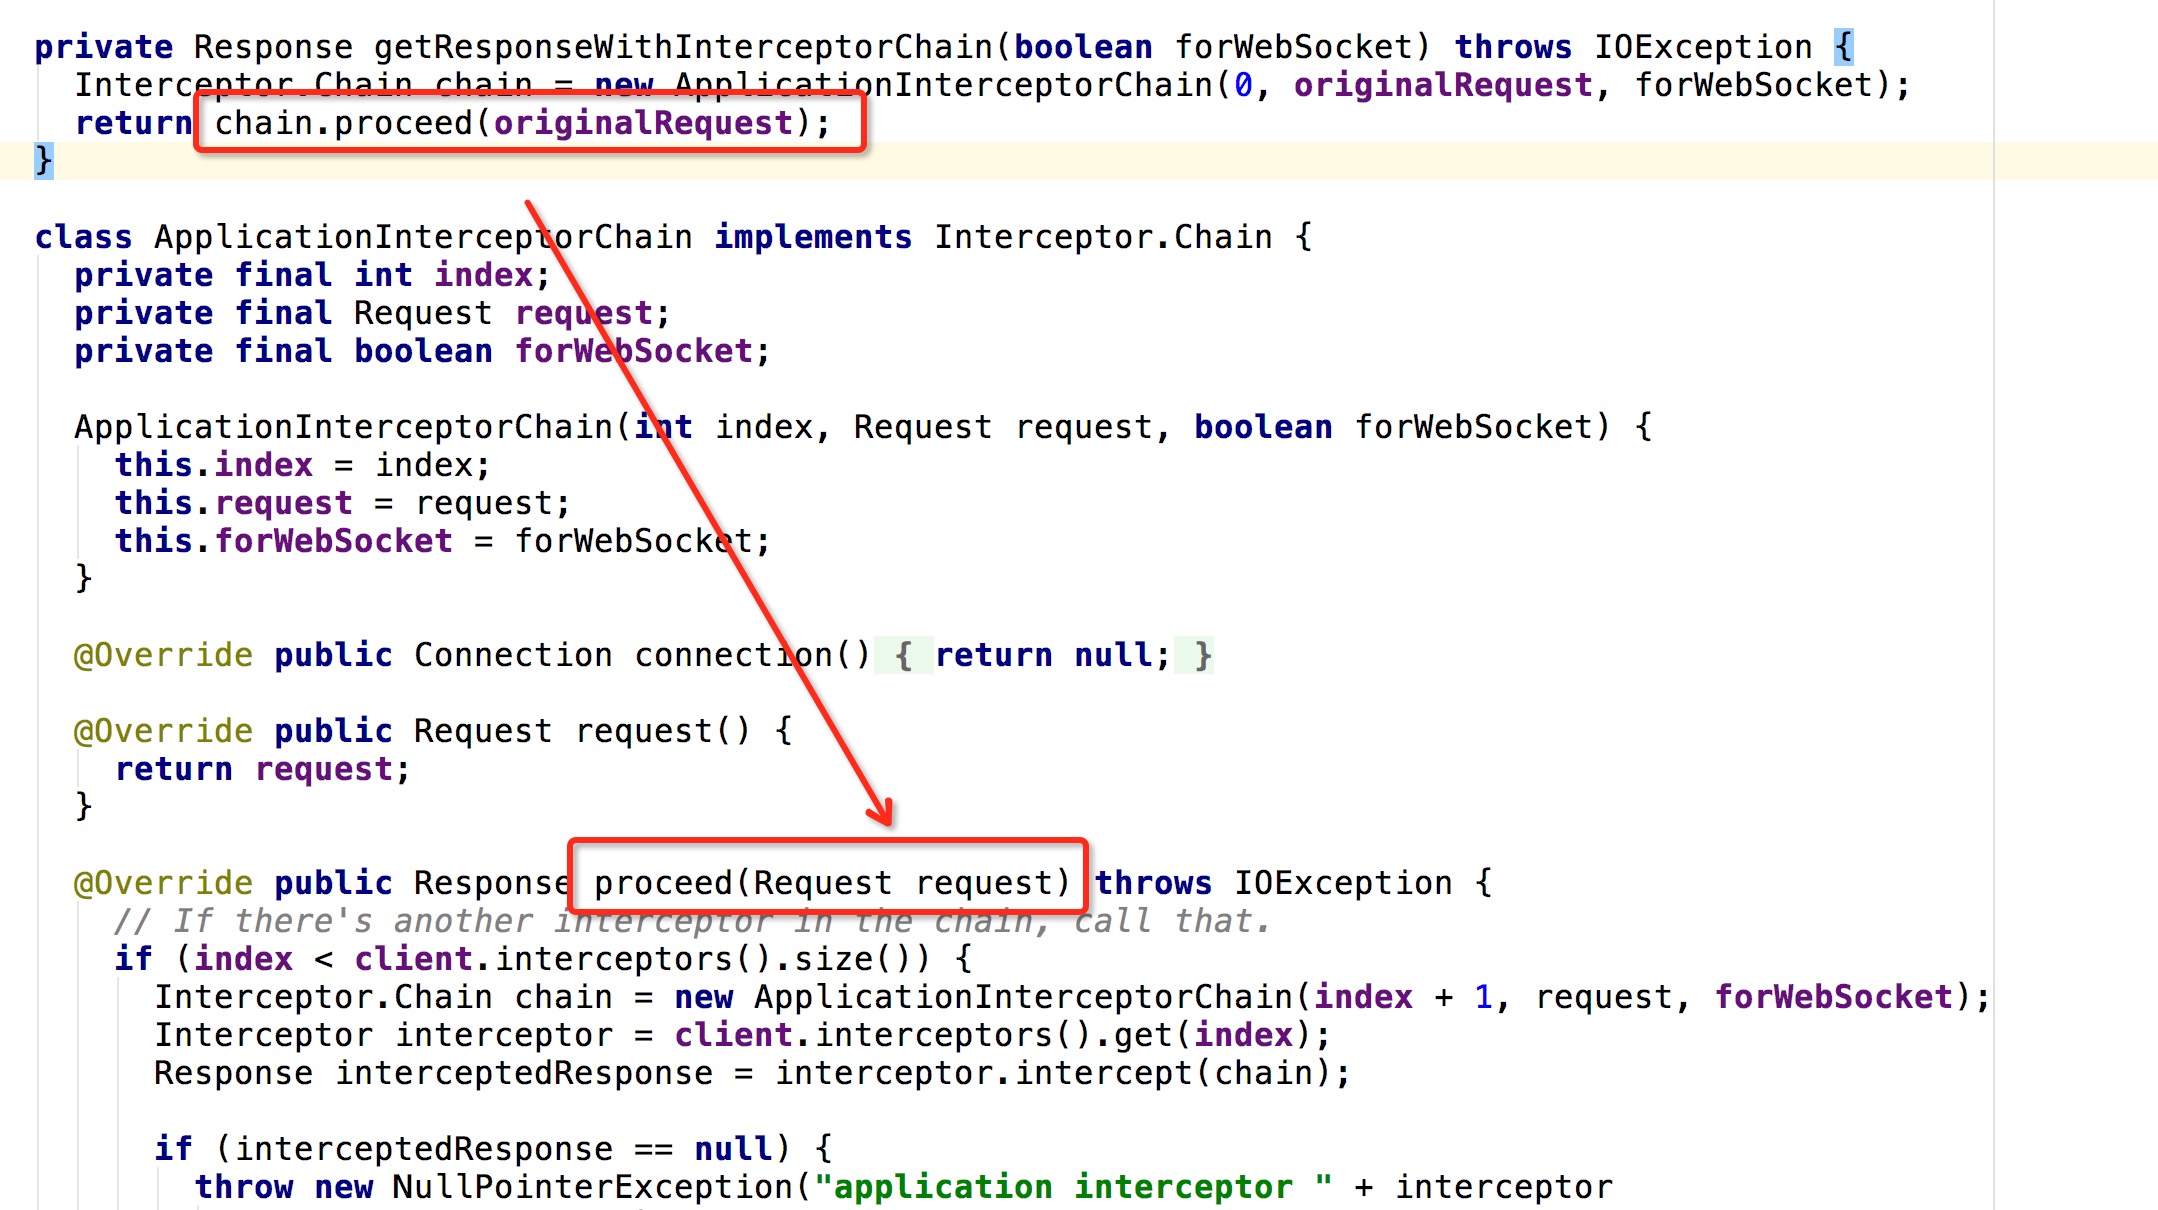
在getResponseWithInterceptorChain中新建了一個ApplicationInterceptorChain物件,並呼叫其proceed方法,並且傳入的originalRequest就是我們在Activity中所初始化的Request物件。
接下來我們來看看這個ApplicationInterceptorChain是什麼。從上圖中我們看到它繼承了Interceptor.Chain類,點選去看一下:
public interface Interceptor {
  Response intercept(Chain chain) throws IOException;

  interface Chain {
    Request request();

    Response proceed(Request request) throws IOException;

    Connection connection();
  }
}
可以看到Interceptor是一個介面,內部只有一個intercept方法,用來處理該攔截器想要如何處理請求。而Chain是Interceptor中的一個內部介面,它裡面最重要的方法就是proceed方法。接下來我們回到ApplicationInterceptorChain中看一下它是如何實現proceed方法的
@Override public Response proceed(Request request) throws IOException {
      // If there's another interceptor in the chain, call that.
      if (index < client.interceptors().size()) {
        Interceptor.Chain chain = new ApplicationInterceptorChain(index + 1, request, forWebSocket);
        Interceptor interceptor = client.interceptors().get(index);
        Response interceptedResponse = interceptor.intercept(chain);

        if (interceptedResponse == null) {
          throw new NullPointerException("application interceptor " + interceptor
              + " returned null");
        }

        return interceptedResponse;
      }

      // No more interceptors. Do HTTP.
      return getResponse(request, forWebSocket);
    }
index預設為0. 而client.interceptors()返回的是OkHttpClient內部的一個全域性List變數,如下所示
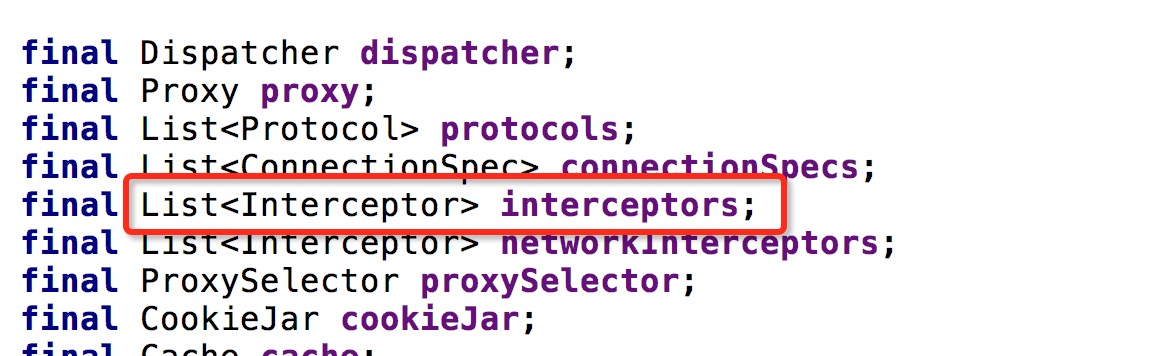
我們可以通過OkHttpClient.addInterceptor(Interceptor物件)的方式向這個集合中新增攔截器物件。一旦集合中有攔截器物件,則會在此方法中進行迴圈遞迴的方式遍歷client中所有的intercepts(請求前攔截). 在遞迴遍歷的最裡層最終呼叫了最後一行程式碼getResponse方法獲取請求結果,再層層往回傳遞。
用一張圖形象的描述一下過程及就是如下圖所示:
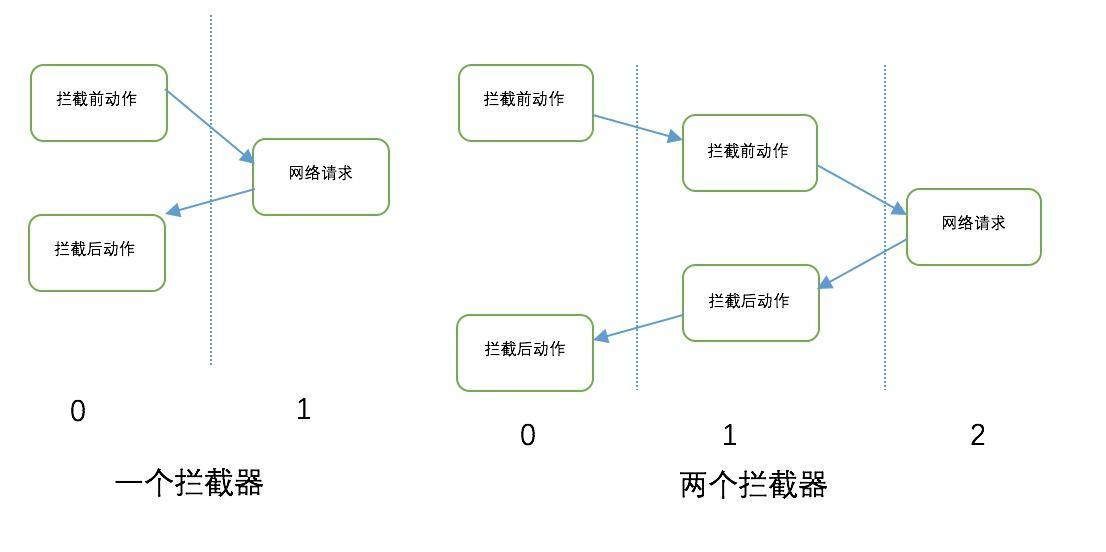
注意:當我們在自己實現Interceptor時並複寫intercept方法時,一定要記住呼叫chain.proceed方法,否則上面提到的迴圈遞迴則會終止,也就是說最終真正的傳送網路請求並獲取結果的getResponse方法就不會被呼叫
既然說到攔截器了,我們就來看看OkHttp中的攔截器究竟是個什麼玩意。
攔截器是一種強大的機制,可以監視、重寫和重試呼叫。我們可以用攔截器做很多事情,新增我們自己的頭部資訊,設定有網請求,沒網走快取等。
攔截器分為兩種攔截器,一種是應用攔截器,一種是網路攔截器。
這兩種攔截器的區別主要是以下幾點:
網路攔截器和應用攔截器的區別主要有以下幾點:
    應用攔截器:
    1. 不需要擔心中間過程的響應,如重定向和重試.
    2. 總是隻呼叫一次,即使HTTP響應是從快取中獲取.
    3. 觀察應用程式的初衷. 不關心OkHttp注入的頭資訊如: If-None-Match.
    4. 允許短路而不呼叫 Chain.proceed(),即中止呼叫.
    5. 允許重試,使 Chain.proceed()呼叫多次.

    網路攔截器:
    1. 能夠操作中間過程的響應,如重定向和重試.
    2. 當網路短路而返回快取響應時不被呼叫.
    3. 只觀察在網路上傳輸的資料.
    4. 攜帶請求來訪問連線.
至於攔截器的具體使用場景,可以參考Picasso高逼格使用技巧這篇文章中的如下程式碼
private static OkHttpClient getProgressBarClient(final ProgressListener listener) {
        return getClient().newBuilder().addNetworkInterceptor(new Interceptor() {
            @Override
            public Response intercept(Chain chain) throws IOException {
                Response originalResponse = chain.proceed(chain.request());
                return originalResponse.newBuilder()
                        .body(new ProgressResponseBody(originalResponse.body(), listener))
                        .build();
            }
        }).build();
    }
好了回到正題上,剛才說了在迴圈遞迴遍歷的最裡層,最終會呼叫getResponse方法傳送網路請求並返回Response物件
Response getResponse(Request request, boolean forWebSocket) throws IOException {
    // Copy body metadata to the appropriate request headers.
    RequestBody body = request.body();
    if (body != null) {
      Request.Builder requestBuilder = request.newBuilder();

      MediaType contentType = body.contentType();
      if (contentType != null) {
        requestBuilder.header("Content-Type", contentType.toString());
      }

      long contentLength = body.contentLength();
      if (contentLength != -1) {
        requestBuilder.header("Content-Length", Long.toString(contentLength));
        requestBuilder.removeHeader("Transfer-Encoding");
      } else {
        requestBuilder.header("Transfer-Encoding", "chunked");
        requestBuilder.removeHeader("Content-Length");
      }

      request = requestBuilder.build();
    }

    // Create the initial HTTP engine. Retries and redirects need new engine for each attempt.
    engine = new HttpEngine(client, request, false, false, forWebSocket, null, null, null);

    int followUpCount = 0;
    while (true) {
      if (canceled) {
        engine.releaseStreamAllocation();
        throw new IOException("Canceled");
      }

      boolean releaseConnection = true;
      try {
        engine.sendRequest();
        engine.readResponse();
        releaseConnection = false;
      } catch (RequestException e) {
        // The attempt to interpret the request failed. Give up.
        throw e.getCause();
      } catch (RouteException e) {
        // The attempt to connect via a route failed. The request will not have been sent.
        HttpEngine retryEngine = engine.recover(e.getLastConnectException(), null);
        if (retryEngine != null) {
          releaseConnection = false;
          engine = retryEngine;
          continue;
        }
        // Give up; recovery is not possible.
        throw e.getLastConnectException();
      } catch (IOException e) {
        // An attempt to communicate with a server failed. The request may have been sent.
        HttpEngine retryEngine = engine.recover(e, null);
        if (retryEngine != null) {
          releaseConnection = false;
          engine = retryEngine;
          continue;
        }

        // Give up; recovery is not possible.
        throw e;
      } finally {
        // We're throwing an unchecked exception. Release any resources.
        if (releaseConnection) {
          StreamAllocation streamAllocation = engine.close();
          streamAllocation.release();
        }
      }

      Response response = engine.getResponse();
      Request followUp = engine.followUpRequest();

      if (followUp == null) {
        if (!forWebSocket) {
          engine.releaseStreamAllocation();
        }
        return response;
      }

      StreamAllocation streamAllocation = engine.close();

      if (++followUpCount > MAX_FOLLOW_UPS) {
        streamAllocation.release();
        throw new ProtocolException("Too many follow-up requests: " + followUpCount);
      }

      if (!engine.sameConnection(followUp.url())) {
        streamAllocation.release();
        streamAllocation = null;
      }

      request = followUp;
      engine = new HttpEngine(client, request, false, false, forWebSocket, streamAllocation, null,
          response);
    }
  }
以上程式碼比較長,我們分段來解釋
- 首先看第3行到21行是根據request中的引數重新構建一個request物件,在Request的頭部加入了一些引數
- 然後在25行根據request和OkHttpClient建立了一個HttpEngine,然後呼叫此HttpEngine.sendRequest方法傳送請求以及readResponse方法讀取獲取的請求結果資訊。
- 在第44行和54行如果訪問時發生了錯誤,例如RouteException、IOException,則會嘗試重連,呼叫HttpEngine的recover方法,重新生成一個HttpEngine來訪問,然後重新進入剛剛的迴圈
- 在第78行如果訪問成功,並且不需要重定向,則將在第71行通過getResponse方法來獲取的請求結果返回
- 在第72行呼叫followUpRequest來獲取重定向請求,如果此重定向請求不為null,則程式碼會執行從81行~96行,主要是重新建立一個HttpEngine物件再進行請求操作。這裡需要了解下重定向的概念
- 一個簡單的重定向例子就是一個網站,登陸的使用者分為兩種:管理員和遊客,同一個url,對於不同身份的人來說訪問到的頁面可能不一樣,這裡就是用了重定向功能,例如該網站的某個頁面,如果管理員訪問是長某某樣子(網頁A),遊客訪問是長某某樣子(網頁B),這兩個網頁對應的url也不同,但是初始訪問的url都是一樣的,這是通過伺服器對url和使用者解析,返回一個新的url讓使用者去訪問。不知道這麼講大家懂了沒。。。一個簡單的請求,重定向可以多次,不同的瀏覽器支援不同的次數。OkHttp框架中重定向最大次數由HttpEngine.MAX_FOLLOW_UPS決定:
- 一個簡單的重定向例子就是一個網站,登陸的使用者分為兩種:管理員和遊客,同一個url,對於不同身份的人來說訪問到的頁面可能不一樣,這裡就是用了重定向功能,例如該網站的某個頁面,如果管理員訪問是長某某樣子(網頁A),遊客訪問是長某某樣子(網頁B),這兩個網頁對應的url也不同,但是初始訪問的url都是一樣的,這是通過伺服器對url和使用者解析,返回一個新的url讓使用者去訪問。不知道這麼講大家懂了沒。。。一個簡單的請求,重定向可以多次,不同的瀏覽器支援不同的次數。OkHttp框架中重定向最大次數由HttpEngine.MAX_FOLLOW_UPS決定:

上面這段程式碼基本講解完畢,但是在程式碼中,還看到一個概念StreamAllocation,對於StreamAllocation我將專門重新寫一篇文章進行講解–OkHttp中StreamAllocation的分析 這篇文章一定要看!!在瞭解了什麼是StreamAllocation、Http和Socket相關知識之後,我們重新回到剛才的程式碼中的下列片段,也就是88~95行
if (!engine.sameConnection(followUp.url())) {
        streamAllocation.release();
        streamAllocation = null;
}

      request = followUp;
      engine = new HttpEngine(client, request, false, false, forWebSocket, streamAllocation, null,
          response);
當發現需要重定向的時候,就會執行這段程式碼,首先先檢測重定向的url和剛剛的請求是不是同一個Connection,看下sameConnection函式:
public boolean sameConnection(HttpUrl followUp){
    HttpUrl url = userRequest.url();
    return url.host().equals(followUp.host())
        && url.port() == followUp.port()
        && url.scheme().equals(followUp.scheme());
}
這函式很簡單,只是看下這兩個url的host、port、scheme是不是一樣。如果發現不一樣,就釋放HttpEngine原來的streamAllocation,並置空,如果發現一樣,則重用剛剛的stream。HttpEngine的建構函式裡面會判斷傳入的StreamAllocation是不是為空,若為空則建立一個根據request,並傳入ConnectionPool,建立一個streamAllocation,並且從ConnectionPool中取出Connection,並將該Connection記錄到StreamAllocation中,如果沒有可用的RealConnection,就建立個新的,然後再放到ConnectionPool中
重點開始放到HttpEngine身上
先從followUpRequest()方法下手:
client傳送一個request之後,server可能回覆一個重定向的response,並在這個response中告知client需要重新訪問的server的IP。此時,client需要重新向新的server傳送request,並等待新server的回覆。所以我們需要單獨判斷重定向response,併發送多次request。有了OKHttp,這一切你都不用管,它會自動幫你完成所有這一切。OKHttp中followUpRequest()方法就是完成這個功能的。是不是瞬間感覺OKHttp強大到不要不要的啊~。這個方法流程比較簡單,就不給出流程圖了
public Request followUpRequest() throws IOException {
    if (userResponse == null) throw new IllegalStateException();
    Proxy selectedProxy = getRoute() != null
        ? getRoute().getProxy()
        : client.getProxy();
    int responseCode = userResponse.code();

    // 利用responseCode來分析是否需要自動傳送後續request
    switch (responseCode) {
      // 未認證使用者,不能訪問server或代理,故需要傳送認證的request
      case HTTP_PROXY_AUTH:
        if (selectedProxy.type() != Proxy.Type.HTTP) {
          throw new ProtocolException("Received HTTP_PROXY_AUTH (407) code while not using proxy");
        }

      case HTTP_UNAUTHORIZED:
        return OkHeaders.processAuthHeader(client.getAuthenticator(), userResponse, selectedProxy);

      // 永久重定向,暫時重定向,永久移動了等和重定向相關的response,response code中以3打頭的都是
      // 它們需要重新發送request給新的server,新sever的ip在response中會給出
      case HTTP_PERM_REDIRECT:
      case HTTP_TEMP_REDIRECT:
        if (!userRequest.method().equals("GET") && !userRequest.method().equals("HEAD")) {
            return null;
        }
      case HTTP_MULT_CHOICE:
      case HTTP_MOVED_PERM:
      case HTTP_MOVED_TEMP:
      case HTTP_SEE_OTHER:
        // Does the client allow redirects?
        if (!client.getFollowRedirects()) return null;

        // 新的server的IP地址在response的Location header中給出
        String location = userResponse.header("Location");
        if (location == null) return null;
        HttpUrl url = userRequest.httpUrl().resolve(location);

        // Don't follow redirects to unsupported protocols.
        if (url == null) return null;

        // If configured, don't follow redirects between SSL and non-SSL.
        boolean sameScheme = url.scheme().equals(userRequest.httpUrl().scheme());
        if (!sameScheme && !client.getFollowSslRedirects()) return null;

        // Redirects don't include a request body.
        Request.Builder requestBuilder = userRequest.newBuilder();
        if (HttpMethod.permitsRequestBody(userRequest.method())) {
          requestBuilder.method("GET", null);
          requestBuilder.removeHeader("Transfer-Encoding");
          requestBuilder.removeHeader("Content-Length");
          requestBuilder.removeHeader("Content-Type");
        }

        // 刪掉使用者認證資訊
        if (!sameConnection(url)) {
          requestBuilder.removeHeader("Authorization");
        }

        return requestBuilder.url(url).build();

      default:
        return null;
    }
  }
接下來再看一下sendRequest,這個方法在之前的篇章中也做過簡單的介紹,在這我們在重新鞏固一下:
public void sendRequest() throws RequestException, RouteException, IOException {
    if (cacheStrategy != null) return; // Already sent.
    if (httpStream != null) throw new IllegalStateException();

    Request request = networkRequest(userRequest);

    InternalCache responseCache = Internal.instance.internalCache(client);
    Response cacheCandidate = responseCache != null
        ? responseCache.get(request)
        : null;

    long now = System.currentTimeMillis();
    cacheStrategy = new CacheStrategy.Factory(now, request, cacheCandidate).get();
    networkRequest = cacheStrategy.networkRequest;
    cacheResponse = cacheStrategy.cacheResponse;

    if (responseCache != null) {
      responseCache.trackResponse(cacheStrategy);
    }

    if (cacheCandidate != null && cacheResponse == null) {
      closeQuietly(cacheCandidate.body()); // The cache candidate wasn't applicable. Close it.
    }

    // If we're forbidden from using the network and the cache is insufficient, fail.
    if (networkRequest == null && cacheResponse == null) {
      userResponse = new Response.Builder()
          .request(userRequest)
          .priorResponse(stripBody(priorResponse))
          .protocol(Protocol.HTTP_1_1)
          .code(504)
          .message("Unsatisfiable Request (only-if-cached)")
          .body(EMPTY_BODY)
          .build();
      return;
    }

    // If we don't need the network, we're done.
    if (networkRequest == null) {
      userResponse = cacheResponse.newBuilder()
          .request(userRequest)
          .priorResponse(stripBody(priorResponse))
          .cacheResponse(stripBody(cacheResponse))
          .build();
      userResponse = unzip(userResponse);
      return;
    }

    // We need the network to satisfy this request. Possibly for validating a conditional GET.
    boolean success = false;
    try {
      httpStream = connect();
      httpStream.setHttpEngine(this);

      if (writeRequestHeadersEagerly()) {
        long contentLength = OkHeaders.contentLength(request);
        if (bufferRequestBody) {
          if (contentLength > Integer.MAX_VALUE) {
            throw new IllegalStateException("Use setFixedLengthStreamingMode() or "
                + "setChunkedStreamingMode() for requests larger than 2 GiB.");
          }

          if (contentLength != -1) {
            // Buffer a request body of a known length.
            httpStream.writeRequestHeaders(networkRequest);
            requestBodyOut = new RetryableSink((int) contentLength);
          } else {
            // Buffer a request body of an unknown length. Don't write request headers until the
            // entire body is ready; otherwise we can't set the Content-Length header correctly.
            requestBodyOut = new RetryableSink();
          }
        } else {
          httpStream.writeRequestHeaders(networkRequest);
          requestBodyOut = httpStream.createRequestBody(networkRequest, contentLength);
        }
      }
      success = true;
    } finally {
      // If we're crashing on I/O or otherwise, don't leak the cache body.
      if (!success && cacheCandidate != null) {
        closeQuietly(cacheCandidate.body());
      }
    }
  }
程式碼還是很長的,先來看下第五行,先是呼叫了一個networkRequest返回了一個request,這個函式就是對原來我們外部傳進去的request做了一個封裝,封裝成一個真正訪問網路請求的request。在HttpEngine中有兩個request,一個叫userRequest,一個是networkRequest,第一個是外部傳入的,未經OkHttp修改的,第二個是根據userRequest封裝的一個request,用來訪問網路。接下來就是獲取InternalCache,Internal.instance是一個單例,該單例初始化是在OkHttpClient裡面,可以看到呼叫Internal.instance.internalCache(client)函式只是呼叫了client(OkHttpClient)的internalCache,這個函式是返回了我們傳入OkHttpClient的cache,如果你建立OkHttpClient的時候,沒有傳入,那麼這裡就會返回空。
得到了InternalCache後,嘗試根據request去獲取response,當然可能為空。接下來就到CacheStrategy了,CacheStrategy是一個決定訪問網路還是訪問快取的類。CacheStrategy.Factory是工廠類,通過傳入request和剛剛internalCache中獲取到的response,去get一個CacheStrategy,Factory.get函式主要是對request和response做了一個檢查,會根據response合不合法、是否過期、request的引數來判斷,最後返回一個CacheStrategy。CacheStrategy很簡單,裡面有兩個變數,一個是networkRequest,一個是cacheResponse(這個變數和傳入Factory的response可能是不一樣的哦!)。返回到剛剛的HttpEngine.sendRequest函式中看第17行,如果InternalCache不為空,就呼叫trackResponse,這個函式很簡單,就是記錄下快取讀取命中率這些資料。然後如果從InternalCache中response不為空,但是cacheStrategy的response為空,則說明剛剛InternalCache取出來的response無效,則需要關掉。如果CacheStrategy的networkRequest不為空,則說明需要進行網路訪問,如果cacheResponse不為空,則說明訪問快取足以。根據這個理論,下面一直到第47行的程式碼不成問題,就不解釋了。接下來看網路訪問的部分。
網路訪問主要是通過HttpStream來實現,HttpStream這是一個介面,裡面定義了一些函式,這些函式是負責讀取網路資料、輸出資料等。實現該介面的有兩個類,一個是Http2xStream,一個是Http1xStream。第一個是專門負責Http2.0版本的,第二個是負責Http1.x版本的,兩者內部實現機制不一樣。Http2xStream是通過一個FramedConnection,至於對FramedConnection的理解,可以看前面關於Http2.0講解的文章,看完那個你應該比較能夠大概清楚的理解他了,我就不解釋了,這裡我也沒深入去看.
而Http1xStream則是通過sink和source來實現的,至於sink和source是什麼將在
OkHttp中sink和source的分析 這一篇中做詳細介紹。
今天先寫到這裡吧,未完待續。。。接下里會跟中Http1XStream中的connect方法實現