iOS 微信右上角下拉選單效果之CMPopTipView,各種角度各種位置
阿新 • • 發佈:2019-01-11
早之前在專案中寫了一個類似微信右上角下拉的選單封裝,但是是寫死的,當時根本沒有考慮到去其他地方彈出這個東西,雖然看起來彈個窗出來很簡單,但是你位子不確定之後彈出來是有點麻煩的,反正我總是覺得,我們能想到的,老外早就想到了,多給自己弄點工具庫,多看看原始碼,指不定哪天我也搞出一個庫來,世界上有專案經理這種東西,那就沒有什麼需求是不可能的,各位手頭上多準備點工具還是非常有必要的。
先看圖:
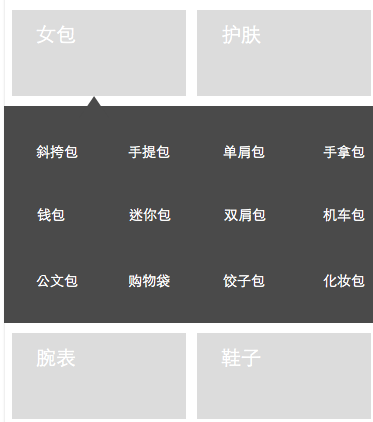
需求是這樣的,點選分類的按鈕,竟然不Push到另一個VC去,非要彈個窗出來

但是像我這樣的讀書人這麼有素質的,心裡肯定是這麼想的


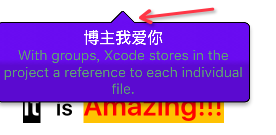
Show Time(UITableView,UICollectionView,UIImageView,UILabel都可彈)
Demo介紹
首先,新建一個工程,把Button創建出來,點選事件加上,先看屬性
所有非NavigationItemButton的點選事件@interface ViewController () <CMPopTipViewDelegate,UICollectionViewDelegate,UICollectionViewDataSource,UICollectionViewDelegateFlowLayout,UITableViewDelegate,UITableViewDataSource> @property (nonatomic,strong) CMPopTipView *roundRectButtonPopTipView; @property (nonatomic,strong) NSMutableArray *dataSource; //!< collectionView的資料來源 @property (nonatomic,strong) GroupList *list; //!< 請求回來的資料 @property (nonatomic,strong) UICollectionView *collectionView; @property (nonatomic,strong) UIImageView *imageView; @property (nonatomic,strong) UIImageView *imageView1; @property (weak, nonatomic) IBOutlet UILabel *middleLabel; @property (nonatomic,strong) NSMutableArray *visiblePopTipViews; //!< 可見的PopView @property (nonatomic,strong) id currentPopTipViewTarget; //!< 當前的按鈕 @property (nonatomic,strong) UITableView *tableView; @property (nonatomic,strong) NSMutableArray *tableDataSource; @property (nonatomic,strong) UIButton *gotoCartButton; // NVBar的按鈕 @end
注:該方法可以獲取到已載入資料的CollectionView的理論高度
height = self.collectionView.collectionViewLayout.collectionViewContentSize.height;- (IBAction)click:(UIButton *)sender { // 先dismiss之前的所有popView [self dismissAllPopTipViews]; // 當檢測到是和之前一樣的按鈕,由於已經清空,那麼不進行任何操作,也把容器清空,下次再點就可以下一波操作了 if (sender == self.currentPopTipViewTarget) { self.currentPopTipViewTarget = nil; } else { // 沒有pop的時候,先計算出collectionView的高度 CGFloat height; if (sender.tag == 1000) { self.dataSource = [[NSMutableArray alloc] initWithArray:self.list.data.role]; [self.collectionView reloadData]; } else if (sender.tag == 1003) { self.dataSource = [[NSMutableArray alloc] initWithArray:self.list.data.list]; [self.collectionView reloadData]; } // 算高度 height = self.collectionView.collectionViewLayout.collectionViewContentSize.height; NSString *title = nil; NSString *msg = nil; CMPopTipView *popView; switch (sender.tag) { case 1000: self.collectionView.frame = CGRectMake(0, 0, 300, height); self.collectionView.alwaysBounceVertical = YES; // 載入自定義View popView = [[CMPopTipView alloc] initWithCustomView:self.collectionView]; break; case 1001: msg = @"這是一個簡單的Demo,希望大家看明白,能用在自己的專案中"; title = @"博主是逗逼"; // 載入title和Msg的混合 popView = [[CMPopTipView alloc] initWithTitle:title message:msg]; break; case 1002: self.imageView.frame = CGRectMake(0, 0, 350, 300); popView = [[CMPopTipView alloc] initWithCustomView:self.imageView]; break; case 1003: self.collectionView.frame = CGRectMake(0, 0, 300, height>400?400:height); self.collectionView.alwaysBounceVertical = YES; popView = [[CMPopTipView alloc] initWithCustomView:self.collectionView]; break; case 1004: msg = @"With groups, Xcode stores in the project a reference to each individual file."; title = @"博主我愛你"; popView = [[CMPopTipView alloc] initWithTitle:title message:msg]; break; case 1005: self.imageView1.frame = CGRectMake(0, 0, 350, 300); popView = [[CMPopTipView alloc] initWithCustomView:self.imageView1]; break; default: break; } popView.delegate = self; popView.cornerRadius = 5; // 是否有陰影 //popView.hasShadow = YES; // 是否有梯度 //popView.hasGradientBackground = NO; popView.backgroundColor = [UIColor colorWithRed:arc4random() % 256 / 255.0 green:arc4random() % 256 / 255.0 blue:arc4random() % 256 / 255.0 alpha:1]; popView.textColor = [UIColor colorWithRed:arc4random() % 256 / 255.0 green:arc4random() % 256 / 255.0 blue:arc4random() % 256 / 255.0 alpha:1]; // 0是Slide 1是pop 2是Fade但是有問題,用前兩個就好了 popView.animation = arc4random() % 1; // 立體效果,預設是YES popView.has3DStyle = arc4random() % 1; // 是否點選任意位子就影藏 //popView.dismissTapAnywhere = YES; // 是否自定影藏 //[popView autoDismissAnimated:YES atTimeInterval:5.0]; [popView presentPointingAtView:sender inView:self.view animated:YES]; [self.visiblePopTipViews addObject:popView]; self.currentPopTipViewTarget = sender; } }
代理方法和銷燬PopView的方法
// 點選的時候取消PopView
- (void)dismissAllPopTipViews
{
    while ([self.visiblePopTipViews count] > 0) {
        CMPopTipView *popTipView = [self.visiblePopTipViews objectAtIndex:0];
        [popTipView dismissAnimated:YES];
        [self.visiblePopTipViews removeObjectAtIndex:0];
    }
}
// PopView的代理,當Pop消失的時候呼叫
- (void)popTipViewWasDismissedByUser:(CMPopTipView *)popTipView
{
    [self dismissAllPopTipViews];
    self.currentPopTipViewTarget = nil;
    NSLog(@"消失了");
    self.roundRectButtonPopTipView = nil;
}例如圓角cornerRadius是預設10,如果不需要圓角就可以去掉
// 預設值
//- (id)initWithFrame:(CGRect)frame
//{
//    if ((self = [super initWithFrame:frame])) {
//        // Initialization code
//        self.opaque = NO;
//
//        _topMargin = 2.0;
//        _pointerSize = 12.0;
//        _sidePadding = 2.0;
//        _borderWidth = 1.0;
//
//        self.textFont = [UIFont boldSystemFontOfSize:14.0];
//        self.textColor = [UIColor whiteColor];
//        self.textAlignment = NSTextAlignmentCenter;
//        self.backgroundColor = [UIColor colorWithRed:62.0/255.0 green:60.0/255.0 blue:154.0/255.0 alpha:1.0];
//        self.has3DStyle = YES;
//        self.borderColor = [UIColor blackColor];
//        self.hasShadow = YES;
//        self.animation = CMPopTipAnimationSlide;
//        self.dismissTapAnywhere = NO;
//        self.preferredPointDirection = PointDirectionAny;
//        self.hasGradientBackground = YES;
//        self.cornerRadius = 10.0;
//    }
//    return self;
//}
然後,我們再看看給UINavigationBar上面的UIBarButtonItem的方法呼叫
其他邏輯方法都基本一致,只是呼叫的最終彈窗方法不同
popView presentPointingAtBarButtonItem: animated:// 點選了NavigationController上的按鈕
- (void)gotoCart:(UIButton *)sender
{
[self dismissAllPopTipViews];
if (sender == self.currentPopTipViewTarget) {
self.currentPopTipViewTarget = nil;
}
else
{
CGFloat height;
[self.tableView reloadData];
height = self.tableView.contentSize.height;
self.tableView.frame = CGRectMake(0, 0, 100, height);
self.tableView.backgroundColor = [UIColor blackColor];
self.tableView.alwaysBounceVertical = YES;
CMPopTipView *popView = [[CMPopTipView alloc] initWithCustomView:self.tableView];
popView.delegate = self;
popView.cornerRadius = 5;
popView.backgroundColor = [UIColor blackColor];
popView.textColor = [UIColor whiteColor];
// 0是Slide 1是pop 2是Fade但是有問題,用前兩個就好了
popView.animation = arc4random() % 1;
// 立體效果,預設是YES
popView.has3DStyle = arc4random() % 1;
// popView.dismissTapAnywhere = YES;
// [popView autoDismissAnimated:YES atTimeInterval:5.0];
[popView presentPointingAtView:sender inView:self.view animated:YES];
// 如果是原生的UIBarButtonItem,那麼就呼叫這個方法
// popView presentPointingAtBarButtonItem:<#(UIBarButtonItem *)#> animated:<#(BOOL)#>
[self.visiblePopTipViews addObject:popView];
self.currentPopTipViewTarget = sender;
}
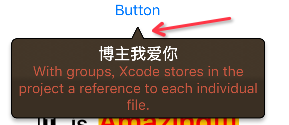
}他預設的尖尖Point三角形底邊和高度是相等的,這樣的Point看起來就會比較矮小,各位
如果有興趣跑起來Demo看看就一定會想改一下
來看看他的原始碼,這種View的顯示肯定在drawRect:的方法裡面完成的
只截圖該方法裡面的一部分程式碼,我們只要把他處理的X座標修改就行了
CGRect bubbleRect = [self bubbleFrame];

	CGContextRef c = UIGraphicsGetCurrentContext();

    CGContextSetRGBStrokeColor(c, 0.0, 0.0, 0.0, 1.0);	// black
	CGContextSetLineWidth(c, self.borderWidth);

	CGMutablePathRef bubblePath = CGPathCreateMutable();

	if (_pointDirection == PointDirectionUp) {
        // 這裡的原點是point的尖尖
		CGPathMoveToPoint(bubblePath, NULL, _targetPoint.x+_sidePadding, _targetPoint.y);
        // 注意這裡的X軸是預設給的_pointer的寬度,這個pointer是個正三角形,但是我們要個等腰的,所有X軸加上_pointer/2,Y軸加上_pointer,OK
		CGPathAddLineToPoint(bubblePath, NULL, _targetPoint.x+_sidePadding+_pointerSize/2, _targetPoint.y+_pointerSize);

		CGPathAddArcToPoint(bubblePath, NULL,
							bubbleRect.origin.x+bubbleRect.size.width, bubbleRect.origin.y,
							bubbleRect.origin.x+bubbleRect.size.width, bubbleRect.origin.y+_cornerRadius,
							_cornerRadius);
		CGPathAddArcToPoint(bubblePath, NULL,
							bubbleRect.origin.x+bubbleRect.size.width, bubbleRect.origin.y+bubbleRect.size.height,
							bubbleRect.origin.x+bubbleRect.size.width-_cornerRadius, bubbleRect.origin.y+bubbleRect.size.height,
							_cornerRadius);
		CGPathAddArcToPoint(bubblePath, NULL,
							bubbleRect.origin.x, bubbleRect.origin.y+bubbleRect.size.height,
							bubbleRect.origin.x, bubbleRect.origin.y+bubbleRect.size.height-_cornerRadius,
							_cornerRadius);
		CGPathAddArcToPoint(bubblePath, NULL,
							bubbleRect.origin.x, bubbleRect.origin.y,
							bubbleRect.origin.x+_cornerRadius, bubbleRect.origin.y,
							_cornerRadius);
        // 這裡也要改掉,不然自動關閉的時候就不是等腰三角形了
		CGPathAddLineToPoint(bubblePath, NULL, _targetPoint.x+_sidePadding-_pointerSize/2, _targetPoint.y+_pointerSize);
	}
	else {
        // 上面改了那麼下面也要改掉
		CGPathMoveToPoint(bubblePath, NULL, _targetPoint.x+_sidePadding, _targetPoint.y);
		CGPathAddLineToPoint(bubblePath, NULL, _targetPoint.x+_sidePadding-_pointerSize/2, _targetPoint.y-_pointerSize);

		CGPathAddArcToPoint(bubblePath, NULL,
							bubbleRect.origin.x, bubbleRect.origin.y+bubbleRect.size.height,
							bubbleRect.origin.x, bubbleRect.origin.y+bubbleRect.size.height-_cornerRadius,
							_cornerRadius);
		CGPathAddArcToPoint(bubblePath, NULL,
							bubbleRect.origin.x, bubbleRect.origin.y,
							bubbleRect.origin.x+_cornerRadius, bubbleRect.origin.y,
							_cornerRadius);
		CGPathAddArcToPoint(bubblePath, NULL,
							bubbleRect.origin.x+bubbleRect.size.width, bubbleRect.origin.y,
							bubbleRect.origin.x+bubbleRect.size.width, bubbleRect.origin.y+_cornerRadius,
							_cornerRadius);
		CGPathAddArcToPoint(bubblePath, NULL,
							bubbleRect.origin.x+bubbleRect.size.width, bubbleRect.origin.y+bubbleRect.size.height,
							bubbleRect.origin.x+bubbleRect.size.width-_cornerRadius, bubbleRect.origin.y+bubbleRect.size.height,
							_cornerRadius);
		CGPathAddLineToPoint(bubblePath, NULL, _targetPoint.x+_sidePadding+_pointerSize/2, _targetPoint.y-_pointerSize);
	}

	CGPathCloseSubpath(bubblePath);

    CGContextSaveGState(c);
	CGContextAddPath(c, bubblePath);
	CGContextClip(c);
效果如下:

貌似下載不了,說什麼檔名太長了,反正不懂為什麼,需要的同學可以像我拿或者直接
開啟你的終端按以下操作clone一下
trainingvdi:~ MKJ$ cd ~/Desktop

trainingvdi:Desktop MKJ$ pwd

/Users/MKJ/Desktop

trainingvdi:Desktop MKJ$ mkdir hehe

trainingvdi:Desktop MKJ$ cd hehe/

trainingvdi:hehe MKJ$ pwd

/Users/MKJ/Desktop/hehe

trainingvdi:hehe MKJ$ git clone https://github.com/DeftMKJ/Pop.git

Cloning into 'Pop'...

remote: Counting objects: 361, done.

remote: Total 361 (delta 0), reused 0 (delta 0), pack-reused 361

Receiving objects: 100% (361/361), 407.47 KiB | 119.00 KiB/s, done.

Resolving deltas: 100% (142/142), done.

Checking connectivity... done.
然後開啟你桌面的hehe資料夾就好了