
Qt and computer vision
1.安裝visual studio profession 2015 或者visual studio profession community 2015
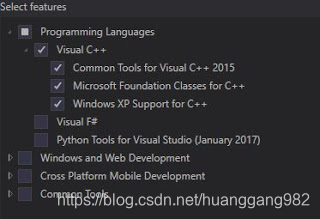
安裝visual c ++工具箱,如下圖所示,確保選擇所有這些工具箱
2.安裝偵錯程式(Debugging Tools for Windows)
我的是win7 64位旗艦版+sp1,所以從這裡下載了偵錯程式(dbg_x86.msi,dbg_amd64.msi)
3.安裝Qt Creator
從
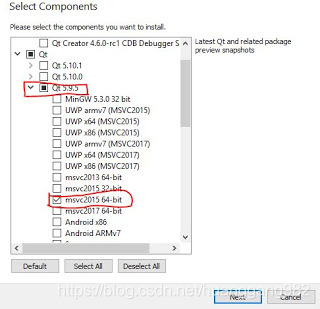
選擇要安裝的Qt版本,每個版本的Qt(Qt5.x)都有很多要下載的二進位制檔案,只選擇你需要的那個。我們更喜歡在這裡安裝Qt5.9.5。為什麼Qt5.9.5?因為Qt5.9是Qt的長期支援版本,理論上長期支援應該更穩定。可以把msvc2015 32-bit也選上。
4.安裝OpenCV 3.4.2
到source forge下載OpenCV 3.4.2
5.用Qt Creator建立一個新專案
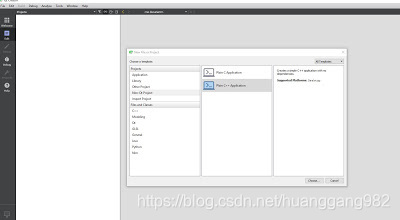
a.建立專案

b.你將看到很多選項,為簡單起見,讓我們選擇“Application-> Non-Qt project-> Plain c ++ application”。告訴QtCreator,我們想要在不使用任何Qt元件的情況下建立一個c ++程式。
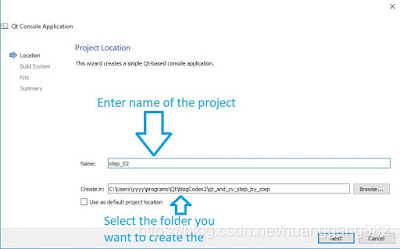
c.輸入資料夾的路徑和專案名稱
d.單擊Next按鈕並立即使用qmake作為您的構建系統(您也可以選擇cmake,但我在使用Qt時總是更喜歡qmake)。
e.你會看到一個頁面要求你選擇你的套件,套件是QtCreator用來分組不同設定的工具,如裝置,編譯器,Qt版本等。
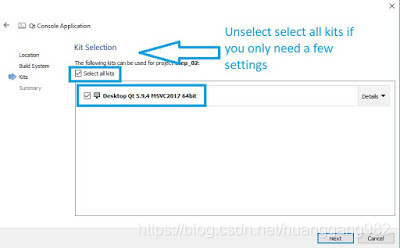
f.單擊下一步,QtCreator可能會要求您新增版本控制,為簡單起見,請選擇無。點選完成。
g.如果你看到這樣的螢幕,那就意味著你成功了。
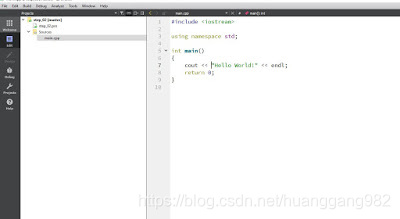
h.編寫程式碼以通過opencv讀取影象
#include <iostream>

#include <opencv2/core.hpp>
#include <opencv2/highgui.hpp>

//propose of namespace are
//1. Decrease the chance of name collison
//2. Help you organizes your codes into logical groups
//Without declaring using namespace std, everytime when you are using
//the classes, functions in the namespace, you have to call with the
//prefix "std::".
using namespace cv;
using namespace std;

/**
 * main function is the global, designated start function of c++.
 * @param argc Number of the parameters of command line
 * @param argv Content of the parameters of command line.
 * @return any integer within the range of int, meaning of the return value is
 * defined by the users
 */
int main(int argc, char *argv[])
{
    if(argc != 2){
        cout<<"Run this example by invoking it like this: "<<endl;
        cout<<"./step_02.exe lena.jpg"<<endl;
        cout<<endl;
        return -1;
    }

    //If you execute by Ctrl+R, argv[0] == "step_02.exe", argv[1] == lena.jpg
    cout<<argv[0]<<","<<argv[1]<<endl;

    //Open the image
    auto const img = imread(argv[1]);
    if(!img.empty()){
        imshow("img", img); //Show the image on screen
        waitKey(); //Do not exist the program until users press a key
    }else{
        cout<<"cannot open image:"<<argv[1]<<endl;

        return -1;
    }

    return 0; //usually we return 0 if everything are normal
}
i.在.pro檔案中增加如下內容:
INCLUDEPATH += your_install_path_of_opencv/opencv/opencv_3_4_2/opencv/build/include
LIBS += your_install_path_of_opencv/opencv/opencv_3_4_2/opencv/build/x64/vc14/lib/opencv_world342.lib
j.修改專案構建方式從debug改為release
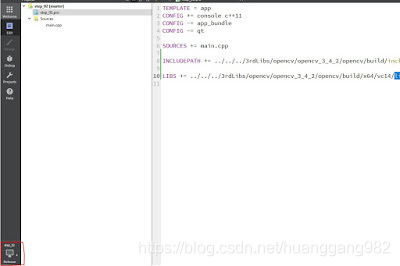
單擊紅色區域包圍的圖示,然後將其從debug更改為release。我們為什麼這樣做?
在許多情況下,release模式比debug模式快得多。
我們連結到的庫是作為釋出庫構建的,除非您想找麻煩,否則不要在專案中混合除錯和釋出庫。
6.執行應用程式
將 opencv_world342.dll和opencv_ffmpeg342_64.dll(它們放在/opencv/build/x64/vc14/bin中)複製到shadow build(也就是生成的exe)的資料夾裡。
注:由於我的系統是win7 64位旗艦版,雖然已經安裝了sp1,但是執行exe時仍然提示缺少api-ms-win-downlevel-shlwapi-l1-1-0.dll:
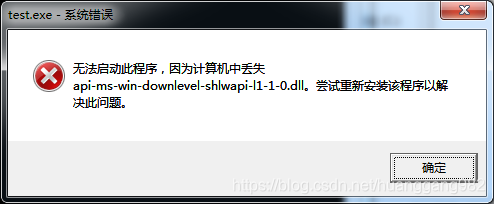
這個問題已經解決了,參考https://github.com/opencv/opencv/issues/12010 只需要下載安裝這個補丁就可以了,安裝好後需要重啟系統。
7.在QtCreator中新增命令列引數,沒有它,當您單擊Ctrl + R執行程式時,應用程式不知道影象在哪裡。
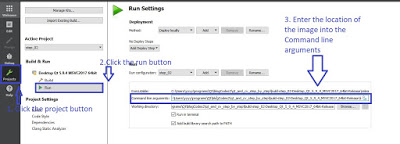
8.如果成功,您應該看到應用程式開啟命令列引數列表中指定的影象。
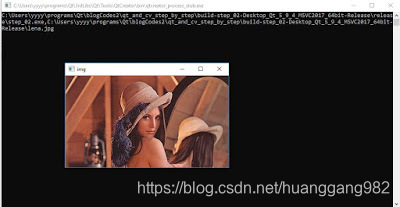
親測通過,故記錄下來。
參考:
http://qtandopencv.blogspot.com/2018/04/qt-and-computer-vision-0-setup.html
http://qtandopencv.blogspot.com/2018/08/qt-and-computer-vision-2-build-simple.html