Android上實現一個簡單的天氣預報APP(六) 更新介面資料
學習參考資源:https://www.gitbook.com/book/zhangqx/mini-weather/details
前面我們已經設定好了基本的介面,獲取了網路上的天氣資料並解析出來了,接下來,我們要將介面上胡亂寫的天氣資料更新為實時獲取的真實的天氣資料。
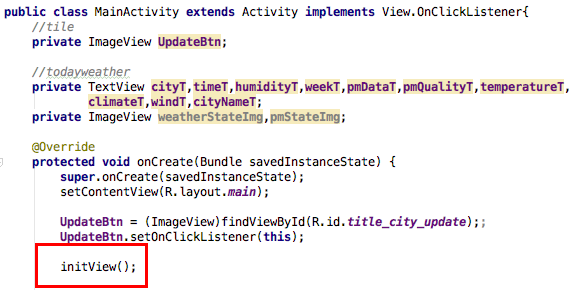
1)初始化介面
1.定義元件對應的變數
2.編寫initView()方法
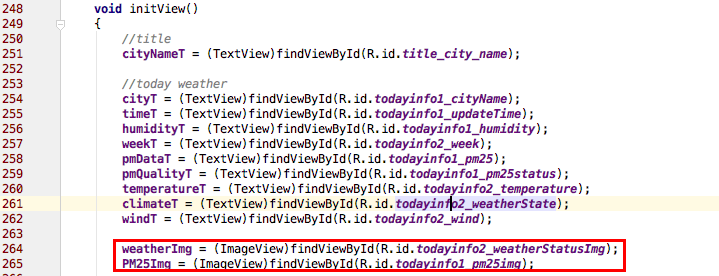
前面我們已經在main.xml中定義了佈局,這裡我們可以直接通過findViewById的方法將變數與元件繫結好,並設定初值。
initView()函式如下:
void initView()
    {
        //title
        cityNameT = (TextView)findViewById(R.id.title_city_name);

        //today weather
        cityT = (TextView)findViewById(R.id.todayinfo1_cityName);
        timeT = (TextView)findViewById(R.id.todayinfo1_updateTime);
        humidityT = (TextView)findViewById(R.id.todayinfo1_humidity);
        weekT = (TextView)findViewById(R.id.todayinfo2_week);
        pmDataT = (TextView)findViewById(R.id.todayinfo1_pm25);
        pmQualityT = (TextView)findViewById(R.id.todayinfo1_pm25status);
        temperatureT = (TextView)findViewById(R.id.todayinfo2_temperature);
        climateT = (TextView)findViewById(R.id.todayinfo2_weatherState);
        windT = (TextView)findViewById(R.id.todayinfo2_wind);

        weatherStateImg = (ImageView)findViewById(R.id.todayinfo2_weatherStatusImg);
        pmStateImg = (ImageView)findViewById(R.id.todayinfo1_pm25img);

        cityNameT.setText("N/A");

        cityT.setText("N/A");
        timeT.setText("N/A");
        humidityT.setText("N/A");
        weekT.setText("N/A");
        pmDataT.setText("N/A");
        pmQualityT.setText("N/A");
        temperatureT.setText("N/A");
        climateT.setText("N/A");
        windT.setText("N/A");
    }
在onCreate中呼叫initView()
附:
佈局檔案main.xml
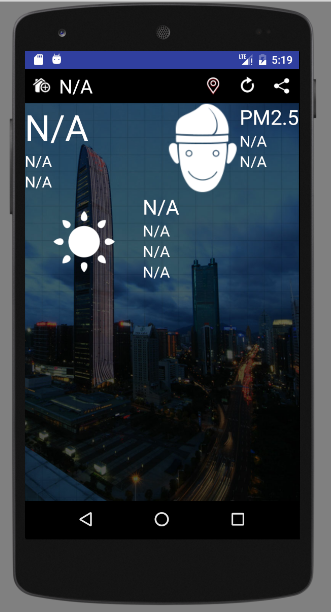
執行一下!<?xml version="1.0" encoding="utf-8"?> <RelativeLayout xmlns:android="http://schemas.android.com/apk/res/android" android:orientation="vertical" android:layout_width="match_parent" android:layout_height="match_parent"> <RelativeLayout android:id="@+id/title_relative" android:layout_width="match_parent" android:layout_height="45.0dp" android:background="#000000"> <ImageView android:id="@+id/title_city_manager" android:layout_height="45.0dp" android:layout_width="45.0dp" android:src="@drawable/title_city_manager"> </ImageView> <TextView android:id="@+id/title_city_name" android:layout_height="45.0dp" android:layout_width="match_parent" android:layout_toRightOf="@id/title_city_manager" android:gravity="center_vertical" android:text="天氣預報" android:textSize="25.0sp" android:textColor="#FFFFFF"> </TextView> <ImageView android:id="@+id/title_city_locate" android:layout_height="45.0dp" android:layout_width="45.0dp" android:layout_toLeftOf="@+id/title_city_update" android:src="@drawable/title_city_locate"> </ImageView> <ImageView android:id="@+id/title_city_update" android:layout_height="45.0dp" android:layout_width="45.0dp" android:layout_toLeftOf="@+id/title_city_share" android:src="@drawable/title_city_update"> </ImageView> <ImageView android:id="@+id/title_city_share" android:layout_height="45.0dp" android:layout_width="45.0dp" android:layout_alignParentRight="true" android:src="@drawable/title_city_share"> </ImageView> </RelativeLayout> <RelativeLayout android:id="@+id/today_relative" android:layout_height="wrap_content" android:layout_width="match_parent" android:layout_below="@id/title_relative" android:background="@drawable/main_background"> <RelativeLayout android:id="@+id/todayinfo1_relative" android:layout_width="wrap_content" android:layout_height="wrap_content" android:orientation="vertical"> <LinearLayout android:id="@+id/todayinfo1_linear1" android:layout_width="wrap_content" android:layout_height="wrap_content" android:orientation="vertical"> <TextView android:id="@+id/todayinfo1_cityName" android:layout_width="wrap_content" android:layout_height="wrap_content" android:text="北京" android:textColor="#FFFFFF" android:textSize="47.0sp"/> <TextView android:id="@+id/todayinfo1_updateTime" android:layout_width="wrap_content" android:layout_height="wrap_content" android:text="釋出時間18:25" android:textColor="#FFFFFF" android:textSize="20.0sp"/> <TextView android:id="@+id/todayinfo1_humidity" android:layout_width="wrap_content" android:layout_height="wrap_content" android:text="溼度:57%" android:textColor="#FFFFFF" android:textSize="20.0sp"/> </LinearLayout> <LinearLayout android:id="@+id/todayinfo1_linear2" android:layout_height="wrap_content" android:layout_width="wrap_content" android:orientation="vertical" android:layout_toLeftOf="@+id/todayinfo1_linear3"> <ImageView android:id="@+id/todayinfo1_pm25img" android:layout_width="wrap_content" android:layout_height="wrap_content" android:src="@drawable/pm25_0_50"> </ImageView> </LinearLayout> <LinearLayout android:id="@+id/todayinfo1_linear3" android:layout_height="wrap_content" android:layout_width="wrap_content" android:orientation="vertical" android:layout_alignParentRight="true"> <TextView android:layout_width="wrap_content" android:layout_height="wrap_content" android:text="PM2.5" android:textColor="#FFFFFF" android:textSize="27.0sp"/> <TextView android:id="@+id/todayinfo1_pm25" android:layout_width="wrap_content" android:layout_height="wrap_content" android:text="220" android:textColor="#FFFFFF" android:textSize="20.0sp"/> <TextView android:id="@+id/todayinfo1_pm25status" android:layout_width="wrap_content" android:layout_height="wrap_content" android:text="重度汙染" android:textColor="#FFFFFF" android:textSize="20.0sp"/> </LinearLayout> </RelativeLayout> <RelativeLayout android:id="@+id/todayinfo2_relative" android:layout_height="wrap_content" android:layout_width="match_parent" android:layout_below="@id/todayinfo1_relative"> <LinearLayout android:id="@+id/todayinfo2_linear1" android:layout_height="wrap_content" android:layout_width="wrap_content" android:orientation="vertical"> <ImageView android:id="@+id/todayinfo2_weatherStatusImg" android:layout_width="155dp" android:layout_height="128dp" android:src="@drawable/weather_qing"/> </LinearLayout> <LinearLayout android:id="@+id/todayinfo2_linear2" android:layout_width="wrap_content" android:layout_height="wrap_content" android:orientation="vertical" android:layout_toRightOf="@id/todayinfo2_linear1"> <TextView android:id="@+id/todayinfo2_week" android:layout_width="wrap_content" android:layout_height="wrap_content" android:text="今天 星期三" android:textColor="#FFFFFF" android:textSize="27.0sp"> </TextView> <TextView android:id="@+id/todayinfo2_temperature" android:layout_height="wrap_content" android:layout_width="wrap_content" android:text="2攝氏度~7攝氏度" android:textColor="#FFFFFF" android:textSize="20.0sp"> </TextView> <TextView android:id="@+id/todayinfo2_weatherState" android:layout_height="wrap_content" android:layout_width="wrap_content" android:text="晴" android:textColor="#FFFFFF" android:textSize="20.0sp"> </TextView> <TextView android:id="@+id/todayinfo2_wind" android:layout_height="wrap_content" android:layout_width="wrap_content" android:text="微風" android:textColor="#FFFFFF" android:textSize="20.0sp"> </TextView> </LinearLayout> </RelativeLayout> </RelativeLayout> </RelativeLayout>
2)更新資料
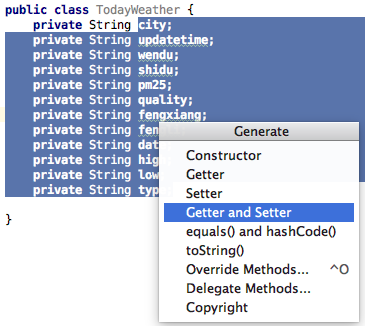
1.建立一個類,用於儲存待更新變數以及它們的setter and getter。
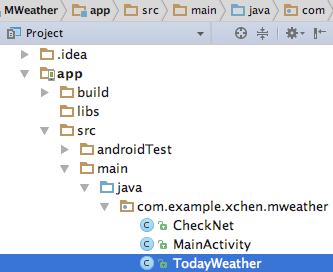
新建一個名為TodayWeather的java類
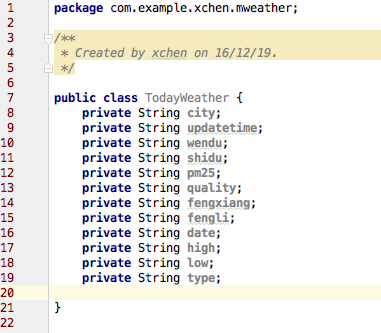
定義變數
右鍵-generate-setter and getter
編寫toString()
TodayWeather類完成,接下來我們要開始賦值。
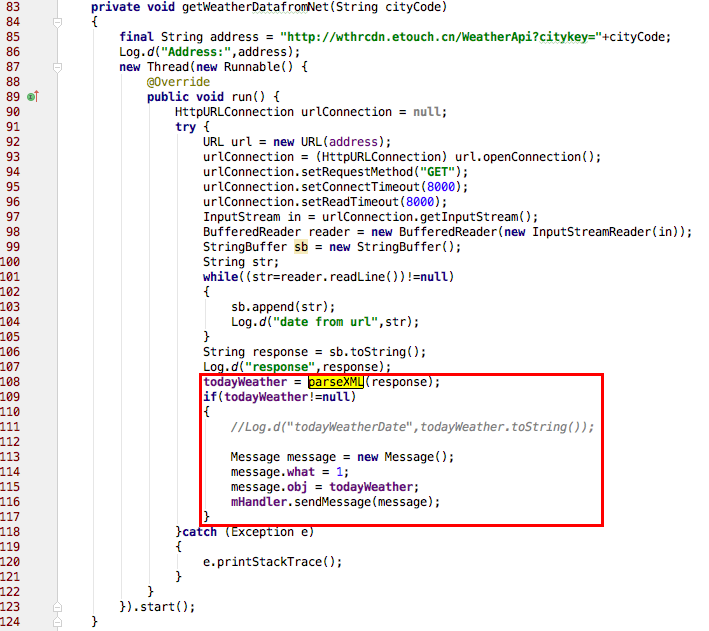
2.將我們解析的天氣資料,賦值給這些我們TodayWeather中定義的變數
修改parseXML(String xmlData)函式:將返回值型別改為TodayWeather,函式中定義一個TodayWeather變數,並邊解析邊賦值
private TodayWeather parseXML(String xmlData)
    {
        TodayWeather todayWeather = null;

        int fengliCount = 0;
        int fengxiangCount = 0;
        int dateCount = 0;
        int highCount = 0;
        int lowCount = 0;
        int typeCount = 0;
        try {
            XmlPullParserFactory factory = XmlPullParserFactory.newInstance();
            XmlPullParser xmlPullParser = factory.newPullParser();
            xmlPullParser.setInput(new StringReader(xmlData));

            int eventType = xmlPullParser.getEventType();
            Log.d("MWeater","start parse xml");

            while(eventType!=xmlPullParser.END_DOCUMENT)
            {
                switch (eventType)
                {
                    //文件開始位置
                    case XmlPullParser.START_DOCUMENT:
                        Log.d("parse","start doc");
                        break;
                    //標籤元素開始位置
                    case XmlPullParser.START_TAG:
                        if(xmlPullParser.getName().equals("resp"))
                        {
                            todayWeather = new TodayWeather();
                        }
                        if(todayWeather!=null) {
                            if (xmlPullParser.getName().equals("city")) {
                                eventType = xmlPullParser.next();
                                Log.d("city", xmlPullParser.getText());
                                todayWeather.setCity(xmlPullParser.getText());
                            } else if (xmlPullParser.getName().equals("updatetime")) {
                                eventType = xmlPullParser.next();
                                Log.d("updatetime", xmlPullParser.getText());
                                todayWeather.setUpdatetime(xmlPullParser.getText());
                            } else if (xmlPullParser.getName().equals("wendu")) {
                                eventType = xmlPullParser.next();
                                Log.d("wendu", xmlPullParser.getText());
                                todayWeather.setWendu(xmlPullParser.getText());
                            } else if (xmlPullParser.getName().equals("fengli") && fengliCount == 0) {
                                eventType = xmlPullParser.next();
                                Log.d("fengli", xmlPullParser.getText());
                                todayWeather.setFengli(xmlPullParser.getText());
                                fengliCount++;
                            } else if (xmlPullParser.getName().equals("shidu")) {
                                eventType = xmlPullParser.next();
                                Log.d("shidu", xmlPullParser.getText());
                                todayWeather.setShidu(xmlPullParser.getText());
                            } else if (xmlPullParser.getName().equals("fengxiang") && fengxiangCount == 0) {
                                eventType = xmlPullParser.next();
                                Log.d("fengxiang", xmlPullParser.getText());
                                todayWeather.setFengxiang(xmlPullParser.getText());
                                fengxiangCount++;
                            } else if (xmlPullParser.getName().equals("pm25")) {
                                eventType = xmlPullParser.next();
                                Log.d("pm25", xmlPullParser.getText());
                                todayWeather.setPm25(xmlPullParser.getText());
                            } else if (xmlPullParser.getName().equals("quality")) {
                                eventType = xmlPullParser.next();
                                Log.d("quelity", xmlPullParser.getText());
                                todayWeather.setQuality(xmlPullParser.getText());
                            } else if (xmlPullParser.getName().equals("date") && dateCount == 0) {
                                eventType = xmlPullParser.next();
                                Log.d("date", xmlPullParser.getText());
                                todayWeather.setDate(xmlPullParser.getText());
                                dateCount++;
                            } else if (xmlPullParser.getName().equals("high") && highCount == 0) {
                                eventType = xmlPullParser.next();
                                Log.d("high", xmlPullParser.getText());
                                todayWeather.setHigh(xmlPullParser.getText());
                                highCount++;
                            } else if (xmlPullParser.getName().equals("low") && lowCount == 0) {
                                eventType = xmlPullParser.next();
                                Log.d("low", xmlPullParser.getText());
                                todayWeather.setLow(xmlPullParser.getText());
                                lowCount++;
                            } else if (xmlPullParser.getName().equals("type") && typeCount == 0) {
                                eventType = xmlPullParser.next();
                                Log.d("type", xmlPullParser.getText());
                                todayWeather.setType(xmlPullParser.getText());
                                typeCount++;
                            }
                        }
                        break;
                    case XmlPullParser.END_TAG:
                        break;
                }
                eventType=xmlPullParser.next();
            }
        }catch (Exception e)
        {
            e.printStackTrace();
        }
        return todayWeather;
    }
編寫函式updateTodayWeather(TodayWeather)更新元件
void updateTodayWeather(TodayWeather todayWeather)
    {
        cityNameT.setText(todayWeather.getCity()+"天氣");
        cityT.setText(todayWeather.getCity());
        timeT.setText(todayWeather.getUpdatetime());
        humidityT.setText("溼度:"+todayWeather.getShidu());
        pmDataT.setText(todayWeather.getPm25());
        pmQualityT.setText(todayWeather.getQuality());
        weekT.setText(todayWeather.getDate());
        temperatureT.setText(todayWeather.getHigh()+"~"+todayWeather.getLow());
        climateT.setText(todayWeather.getType());
        windT.setText("風力:"+todayWeather.getFengli());
        Toast.makeText(MainActivity.this,"更新成功",Toast.LENGTH_SHORT).show();
    }
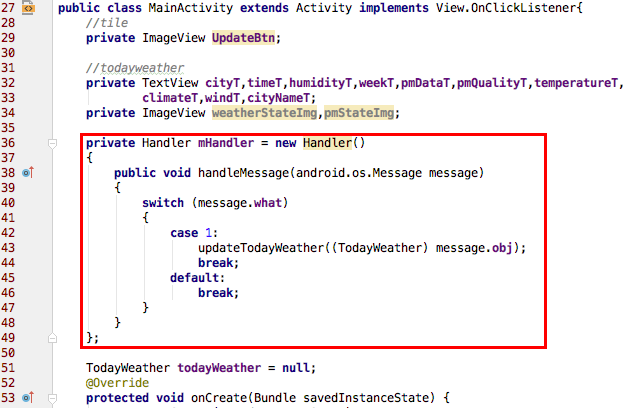
最後用handler啟動更新
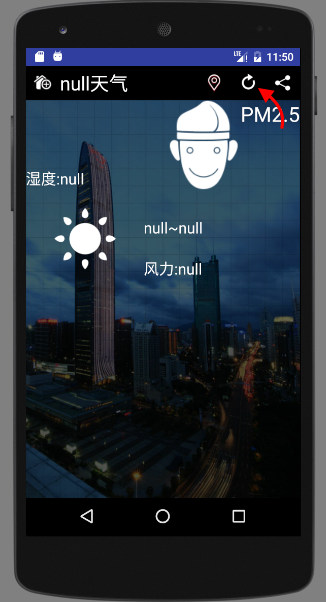
執行一下!
點選更新圖示
3)根據天氣狀態更改圖片
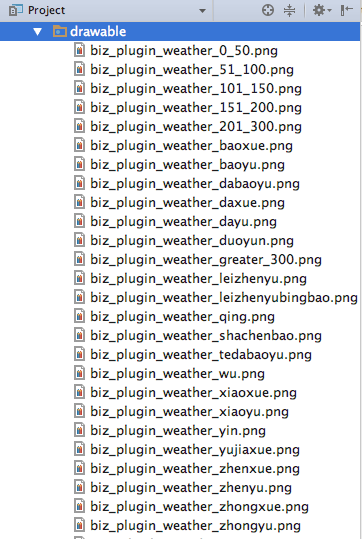
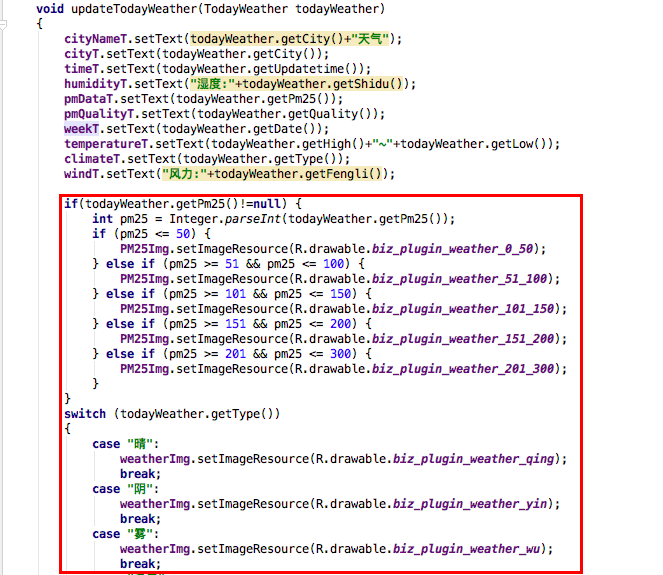
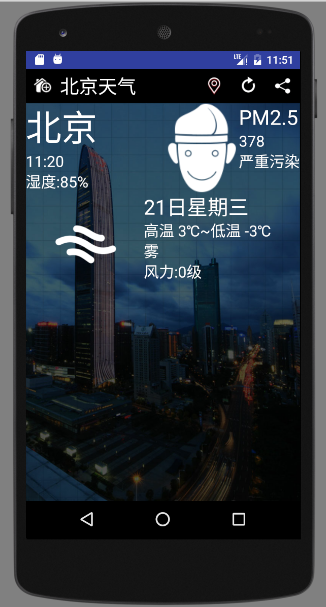
我們將pm25值的檔次分為50以下、50-100、100-150、150-200、200-250、250-300、300以上,隨著pm25值不同更改pm25State圖片。 天氣狀態圖片也隨著實時天氣狀態更改。1.載入圖片資源
2.定義ImageView變數,並繫結元件,設定更新動作
在MainActivity的updateTodayWeather(TodayWeather)函式中,新增程式碼:
updateTodayWeather
void updateTodayWeather(TodayWeather todayWeather)
    {
        cityNameT.setText(todayWeather.getCity()+"天氣");
        cityT.setText(todayWeather.getCity());
        timeT.setText(todayWeather.getUpdatetime());
        humidityT.setText("溼度:"+todayWeather.getShidu());
        pmDataT.setText(todayWeather.getPm25());
        pmQualityT.setText(todayWeather.getQuality());
        weekT.setText(todayWeather.getDate());
        temperatureT.setText(todayWeather.getHigh()+"~"+todayWeather.getLow());
        climateT.setText(todayWeather.getType());
        windT.setText("風力:"+todayWeather.getFengli());

        if(todayWeather.getPm25()!=null) {
            int pm25 = Integer.parseInt(todayWeather.getPm25());
            if (pm25 <= 50) {
                PM25Img.setImageResource(R.drawable.biz_plugin_weather_0_50);
            } else if (pm25 >= 51 && pm25 <= 100) {
                PM25Img.setImageResource(R.drawable.biz_plugin_weather_51_100);
            } else if (pm25 >= 101 && pm25 <= 150) {
                PM25Img.setImageResource(R.drawable.biz_plugin_weather_101_150);
            } else if (pm25 >= 151 && pm25 <= 200) {
                PM25Img.setImageResource(R.drawable.biz_plugin_weather_151_200);
            } else if (pm25 >= 201 && pm25 <= 300) {
                PM25Img.setImageResource(R.drawable.biz_plugin_weather_201_300);
            }
        }
        if(todayWeather.getType()!=null) {
            Log.d("type", todayWeather.getType());
            switch (todayWeather.getType()) {
                case "晴":
                    weatherImg.setImageResource(R.drawable.biz_plugin_weather_qing);
                    break;
                case "陰":
                    weatherImg.setImageResource(R.drawable.biz_plugin_weather_yin);
                    break;
                case "霧":
                    weatherImg.setImageResource(R.drawable.biz_plugin_weather_wu);
                    break;
                case "多雲":
                    weatherImg.setImageResource(R.drawable.biz_plugin_weather_duoyun);
                    break;
                case "小雨":
                    weatherImg.setImageResource(R.drawable.biz_plugin_weather_xiaoyu);
                    break;
                case "中雨":
                    weatherImg.setImageResource(R.drawable.biz_plugin_weather_zhongyu);
                    break;
                case "大雨":
                    weatherImg.setImageResource(R.drawable.biz_plugin_weather_dayu);
                    break;
                case "陣雨":
                    weatherImg.setImageResource(R.drawable.biz_plugin_weather_zhenyu);
                    break;
                case "雷陣雨":
                    weatherImg.setImageResource(R.drawable.biz_plugin_weather_leizhenyu);
                    break;
                case "雷陣雨加暴":
                    weatherImg.setImageResource(R.drawable.biz_plugin_weather_leizhenyubingbao);
                    break;
                case "暴雨":
                    weatherImg.setImageResource(R.drawable.biz_plugin_weather_baoyu);
                    break;
                case "大暴雨":
                    weatherImg.setImageResource(R.drawable.biz_plugin_weather_dabaoyu);
                    break;
                case "特大暴雨":
                    weatherImg.setImageResource(R.drawable.biz_plugin_weather_tedabaoyu);
                    break;
                case "陣雪":
                    weatherImg.setImageResource(R.drawable.biz_plugin_weather_zhenxue);
                    break;
                case "暴雪":
                    weatherImg.setImageResource(R.drawable.biz_plugin_weather_baoxue);
                    break;
                case "大雪":
                    weatherImg.setImageResource(R.drawable.biz_plugin_weather_daxue);
                    break;
                case "小雪":
                    weatherImg.setImageResource(R.drawable.biz_plugin_weather_xiaoxue);
                    break;
                case "雨夾雪":
                    weatherImg.setImageResource(R.drawable.biz_plugin_weather_yujiaxue);
                    break;
                case "中雪":
                    weatherImg.setImageResource(R.drawable.biz_plugin_weather_zhongxue);
                    break;
                case "沙塵暴":
                    weatherImg.setImageResource(R.drawable.biz_plugin_weather_shachenbao);
                    break;
                default:
                    break;
            }
        }
        Toast.makeText(MainActivity.this,"更新成功",Toast.LENGTH_SHORT).show();
    }
相關推薦
Android上實現一個簡單的天氣預報APP(六) 更新介面資料
學習參考資源:https://www.gitbook.com/book/zhangqx/mini-weather/details 前面我們已經設定好了基本的介面,獲取了網路上的天氣資料並解析出來了,接下來,我們要將介面上胡亂寫的天氣資料更新為實時獲取的真實的天氣資料。 1)
Android上實現一個簡單的天氣預報APP(十) 城市列表搜尋框
學習參考資源:https://www.gitbook.com/book/zhangqx/mini-weather/details 前面我們已經實現了點選城市列表ListView中的Item,實現更新天氣資訊的動作。接下來,我們將每個item的資訊補充的更為完整,並實現搜尋功
Android上實現一個簡單的天氣預報APP(十五) 釋出天氣預報APP
學習參考資源:https://www.gitbook.com/book/zhangqx/mini-weather/details 準備: 一張應用圖示 apk檔案 4~6張程式執行截圖 操作: 登入平臺,例如360移動開發平臺:http://dev.360.cn 按操作填寫
Android上實現一個簡單的天氣預報APP(三) 獲取網路資料
學習參考資源:https://www.gitbook.com/book/zhangqx/mini-weather/details 前面我們已經配置好了介面佈局,顯示佈局上的資料都是我們胡亂載入的,接下里我們要將這些資料更新為網路上的真實資料 1)檢查網路連線狀態 1.新建一
Android上實現一個簡單的天氣預報APP(十三) 導航ViewPager
學習參考資源:https://www.gitbook.com/book/zhangqx/mini-weather/details ViewPager是安裝軟體後,第一次開啟軟體時展示的導航。 1)在進入天氣介面之前,先進入導航介面 1.建立一個導航佈局 guide.xml一
Android上實現一個簡單的天氣預報APP(十二) 未來三天的天氣預報
學習參考資源:https://www.gitbook.com/book/zhangqx/mini-weather/details 前面我們已經可以獲取當天的天氣資料,並在螢幕上更新資料了,接下來我們獲取未來三天的天氣預報資料。 1)配置未來三天的佈局 在佈局檔案main.x
Android上實現一個簡單的天氣預報APP(八) 從資料庫讀取城市資料
學習參考資源:https://www.gitbook.com/book/zhangqx/mini-weather/details 前面我們已經實現了今日天氣的主介面佈局,並可以從網路上實時獲取天氣資料更新到介面上,並通過按鈕切入選擇城市介面。接下來,我們通過讀取資料庫檔案獲
使用工具Android Studio實現一個簡單的Android版的新聞APP
目的: >>這是我學完Android課程後所寫的一個小的、簡單版的新聞APP 技術概要: 用到了SQLite資料庫,用它來儲存每篇新聞下的評論 新聞的來源是新浪新聞,我通過使用
Android下實現一個簡單的計算器原始碼
下面的內容是關於Android下實現一個簡單的計算器的內容。 import android.app.Activity; import android.os.Bundle;import android.view.View;import android.widget.Button;import android.w
android基礎學習綜合例項——天氣預報App
經過幾個月的Android學習,自己先做一個App檢驗一下學習的基礎知識怎麼樣,偶然在網上看到一些天氣Api,所以自己也想實現以下,本文主要講解在開發天氣預報App第一步——怎麼樣獲取天氣預報App? 還有很多其它的天氣預報資料介面,我只看了這3個,它們都
Android 簡易版天氣預報app的實現(改進版)
最近總是有人來和我說我以前寫的一個小app無法正常獲取資料~Android簡易版天氣預報app 今天就又運行了下來查詢問題,發現或許是介面有限制吧,不能在多臺手機使用同個apikey 然後,發現了我寫的程式碼實在亂七八糟,介面也實在不好看,就又重寫了一遍,小
Android 端天氣預報APP的實現(一)天氣顯示介面之上下滑動
最近參加了一個小比賽,選了天氣預報APP這個題目,最初選擇它,是想練練網路資料獲取和資料解析方面的知識,後來發現倒是學到了不少介面的東西。下面我來一步步講解一下我是怎麼完成的吧~ 首先,天氣預報最直觀的部分應該就是天氣顯示介面了,這裡,我想做成可以有上下滑動的
用TextView實現一個簡單的Android資訊顯示工具
本文用 TextView 實現一個在手機上顯示 Android 資訊的工具類。比如涉及到訊號的傳遞時,那種類似日誌記錄的功能。先看圖: 先看佈局檔案的程式碼,注意 TextView 裡面的幾個屬性就可以了。 <?xml version="1.0" encoding="utf-8"
Android-實現一個簡單的自動翻譯外掛
實現一個簡單的自動翻譯外掛 最近在開發專案是要將Android相關的資源進行國際化,需要將values目錄中所有相關的字串資源(中文),生成匹配的一套英文且儲存在values-en目錄;當然國際化不僅僅是要英文還要提供臺灣等其他語言,這裡為了演示方便,只說下如
Windows 上靜態編譯 Libevent 2.0.10 並實現一個簡單 HTTP 伺服器
假設 Visual Studio 2005 的安裝路徑為“D:\Program Files\Microsoft Visual Studio 8\”,Libevent 2.0.10 解壓後的路徑為“D:\libevent-2.0.10-stable”。 編譯生成L
【Android 網路資料解析實現一個簡單的新聞例項(一)】
一般安卓在學到非同步任務AsyncTask之後都會有個安卓小專案的任務。得到(荔枝新聞,茶百科等)新聞網路介面來解析網路圖片或文字到ListView元件上顯示。其中要使用到的知識大概有:獲取網路資料(HttpUtil),解析網路資料(NewsParse),防止因
一個簡單的手電筒APP原始碼分享(支援Android O(8.0)及以下版本)
一個簡單的手電筒APP(無閃光燈的裝置開啟螢幕照明模式) GitHub地址: 打包下載 程式碼分析 Android 5及以下 需要使用類: android.hardware.Camera 開啟手電 private Camera ca
android應用開發-從設計到實現 4-8 天氣預報的佈局
天氣預報的佈局 現在我們開始進行天氣預報區域的佈局。 可以看出,這個區域,由5個完全一樣的元件組合而成。只要我們完成一個元件-天氣預報項的佈局,再把這個佈局複製貼上,很容易就完成了。 天氣預報項 在layout目錄上點選右鍵,選擇New -&
android硬編碼h264資料,並使用rtp推送資料流,實現一個簡單的直播-MediaCodec(一)
寫在前面:我並非專業做流媒體的coder,對流媒體行業無比崇拜,只是做了幾年安卓車載ROM,對安卓AV開發算是略懂。本篇部落格是我對MediaCodec編解碼和rtp推流的一次嘗試,希望能給有需要的朋友一些細微的幫助,不喜勿噴,如果有不對的地方希望大神指正共
【Android遊戲開發十六】Android Gesture之【觸控式螢幕手勢識別】操作!利用觸控式螢幕手勢實現一個簡單切換圖片的功能!
原創,轉載務必在明顯處註明:很多童鞋說我的程式碼執行後,點選home或者back後會程式異常,如果你也這樣遇到過,那麼你肯定沒有仔細讀完Himi的博文,第十九篇Himi專門寫了關於這些錯誤的原因和解決方法,這裡我在部落格都補充說明下,省的童鞋們總疑惑這一塊;請點選下面聯絡進入


