Android BottomNavigationBar底部導航控制器的使用
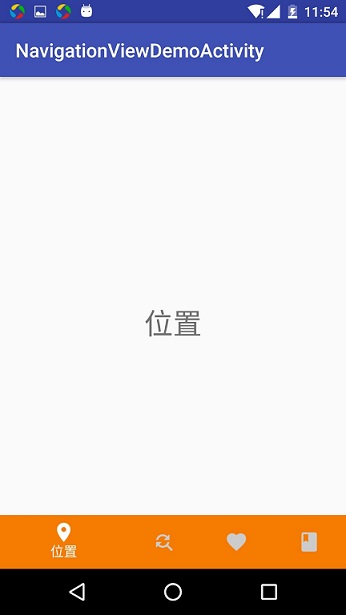
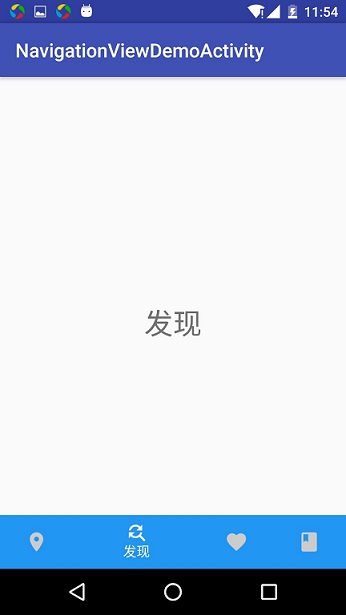
最近Google在自己推出的Material design中增加了Bottom Navigation導航控制。Android一直沒有官方的導航控制器,自己實現確實是五花八門,有了這個規定之後,就類似蘋果的底部Toolbar,以後我們的APP就會有一致的風格,先看一張效果:

這是官方在Material design中給出一張圖,確實很不錯。
1.BottomNavigationBar的下載地址
2.使用的方法
2.1在Gradle中新增
compile ‘com.ashokvarma.android:bottom-navigation-bar:0.9.5’
2.2佈局實現
 <com.ashokvarma.bottomnavigation.BottomNavigationBar
        android:layout_gravity="bottom"
        android:id="@+id/bottom_navigation_bar"
        android:layout_width="match_parent"
        android:layout_height="wrap_content"/>
2.3類中Activity中新增BottomNavigationItem
BottomNavigationBar bottomNavigationBar = (BottomNavigationBar) findViewById(R.id 2.4設定事件監聽器TabChangeListener
 bottomNavigationBar.setTabSelectedListener(new BottomNavigationBar.OnTabSelectedListener(){
            @Override
            public void onTabSelected(int position) {
            }
            @Override
            public void onTabUnselected(int position) {]
            }
            @Override
            public void onTabReselected(int position) {
            }
        });
3.案例的實現
佈局檔案
<?xml version="1.0" encoding="utf-8"?>
<RelativeLayout xmlns:android="http://schemas.android.com/apk/res/android"
    xmlns:tools="http://schemas.android.com/tools"
    xmlns:app="http://schemas.android.com/apk/res-auto" android:layout_width="match_parent"
    android:layout_height="match_parent"
    app:layout_behavior="@string/appbar_scrolling_view_behavior"
    tools:showIn="@layout/activity_navigation_view_demo"
    tools:context="com.lidong.demo.navigation_view.BottomNavigationBarDemoActivity">

    <LinearLayout
        android:id="@+id/tb"
        android:layout_width="match_parent"
         android:layout_height="match_parent"
        android:orientation="vertical" />
    <com.ashokvarma.bottomnavigation.BottomNavigationBar
        android:id="@+id/bottom_navigation_bar"
        android:layout_width="match_parent"
        android:layout_alignParentBottom="true"
        android:layout_height="wrap_content"/>
</RelativeLayout>
Activity的程式碼:
package com.lidong.demo.navigation_view;

import android.app.FragmentManager;
import android.app.FragmentTransaction;
import android.os.Bundle;
import android.support.v7.app.AppCompatActivity;
import android.support.v7.widget.Toolbar;
import android.util.Log;

import com.ashokvarma.bottomnavigation.BottomNavigationBar;
import com.ashokvarma.bottomnavigation.BottomNavigationItem;
import com.lidong.demo.R;

/**
 * BottomNavigationBar實現
 */
public class BottomNavigationBarDemoActivity extends AppCompatActivity implements BottomNavigationBar.OnTabSelectedListener {

    private BottomNavigationBar bottomNavigationBar;
    int lastSelectedPosition = 0;
    private String TAG = BottomNavigationBarDemoActivity.class.getSimpleName();
    private LocationFragment mLocationFragment;
    private FindFragment mFindFragment;
    private FavoritesFragment mFavoritesFragment;
    private BookFragment mBookFragment;

    @Override
    protected void onCreate(Bundle savedInstanceState) {
        super.onCreate(savedInstanceState);
        setContentView(R.layout.activity_navigation_view_demo);
        Toolbar toolbar = (Toolbar) findViewById(R.id.toolbar);
        setSupportActionBar(toolbar);
        bottomNavigationBar = (BottomNavigationBar) findViewById(R.id.bottom_navigation_bar);

        bottomNavigationBar
                .addItem(new BottomNavigationItem(R.mipmap.ic_location_on_white_24dp, "位置").setActiveColor(R.color.orange))
                .addItem(new BottomNavigationItem(R.mipmap.ic_find_replace_white_24dp, "發現").setActiveColor(R.color.blue))
                .addItem(new BottomNavigationItem(R.mipmap.ic_favorite_white_24dp, "愛好").setActiveColor(R.color.green))
                .addItem(new BottomNavigationItem(R.mipmap.ic_book_white_24dp, "圖書").setActiveColor(R.color.blue))
                .setFirstSelectedPosition(lastSelectedPosition )
                .initialise();

        bottomNavigationBar.setTabSelectedListener(this);
        setDefaultFragment();
    }

    /**
     * 設定預設的
     */
    private void setDefaultFragment() {
        FragmentManager fm = getFragmentManager();
        FragmentTransaction transaction = fm.beginTransaction();
        mLocationFragment = LocationFragment.newInstance("位置");
        transaction.replace(R.id.tabs, mLocationFragment);
        transaction.commit();
    }

    @Override
    public void onTabSelected(int position) {
        Log.d(TAG, "onTabSelected() called with: " + "position = [" + position + "]");
        FragmentManager fm = this.getFragmentManager();
        //開啟事務
        FragmentTransaction transaction = fm.beginTransaction();
        switch (position) {
            case 0:
                if (mLocationFragment == null) {
                    mLocationFragment = LocationFragment.newInstance("位置");
                }
                transaction.replace(R.id.tb, mLocationFragment);
                break;
            case 1:
                if (mFindFragment == null) {
                    mFindFragment = FindFragment.newInstance("發現");
                }
                transaction.replace(R.id.tb, mFindFragment);
                break;
            case 2:
                if (mFavoritesFragment == null) {
                    mFavoritesFragment = FavoritesFragment.newInstance("愛好");
                }
                transaction.replace(R.id.tb, mFavoritesFragment);
                break;
            case 3:
                if (mBookFragment == null) {
                    mBookFragment = BookFragment.newInstance("圖書");
                }
                transaction.replace(R.id.tb, mBookFragment);
                break;
            default:
                break;
        }
        // 事務提交
        transaction.commit();
    }

    @Override
    public void onTabUnselected(int position) {
        Log.d(TAG, "onTabUnselected() called with: " + "position = [" + position + "]");
    }

    @Override
    public void onTabReselected(int position) {

    }
}
fragment的程式碼
package com.lidong.demo.navigation_view;

import android.app.Fragment;
import android.os.Bundle;
import android.view.LayoutInflater;
import android.view.View;
import android.view.ViewGroup;
import android.widget.TextView;

import com.lidong.demo.R;

public class LocationFragment extends Fragment {


    public static LocationFragment newInstance(String param1) {
        LocationFragment fragment = new LocationFragment();
        Bundle args = new Bundle();
        args.putString("agrs1", param1);
        fragment.setArguments(args);
        return fragment;
    }

    public LocationFragment() {

    }

    @Override
    public void onCreate(Bundle savedInstanceState) {
        super.onCreate(savedInstanceState);
    }

    @Override
    public View onCreateView(LayoutInflater inflater, ViewGroup container,
                             Bundle savedInstanceState) {
        View view = inflater.inflate(R.layout.fragment_location, container, false);
        Bundle bundle = getArguments();
        String agrs1 = bundle.getString("agrs1");
        TextView tv = (TextView)view.findViewById(R.id.tv_location);
        tv.setText(agrs1);
        return view;
    }


}
程式碼實現起來很簡單,就載入佈局,新增BottomNavigationItem,設定TabChangeListener就這三步搞定底部導航控制器。
效果實現:

相關推薦
Android BottomNavigationBar底部導航控制器的使用(包含預設postion的設定)
轉載請標明出處:http://blog.csdn.net/u010046908/article/details/50962081本文出自:【李東的部落格】 最近Google在自己推出的Material design中增加了Bottom Navigation導航控制。Android一直沒有官方的導航控制器
Android BottomNavigationBar底部導航控制器的使用
最近Google在自己推出的Material design中增加了Bottom Navigation導航控制。Android一直沒有官方的導航控制器,自己實現確實是五花八門,有了這個規定之後,就類似蘋果的底部Toolbar,以後我們的APP就會有一致的風格,
Android BottomNavigationBar底部導航控制器的使用1
PS:底部導航控制器,比較炫酷,可以根據自己的喜好來製作導航點選效果, bar.setMode(BottomNavigationBar.MODE_SHIFTING); bar.setBackgroundStyle(BottomNavigationBar.B
Android——BottomNavigationBar底部導航欄的快速實現
底部導航的快速實現,不用繁瑣的LinearLayout或者RadioGroup等的那麼多程式碼,簡單,粗暴。 1.基本使用 a.在Android Studio下新增依賴: compile 'com.ashokvarma.android:bottom
Android學習總結——輸入法將BottomNavigationBar(底部導航欄)頂上去的問題
andro devel google tps 底部導航 style log cti googl 在應用清單中給當前<Activity>設置: android:windowSoftInputMode="adjustPan" 關於android:windo
Android學習之BottomNavigationBar實現Android特色底部導航欄
Android底部導航欄的實現方式特別多,例如TabHost,TabLayout,或者TextView等,都可以實現底部導航欄的效果,但是卻沒有Google官方統一的導航欄樣式,今天講的就是Google最近新增到Material design中的底部導航欄Bot
BottomNavigationBar實現Android特色底部導航欄
Android底部導航欄的實現方式特別多,例如TabHost,TabLayout,或者TextView等,都可以實現底部導航欄的效果,但是卻沒有Google官方統一的導航欄樣式,今天講的就是Google最近新增到Material design中的底部導航欄BottomNa
Android隱藏底部導航欄三大金剛按鈕
注:非uid.system專案不用看了。。。。避免看完嘗試不行,233333 定製化專案難免會用到這種需求,要就隱藏底部導航欄,讓使用者不能點選,底部導航欄的3大金剛分別就是我們看到的-返回鍵、home鍵、recent鍵。返回鍵對於我們來說很簡單,平時總是要監聽重
Android基礎-底部導航欄搭建方式二 (RadioGroup+FrameLayout)
程式碼如下: 1. xml檔案: <?xml version="1.0" encoding="utf-8"?> <LinearLayout xmlns:android="http://schemas.android.com/apk/res/andro
三種方式實現Android頁面底部導航欄
我們在Android手機上使用新浪微博和QQ等一些軟體時,經常會遇到類似下面這種頁面底部導航欄的控制元件,使用這種導航欄可以在手機螢幕的一頁中顯示儘可能多的內容,如下圖所示: 下面我將實現這種導航欄的三種方法總結如下: 一、使用TabHost實現(TabHost在新版的A
Fragment的使用(Android實現底部導航欄)
一、佈局頁面新增 1.新增四個切換頁面的佈局 (1)四個切換頁面的佈局(四個頁面相同): <?xml version="1.0" encoding="utf-8"?> <LinearLayout xmlns:android="http:
三步搞定Android應用底部導航欄
public class ActivitycollectiondemoActivity extends ActivityCollection { /** Called when the activity is first created. */ @Override public
安卓 BottomNavigationBar 底部導航的使用
簡介:Google推出的BottomNavigationBar底部導航欄 1 、基本的使用(add和replace方式) 2、擴充套件新增訊息和圖形 3、修改圖片大小與文字間距 1、預設使用studio背景圖,防止少圖片資源(效果圖雖不盡人意~)
BottomNavigationBar 底部導航控件
nta 默認 item art ontap navi con tap current BottomNavigationBar 底部導航控件 屬性 說明BottomNavigationBarItem 多個 item,iconSize icon大小currentIndex 默
Android仿小米商城底部導航欄之二(BottomNavigationBar、ViewPager和Fragment的聯動使用)
簡介 在前文《Android仿小米商城底部導航欄(基於BottomNavigationBar)》我們使用BottomNavigationBar控制元件模仿實現了小米商城底部導航欄效果。接下來更進一步的,我們將通過BottomNavigationBar控制元件和
Android用BottomNavigationBar實現底部導航欄
之前底部導航欄的基本上都是自己通過selector來實現的,今天換上了Google推出的BottomNavigationBar,感覺效果還不錯,寫了一個專案上要用到的功能的demo,先上一張效果圖,大家感受一下:這裡主要介紹BottomNavigationBar的使用,首先要
Android BottomNavigationBar 實現底部導航欄的快捷方式
Bottom navigation,為頂級檢視(top-level views)提供快速導航,可以快速的訪問和重新整理頂級檢視 本文提供很完善 底部導航 Frament 一步到位 首先就是新增依賴 //底部導航欄 compile 'com.ashokvarma.andr
Android--BottomNavigationBar實現底部導航欄
package com.android.xiaobai; import android.os.Bundle; import android.support.annotation.Nullable; import android.support.v4.app.Fragment; import android.
Xamarin.Forms 3.1.0+版本 Android 原生支持底部導航欄
toolbar ott 支持 cor for aml otto nfx XML Xamarin.Forms 3.1.0+版本 Android 原生支持底部導航欄 Xamarin.Forms 3.1.0以上版本終於支持Android底部導航欄啦,可以不用第三方的支持庫了。 h
Android BottomNavigationBar導航欄
UNC https 標記 點擊 wid ext public hid class 基本屬性 setActiveColor //選中item的字體顏色 setInActiveColor //未選中Item中的顏色 setBarBackgroundColor/

