從頭開始基於Maven搭建SpringMVC+Mybatis專案(3)
接上文內容,本節介紹基於Mybatis的查詢和分頁功能,並展示一個自定義的分頁標籤,可重複使用以簡化JSP頁面的開發。
在上一節中,我們已經使用Maven搭建好了專案的基礎結構,包括一個父專案petstore-parent和資料庫持久層模組petstore-persist及Web站點petstore-web,現在來為petstore-web新增一些功能。對於初學者來說,可能第一個遇到的較複雜問題就是分頁查詢,那麼就先從解決它開始。
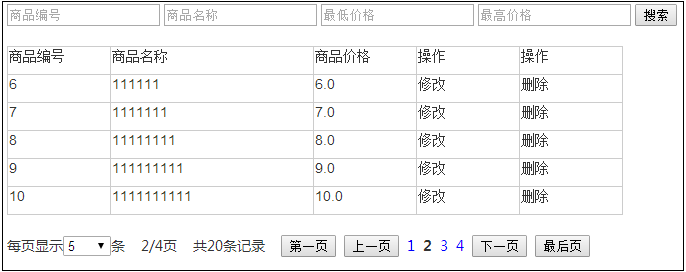
看一下完成的效果:
上面是四個可選的查詢條件,使用者可以根據需要組合查詢條件。
中間是符合條件的資料展示表格,對查詢結果可以執行修改和刪除操作,但是暫未實現。
最下面是一個分頁導航欄,以自定義標籤(Tag)技術實現,可複用到多個jsp頁面。
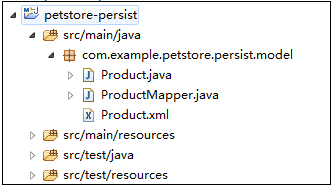
下面來介紹關鍵步驟和程式碼。首先是petstore-persist模組,目錄結構如下:
Product.java是一個普通的Java Bean,這裡略過。ProductMapper.java中定義了兩個方法:
使用時,首先呼叫matches方法獲得符合條件的記錄總數,然後根據每頁顯示的記錄數和當前頁數計算讀取資料的Limit偏移量和記錄數,再呼叫findProducts方法讀取資料。兩個方法的引數都使用了@Param註解,例如@Param(value="id") int id,在對映檔案中,可通過#{id}的格式來使用這個引數。package com.example.petstore.persist.model; import java.util.List; import org.apache.ibatis.annotations.Param; public interface ProductMapper { /** * 查詢符合條件的記錄總數 * @param id * @param name * @param fromPrice * @param toPrice * @return */ int matches(@Param(value="id") int id, @Param(value="name") String name, @Param(value="fromPrice") float fromPrice, @Param(value="toPrice") float toPrice); /** * 按查詢條件及分頁條件分段查詢記錄 * @param id * @param name * @param fromPrice * @param toPrice * @param fetchIndex * @param fetchCount * @return */ List<Product> findProducts(@Param(value="id") int id, @Param(value="name") String name, @Param(value="fromPrice") float fromPrice, @Param(value="toPrice") float toPrice, @Param(value="fetchIndex") int fetchIndex, @Param(value="fetchCount") int fetchCount); }
在Product.xml中新增兩個方法的SQL對映:
<?xml version="1.0" encoding="UTF-8"?>
<!DOCTYPE mapper PUBLIC "-//mybatis.org//DTD Mapper 3.0//EN" "http://mybatis.org/dtd/mybatis-3-mapper.dtd">
<mapper namespace="com.example.petstore.persist.model.ProductMapper">
	<resultMap type="com.example.petstore.persist.model.Product"
		id="productMap">
		<id column="p_id" property="id" />
		<result column="p_name" property="name" />
		<result column="p_price" property="price" />
	</resultMap>
	<select id="matches" resultType="int">
		select count(*) from t_product
		<where>
			<if test="id>0">
				p_id=#{id}
			</if>
			<if test="name!=null and name!='' ">
				and locate(#{name},p_name)>0
			</if>
			<if test="fromPrice>-1">
				and p_price>=#{fromPrice}
			</if>
			<if test="toPrice>-1">
				and p_price<=#{toPrice}
			</if>
		</where>
	</select>
	<select id="findProducts" resultMap="productMap">
		select * from t_product
		<where>
			<if test="id>0">
				p_id=#{id}
			</if>
			<if test="name!=null and name!='' ">
				and locate(#{name},p_name)>0
			</if>
			<if test="fromPrice>-1">
				and p_price>=#{fromPrice}
			</if>
			<if test="toPrice>-1">
				and p_price<=#{toPrice}
			</if>
		</where>
		limit #{fetchIndex},#{fetchCount}
	</select>
</mapper>
可以看到上面兩個方法中,就是通過<where><if>等元素來組裝查詢SQL。Mybatis的優點之一就是直接使用SQL語法,有SQL基礎的情況下非常容易上手。
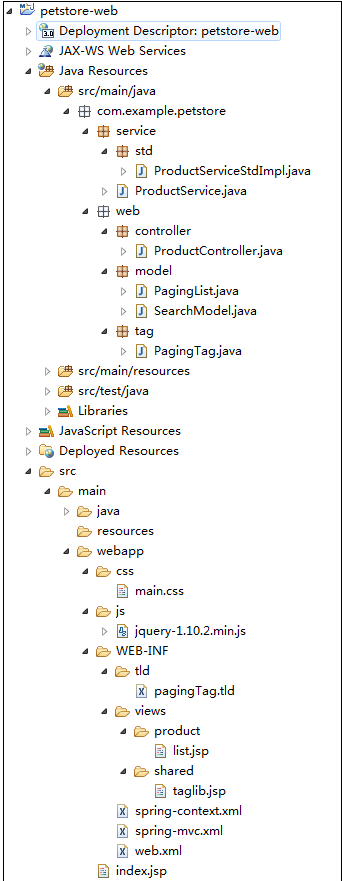
下面進入petstore-web模組,先來看整體結構:
其中com.example.petstore.web.tag.PagingTag.java是分頁標籤類,關鍵程式碼:
	private int pageIndex = 1;  //當前頁數
	private int pageSize = 20;  //預設每頁行數
	private int pageCount = 0;  //記錄總頁數
	private int itemCount = 0;  //記錄總條數
	private int numCount = 10;  //分頁欄數字導航連結個數

	@Override
	public void doTag() throws JspException, IOException {
		JspWriter out = this.getJspContext().getOut();

		out.write("<script type=\"text/javascript\">function navigatorPage(pageIndex) {document.getElementById('pageIndex').value = pageIndex;document.forms[0].submit();}</script>");

		out.write("每頁顯示");
		out.write("<select id='pageSize' name='pageSize' onchange='navigatorPage(" + pageIndex + ")'>");
		out.write("<option value='5'" + (pageSize == 5 ? " selected='true'" : "") + ">5</option>");
		out.write("<option value='10'" + (pageSize == 10 ? " selected='true'" : "") + ">10</option>");
		out.write("<option value='20'" + (pageSize == 20 ? " selected='true'" : "") + ">20</option>");
		out.write("<option value='50'" + (pageSize == 50 ? " selected='true'" : "") + ">50</option>");
		out.write("<option value='100'" + (pageSize == 100 ? " selected='true'" : "") + ">100</option>");
		out.write("<option value='500'" + (pageSize == 500 ? " selected='true'" : "") + ">500</option>");
		out.write("</select>");
		out.write("條    ");

		out.write(pageIndex + "/" + pageCount + "頁    ");
		out.write("共" + itemCount + "條記錄    ");

		out.write("<input type='button' value='第一頁' onclick='javascript:navigatorPage(1);'" + (pageIndex > 1 ? "" : " disabled='true'") + " />  ");
		out.write("<input type='button' value='上一頁' onclick='javascript:navigatorPage(" + (pageIndex - 1) + ");'" + (pageIndex > 1 ? "" : " disabled='true'") + " />  ");

		//數字導航欄
		int iStartIndex = 1;
		int iEndIndex = pageCount;
		if(pageCount <= numCount) {
		} else if ((pageIndex + (numCount + 1) / 2) > pageCount) {
			iStartIndex = pageCount - (numCount - 1);
			iEndIndex = pageCount;
        } else if (pageIndex <= (numCount + 1) / 2) {
        	iEndIndex = numCount;
        } else {
            if (numCount % 2 == 0) {
            	iStartIndex = pageIndex - numCount / 2;
            	iEndIndex = pageIndex + (numCount - 1) / 2;
            } else {
            	iStartIndex = pageIndex - numCount / 2;
            	iEndIndex = pageIndex + numCount / 2;
            }
        }
		for(int i = iStartIndex; i <= iEndIndex; i++) {
			if(i == pageIndex) {
				out.write("<strong>" + i + "</strong>  ");
			} else {
				out.write("<a href='javascript:navigatorPage(" + i + ");'>" + i + "</a>  ");
			}
		}

		out.write("<input type='button' value='下一頁' onclick='javascript:navigatorPage(" + (pageIndex + 1) + ");'" + (pageIndex < pageCount ? "" : " disabled='true'") + " />  ");
		out.write("<input type='button' value='最後頁' onclick='javascript:navigatorPage(" + pageCount + ");'" + (pageIndex < pageCount ? "" : " disabled='true'") + " />");
		out.write("<input type='hidden' id='pageIndex' name='pageIndex' value='" + pageIndex + "'/>");
}在WEB-INF下建立目錄tld,然後新增pagingTag.tld,內容如下:
<?xml version="1.0" encoding="UTF-8"?>
<!DOCTYPE taglib
  PUBLIC "-//Sun Microsystems, Inc.//DTD JSP Tag Library 1.2//EN"
  "http://java.sun.com/dtd/web-jsptaglibrary_1_2.dtd">
<taglib>
	<tlib-version>2.0</tlib-version>
	<jsp-version>1.2</jsp-version>
	<short-name>Paging</short-name>
	<uri>http://blog.csdn.net/autfish/tag/</uri>
	<display-name>Paging Tag</display-name>
	<description>Paging Tag library</description>

	<tag>
		<name>pagingTag</name>
		<tag-class>com.example.petstore.web.tag.PagingTag</tag-class>
		<body-content>empty</body-content>
		<description>create navigation for paging</description>
		<attribute>
			<name>pageIndex</name>
			<rtexprvalue>true</rtexprvalue>
		</attribute>
		<attribute>
			<name>pageSize</name>
			<rtexprvalue>true</rtexprvalue>
		</attribute>
		<attribute>
			<name>pageCount</name>
			<rtexprvalue>true</rtexprvalue>
		</attribute>
		<attribute>
			<name>itemCount</name>
			<rtexprvalue>true</rtexprvalue>
		</attribute>
	</tag>
</taglib>在web.xml中啟用這個標籤:
	<jsp-config>
		<taglib>
			<taglib-uri>http://blog.csdn.net/autfish/tag/</taglib-uri>
			<taglib-location>/WEB-INF/tld/pagingTag.tld</taglib-location>
		</taglib>
</jsp-config><%@ taglib prefix="my" uri="http://blog.csdn.net/autfish/tag/" %><my:pagingTag pageIndex="${contentModel.pageIndex}" pageSize="${contentModel.pageSize}" pageCount="${contentModel.pageCount}" itemCount="${contentModel.itemCount}" /> private int pageIndex = 1;
private int pageSize = 20;
private int pageCount = 0;
private int itemCount = 0;
private List<T> items;@Controller
@RequestMapping("/product")
public class ProductController {
@Autowired
private ProductService productService;
@RequestMapping(value="/list")
public String listProduct(Model model, @ModelAttribute("searchModel") SearchModel formModel,
@RequestParam(value=PagingList.PAGE_INDEX_NAME, defaultValue="1") int pageIndex,
@RequestParam(value=PagingList.PAGE_SIZE_NAME, defaultValue="10") int pageSize) {
int id = 0;
String name = "";
float fromPrice = -1;
float toPrice = -1;
if(formModel != null) {
id = NumberUtils.toInt(formModel.getId(), 0);
name = formModel.getName();
fromPrice = NumberUtils.toFloat(formModel.getFromPrice(), -1);
toPrice = NumberUtils.toFloat(formModel.getToPrice(), -1);
}
model.addAttribute("searchModel", formModel);
PagingList<Product> contentModel = this.productService.findProducts(id, name, fromPrice, toPrice, pageIndex, pageSize);
model.addAttribute("contentModel", contentModel);
return "product/list";
}
}@Service
public class ProductServiceStdImpl implements ProductService {
@Autowired
private ProductMapper productMapper;
@Override
public PagingList<Product> findProducts(int id, String name,
float fromPrice, float toPrice, int pageIndex, int pageSize) {
int total = this.productMapper.matches(id, name, fromPrice, toPrice);
int pageCount = total % pageSize == 0 ? total / pageSize : total / pageSize + 1;
if(pageIndex > pageCount)
pageIndex = pageCount;
int fetchIndex = (pageIndex - 1) * pageSize;
int fetchCount = fetchIndex + pageSize > total ? (total - fetchIndex) : pageSize;
List<Product> list = this.productMapper.findProducts(id, name, fromPrice, toPrice, fetchIndex, fetchCount);
PagingList<Product> paging = new PagingList<Product>();
paging.setItemCount(total);
paging.setPageCount(pageCount);
paging.setPageIndex(pageIndex);
paging.setPageSize(pageSize);
paging.setItems(list);
return paging;
}
}限於篇幅,不能把所有的原始碼一一貼上,有興趣可以下載原始碼。
在WEB容器如tomcat中執行petstore-web模組,使用http://localhost:8080/petstore-web/product/list訪問,順利的話就看到了一開始的畫面。如果出錯,比對原始碼檢查差異即可。總結
分頁查詢功能使用頻繁,且開發比較複雜,按需定製一套可複用的分頁元件對提高開發效率有很大的幫助。下一節我們繼續完善Web模組,增加增刪改查以及許可權控制功能。
相關推薦
從頭開始基於Maven搭建SpringMVC+Mybatis專案(3)
接上文內容,本節介紹基於Mybatis的查詢和分頁功能,並展示一個自定義的分頁標籤,可重複使用以簡化JSP頁面的開發。 在上一節中,我們已經使用Maven搭建好了專案的基礎結構,包括一個父專案petstore-parent和資料庫持久層模組petstore-persist
從頭開始基於Maven搭建SpringMVC+Mybatis專案(4)
接上文內容,上一節中的示例中完成了支援分頁的商品列表查詢功能,不過我們的目標是打造一個商品管理後臺,本節中還需要補充新增、修改、刪除商品的功能,這些功能依靠Mybatis操作資料庫,並通過SpringMVC的資料驗證功能檢查資料合法性。既然是後臺,那麼肯定還需要驗證和登入,
從頭開始基於Maven搭建SpringMVC+Mybatis專案(1)
技術發展日新月異,許多曾經擁有霸主地位的流行技術短短几年間已被新興技術所取代。 在Java的世界中,框架之爭可能比語言本身的改變更讓人關注。近幾年,SpringMVC憑藉簡單輕便、開發效率高、與Spring框架無縫整合等特點,逐漸擊敗前輩Struts/Struts2,成為最
Maven搭建SpringMVC+Mybatis專案詳解
前言 最近比較閒,複習搭建一下專案,這次主要使用Spring+SpringMVC+Mybatis。專案持久層使用Mybatis3,控制層使用SpringMVC4.1,使用Spring4.1管理控制器,資料庫連線池使用druid資料來源,該項資料庫暫使用My
Intellij Idea建立基於Maven的SpringMVC+MyBatis專案
前言:SpringMVC是一款輕量級的Web開發框架,非常有利於新手上手,對於持久化層,目前可選擇的是Hibernate和Mybatis,而Mybatis的學習曲線較為平整,因此本文介紹了利用Intellij Idea建立基於Maven的SpringMVC/My
Maven搭建SpringMVC+Hibernate專案詳解
前言 今天覆習一下SpringMVC+Hibernate的搭建,本來想著將Spring-Security許可權控制框架也映入其中的,但是發現內容太多了,Spring-Security的就留在下一篇吧,這篇主要搭建SpringMVC4.1.4和Hibernate4.
基於maven搭建spring+springMVC+mybatis(SSM)框架專案
一.簡介 這篇文章是記錄我自己手動搭建基於maven的SSM(spring+springMVC+mybatis)框架專案的整個過程,目的是為了加深印象和方便以後查閱以及整理思路。 二.開發環境準備 (1)系統:Windows10(專業版) (2)eclispe版本:Eclipse J
使用IDEA基於Maven搭建多模塊聚合工程(springmvc+spring+mybatis整合)
utf-8 組件 json處理 con mon 博客 quick 作者 處理工具 文章有不當之處,歡迎指正,如果喜歡微信閱讀,你也可以關註我的微信公眾號:好好學java,獲取優質學習資源。 終於有時間搞java了,今天使用IDEA基於maven搭建了多模塊聚合工程,經過了
使用IDEA基於Maven搭建多模組聚合工程(springmvc+spring+mybatis整合)
文章有不當之處,歡迎指正,如果喜歡微信閱讀,你也可以關注我的微信公眾號:好好學java,獲取優質學習資源。 終於有時間搞java了,今天使用IDEA基於maven搭建了多模組聚合工程,經過了多番嘗試,終於成功啦! 注意:這裡是在原作者的基礎上改進的版
solr測試專案(上)--基於maven的springmvc環境搭建
從去年9月21開始寫部落格,今天整一年了。 從開始寫文章到現在,寫過spring的,springmvc的,spring與其他框架整合的(包括hibernate,ehcache,shiro),寫過一些工具類,寫過微信公眾號開發,寫過前端的一些小demo,雖然一直
idea 搭建 springMVC+mybatis+maven 專案(二)
空的maven專案搭建完成之後,可以為自己的專案新增內容了,下面是我設定的檔案結構: 如果你發現在建立java檔案之後,無法建立package屬性的檔案,那麼你需要下面的配置了——–配置每一個資料夾的屬性。 點選File->Project Stru
使用idea搭建基於maven的ssm聚合專案
版本統一 關於專案搭建,版本間的相互依賴很重要,所以一般情況下需要固定版本。 jd
搭建eclipse+tomcat+maven+shiro+springmvc+jpa專案(二):基本框架搭建
1、pom.xml配置 <project xmlns="http://maven.apache.org/POM/4.0.0" xmlns:xsi="http://www.w3.org/2001/XMLSchema-instance" xsi:schemaLocation="http://m
搭建eclipse+tomcat+maven+shiro+springmvc+jpa專案(一):技術選型及架構文件
一、Java語言 Java是一門面向物件程式語言,不僅吸收了C++語言的各種優點,還摒棄了C++裡難以理解的多繼承、指標等概念,因此Java語言具有功能強大和簡單易用兩個特徵。Java語言作為靜態面向物件程式語言的代表,極好地實現了面向物件理論,允許程式設計師以優雅的思維方式進行復雜的程式設計。
Spring+Spring MVC+Mybatis+Maven搭建多模組專案
maven多模組專案SpringMVC簡單例項:劃分多模組,也就是方便多人開發,自己開發自己的那塊沒有多大沖突。 專案結構 整個專案目錄是這樣的: GitHub地址 :https://github.com/thecattle/maven_model —-
搭建Maven+Spring+SpringMVC+Mybatis後臺環境之在IDEA中整合Maven
搭建Maven+Spring+SpringMVC+Mybatis後臺環境之在IDEA中整合Maven 開啟IDEA,插一句閒話:沒事就更新最新版吧,之前用的2018.1差點把自己坑死,同樣的裝備換成最新版,啥問題都沒有。 1、開啟 File → Settings 如圖配置
搭建Maven+Spring+SpringMVC+Mybatis後臺環境之Maven的安裝與配置
搭建Maven+Spring+SpringMVC+Mybatis後臺環境之Maven的安裝與配置 最近沉迷於小程式開發,前端學習的差不多了,後臺想用Maven+Spring+SpringMVC+Mybati體系結構來開發,用MySQL作為資料庫。本文先介紹Maven的安裝。 下載
Maven搭建SpringMVC專案詳解
前言 上一次複習搭建了SpringMVC+Mybatis,這次搭建一下SpringMVC,採用的是SpringJDBC,沒有采用任何其他的ORM框架,SpringMVC提供了一整套的WEB框架,所以如果想搭建純的SpringMVC的話,而且不必映入別的任何框
Spring+Spring MVC+Mybatis+Maven搭建多模組專案(二)
基於第一篇文章《Spring+Spring MVC+Mybatis+Maven搭建多模組專案(一)》的基礎上,寫一個完整的示例,從頁面到Dao層的整個過程 1、先在bug.model模組下建立com.bug.model.user包,在包中建立UserVO物件
Spring+Spring MVC+Mybatis+Maven搭建多模組專案(一)
最近在研究Spring MVC和Maven,工作中也是使用Spring MVC、Mybatis及Maven整合,出於好奇,自己也搭建了一個Spring+Spring MVC+Mybatis+Maven的多模組框架,先介紹一下我的工程結構 bug.root:根模


