從頭開始基於Maven搭建SpringMVC+Mybatis專案(4)
接上文內容,上一節中的示例中完成了支援分頁的商品列表查詢功能,不過我們的目標是打造一個商品管理後臺,本節中還需要補充新增、修改、刪除商品的功能,這些功能依靠Mybatis操作資料庫,並通過SpringMVC的資料驗證功能檢查資料合法性。既然是後臺,那麼肯定還需要驗證和登入,這部分使用攔截器(interceptor)來實現。此外,我們還需要解決諸如中文處理、靜態資源過濾等經常會造成麻煩的小問題。
來看一下完成的效果,點選原商品列表功能/product/list,首先提示登入
如果登入出錯,做相應的提示
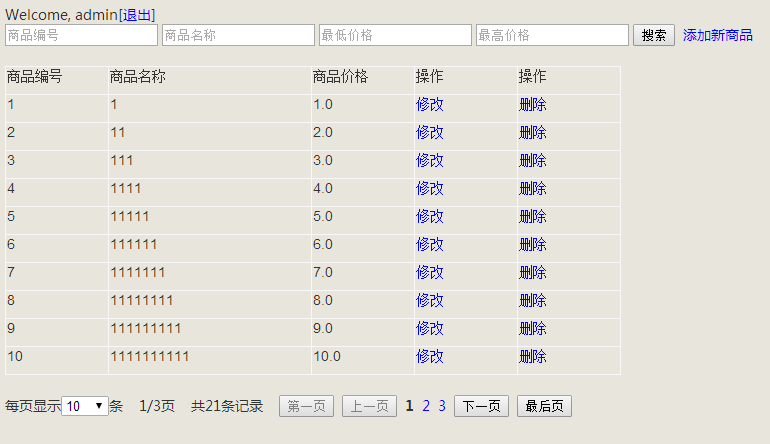
登入成功後進入商品列表頁面
選擇任意商品,點選修改,開啟修改商品頁面。名稱和價格兩個屬性輸入框儲存原值以方便修改
修改內容不符合規範則觸發SpringMVC的驗證提示
點選退出則重回登入頁。
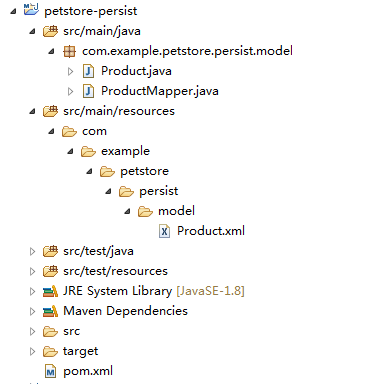
接下來敘述實現的主要環節,先回到petstore-persist模組,為商品管理增加插入(insert)、更新(update)、刪除(delete)三個方法。
ProductMapper.java:
	void addProduct(Product product);

	void updateProduct(Product product);

void deleteProduct(int id);下面切換到petstore-web模組,先新增一個攔截器檢查使用者是否登入。SpringMVC的攔截器可以看作是Controller的守門警衛,其定義的preHandle方法和postHandle方法分別守在Controller的進出口,可以攔截住進出的客人(Request)做諸如登記、檢查、對輸出資訊再處理等操作。我們這裡的攔截器非常簡單,在preHandle中檢查使用者的Session中是否攜帶登入資訊,檢查通過則進入目標頁面,否則重新分派到登入頁面。<insert id="addProduct" parameterType="com.example.petstore.persist.model.Product" useGeneratedKeys="true" keyProperty="id"> insert into t_product(p_name,p_price) values(#{name},#{price}) </insert> <update id="updateProduct" parameterType="com.example.petstore.persist.model.Product"> update t_product set p_name=#{name},p_price=#{price} where p_id=#{id} </update> <delete id="deleteProduct" parameterType="int"> delete from t_product where p_id=#{id} </delete>
在配置檔案中啟用攔截器,本例中是spring-mvc.xmlpublic class AuthorityInterceptor implements HandlerInterceptor { @Override public void afterCompletion(HttpServletRequest request, HttpServletResponse response, Object handler, Exception ex) { } @Override public void postHandle(HttpServletRequest request, HttpServletResponse response, Object handler, ModelAndView modelAndView) { } @Override public boolean preHandle(HttpServletRequest request, HttpServletResponse response, Object handler) throws Exception { String backUrl = request.getServletPath().toString(); String sessionName = "adminUser"; String currentUser = (String)request.getSession(true).getAttribute(sessionName); if(currentUser != null && currentUser.equals("admin")) { return true; } response.sendRedirect(request.getContextPath() + "/admin/toLogin?backUrl=" + backUrl); return false; } }
	<mvc:interceptors>
	    <mvc:interceptor>
	        <mvc:mapping path="/**" />
	        <mvc:exclude-mapping path="/admin/**" />
	        <mvc:exclude-mapping path="/css/**" />
	        <mvc:exclude-mapping path="/js/**" />
	        <bean class="com.example.petstore.web.interceptor.AuthorityInterceptor "/>
	    </mvc:interceptor>
</mvc:interceptors>/admin/目錄下的請求為登入相關處理,例如登入頁面,這些需要能被未登入的使用者訪問。/css/和/js/目錄下為靜態檔案,不應該被攔截。而且,靜態檔案也不應該交給SpringMVC的前置控制器DispatcherServlet處理,這樣會造成不必要的效能損耗。所以還應該在spring-mvc.xml中加入:
	<mvc:resources mapping="/css/**" location="/css/"/>
<mvc:resources mapping="/js/**" location="/js/"/>(注:處理靜態檔案的訪問應該交給Nginx或Apache等Web伺服器,如果僅使用Tomcat等Java容器更好的方式是通過在web.xml中設定servlet-mapping來處理。這裡只是演示SpringMVC功能)
被攔截的請求交給登入控制器AdminController處理
@Controller
@SessionAttributes("adminUser")
@RequestMapping("/admin")
public class AdminController {

	@RequestMapping(value="/toLogin")
	public String toLogin(@ModelAttribute("adminModel") AdminModel adminModel) {
		return "authority/login";
	}

	@RequestMapping(value="/login", method = {RequestMethod.GET, RequestMethod.POST})
	public String login(Model model, @ModelAttribute("adminModel") AdminModel adminModel, @RequestParam("backUrl") String backUrl) throws IOException {

		boolean valid = true;
		String message = null;
		if(adminModel == null) {
			message = "非法操作";
			valid = false;
		} else if (!adminModel.getUsername().equals("admin")) {
			message = "使用者名稱不存在";
			valid = false;
		} else if (!adminModel.getPassword().equals("123456")) {
			message = "密碼不正確";
			valid = false;
		}

		if(!valid) {
			ErrorModel errorModel = new ErrorModel();
			errorModel.setMessage(message);
			errorModel.setPage("返回上一頁", "javascript:history.back();");
			model.addAttribute("errorModel", errorModel);
			return "comm/error";
		} else {
			model.addAttribute("adminUser", adminModel.getUsername());
			if(StringUtils.isBlank(backUrl)) {
				return "redirect:/product/list";
			} else {
				return "redirect:" + backUrl;
			}
		}
	}

	@RequestMapping(value="/logout")
	public String logout(ModelMap modelMap, SessionStatus sessionStatus, @ModelAttribute("adminModel") AdminModel adminModel) throws IOException {
		sessionStatus.setComplete();
		return "authority/login";
	}
}登入成功後就可以執行增加、刪除和修改的操作了。先看刪除,通過ajax方式呼叫Controller介面處理:
<td><a href="javascript:void(0);" onclick="javascript:delProduct(${item.id});">刪除</a></td><script type="text/javascript">
function delProduct(id) {
if(!window.confirm("確定要刪除嗎?")) {
return false;
}
$.ajax({
data:"id=" + id,
type:"GET",
dataType: 'json',
url:"<c:url value='/product/delete'/>",
error:function(data){
alert("刪除失敗");
},
success:function(data){
if(data.code > 0) {
alert("刪除成功");
document.forms[0].submit();
} else {
alert("刪除失敗");
}
}
});
}
</script> @RequestMapping(value="/delete", method = {RequestMethod.GET})
@ResponseBody
public Map<String, String> delete(@RequestParam(value="id") int id) throws IOException {
this.productService.deleteProduct(id);
Map<String, String> map = new HashMap<String, String>(1);
map.put("code", "1");
return map;
}<a href="<c:url value='/product/toAddOrUpdate'/>">新增新商品</a><a href="<c:url value='/product/toAddOrUpdate'/>?id=${item.id}">修改</a> @RequestMapping(value="/toAddOrUpdate", method = {RequestMethod.GET})
public String toAddOrUpdate(Model model, @RequestParam(value="id", defaultValue="0") int id) {
if(id > 0) {
Product product = this.productService.selectById(id);
if(product != null) {
model.addAttribute("productModel", product);
} else {
ErrorModel errorModel = new ErrorModel();
errorModel.setMessage("商品不存在或已下架");
Map<String, String> pages = new HashMap<String, String>();
pages.put("返回上一頁", "javascript:history.back();");
errorModel.setPages(pages);
model.addAttribute("errorModel", errorModel);
return "comm/error";
}
} else {
model.addAttribute("productModel", new Product());
}
return "product/addOrUpdate";
}新增/修改商品頁面:
	<form:form action="${pageContext.request.contextPath}/product/addOrUpdate" method="POST" modelAttribute="productModel">
		<c:if test="${productModel.id==0}">
		新增新商品
		</c:if>
		<c:if test="${productModel.id!=0}">
		修改商品資訊, 商品ID: ${productModel.id}
		</c:if>
		<div></div>
		<form:hidden path="id" />
		<div>商品名稱: <form:input path="name" autocomplete="off" placeholder="商品名稱" /><form:errors path="name" cssClass="error" /></div>
		<div>商品價格: <form:input path="price" autocomplete="off" placeholder="商品價格" /><form:errors path="price" cssClass="error" /></div>
		<div><button type="submit">提交</button></div>
	</form:form>
在使用者提交商品資訊時,通常我們希望做一下檢查以避免使用者提交了不符合規定的內容。SpringMVC對伺服器端驗證提供了優秀的支援方案。我們來看對商品名稱的檢查:
第一步,在addOrUpdate.jsp中新增<form:errors path="name" cssClass="error" />用於顯示錯誤提示資訊。
第二步,修改Model類Product.java,在name屬性上添加註解@Pattern(regexp="[\\u4e00-\\u9fa5]{4,30}"),即限定為4至30箇中文字元。
第三步,在Controller中檢查BindingResult的例項是否包含錯誤:
	@RequestMapping(value="/addOrUpdate", method = {RequestMethod.POST})
	public String addOrUpdate(Model model, @Valid @ModelAttribute("productModel") Product productModel, BindingResult bindingResult) {

		if(bindingResult.hasErrors()) {
			return "product/addOrUpdate";
		}

		int id = productModel.getId();
		if(id > 0) {
			this.productService.updateProduct(productModel);
		} else {
			this.productService.addProduct(productModel);
		}
		return list(model, new SearchModel(), PagingList.DEFAULT_PAGE_INDEX, PagingList.DEFAULT_PAGE_SIZE);
} <dependency>
<groupId>org.hibernate</groupId>
<artifactId>hibernate-validator</artifactId>
<version>5.2.4.Final</version>
</dependency> <filter>
<filter-name>encodingFilter</filter-name>
<filter-class>org.springframework.web.filter.CharacterEncodingFilter</filter-class>
<init-param>
<param-name>encoding</param-name>
<param-value>UTF-8</param-value>
</init-param>
</filter>
<filter-mapping>
<filter-name>encodingFilter</filter-name>
<url-pattern>/*</url-pattern>
</filter-mapping>最後,介紹一下使用Maven的jetty-maven-plugin外掛來測試專案,為此,還要稍稍改造一下petstore-persist模組。把src/main/java/com/example/petstore/persist/model/Product.xml移動到資源目錄,即 src/main/resources/com/example/petstore/persist/model/Product.xml
修改Maven配置檔案,如D:\Maven\conf\settings.xml,新增
<pluginGroups>
  <pluginGroup>org.mortbay.jetty</pluginGroup>
</pluginGroups> <build>
<plugins>
<plugin>
<groupId>org.apache.maven.plugins</groupId>
<artifactId>maven-compiler-plugin</artifactId>
<version>2.3.2</version>
<configuration>
<source>1.8</source>
<target>1.8</target>
<encoding>utf8</encoding>
</configuration>
</plugin>
</plugins>
</build> <build>
<finalName>petstore-web</finalName>
<plugins>
<plugin>
<groupId>org.mortbay.jetty</groupId>
<artifactId>jetty-maven-plugin</artifactId>
<version>8.1.16.v20140903</version>
<configuration>
<scanIntervalSeconds>10</scanIntervalSeconds>
<webAppConfig>
<contextPath>/petstore</contextPath>
</webAppConfig>
</configuration>
</plugin>
</plugins>
</build>mvn clean install
把petstore-persist模組安裝到本地Maven倉庫中,然後切換到petstore-web目錄下,執行
mvn jetty:run
該命令啟動jetty伺服器並預設繫結8080埠,如果8080已被佔用,可以指定其他埠
mvn jetty:run -Djetty.port=9999
啟動成功後,開啟瀏覽器輸入 http://localhost:8080/petstore/index.jsp
那麼,你是否順利看到站點首頁了呢?
(完)


