
PaintView 繪圖控制元件解析
部落格地址:部落格園,版權所有,轉載須聯絡作者。
最近做了個繪圖的控制元件,實現了一些有趣的功能。
先上效果圖:

PaintView畫圖工具:
1.可直接使用設定按鈕來實現已擁有的方法,且拓展性強
2.基礎功能:更換顏色、更換橡皮、以及更換橡皮和筆的粗細、清屏、倒入圖片
3.特殊功能:儲存畫筆軌跡幀動畫、幀動畫匯入匯出、ReDo和UnDo
如何使用該控制元件可以在GitHub的README中找到,此處不再贅述。
原理分析:
1.繪圖控制元件繼承於View,使用canvas做畫板,在canvas上設定一個空白的Bitmap作為畫布,以儲存畫下的軌跡。
mPaint = new Paint(); mEraserPaint = new Paint(); Init_Paint(UserInfo.PaintColor,UserInfo.PaintWidth); Init_Eraser(UserInfo.EraserWidth); WindowManager manager = (WindowManager)context.getSystemService(Context.WINDOW_SERVICE); width = manager.getDefaultDisplay().getWidth(); height= manager.getDefaultDisplay().getHeight(); mBitmap = Bitmap.createBitmap(width, height, Bitmap.Config.ARGB_8888); mCanvas = new Canvas(mBitmap); mPath = new Path(); mBitmapPaint = new Paint(Paint.DITHER_FLAG);
mPaint作為畫筆, mEraserPaint 作為橡皮,使用兩個在onDraw的重新整理的時候就會容易一點,接著獲取了螢幕的寬和高,使之為Bitmap的寬和高。 新建canvas,路徑Path,
和往bitmap上畫的畫筆mBitmapPaint。
2.橡皮和鉛筆的配置:
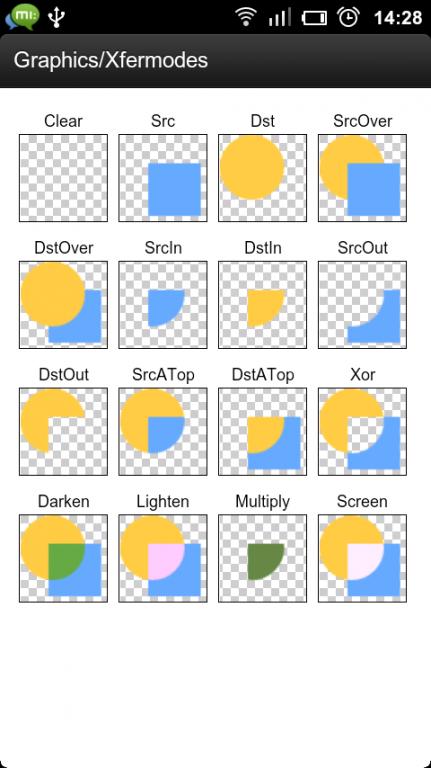
 1     // init paint
 2     private void Init_Paint(int color ,int width){
 3         mPaint.setAntiAlias(true);
 4         mPaint.setDither(true);
 5         mPaint.setColor(color);
 6         mPaint.setStyle(Paint.Style.STROKE);
 7         mPaint.setStrokeJoin(Paint.Join.ROUND);
 8         mPaint.setStrokeCap(Paint.Cap.ROUND);
 9         mPaint.setStrokeWidth(width);
10     }
11
12
13     // init eraser
14     private void Init_Eraser(int width){
15         mEraserPaint.setAntiAlias(true);
16         mEraserPaint.setDither(true);
17         mEraserPaint.setColor(0xFF000000);
18         mEraserPaint.setStrokeWidth(width);
19         mEraserPaint.setStyle(Paint.Style.STROKE);
20         mEraserPaint.setStrokeJoin(Paint.Join.ROUND);
21         mEraserPaint.setStrokeCap(Paint.Cap.SQUARE);
22         // The most important
23         mEraserPaint.setXfermode(new PorterDuffXfermode(PorterDuff.Mode.DST_OUT));
24     }
鉛筆的屬性不用說,檢視一下原始碼就知道了,橡皮的顏色隨便設定應該都可以, 重點在最後一句。
mEraserPaint.setXfermode(new PorterDuffXfermode(PorterDuff.Mode.DST_OUT));
意思是設定了層疊的方式,當橡皮擦上去的時候,即新加上的一層(橡皮)和原有層有重疊部分時,取原有層去掉重疊部分的剩餘部分,這也就達到了橡皮的功能。
3.PaintView重點在於對於按下、移動、擡起的監聽:
 1     private void Touch_Down(float x, float y) {
 2         mPath.reset();
 3         mPath.moveTo(x, y);
 4         mX = x;
 5         mY = y;
 6          if(IsRecordPath) {
 7              listener.AddNodeToPath(x, y, MotionEvent.ACTION_DOWN, IsPaint);
 8          }
 9     }
10
11
12     private void Touch_Move(float x, float y) {
13         float dx = Math.abs(x - mX);
14         float dy = Math.abs(y - mY);
15         if (dx >= TOUCH_TOLERANCE || dy >= TOUCH_TOLERANCE) {
16             mPath.quadTo(mX, mY, (x + mX) / 2, (y + mY) / 2);
17             mX = x;
18             mY = y;
19             if(IsRecordPath) {
20                 listener.AddNodeToPath(x, y, MotionEvent.ACTION_MOVE, IsPaint);
21             }
22         }
23     }
24     private void Touch_Up(Paint paint){
25         mPath.lineTo(mX, mY);
26         mCanvas.drawPath(mPath, paint);
27         mPath.reset();
28         if(IsRecordPath) {
29             listener.AddNodeToPath(mX, mY, MotionEvent.ACTION_UP, IsPaint);
30         }
31     }
    @Override
    public boolean onTouchEvent(MotionEvent event) {
        float x = event.getX();
        float y = event.getY();
        switch (event.getAction()) {
            case MotionEvent.ACTION_DOWN:
                Touch_Down(x, y);
                invalidate();
                break;

            case MotionEvent.ACTION_MOVE:
                Touch_Move(x, y);
                invalidate();
                break;

            case MotionEvent.ACTION_UP:
                if(IsPaint){
                    Touch_Up(mPaint);
                }else {
                    Touch_Up(mEraserPaint);
                }
                invalidate();
                break;
        }
        return true;
    }
Down的時候移動點過去,Move的時候利用塞貝爾曲線將至連成一條線,Up的時候降至畫在mCanvas上,並將path重置,並且每一次操作完都呼叫invalidate();以實現重新整理。
另外clean方法:
 1     public void clean() {
 2         mBitmap = Bitmap.createBitmap(width, height, Bitmap.Config.ARGB_8888);
 3         mCanvas.setBitmap(mBitmap);
 4         try {
 5             Message msg = new Message();
 6             msg.obj = PaintView.this;
 7             msg.what = INDIVIDE;
 8             handler.sendMessage(msg);
 9             Thread.sleep(0);
10         } catch (InterruptedException e) {
11             // TODO Auto-generated catch block
12             e.printStackTrace();
13         }
14     }
15     private Handler handler=new Handler(){
16
17         @Override
18         public void handleMessage(Message msg) {
19             switch (msg.what){
20                 case INDIVIDE:
21                     ((View) msg.obj).invalidate();
22                     break;
23                 case CHOOSEPATH:
24                     JsonToPathNode(msg.obj.toString());
25                     break;
26             }
27             super.handleMessage(msg);
28         }
29
30     };
clean方法就是重設Bitmap並且重新整理介面,達到清空的效果。
還有一些set的方法:
 1     public void setColor(int color) {
 2         showCustomToast("已選擇顏色" + colorToHexString(color));
 3         mPaint.setColor(color);
 4     }
 5
 6
 7     public void setPenWidth(int width) {
 8         showCustomToast("設定筆粗為:" + width);
 9         mPaint.setStrokeWidth(width);
10     }
11
12     public void setIsPaint(boolean isPaint) {
13         IsPaint = isPaint;
14     }
15
16     public void setOnPathListener(OnPathListener listener) {
17         this.listener = listener;
18     }
19
20     public void setmEraserPaint(int width){
21         showCustomToast("設定橡皮粗為:"+width);
22         mEraserPaint.setStrokeWidth(width);
23     }
24
25     public void setIsRecordPath(boolean isRecordPath,PathNode pathNode) {
26         this.pathNode = pathNode;
27         IsRecordPath = isRecordPath;
28     }
29
30     public void setIsRecordPath(boolean isRecordPath) {
31         IsRecordPath = isRecordPath;
32     }
33     public boolean isShowing() {
34         return IsShowing;
35     }
36
37
38     private static String colorToHexString(int color) {
39         return String.format("#%06X", 0xFFFFFFFF & color);
40     }
41
42     // switch eraser/paint
43     public void Eraser(){
44         showCustomToast("切換為橡皮");
45         IsPaint = false;
46         Init_Eraser(UserInfo.EraserWidth);
47     }
48
49     public void Paint(){
50         showCustomToast("切換為鉛筆");
51         IsPaint = true;
52         Init_Paint(UserInfo.PaintColor, UserInfo.PaintWidth);
53     }
54
55     public Paint getmEraserPaint() {
56         return mEraserPaint;
57     }
58
59     public Paint getmPaint() {
60         return mPaint;
61     }
這些都不是很主要的東西。
4.設定圖片:
 1     /**
 2      *  @author [email protected]
 3      *  @param uri get the uri of a picture
 4      * */
 5     public void setmBitmap(Uri uri){
 6         Log.e("圖片路徑", String.valueOf(uri));
 7         ContentResolver cr = context.getContentResolver();
 8         try {
 9             mBitmapBackGround = BitmapFactory.decodeStream(cr.openInputStream(uri));
10 //            RectF rectF = new RectF(0,0,width,height);
11             mCanvas.drawBitmap(mBitmapBackGround, 0, 0, mBitmapPaint);
12         } catch (FileNotFoundException e) {
13             e.printStackTrace();
14         }
15         invalidate();
16     }
17
18     /**
19      *  @author [email protected]
20      *  @param file Pictures' file
21      * */
22     public void BitmapToPicture(File file){
23         FileOutputStream fileOutputStream = null;
24         try {
25             SimpleDateFormat formatter = new SimpleDateFormat("yyyy-MM-dd-HH-mm-ss");
26             Date now = new Date();
27             File tempfile = new File(file+"/"+formatter.format(now)+".jpg");
28             fileOutputStream = new FileOutputStream(tempfile);
29             mBitmap.compress(Bitmap.CompressFormat.JPEG, 100, fileOutputStream);
30             showCustomToast(tempfile.getName() + "已儲存");
31         } catch (FileNotFoundException e) {
32             e.printStackTrace();
33         }
34     }
加入圖片和將之儲存為圖片。
5.重點:紀錄幀動畫
其實說是幀動畫,我其實是把每個onTouchEvent的動作的座標、筆的顏色、等等記錄了下來,再清空了在子執行緒重繪以實現第一幅效果圖裡點選一鍵重繪的效果,
但從原理上說仍可歸於逐幀動畫。
首先設定一個Linstener監聽儲存。
package com.lfk.drawapictiure;

/**
 * Created by liufengkai on 15/8/26.
 */
public interface OnPathListener {

    void AddNodeToPath(float x, float y ,int event,boolean Ispaint);

}
再在監聽裡進行儲存:
 1         paintView.setOnPathListener(new OnPathListener() {
 2             @Override
 3             public void AddNodeToPath(float x, float y, int event, boolean IsPaint) {
 4                 PathNode.Node tempnode = pathNode.new Node();
 5                 tempnode.x = x;
 6                 tempnode.y = y;
 7                 if (IsPaint) {
 8                     tempnode.PenColor = UserInfo.PaintColor;
 9                     tempnode.PenWidth = UserInfo.PaintWidth;
10                 } else {
11                     tempnode.EraserWidth = UserInfo.EraserWidth;
12                 }
13                 tempnode.IsPaint = IsPaint;
14                 Log.e(tempnode.PenColor + ":" + tempnode.PenWidth + ":" + tempnode.EraserWidth, tempnode.IsPaint + "");
15                 tempnode.TouchEvent = event;
16                 tempnode.time = System.currentTimeMillis();
17                 pathNode.AddNode(tempnode);
18             }
19         });
其中PathNode是一個application類,用於儲存存下來的arraylist:
 1 package com.lfk.drawapictiure;
 2 import android.app.Application;
 3
 4 import java.util.ArrayList;
 5
 6 /**
 7  * Created by liufengkai on 15/8/25.
 8  */
 9 public class PathNode extends Application{
10     public class Node{
11         public Node() {}
12         public float x;
13         public float y;
14         public int PenColor;
15         public int TouchEvent;
16         public int PenWidth;
17         public boolean IsPaint;
18         public long time;
19         public int EraserWidth;
20
21     }
22     private ArrayList<Node> PathList;
23
24
25     public ArrayList<Node> getPathList() {
26         return PathList;
27     }
28
29     public void AddNode(Node node){
30         PathList.add(node);
31     }
32
33     public Node NewAnode(){
34         return new Node();
35     }
36
37
38     public void ClearList(){
39         PathList.clear();
40     }
41
42     @Override
43     public void onCreate() {
44         super.onCreate();
45         PathList = new ArrayList<Node>();
46     }
47
48     public void setPathList(ArrayList<Node> pathList) {
49         PathList = pathList;
50     }
51
52     public Node getTheLastNote(){
53         return PathList.get(PathList.size()-1);
54     }
55
56     public void deleteTheLastNote(){
57         PathList.remove(PathList.size()-1);
58     }
59
60     public PathNode() {
61         PathList = new ArrayList<Node>();
62     }
63
64 }
存入之後,再放到子執行緒裡面逐幀的載入播放:
 1 class PreviewThread implements Runnable{
 2         private long time;
 3         private ArrayList<PathNode.Node> nodes;
 4         private View view;
 5         public PreviewThread(View view, ArrayList<PathNode.Node> arrayList) {
 6             this.view = view;
 7             this.nodes = arrayList;
 8         }
 9         public void run() {
10             time = 0;
11             IsShowing = true;
12             clean();
13             for(int i = 0 ;i < nodes.size();i++) {
14                 PathNode.Node node=nodes.get(i);
15                 Log.e(node.PenColor+":"+node.PenWidth+":"+node.EraserWidth,node.IsPaint+"");
16                 float x = node.x;
17                 float y = node.y;
18                 if(i<nodes.size()-1) {
19                     time=nodes.get(i+1).time-node.time;
20                 }
21                 IsPaint = node.IsPaint;
22                 if(node.IsPaint){
23                     UserInfo.PaintColor = node.PenColor;
24                     UserInfo.PaintWidth = node.PenWidth;
25                     Init_Paint(node.PenColor,node.PenWidth);
26                 }else {
27                     UserInfo.EraserWidth = node.EraserWidth;
28                     Init_Eraser(node.EraserWidth);
29                 }
30                 switch (node.TouchEvent) {
31                     case MotionEvent.ACTION_DOWN:
32                         Touch_Down(x,y);
33                         break;
34                     case MotionEvent.ACTION_MOVE:
35                         Touch_Move(x,y);
36                         break;
37                     case MotionEvent.ACTION_UP:
38                         if(node.IsPaint){
39                             Touch_Up(mPaint);
40                         }else {
41                             Touch_Up(mEraserPaint);
42                         }
43                         break;
44                 }
45                     Message msg=new Message();
46                     msg.obj = view;
47                     msg.what = INDIVIDE;
48                     handler.sendMessage(msg);
49                 if(!ReDoOrUnDoFlag) {
50                     try {
51                         Thread.sleep(time);
52                     } catch (InterruptedException e) {
53                         e.printStackTrace();
54                     }
55                 }
56             }
57             ReDoOrUnDoFlag = false;
58             IsShowing = false;
59             IsRecordPath = true;
60         }
61     }
1     public void preview(ArrayList<PathNode.Node> arrayList) {
2         IsRecordPath = false;
3         PreviewThread previewThread = new PreviewThread(this, arrayList);
4         Thread thread = new Thread(previewThread);
5         thread.start();
6     }
這是播放的幀動畫,接下來說儲存幀動畫,我將之輸出成json並輸出到檔案中去。
 1     public void PathNodeToJson(PathNode pathNode,File file){
 2         ArrayList<PathNode.Node> arrayList = pathNode.getPathList();
 3         String json = "[";
 4         for(int i = 0;i < arrayList.size();i++){
 5             PathNode.Node node = arrayList.get(i);
 6             json += "{"+"\""+"x"+"\""+":"+px2dip(node.x)+"," +
 7                     "\""+"y"+"\""+":"+px2dip(node.y)+","+
 8                     "\""+"PenColor"+"\""+":"+node.PenColor+","+
 9                     "\""+"PenWidth"+"\""+":"+node.PenWidth+","+
10                     "\""+"EraserWidth"+"\""+":"+node.EraserWidth+","+
11                     "\""+"TouchEvent"+"\""+":"+node.TouchEvent+","+
12                     "\""+"IsPaint"+"\""+":"+"\""+node.IsPaint+"\""+","+
13                     "\""+"time"+"\""+":"+node.time+
14                     "},";
15         }
16         json = json.substring(0,json.length()-1);
17         json += "]";
18         try {
19             json = enCrypto(json, "[email protected]");
20         } catch (InvalidKeySpecException e) {
21             e.printStackTrace();
22         } catch (InvalidKeyException e) {
23             e.printStackTrace();
24         } catch (NoSuchPaddingException e) {
25             e.printStackTrace();
26         } catch (IllegalBlockSizeException e) {
27             e.printStackTrace();
28         } catch (BadPaddingException e) {
29             e.printStackTrace();
30         }
31         SimpleDateFormat formatter = new SimpleDateFormat("yyyy-MM-dd-HH-mm-ss");
32         Date now = new Date();
33         File tempfile = new File(file+"/"+formatter.format(now)+".lfk");
34         try {
35             FileOutputStream fileOutputStream = new FileOutputStream(tempfile);
36             byte[] bytes = json.getBytes();
37             fileOutputStream.write(bytes);
38             fileOutputStream.close();
39             showCustomToast(tempfile.getName() + "已儲存");
40         } catch (FileNotFoundException e) {
41             e.printStackTrace();
42         } catch (IOException e) {
43             e.printStackTrace();
44         }
45
另外還可將檔案從json中提取出來:
 1     private void JsonToPathNode(String file){
 2         String res = "";
 3         ArrayList<PathNode.Node> arrayList = new ArrayList<>();
 4         try {
 5             Log.e("絕對路徑1",file);
 6             FileInputStream in = new FileInputStream(file);
 7             ByteArrayOutputStream bufferOut = new ByteArrayOutputStream();
 8             byte[] buffer = new byte[1024];
 9             for(int i = in.read(buffer, 0, buffer.length); i > 0 ; i = in.read(buffer, 0, buffer.length)) {
10                 bufferOut.write(buffer, 0, i);
11             }
12             res = new String(bufferOut.toByteArray(), Charset.forName("utf-8"));
13             Log.e("字串檔案",res);
14         } catch (FileNotFoundException e) {
15             e.printStackTrace();
16         } catch (IOException e) {
17             e.printStackTrace();
18         }
19         try {
20             res = deCrypto(res, "[email protected]");
21         } catch (InvalidKeyException e) {
22             e.printStackTrace();
23         } catch (InvalidKeySpecException e) {
24             e.printStackTrace();
25         } catch (NoSuchPaddingException e) {
26             e.printStackTrace();
27         } catch (IllegalBlockSizeException e) {
28             e.printStackTrace();
29         } catch (BadPaddingException e) {
30             e.printStackTrace();
31         }
32         try {
33             JSONArray jsonArray = new JSONArray(res);
34             for(int i = 0;i < jsonArray.length();i++){
35                 JSONObject jsonObject = new JSONObject(jsonArray.getString(i));
36                 PathNode.Node node = new PathNode().NewAnode();
37                 node.x = dip2px(jsonObject.getInt("x"));
38                 node.y = dip2px(jsonObject.getInt("y"));
39                 node.TouchEvent = jsonObject.getInt("TouchEvent");
40                 node.PenWidth = jsonObject.getInt("PenWidth");
41                 node.PenColor = jsonObject.getInt("PenColor");
42                 node.EraserWidth = jsonObject.getInt("EraserWidth");
43                 node.IsPaint = jsonObject.getBoolean("IsPaint");
44                 node.time = jsonObject.getLong("time");
45                 arrayList.add(node);
46             }
47         } catch (JSONException e) {
48             e.printStackTrace();
49         }
50         pathNode.setPathList(arrayList);
51     }
另外如果不想讓別人看出輸出的是json的話可以使用des加密演算法:
1 /** 2 * 加密(使用DES演算法) 3 * 4 * @param txt 5 * 需要加密的文字 6 * @param key 7 * 金鑰 8 * @return 成功加密的文字 9 * @throws InvalidKeySpecException 10 * @throws InvalidKeyException 11 * @throws相關推薦
PaintView 繪圖控制元件解析
部落格地址:部落格園,版權所有,轉載須聯絡作者。 最近做了個繪圖的控制元件,實現了一些有趣的功能。 先上效果圖: PaintView畫圖工具: 1.可直接使用設定按鈕來實現已擁有的方法,且拓展性強 2.基礎功能:更換顏色、更換橡皮、以及更換橡皮和筆的粗細、清屏、倒入
Access-控制元件解析-列表框-02-獲取選項
微信公眾號原文 系統:Windows 7 軟體:Excel 2010 / Access 2010 這個系列介紹常用的控制元件 包括在介面端的設定及在程式碼端的實現 Part 1:本篇目標 本篇介紹的控制元件為:列表框。涉及
【向量圖控制元件更新】向量繪圖控制元件VectorDraw系列產品 v8.8001.0.2 Beta釋出
VectorDraw Developer Framework(VDF)是一個用於應用程式視覺化的圖形引擎庫。有了VDF提供的功能,您可以輕鬆地建立、編輯、管理、輸出、輸入和列印2D和3D圖形檔案。該庫還支援許多向量和柵格輸入和輸出格式,包括本地PDF和SVG匯出。 VectorDraw web libr
快速掌握TeeChart繪圖控制元件攻略(C#)
在自己軟體開發過程中,常會用到繪圖控制元件,鑑於開發週期的限制,為了加快專案的開發效率,常選擇使用TeeChart圖表控制元件,快速將資料繪製成各式的曲線或圖表,直觀、形象地表示出資料傳遞出來的資訊,下面是小編為大家總結的TeeChart繪圖常用操作/屬性。 百度經驗:jingyan.ba
TeeChart替代品,MFC下好用的高速繪圖控制元件-(Hight-Speed Charting)
也許這是vc下最好最方便的繪圖類,它有TeeChart的繪圖和操作風格,不用當心註冊破解的問題,因為它是開源的。不用打包註冊,因為它是封裝成類的,能方便擴充套件繼承。vc6.0到vs2010都能使用,而且非常簡單。 在使用它的時候,展示一下它的效果吧: 如果
WPF 在繪圖控制元件(Shape)中新增文字 [2018.7.15]
原文: WPF 在繪圖控制元件(Shape)中新增文字 [2018.7.15] Q:使用Shape的子類Ellipse畫一個圓,如何在圓中新增文字? A:Shape類中不包含Text屬性。可使用Shape類和TextBlock類組合,放到Grid中來實現。 &n
C#開源繪圖控制元件Oxyplot
var model = new PlotModel { Title = "圖的標題" }; var scatterSeries = new ScatterSeries { MarkerType = MarkerType.Diamond , Title = "散點系列
第三方繪圖控制元件 AChartEngine 淺析
背景 當今越來越多的Android APP使用友好的介面與使用者互動,如圖所示的炒股類APP、財務報表類APP等。 可見,繪圖控制元件必不可少,Android系統提供瞭如下的繪圖工具: 2D圖形繪製 -Paint -Canvas 3D圖
qt超強繪圖控制元件qwt
qwt是一個基於LGPL版權協議的開源專案, 可生成各種統計圖。它為具有技術專業背景的程式提供GUI元件和一組實用類,其目標是以基於2D方式的窗體部件來顯示資料, 資料來源以數值,陣列或一組浮點數等方式提供, 輸出方式可以是Curves(曲線),Slider(滾動條),Di
利用OFFICE 2003 OWC 繪圖控制元件在.NET平臺下實現資料圖表的繪製
來源:蘭州大學網路教育學院 宋昀傑 馬青 劉江 摘要:OWC,即Office Web Components,是微軟隨Office提供的繪圖控制元件,設計的目的是為眾多的控制元件容器提供互動的電子表格建模,資料報表和資料視覺化功能。OWC庫包含四個主要的元件:電子表格元件
Android自定義view組合控制元件解析
##使用場景 在開發中,或許一個業務需求中會出現很多系統控制元件組合成的佈局,並且經常需要複用。 比如下圖中 qq或者微博的title欄,在一款app中,可能不同的介面 類似的view要出現很多次,這個時候 就可以設計自己的view控制元件,就稱為組合控制元件
MFC OnPaint中控制元件繪圖,覆蓋重疊的控制元件
對話方塊上又兩個控制元件,一個static控制元件SS_BITMAP屬性,用來繪圖(canvas),一個static控制元件SS_BITMAP屬性,用來顯示圖片(tool),tool和canvas有重疊部分,為了使canvas在重新整理後不至於消失,我在OnPaint中採用雙緩衝繪圖方式重新整理內容
C#控制元件繪圖恢復最小化後不自動重繪問題
最近在學習C#中的繪圖,使用控制元件繪圖時發現一個現象:即使將繪圖程式碼寫在了Paint方法中,將視窗最小化再恢復後依然不會重繪,而只有將滑鼠移到控制元件上或者有其他改變視窗的行為時才會重繪。 一開始以為是自己的方法不對,折騰了很久。後來老師說好像是作業系統的問題,個人觀察也是這樣,據我猜測可能是視窗恢復後
Kotlin直接使用控制元件ID原理解析
最近斷斷續續地把專案的介面部分的程式碼由JAva改成了Kotlin編寫,並且如果應用了kotlin-android-extensions外掛,一個顯而易見的好處是再也不用寫 findViewById()來例項化你的控制元件物件了,直接操作你在佈局檔案裡的id即可,這一點我感覺比butterknife做的還簡潔
RelativeLayout控制元件居中詳細解析(可能是最完美的方法)
在RelativeLayout中設定控制元件全部居中,需要注意在父佈局的一些細節設定即可,現在給出完美的解決方法,先看例項: <?xml version="1.0" encoding="utf-8"?> <RelativeLayout xml
Android RecyclerView 使用完全解析 體驗藝術般的控制元件
概述 RecyclerView出現已經有一段時間了,相信大家肯定不陌生了,大家可以通過匯入support-v7對其進行使用。 據官方的介紹,該控制元件用於在有限的視窗中展示大量資料集,其實這樣功能的控制元件我們並不陌生,例如:ListView、Gri
如何設計一個 iOS 控制元件? iOS 控制元件完全解析
程式碼的等級:可編譯、可執行、可測試、可讀、可維護、可複用 前言 一個控制元件從外在特徵來說,主要是封裝這幾點: 互動方式 顯示樣式 資料使用 對外在特徵的封裝,能讓我們在多種環境下達到 PM 對產品的要求,並且提到程式碼複用率,使維護工作保持在一個相對較小的範圍內;而
Atitit table的讀取解析from html by jsoup java html paresr 目錄 1. atitit.gui控制元件的定位與選擇器 1 2. 讀取表格流程 遍歷表格ta
Atitit table的讀取解析from html by jsoup java html paresr 目錄 1. atitit.gui控制元件的定位與選擇器 1 2. 讀取表格流程 遍歷表格table 2 3. W3cdom標準化 2
Qt之在控制元件上繪圖
1.總述 Qt的要在當前類對應的視窗上繪圖一般需要重寫paintEvent函式,但是Qt的事件過濾器預設是把父視窗下子控制元件的繪圖事件給過濾了的,因此重寫父視窗的paintEvent函式是無法在子控制元件上進行繪圖的,下面舉一個例子。 1 void MainWindow::m
ListView---一個神奇的控制元件原始碼解析
ListView—–一個神奇的控制元件 讓我們帶著一個問題來開始我們的ListView之旅。 為什麼ListView能夠顯示成千上萬條資料都不會OOM,而且消耗記憶體還基本保持恆定? View控制元件,就是為了互動和展示資料用的。對於其他View控制元件,