
Android Studio 表格佈局實現登入介面
在xml檔案中新增如下程式碼:
<TableLayout xmlns:android="http://schemas.android.com/apk/res/android"
android:id="@+id/tableLayout1"
android:layout_height="match_parent"
android:layout_width="match_parent"
android:gravity="center"
>
//第一行
<TableRow
android:id="@+id/tableRow1" 效果圖:
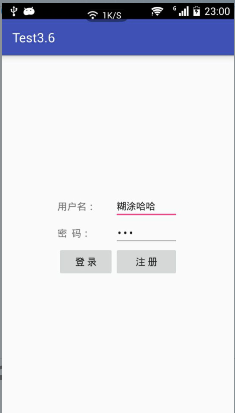
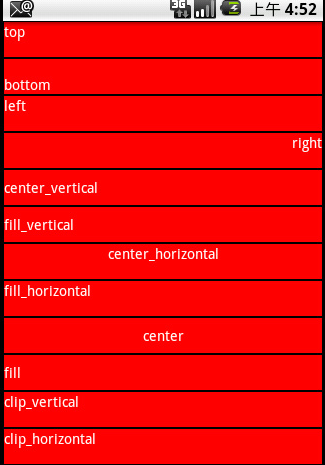
知識點:
1、gravity : 用於設定View中內容相對於View元件的對齊方式。其可選值有:top、bottom、left、right、fill_vertical、center_horizontal、center、fill、clip_vertical、clip_horizontal。這些值也可以同時指定,各屬性值用豎線隔開。例如靠右下角對其:right|bottom。
相關推薦
Android Studio 表格佈局實現登入介面
在xml檔案中新增如下程式碼: <TableLayout xmlns:android="http://schemas.android.com/apk/res/android" android:id="@+id/tableLayout1"
Android實現登入介面和功能例項
最近一個android小程式需要登入功能,我簡單實現了一下。現在記錄下來也當做個筆記,同時也希望可以相互學習。所以,如果我的程式碼有問題,還各位請提出來。多謝了! 下面,就簡述一下此例項的主要內容: 輸入使用者名稱和密碼 ,從本地檔案userinfo.json中讀取users。判斷此使
Android 記住密碼和自動登入介面的實現(SharedPreferences 的用法)
SharedPreferences介紹: SharedPreferences是Android平臺上一個輕量級的儲存類,主要是儲存一些常用的配置引數,它是採用xml檔案存放資料的,檔案存放在"/data/data<package name>/shared_pref
Android 實現登入介面和功能例項
最近一個android小程式需要登入功能,我簡單實現了一下。現在記錄下來也當做個筆記,同時也希望可以相互學習。所以,如果我的程式碼有問題,還各位請提出來。多謝了! 下面,就簡述一下此例項的主要內容: 輸入使用者名稱和密碼 ,從本地檔案user
如何Android studio 的佈局XML時預覽介面彈出的Rendering Problems?
如何Android studio 的佈局XML時預覽介面彈出的Rendering Problems? 問題圖預覽: 點選“Preview”預覽選單欄的“AppTheme”,從彈出的選單框中選
Android探索之路:實現登入介面的記住密碼功能
目的功能: 點選 記住密碼時,下次登入時,輸入賬號,密碼自動出現 下面是實現的主要過程: 1、註冊時,除了填寫使用者的一些資訊,還需要在資料庫中設一個欄位,用於判斷使用者是否已經註冊 private
Android Studio 使用Intent實現頁面的跳轉(帶參數)
col xtra ima alt main 都是 img mage android 不管是在APP,還是在網站中,頁面之間的跳轉都是很常見的,本文主要講一下在APP中,如何通過Intent實現頁面的跳轉。 不帶參數: 寫在MainActivity頁面的代碼: 1 In
android studio 使用zxing實現掃碼功能
1、新增依賴 在專案的build.gradle新增:maven { url 'https://jitpack.io' } allprojects { repositories { google() jcenter() maven { u
android 設計比較美觀的登入介面
登入介面的展示效果大概如此 一、編寫activity_main.xml檔案。程式碼如下: <?xml version="1.0" encoding="utf-8"?> <LinearLayout xmlns:android="http://schemas.
Android Studio 相對佈局/網格佈局
1. 相對佈局(RelativeLayout) 1.1 相對佈局視窗內子元件的位置總是相對兄弟元件、父容器來決定的,因此叫相對佈局 1.2 如果A元件位置是由B元件的位置決定的,Android要求先定B元件,再定義A元件 如果A元件位置是由
android studio中ToolBar實現標題欄
首先注意將values中的style類中改成NoActionBar <!-- Base application theme. --> <style name="AppTheme" parent="Theme.AppCompat.Light**.NoActionBar**
android studio抽獎轉盤實現
首先建立一個類,繼承view實現三個方法 package com.zhuanpan.turntable; import android.content.Context; import android.graphics.Canvas; import android.graphics.C
Android Studio-個推-實現簡單聊天(二)
實現聊天,首先要知道聊天雙方的CID,這裡可以獲取到,將其存起來。 這裡用模擬器測試一下,準備倆臺模擬器,分別獲得其CID;準備好聊天介面;注備好聊天介面,就可以測試了。 一、web後臺Contraller package com.smxy.office.con
Android studio layout佈局1
什麼是佈局 就是把介面中的控制元件按照某種規律擺放到指定的位置 佈局的二種實現 程式碼 xml配置檔案:res/layout目錄下 注:也可以同時使用xml和程式碼 佈局的基本屬性 設定背景顏色 android:background="@color/
Android studio layout佈局2
相對佈局(重點) 1.1 相對佈局視窗內子元件的位置總是相對兄弟元件、父容器來決定的,因此叫相對佈局 1.2 如果A元件位置是由B元件的位置決定的,Android要求先定B元件,再定義A元件 如果A元件位置是由B元件的位置決定的,Android要求先定B元件
Android Studio-個推-實現簡單聊天(三)
因為之前的是寫的主要程式碼,現在貼出全部程式碼,有些瑕疵,哈哈哈哈。那我現在開始貼程式碼吧 1.聊天實體類 (1)聊天實體類 ChatUser.java package com.smxy.lj.chat; import java.io.Serializable
Android 用純程式碼實現複雜介面
在開發Android應用時有時會遇到純程式碼實現複雜介面的需求,本文通過例項來演示,希望能對大家有所幫助介面截圖:XML佈局檔案:<?xml version="1.0" encoding="utf-8"?><ScrollView xmlns:andro
Android Studio中TextView實現跑馬燈效果
自建一個MarqueeText 類 繼承自AppCompatTextView並重載父類的三個構造方法,新增一個isFocused方法 public class MarqueeText extends AppCompatTextView { public Marque
Android studio 相對佈局常見屬性
一、相對佈局RelativeLayout 1. 相對佈局(重點):相對佈局是通過相對定位的方式讓控制元件出現在佈局任意位置; 在相對佈局中如果不指定控制元件擺放的位置,那麼控制元件都會被預設放在RelativeLayout的左上角。因此要先指定第一個控制元件的位置,
React利用路由實現登入介面的跳轉
React利用路由實現登入介面的跳轉 上一篇在配置好了webpack和react的環境後,接下來開始寫登入介面,以及接下來的跳轉到主頁的功能。 **1、首先看一下總體的目錄結構。**因為很多時候在看別人寫的例子的時候因為目錄結構不熟悉後邊會出現意想不到的岔子。 。 2、大體流程: 1)we