
WindowLess RichEdit 實現QQ聊天視窗的氣泡效果,設計思路和方法。
作為一個由WindowUi入門開始程式設計師之路的程式設計師還是比較好奇一些新UI效果實現的。
時下最流行的UI設計和開發,已經不再是原生的windows控制元件,也不是directui控制元件,更多的偏向於h5寫介面了。
但是我們公司產品的UI是我個人實現的一個directui庫,由於個人興趣當初一時興起實現的庫陰差陽錯的用於專案中了,現在即使想換成h5的也很難下手了。
directui對比h5而言不太靈活,功能遠沒有h5多,directui各個控制元件和功能都要自己實現,h5只要找一個瀏覽器殼就可以了簡單快速。
但是directui記憶體佔用少,執行效率高是優勢,所以一直沒有換掉directui庫。
以上是廢話,基於我個人依然偏向於用directui實現介面,也就一直在維護directui庫,作為較難的richedit控制元件一直比較頭疼,如何能像qq一樣的靈活和完善也是我一直追尋的,但是網上的一些資料比較少,也沒有什麼相對好的文章和技術介紹。 最近好奇qq的氣泡效果的實現,因為qq也是用windowsless richedit實現的聊天視窗,而且也是用的richedit2.0 只是加了一個附加dll做了一些擴充套件,我也是用richedit2.0了啊,實現不了那個氣泡效果 就很自卑啊。
剛實現好,有一些細節還沒調整,但是微調一下應該就可以實際應用了。
相應的QQ聊天視窗的其他訊息 用如下方法大致也可以實現。
這裡我目前實現的,通過複製貼上的方式在原有氣泡上修改氣泡也可以正常變大,但是輸入字元和撤銷氣泡會異常,要想解決這個需要攔截輸入變成插入,自己實現撤銷即可,由於我目前沒有這個需求暫時不進行擴充套件了。
可能很多人都有其他辦法可以實現了吧,這玩意如果用h5實現可能是小兒科了 這種實現也不難 如果有人還沒有實現辦法可以參考一下。
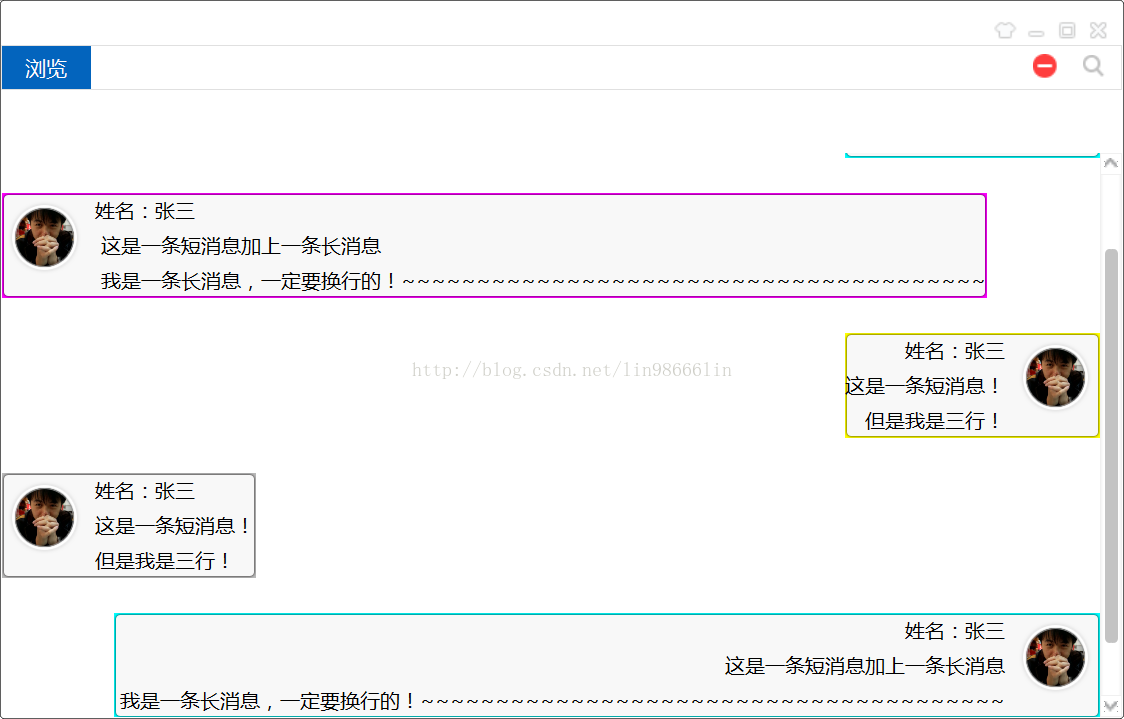
先來一個效果圖吧:
於是開始了蒐集資料 檢視別人的demo,檢視msdn,去翻看介面文件。
最後發現其實實現起來還是比較簡單的,本來想到的實現辦法不太靠譜效率太低 擔心會卡,但是程式碼實現之後發現還是很快的,可能我太小看CPU了吧
實現氣泡主要在於計算圖文混排資料的長度和寬度。
計算高度 就是比較大眾的辦法而且也沒有其他特殊通道好像,就是第一行第一個字元的左上角頂點和最後一個字元下一行左上角頂點之差,
寬度計算出最長一行的寬度即可。這裡就一個地方比較變態,如果一行太長自動換行了,那麼選中這一行的最後一個字元游標會定位到下一行的開頭而不是當前行的結尾,所以這裡需要注意一下,下面我發一下計算圖文資料範圍的程式碼
void CxRichEx::CalAsLeft(StBubbleInfo & sbi,CxRect const& xRect,CxSCROLLINFO const& sli)
{
	//背景專案應有的寬和高
	int iHigh  = 0;
	int iWidth = 0;

	//計算文字高度
	POINT ps = xRichEdit.CxPosFromChar(sbi.lStart);
	POINT pe = xRichEdit.CxPosFromChar(sbi.lEnd+1);
	iHigh = pe.y-ps.y;

	//計算文字寬度
	LONG ls = xRichEdit.GetLineFromIndex(sbi.lStart);
	LONG le = xRichEdit.GetLineFromIndex(sbi.lEnd);

	if(ls!=le) {
		//如果是多行文字
		//計算第一個字元x座標
		xRichEdit.CxSetSel(sbi.lStart,sbi.lStart);
		int iLeft = xRichEdit.GetCurTargetX();
		for (int i=ls;i<=le;i++) {
			int iIndex = xRichEdit.GetLineIndex(i);
			int iLineLen = xRichEdit.GetLineLenght(iIndex);
			if(iLineLen==0)continue;
			int iLast = iIndex+iLineLen;
			xRichEdit.CxSetSel(iLast,iLast);
			int iRight = xRichEdit.GetCurTargetX();
			if(iRight<=iLeft) {
				iWidth = xRect.Width();
				break;
			}
			else {
				iWidth = CxMax(iRight-xRect.left,iWidth);
			}
		}
	}
	else {
		//如果為單行文字
		//寬度直接計算得出
		xRichEdit.CxSetSel(sbi.lStart,sbi.lStart);
		iWidth = xRect.right-xRichEdit.GetCurTargetX();
	}

	//計算控制元件位置
	CxRect rcRelative;
	rcRelative.left = xRect.left;
	rcRelative.top  = ps.y-xRect.top+sli.nPos;

	//調整控制元件位置
	rcRelative.top -= xRcFlate.top;
	iHigh += xRcFlate.top+xRcFlate.bottom;
	iWidth = CxMin(xRect.Width(),iWidth+xRcFlate.left+xRcFlate.right);

	sbi.pBubble->SetParentAdjust(CxRect(0,-sli.nPos,0,0),false);
	sbi.pBubble->SetRelPosition(rcRelative,false);
	sbi.pBubble->ClearRect();
	sbi.pBubble->SetCtrlSize(CxSize(iWidth,iHigh));
	sbi.pBubble->SetAdjust(true);
}

void CxRichEx::CalAsRight(StBubbleInfo& sbi,CxRect const& xRect,CxSCROLLINFO const& sli)
{
	//背景專案應有的寬和高
	int iHigh  = 0;
	int iWidth = 0;

	//計算文字高度
	POINT ps = xRichEdit.CxPosFromChar(sbi.lStart);
	POINT pe = xRichEdit.CxPosFromChar(sbi.lEnd+1);
	iHigh = pe.y-ps.y;

	//計算文字寬度
	LONG ls = xRichEdit.GetLineFromIndex(sbi.lStart);
	LONG le = xRichEdit.GetLineFromIndex(sbi.lEnd);

	if(ls!=le) {
		//多行文字
		//計算第一個字元x座標
		for (int i=ls;i<=le;i++) {
			int iIndex = xRichEdit.GetLineIndex(i);
			xRichEdit.CxSetSel(iIndex,iIndex);
			int iLeft = xRichEdit.GetCurTargetX();
			iWidth = CxMax(xRect.right-iLeft,iWidth);
		}
	}
	else {
		//如果為單行文字
		//寬度直接計算得出
		xRichEdit.CxSetSel(sbi.lStart,sbi.lStart);
		iWidth = CxMax(xRect.right- xRichEdit.GetCurTargetX(),iWidth);
	}


	//計算控制元件位置
	CxRect rcRelative;
	rcRelative.top   = ps.y-xRect.top+sli.nPos;
	//調整控制元件位置
	rcRelative.top -= xRcFlate.top;
	iHigh += xRcFlate.top+xRcFlate.bottom;
	iWidth = CxMin(xRect.Width(),iWidth+xRcFlate.left+xRcFlate.right);
	rcRelative.left = -iWidth;

	sbi.pBubble->SetParentAdjust(CxRect(0,-sli.nPos,0,0),false);
	sbi.pBubble->SetRelPosition(rcRelative,false);
	sbi.pBubble->ClearRect();
	sbi.pBubble->SetCtrlSize(CxSize(iWidth,iHigh));
	sbi.pBubble->SetAdjust(true);
}

void CxRichEx::RejustBubble(StBubbleInfo& sbi,CxRect const& xRect,CxSCROLLINFO const& sli)
{
	//獲取原本選中的位置
	LONG lsStart = 0;
	LONG lsEnd = 0;
	xRichEdit.CxGetSel(lsStart,lsEnd);

	//判斷是是右對齊還是左對齊
	xRichEdit.CxSetSel(sbi.lStart,sbi.lEnd);
	PARAFORMAT2 pf;
	ZeroMemory(&pf,sizeof(pf));
	pf.dwMask = PFM_ALIGNMENT|PFM_STARTINDENT|PFM_RIGHTINDENT;
	xRichEdit.GetParaFormat(pf);
	sbi.bLeftAlignment = (pf.wAlignment==PFA_LEFT);
	sbi.lIndent = pf.dxStartIndent;
	sbi.rIndent = pf.dxRightIndent;

	if(sbi.bLeftAlignment)
		CalAsLeft(sbi,xRect,sli);
	else
		CalAsRight(sbi,xRect,sli);

	//設定回原來的選中區域
	xRichEdit.CxSetSel(lsStart,lsEnd);
}
當計算出了長度和寬度之後就是定位 就是在這個位置插入一個控制元件,插入一個自己實現的TAB容器,在StBubbleInfo內儲存字元氣泡開始位置和截止位置,控制元件指標等必要資訊。 接著調整控制元件位置,調整時機:richedit位置和大小變化,滾動條發生變化 ,內容發生變化(計算受影響氣泡位置和大小)。
這裡的CxRichedit是我基於Windowless Richedit的封裝,內部基於ITextServices 和ITextHost的封裝,大家根據呼叫介面名 應該可以知道我函式內部的實現了。
由於當初專案的需要 使用的時機不太合適,所以我控制元件庫內部實現程式碼有一些比較混亂,而且訊息回撥使用了boost庫和loki庫的仿函式,現在很少有人能用得上了。
所以其他程式碼不發了,大家根據函式名自己實現即可。
這裡 我把文字進行縮排60畫素 然後插入一個我自己實現的TAB,外部插入氣泡後獲取TAB指標,進行任何個性化設定,所有的控制元件都可以插入到TAB中,同樣也可以響應按鍵等訊息。
氣泡實現的核心程式碼:
RichEx.h
#ifndef __CxRichEx_h__
#define __CxRichEx_h__


class CxRichEx;
class CxRichEdit;

class CxCheckBubble
{
public:
	CxCheckBubble(CxRichEdit& re,CxRichEx& xree,bool bBb);
	~CxCheckBubble();

private:
	long lStart;
	bool bBubble;
	CxRichEx& xRichEx;
	CxRichEdit& xRichedit;
};

class CxRejustBubble
{
public:
	CxRejustBubble(CxRichEdit& re,CxRichEx& xree,bool bBb);
	~CxRejustBubble();

private:
	long lStart;
	long lEnd;
	LONG lNowLong;
	bool bBubble;
	CxRichEx& xRichEx;
	CxRichEdit& xRichedit;
};

class CxRichEx
	: public IRichEx
{
public:
	CxRichEx(CxRichEdit& re);
	~CxRichEx();

	/**
	* @新增氣泡資訊
	*/
	void AddBubble(StBubbleInfo& sbi);

	/**
	* @繪製氣泡
	*/
	void DrawBubble(GDIPlus& graph,RECT const& rcHost,RECT const& rcClip);

	/**
	* @重新調節所有氣泡位置
	*/
	void RejustBubble();

	/**
	* @重新調節指定氣泡位置
	*/
	void RejustBubble(StBubbleInfo& sbi,CxRect const& xRect,CxSCROLLINFO const& sli);

	/**
	* @重新調節指定氣泡位置
	*/
	void ScrollBubble();

	/**
	* @重新調節指定氣泡位置
	*/
	void ScrollBubble(StBubbleInfo const& sbi,CxSCROLLINFO const& sli);

	/**
	* @設定下次是否重新計算位置
	*/
	void SetAdJust(bool bAdjust);

	/**
	* @調整選中的段落
	*/
	void RejustSelect();

	/**
	* @內容發生了變化
	*/
	void ContentChange(long lStart,long lEnd,long lDiff);

	/**
	* @查詢氣泡物件
	*  引數為氣泡索引
	*/
	CxTab* GetBubble(int iIndex);

	/**
	* @查詢氣泡物件
	*  引數為氣泡索引
	*/
	StBubbleInfo* GetBubbleInfo(int iIndex);

	/**
	* @設定控制元件四個方向各自放大畫素
	*/
	void SetFlate(CxRect const& rcFlate);

	/**
	* @獲取控制元件四個方向各自放大畫素
	*/
	CxRect const& GetFlate();

private:
	/**
	* @左對齊計算控制元件大小
	*/
	void CalAsLeft(StBubbleInfo& sbi,CxRect const& xRect,CxSCROLLINFO const& sli);

	/**
	* @右對齊計算控制元件大小
	*/
	void CalAsRight(StBubbleInfo& sbi,CxRect const& xRect,CxSCROLLINFO const& sli);

	/**
	* @釋放控制元件空間
	*/
	void Release();

private:
	CxRect xRcFlate; //標記四個方向各自放大畫素
	std::list<StBubbleInfo*> lBubbleInfo;
	CxRichEdit& xRichEdit;
};


#endif
RichEx.cpp
#include "CxUiLib.h"
#include "CxRichEx.h"

/**************************************************************************
* Add by: [email protected]
* Describe:
*
**************************************************************************/
CxCheckBubble::CxCheckBubble(CxRichEdit& re,CxRichEx& xree,bool bBb)
: xRichedit(re)
, xRichEx(xree)
, bBubble(bBb)
{
	if(!bBubble)return;
	lStart = xRichedit.GetTextLength();
}
CxCheckBubble::~CxCheckBubble()
{
	if(!bBubble)return;
	long lEnd = xRichedit.GetTextLength();
	xRichedit.CxInsertText(lEnd,_T("\r\n"),true);
	StBubbleInfo sbi;
	sbi.lStart = lStart;
	sbi.lEnd   = lEnd;
	xRichEx.AddBubble(sbi);
}
/**************************************************************************
* Add by: [email protected]
* Describe:
*
**************************************************************************/
CxRejustBubble::CxRejustBubble(CxRichEdit& re,CxRichEx& xree,bool bBb)
: xRichedit(re)
, xRichEx(xree)
, bBubble(bBb)
{
	if(bBubble) {
		xRichedit.CxGetSel(lStart,lEnd);
		lNowLong  = xRichedit.GetTextLength();
	}
}

CxRejustBubble::~CxRejustBubble()
{
	if(bBubble) {
		long lNewLong  = xRichedit.GetTextLength();
		xRichEx.ContentChange(lStart,lEnd,lNewLong-lNowLong);
	}
}

/**************************************************************************
* Add by: [email protected]
* Describe:
*
**************************************************************************/
StBubbleInfo::StBubbleInfo()
: lStart(0)
, lEnd(0)
, pBubble(NULL)
, bLeftAlignment(true)
, lIndent(0)
, rIndent(0)
{

}

/**************************************************************************
* Add by: [email protected]
* Describe:
*
**************************************************************************/
CxRichEx::CxRichEx(CxRichEdit& re)
: xRichEdit(re)
{

}
CxRichEx::~CxRichEx()
{
	Release();
}

Color cv[4]={Color(255,255,255,0),Color(255,185,185,185),Color(255,0,255,255),Color(255,255,0,255)};
//新增氣泡資訊
void CxRichEx::AddBubble(StBubbleInfo& sbi)
{
	static int i=1;
	i++;
	CxTab* pBubble = new CxTab();
	pBubble->SetParent(xRichEdit.GetWnd(),xRichEdit.GetPaintCenter());
	pBubble->CxSetBkColor(cv[i%4],cv[i%4],cv[i%4],cv[i%4]);
	StBubbleInfo* pStBbInfo = new StBubbleInfo();
	*pStBbInfo = sbi;
	pStBbInfo->pBubble = pBubble;
	lBubbleInfo.push_back(pStBbInfo);
	CxRect xRect = xRichEdit.GetContentRect();
	CxSCROLLINFO sli;
	xRichEdit.CxGetScrollInfo(sli,CXSB_VERT);
	RejustBubble(*pStBbInfo,xRect,sli);
}

void CxRichEx::DrawBubble(GDIPlus& graph,RECT const& rcHost,RECT const& rcClip)
{
	for (std::list<StBubbleInfo*> ::iterator _it=lBubbleInfo.begin();
		_it!=lBubbleInfo.end();_it++) {
			StBubbleInfo* pBbi = (StBubbleInfo*)*_it;
			IFISNULLCONTINUE(pBbi);
			pBbi->pBubble->CxDrawSelf(graph,rcHost,rcClip);
	}
}

void CxRichEx::RejustBubble()
{
	CxRect xRect = xRichEdit.GetContentRect();
	CxSCROLLINFO sli;
	xRichEdit.CxGetScrollInfo(sli,CXSB_VERT);
	for (std::list<StBubbleInfo*> ::iterator _it=lBubbleInfo.begin();
		_it!=lBubbleInfo.end();_it++) {
			StBubbleInfo* pBbi = (StBubbleInfo*)*_it;
			IFISNULLCONTINUE(pBbi);
			RejustBubble(*pBbi,xRect,sli);
	}
}

void CxRichEx::CalAsLeft(StBubbleInfo & sbi,CxRect const& xRect,CxSCROLLINFO const& sli)
{
	//背景專案應有的寬和高
	int iHigh  = 0;
	int iWidth = 0;

	//計算文字高度
	POINT ps = xRichEdit.CxPosFromChar(sbi.lStart);
	POINT pe = xRichEdit.CxPosFromChar(sbi.lEnd+1);
	iHigh = pe.y-ps.y;

	//計算文字寬度
	LONG ls = xRichEdit.GetLineFromIndex(sbi.lStart);
	LONG le = xRichEdit.GetLineFromIndex(sbi.lEnd);

	if(ls!=le) {
		//如果是多行文字
		//計算第一個字元x座標
		xRichEdit.CxSetSel(sbi.lStart,sbi.lStart);
		int iLeft = xRichEdit.GetCurTargetX();
		for (int i=ls;i<=le;i++) {
			int iIndex = xRichEdit.GetLineIndex(i);
			int iLineLen = xRichEdit.GetLineLenght(iIndex);
			if(iLineLen==0)continue;
			int iLast = iIndex+iLineLen;
			xRichEdit.CxSetSel(iLast,iLast);
			int iRight = xRichEdit.GetCurTargetX();
			if(iRight<=iLeft) {
				iWidth = xRect.Width();
				break;
			}
			else {
				iWidth = CxMax(iRight-xRect.left,iWidth);
			}
		}
	}
	else {
		//如果為單行文字
		//寬度直接計算得出
		xRichEdit.CxSetSel(sbi.lStart,sbi.lStart);
		iWidth = xRect.right-xRichEdit.GetCurTargetX();
	}

	//計算控制元件位置
	CxRect rcRelative;
	rcRelative.left = xRect.left;
	rcRelative.top  = ps.y-xRect.top+sli.nPos;

	//調整控制元件位置
	rcRelative.top -= xRcFlate.top;
	iHigh += xRcFlate.top+xRcFlate.bottom;
	iWidth = CxMin(xRect.Width(),iWidth+xRcFlate.left+xRcFlate.right);

	sbi.pBubble->SetParentAdjust(CxRect(0,-sli.nPos,0,0),false);
	sbi.pBubble->SetRelPosition(rcRelative,false);
	sbi.pBubble->ClearRect();
	sbi.pBubble->SetCtrlSize(CxSize(iWidth,iHigh));
	sbi.pBubble->SetAdjust(true);
}

void CxRichEx::CalAsRight(StBubbleInfo& sbi,CxRect const& xRect,CxSCROLLINFO const& sli)
{
	//背景專案應有的寬和高
	int iHigh  = 0;
	int iWidth = 0;

	//計算文字高度
	POINT ps = xRichEdit.CxPosFromChar(sbi.lStart);
	POINT pe = xRichEdit.CxPosFromChar(sbi.lEnd+1);
	iHigh = pe.y-ps.y;

	//計算文字寬度
	LONG ls = xRichEdit.GetLineFromIndex(sbi.lStart);
	LONG le = xRichEdit.GetLineFromIndex(sbi.lEnd);

	if(ls!=le) {
		//多行文字
		//計算第一個字元x座標
		for (int i=ls;i<=le;i++) {
			int iIndex = xRichEdit.GetLineIndex(i);
			xRichEdit.CxSetSel(iIndex,iIndex);
			int iLeft = xRichEdit.GetCurTargetX();
			iWidth = CxMax(xRect.right-iLeft,iWidth);
		}
	}
	else {
		//如果為單行文字
		//寬度直接計算得出
		xRichEdit.CxSetSel(sbi.lStart,sbi.lStart);
		iWidth = CxMax(xRect.right- xRichEdit.GetCurTargetX(),iWidth);
	}


	//計算控制元件位置
	CxRect rcRelative;
	rcRelative.top   = ps.y-xRect.top+sli.nPos;
	//調整控制元件位置
	rcRelative.top -= xRcFlate.top;
	iHigh += xRcFlate.top+xRcFlate.bottom;
	iWidth = CxMin(xRect.Width(),iWidth+xRcFlate.left+xRcFlate.right);
	rcRelative.left = -iWidth;

	sbi.pBubble->SetParentAdjust(CxRect(0,-sli.nPos,0,0),false);
	sbi.pBubble->SetRelPosition(rcRelative,false);
	sbi.pBubble->ClearRect();
	sbi.pBubble->SetCtrlSize(CxSize(iWidth,iHigh));
	sbi.pBubble->SetAdjust(true);
}

void CxRichEx::RejustBubble(StBubbleInfo& sbi,CxRect const& xRect,CxSCROLLINFO const& sli)
{
	//獲取原本選中的位置
	LONG lsStart = 0;
	LONG lsEnd = 0;
	xRichEdit.CxGetSel(lsStart,lsEnd);

	//判斷是是右對齊還是左對齊
	xRichEdit.CxSetSel(sbi.lStart,sbi.lEnd);
	PARAFORMAT2 pf;
	ZeroMemory(&pf,sizeof(pf));
	pf.dwMask = PFM_ALIGNMENT|PFM_STARTINDENT|PFM_RIGHTINDENT;
	xRichEdit.GetParaFormat(pf);
	sbi.bLeftAlignment = (pf.wAlignment==PFA_LEFT);
	sbi.lIndent = pf.dxStartIndent;
	sbi.rIndent = pf.dxRightIndent;

	if(sbi.bLeftAlignment)
		CalAsLeft(sbi,xRect,sli);
	else
		CalAsRight(sbi,xRect,sli);

	//設定回原來的選中區域
	xRichEdit.CxSetSel(lsStart,lsEnd);
}


void CxRichEx::ScrollBubble()
{
	CxSCROLLINFO sli;
	xRichEdit.CxGetScrollInfo(sli,CXSB_VERT);
	for (std::list<StBubbleInfo*> ::iterator _it=lBubbleInfo.begin();
		_it!=lBubbleInfo.end();_it++) {
			StBubbleInfo* pBbi = (StBubbleInfo*)*_it;
			IFISNULLCONTINUE(pBbi);
			ScrollBubble(*pBbi,sli);
	}
}


void CxRichEx::ScrollBubble(StBubbleInfo const& sbi,CxSCROLLINFO const& sli)
{
	sbi.pBubble->SetAdjust(true);
	sbi.pBubble->SetParentAdjust(CxRect(0,-sli.nPos,0,0),false);
}

void CxRichEx::Release()
{
	for (std::list<StBubbleInfo*> ::iterator _it=lBubbleInfo.begin();
		_it!=lBubbleInfo.end();_it++) {
			StBubbleInfo* pBbi = (StBubbleInfo*)*_it;
			IFISNULLCONTINUE(pBbi);
			SafeDelete(pBbi->pBubble);
			SafeDelete(pBbi);
	}
	lBubbleInfo.clear();
}

CxTab* CxRichEx::GetBubble(int iIndex)
{
	CxTab* pTab = NULL;
	for (std::list<StBubbleInfo*> ::iterator _it=lBubbleInfo.begin();
		!pTab&&_it!=lBubbleInfo.end();_it++) {
			StBubbleInfo* pBbi = (StBubbleInfo*)*_it;
			IFISNULLCONTINUE(pBbi);
			if(iIndex>=pBbi->lStart&&iIndex<=pBbi->lEnd)
				pTab = pBbi->pBubble;
	}
	return pTab;
}

StBubbleInfo* CxRichEx::GetBubbleInfo(int iIndex)
{
	StBubbleInfo* pResult = NULL;
	for (std::list<StBubbleInfo*> ::iterator _it=lBubbleInfo.begin();
		!pResult&&_it!=lBubbleInfo.end();_it++) {
			StBubbleInfo* pBbi = (StBubbleInfo*)*_it;
			IFISNULLCONTINUE(pBbi);
			if(iIndex>=pBbi->lStart&&iIndex<=pBbi->lEnd)
				pResult = pBbi;
	}
	return pResult;
}

void CxRichEx::SetAdJust(bool bAdjust)
{
	for (std::list<StBubbleInfo*> ::iterator _it=lBubbleInfo.begin();
		_it!=lBubbleInfo.end();_it++) {
			StBubbleInfo* pBbi = (StBubbleInfo*)*_it;
			IFISNULLCONTINUE(pBbi);
			IFISNULLCONTINUE(pBbi->pBubble);
			pBbi->pBubble->SetAdjust(bAdjust);
	}
}

void CxRichEx::SetFlate(CxRect const& rcFlate)
{
	xRcFlate = CxRectTurnx(rcFlate);
}

CxRect const& CxRichEx::GetFlate()
{
	return xRcFlate;
}

void CxRichEx::ContentChange(long lStart,long lEnd,long lDiff)
{
	bool bHaveFindIn = false;
	CxRect xRect = xRichEdit.GetContentRect();
	CxSCROLLINFO sli;
	xRichEdit.CxGetScrollInfo(sli,CXSB_VERT);

	for (std::list<StBubbleInfo*> ::iterator _it=lBubbleInfo.begin();
		_it!=lBubbleInfo.end();_it++) {
			StBubbleInfo* pBbi = (StBubbleInfo*)*_it;
			IFISNULLCONTINUE(pBbi);
			if(pBbi->lEnd<lStart)continue;
			//如果節點在選中節點上面
			//則雙偏移
			if(lStart<pBbi->lEnd) {
				if(lStart<pBbi->lStart)
					pBbi->lStart += lDiff;
				pBbi->lEnd += lDiff;
				RejustBubble(*pBbi,xRect,sli);
			}
	}
}
/******************************************
如果選中範圍與節點有交集則調整
******************************************/
void CxRichEx::RejustSelect()
{
	LONG lStart = 0;
	LONG lEnd = 0;
	xRichEdit.CxGetSel(lStart,lEnd);
	CxRect xRect = xRichEdit.GetContentRect();

	CxSCROLLINFO sli;
	xRichEdit.CxGetScrollInfo(sli,CXSB_VERT);

	for (std::list<StBubbleInfo*> ::iterator _it=lBubbleInfo.begin();
		_it!=lBubbleInfo.end();_it++) {
			StBubbleInfo* pBbi = (StBubbleInfo*)*_it;
			IFISNULLCONTINUE(pBbi);
			if(lEnd<pBbi->lStart)continue;
			if(lStart>pBbi->lEnd)continue;
			RejustBubble(*pBbi,xRect,sli);
	}

	xRichEdit.CxSetSel(lStart,lEnd);
}
相關推薦
WindowLess RichEdit 實現QQ聊天視窗的氣泡效果,設計思路和方法。
作為一個由WindowUi入門開始程式設計師之路的程式設計師還是比較好奇一些新UI效果實現的。 時下最流行的UI設計和開發,已經不再是原生的windows控制元件,也不是directui控制元件,更多的偏向於h5寫介面了。 但是我們公司產品的UI是我個人實現的一個di
使用css實現QQ聊天氣泡效果
這是效果圖~ html程式碼: <div class="bubbleDiv"> <div class="bubbleItem"> <!--左側的泡泡--> <span cla
11 TCP實現QQ聊天
odin 其他 close send 發送 rec lis socket raw_input 1.客戶端參考代碼 #coding=utf-8 from socket import * # 創建socket tcpClientSocket = socket(AF_IN
【打死不做程式設計師】python3+qqBot+圖靈機器人實現qq聊天機器人
原理: 通過Python3的qqBot開源庫,基於騰訊的smartQQ協議登入個人QQ,實現監控、收集QQ訊息,進而通過圖靈機器人API接入方式實現自動聊天。 零、前期準備: 1、Python3 2、qqBot & requests & re 3、
html用vue實現模擬聊天視窗
模擬一個人跟自己聊天 < html> 格式省略 <style type="text/css"> .talk_con1{ width:600px; height:500px; border:1px soli
vue實現簡單聊天視窗
構建: 輸入:input 提交:button 歷史訊息展示:ul 實現: 資料展示到介面:data 介面資料動態變化:操作data 資料重新整理: this.data = value <div id="app">
實現qq聊天客服
一行程式碼搞定 <a href="tencent://message/?uin=2581712594&Site=線上QQ&Menu=yes"> <img border="0" src="http://wpa.qq.com/pa?
自定義view系列(5)--99.99%實現QQ側滑刪除效果
首先宣告本文是基於GitHub上"baoyongzhang"的SwipeMenuListView修改而來, 可以說這個側滑刪除效果是我見過效果最好且比較靈活的專案,沒有之一!!! 但是在使用它之前需要給大家提兩點注意事項: 1,該專案支援Gradle dependence
HTML,CSS,JS實現網頁聊天視窗
<!DOCTYPE html> <html lang="en"> <head> <meta charset="UTF-8"> <me
android手把手教你實現QQ側滑選單效果
側滑選單功能非常常見,借鑑學習了之後,自己總結記錄一下,下面實現一種最簡單的側滑選單,後面再修改程式碼實現不同的側滑選單效果 首先是第一種效果 第一種效果是繼承ViewGroup,需要我們自己來測量、滑動處理等。 一、首先講解一下思路: 1、繼承GroupView重
jQuery實現QQ空間圖片展示效果
[ { "id": "1.jpg", "title": "圖片1", "user": "M.J", "avatar": "http://0.gravatar.com/avatar/8a97a5bce
java實現qq聊天室功能
一下是伺服器端原始碼,供大家參考 下面是main.javapackage com; public class Main { public static void main(String args[]) { new ServerListener().start();
websocket實現QQ聊天一之二(UI js編寫)
今天說明一下 websocket實現QQ聊天js程式碼 說明:根據自己實際情況編寫,但是萬變不離這幾個狀態,建議將它封裝為單獨的js檔案,引入 function setMessageInnerHTML(data) { $('.newsList').append(d
獲得qq聊天視窗的控制代碼並使好友視窗獲得焦點
為往群裡面頻繁傳送貼上板內容做些準備,win7,64位下通過。 import com.sun.jna.Native; import com.sun.jna.platform.win32.WinDef.HWND; import com.sun.jna.win32.StdCal
解決:按截圖 ctrl+alt+a QQ聊天視窗就自動最小化(QQ以外的可以截圖)
maven/Java/web/bootstrap/dataTable/app開發QQ群:566862629。希望更多人一起幫助我學習。 一、問題如題 ,想截圖QQ聊天記錄都不行 二、 解決方法
Web網站HTML開啟QQ聊天視窗示例
核心程式碼:tencent://message/?uin=這填qq號&Site=Sambow&Menu=yesHTML:<!DOCTYPE html> <html>
使用 ActiveMQ 中介軟體 實現訊息傳遞可以實現QQ聊天
1.這是使用ActiveMQ 中介軟體的jar包 activemq-all-5.4.2.jar 來實現的訊息傳送與接受的Demo(完全原創的哈..): 2.請大家多多指教: 3. 4./** 5. * 啟動ActiveMQ內建服務 6. * 7. * @auth
html5 postMessage 實現類似 sendMessage 的同步效果,支持跨域
ase HA input itl ner button () function inpu 實現一個客戶端發送 “1+2“ 跨域的另一個頁面中,回調返回”3“的場景。 客戶端:請在 http://127.0.0.1/pk/in
JS 實現監聽視窗大小改變,同時根據視窗大小修改某個元素的大小
文章來自:原始碼線上https://shengli.me/javascript/234.html jQuery的方法: 以上的方法,不能寫在頁面載入完成事件函式$(function(){})內部,而需要寫在外面。 頁面載入完成事件: &
Android實現背景透明度漸變的效果,類似於分享底部的彈出框
實現背景透明度漸變的效果,類似於分享底部的彈出框 這是公司最近寫的一個專案,其中的一個自定義分享模組,剛開始實現的效果比較簡單,背景透明度沒有漸變,而是隨著底部分享的彈出框而一起彈出,看起來比較生硬,使用者體驗不是很好,現在要實現的效果就是類似於SharedS