Android開發之深入理解Android 7.0系統許可權更改相關文件
摘要:
Android 6.0之後的版本增加了執行時許可權,應用程式在執行每個需要系統許可權的功能時,需要新增許可權請求程式碼(預設許可權禁止),否則應用程式無法響應;Android 7.0在Android 6.0的基礎上,對系統許可權進一步更改,這次的許可權更改包括三個方面:
- APP應用程式的私有檔案不再向使用者放寬
- Intent元件傳遞
file://URI的方式可能給接收器留下無法訪問的路徑,觸發FileUriExposedException異常,推薦使用FileProvider DownloadManager不再按檔名分享私人儲存的檔案。舊版應用在訪問COLUMN_LOCAL_FILENAME時可能出現無法訪問的路徑。面向 Android 7.0 或更高版本的應用在嘗試訪問 COLUMN_LOCAL_FILENAME 時會觸發 SecurityException
簡單的三句話,無法讓TeachCourse真正理解Android 7.0系統許可權更改的含義,如果不按照文件的方式去做,API 24開發的應用程式是否就用不了?
一、深入理解FileProvider
FileProvider屬於Android 7.0新增的一個類,該類位於v4包下,詳情可見android.support.v4.content.FileProvider,使用方法類似與ContentProvider,簡單概括為三個步驟,這裡先以呼叫系統相機拍照並儲存sdcard
- 在資原始檔夾
res/xml下新建file_provider.xml檔案,檔案宣告許可權請求的路徑,程式碼如下:
<?xml version="1.0" encoding="utf-8"?>
    <paths xmlns:android="http://schemas.android.com/apk/res/android">
        <!--3、對應外部記憶體卡根目錄:Environment.getExternalStorageDirectory()-->
        <external-path name="ext_root" path="/" />
    </paths>
- 在
AndroidManifest.xml新增元件provider相關資訊,類似元件activity,指定resource屬性引用上一步建立的xml檔案(後面會詳細介紹各個屬性的用法),程式碼如下:
    <!-- 定義FileProvider -->
    <provider
        android:name="android.support.v4.content.FileProvider"
        android:authorities="@string/install_apk_path"
        android:exported="false"
        android:grantUriPermissions="true">
        <meta-data
            android:name="android.support.FILE_PROVIDER_PATHS"
            android:resource="@xml/file_provider" />
</provider>- 最後一步,Java程式碼申請許可權,使用新增的方法
getUriForFile()和grantUriPermission(),程式碼如下(後面會詳細介紹方法對應引數的使用):
    if (Build.VERSION.SDK_INT > 23) {
        /**Android 7.0以上的方式**/
        Uri contentUri = getUriForFile(this, getString(R.string.install_apk_path), file);
        grantUriPermission(getPackageName(), contentUri, Intent.FLAG_GRANT_WRITE_URI_PERMISSION);
        intent.putExtra(MediaStore.EXTRA_OUTPUT, contentUri);
} - 修改
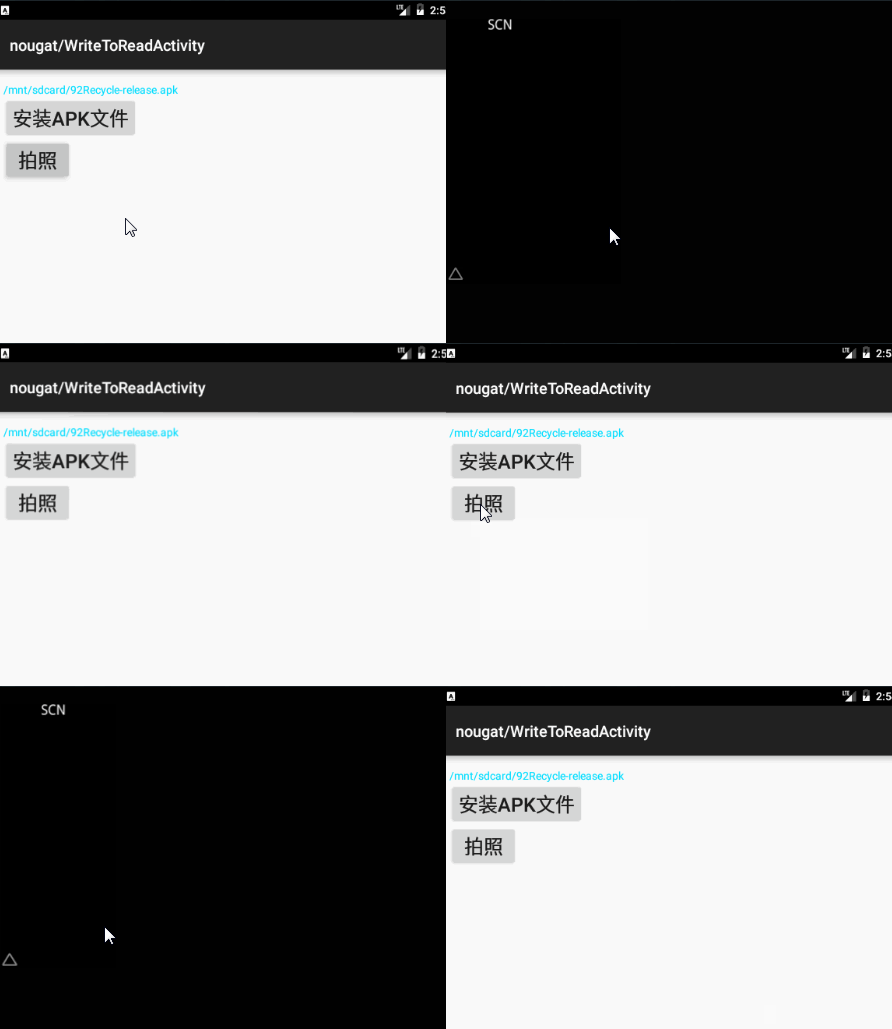
build.gradle檔案compileSdkVersion大於或等於24,targetSdkVersion等於24,使用Android 7.0模擬器執行Demo,效果圖:

那麼,我們已經瞭解Android 7.0系統許可權申請的步驟,接下來說明每一個步驟需要注意的事項、相關方法引數的說明、屬性的含義以及可以的申請許可權目錄(最後下載相關Demo)。
1.1 定義一個FileProvider
直接使用FileProvider本身或者它的子類,需要在AndroidManifest.xml檔案中宣告元件的相關屬性,包括:
android:name,對應屬性值:android.support.v4.content.FileProvider或者子類完整路徑android:authorities,對應屬性值是一個常量,通常定義的方式packagename.fileprovider,例如:cn.teachcourse.fileproviderandroid:exported,對應屬性值是一個boolean變數,設定為falseandroid:grantUriPermissions,對應屬性值也是一個boolean變數,設定為true,允許獲得檔案臨時的訪問許可權
<manifest>
    ...
    <application>
        ...
        <provider
            android:name="android.support.v4.content.FileProvider"
            android:authorities="com.mydomain.fileprovider"
            android:exported="false"
            android:grantUriPermissions="true">
            ...
        </provider>
        ...
    </application>
</manifest>想要關聯res/xml資料夾下建立的file_provider.xml檔案,需要在<provider>標籤內,新增<meta-data>子標籤,設定<meta-data>標籤的屬性值,包括:
android:name,對應屬性值是一個固定的系統常量android.support.FILE_PROVIDER_PATHSandroid:resource,對應屬性值指向我們的xml檔案@xml/file_provider
<provider
    android:name="android.support.v4.content.FileProvider"
    android:authorities="com.mydomain.fileprovider"
    android:exported="false"
    android:grantUriPermissions="true">
    <meta-data
        android:name="android.support.FILE_PROVIDER_PATHS"
        android:resource="@xml/file_provider" />
</provider>
1.2 指定授予臨時訪問許可權的檔案目錄
上一步說明了怎麼定義一個FileProvider,這一步主要說明怎麼定義一個@xml/file_provider檔案。Android Studio或Eclipse開發工具建立Android專案的時候預設不會建立res/xml資料夾,需要開發者手動建立,點選res資料夾新建目錄,命名xml,如下圖:

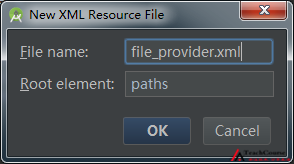
然後,在xml資料夾下新建一個xml檔案,檔案命名file_provider.xml,指定根標籤為paths,如下圖:

在xml檔案中指定檔案儲存的區塊和區塊的相對路徑,在<paths>根標籤中新增<files-path>子標籤(稍後詳細列出所有子標籤),設定子標籤的屬性值,包括:
name,是一個虛設的檔名(可以自由命名),對外可見路徑的一部分,隱藏真實檔案目錄path,是一個相對目錄,相對於當前的子標籤<files-path>根目錄<files-path>,表示內部記憶體卡根目錄,對應根目錄等價於Context.getFilesDir(),檢視完整路徑:/data/user/0/cn.teachcourse.demos/files- 程式碼如下:
<paths xmlns:android="http://schemas.android.com/apk/res/android">
    <files-path name="my_images" path="images/"/>
    ...
</paths><paths>根標籤下可以新增的子標籤也是有限的,參考官網的開發文件,除了上述的提到的<files-path>這個子標籤外,還包括下面幾個:
-
<cache-path>,表示應用預設快取根目錄,對應根目錄等價於getCacheDir(),檢視完整路徑:/data/user/0/cn.teachcourse.demos/cache -
<external-path>,表示外部記憶體卡根目錄,對應根目錄等價於Environment.getExternalStorageDirectory(),
檢視完整路徑:/storage/emulated/0 -
<external-files-path>,表示外部記憶體卡根目錄下的APP公共目錄,對應根目錄等價於Context#getExternalFilesDir(String) Context.getExternalFilesDir(null),
檢視完整路徑:/storage/emulated/0/Android/data/cn.teachcourse.demos/files/Download -
<external-cache-path>,表示外部記憶體卡根目錄下的APP快取目錄,對應根目錄等價於Context.getExternalCacheDir(),檢視完整路徑:/storage/emulated/0/Android/data/cn.teachcourse.demos/cache
最終,在file_provider.xml檔案中,新增上述5種類型的臨時訪問許可權的檔案目錄,程式碼如下:
<?xml version="1.0" encoding="utf-8"?>
<paths xmlns:android="http://schemas.android.com/apk/res/android">
    <!--
    1、name對應的屬性值,開發者可以自由定義;
    2、path對應的屬性值,當前external-path標籤下的相對路徑
    比如:/storage/emulated/0/92Recycle-release.apk
    sdcard路徑:/storage/emulated/0(WriteToReadActivity.java:176)
                      at cn.teachcourse.nougat.WriteToReadActivity.onClick(WriteToReadActivity.java:97)
                      at android.view.View.performClick(View.java:5610)
                      at android.view.View$PerformClick.run(View.java:22265)
    相對路徑:/
    -->
    <!--1、對應內部記憶體卡根目錄:Context.getFileDir()-->
    <files-path
        name="int_root"
        path="/" />
    <!--2、對應應用預設快取根目錄:Context.getCacheDir()-->
    <cache-path
        name="app_cache"
        path="/" />
    <!--3、對應外部記憶體卡根目錄:Environment.getExternalStorageDirectory()-->
    <external-path
        name="ext_root"
        path="pictures/" />
    <!--4、對應外部記憶體卡根目錄下的APP公共目錄:Context.getExternalFileDir(String)-->
    <external-files-path
        name="ext_pub"
        path="/" />
    <!--5、對應外部記憶體卡根目錄下的APP快取目錄:Context.getExternalCacheDir()-->
    <external-cache-path
        name="ext_cache"
        path="/" />
</paths>
1.3 生成指定檔案的Content URI
Content URI方便與另一個APP應用程式共享同一個檔案,共享的方式通過ContentResolver.openFileDescriptor獲得一個ParcelFileDescriptor物件,讀取檔案內容。那麼,如何生成一條完整的Content URI呢?TeachCourse總結後,概括為三個步驟,第一步:明確上述5種類型中的哪一種,第二步:明確指定檔案的完整路徑(包括目錄、檔名),第三步:呼叫getUriForFile()方法生成URI
File imagePath = new File(Environment.getExternalStorageDirectory(), "download");
File newFile = new File(imagePath, "default_image.jpg");
Uri contentUri = getUriForFile(getContext(), "cn.teachcourse.fileprovider", newFile);
1.4 授予Content URI臨時訪問許可權
上一步獲得的Content URI,並沒有獲得指定檔案的讀寫許可權,想要獲得檔案的讀寫許可權需要呼叫Context.grantUriPermission(package, Uri, mode_flags)方法,該方法向指定包名的應用程式申請獲得讀取或者寫入檔案的許可權,引數說明如下:
package,指定應用程式的包名,Android Studio真正的包名指build.gradle宣告的applicationId屬性值;getPackageName()指AndroidManifest.xml檔案宣告的package屬性值,如果兩者不一致,就不能提供getPackageName()獲取包名,否則報錯!Uri,指定請求授予臨時許可權的URI,例如:contentUrimode_flags,指定授予臨時許可權的型別,選擇其中一個常量或兩個:Intent.FLAG_GRANT_READ_URI_PERMISSION,Intent.FLAG_GRANT_WRITE_URI_PERMISSION
授予檔案的臨時讀取或寫入許可權,如果不再需要了,TeachCourse該如何撤銷授予呢?撤銷許可權有兩種方式:第一種:通過呼叫revokeUriPermission()撤銷,第二種:重啟系統後自動撤銷
1.5 對外提供可訪問的Content URI
有多種方式可以向客戶端APP提供可訪問檔案的Content URI,其中一種常用的方式是通過傳送Intent給需要啟動的Activity,在重寫的startActivityResult()方法中獲取授予臨時許可權的Content URI或向用戶提供可訪問的介面來獲取檔案,後面的這種方式獲取檔案後轉換成Content URI,以文章開頭拍照的功能為例,TeachCourse想要在sdcard的公共目錄pictures/檢視已儲存的照片,實現過程:
- 請求授予訪問公共目錄的許可權,程式碼如下:
    if (Build.VERSION.SDK_INT > 23) {
        /**Android 7.0以上的方式**/
        mStorageManager = this.getSystemService(StorageManager.class);
        StorageVolume storageVolume = mStorageManager.getPrimaryStorageVolume();
        Intent intent = storageVolume.createAccessIntent(Environment.DIRECTORY_PICTURES);
        startActivityForResult(intent, REQUEST_CODE_GRAINT_URI);
}- 在重寫的
startActivityResult()方法中獲取授予臨時許可權的Content URI,程式碼如下:
    @Override
    protected void onActivityResult(int requestCode, int resultCode, Intent data) {
        super.onActivityResult(requestCode, resultCode, data);
        switch (requestCode) {
            case REQUEST_CODE_GRAINT_URI:
                updateDirectoryEntries(data.getData());
                Log.d(TAG, "onActivityResult:Uri= "+data.getData());
                break;

        }
}- 查詢
Environment.DIRECTORY_PICTURES目錄,返回的Content URI包含的檔案和檔案型別相關資訊,程式碼如下:
    private static final String[] DIRECTORY_SELECTION = new String[]{
            DocumentsContract.Document.COLUMN_DISPLAY_NAME,
            DocumentsContract.Document.COLUMN_MIME_TYPE,
            DocumentsContract.Document.COLUMN_DOCUMENT_ID,
    };
    @TargetApi(Build.VERSION_CODES.LOLLIPOP)
    private void updateDirectoryEntries(Uri uri) {
        ContentResolver contentResolver = this.getContentResolver();
        Uri docUri = DocumentsContract.buildDocumentUriUsingTree(uri,
                DocumentsContract.getTreeDocumentId(uri));
        Uri childrenUri = DocumentsContract.buildChildDocumentsUriUsingTree(uri,
                DocumentsContract.getTreeDocumentId(uri));

        try (Cursor docCursor = contentResolver
                .query(docUri, DIRECTORY_SELECTION, null, null, null)) {
            while (docCursor != null && docCursor.moveToNext()) {
                mPath_tv.setText(docCursor.getString(docCursor.getColumnIndex(
                        DocumentsContract.Document.COLUMN_DISPLAY_NAME)));
            }
        }

        try (Cursor childCursor = contentResolver
                .query(childrenUri, DIRECTORY_SELECTION, null, null, null)) {
            while (childCursor != null && childCursor.moveToNext()) {
                String fileName = childCursor.getString(childCursor.getColumnIndex(
                        DocumentsContract.Document.COLUMN_DISPLAY_NAME));
                String mimeType = childCursor.getString(childCursor.getColumnIndex(
                        DocumentsContract.Document.COLUMN_MIME_TYPE));
                Log.e(TAG, "updateDirectoryEntries: "+fileName+"\n"+mimeType);
            }

        }
    }
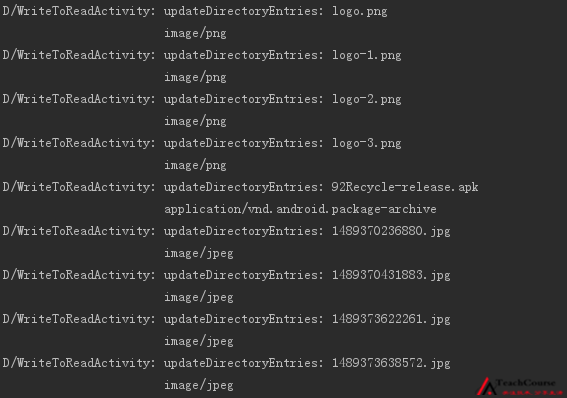
執行Demo,控制檯列印效果圖:

更多說明,可以參考Google提供的例子
二、深入理解DownloadManager
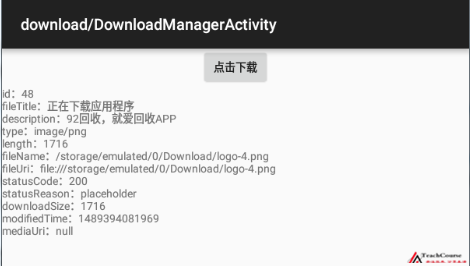
同樣,為了方便理解DownloadManager的用法,首先以一個簡單例子開始:從指定的url下載資源,然後顯示下載資源的相關資訊,執行Demo的效果圖:

Android 7.0系統許可權更改的第三點,簡單的說:通過訪問COLUMN_LOCAL_FILENAME,在Android 7.0系統上可能無法獲取Demo效果圖fileName對應的檔案路徑,這時候可能觸發異常SecurityException,列印的log資訊,如下:
      Caused by: java.lang.SecurityException: COLUMN_LOCAL_FILENAME is deprecated; use ContentResolver.openFileDescriptor() instead
      at android.app.DownloadManager$CursorTranslator.getString(DownloadManager.java:1499)
      at cn.teachcourse.download.DownloadManagerActivity.query(DownloadManagerActivity.java:244)
      at cn.teachcourse.download.DownloadManagerActivity.access$100(DownloadManagerActivity.java:34)
      at cn.teachcourse.download.DownloadManagerActivity$1.onReceive(DownloadManagerActivity.java:186)
      at android.app.LoadedApk$ReceiverDispatcher$Args.run(LoadedApk.java:1122)
      at android.os.Handler.handleCallback(Handler.java:751)
      at android.os.Handler.dispatchMessage(Handler.java:95)
      at android.os.Looper.loop(Looper.java:154)
      at android.app.ActivityThread.main(ActivityThread.java:6077)
      at java.lang.reflect.Method.invoke(Native Method)
      at com.android.internal.os.ZygoteInit$MethodAndArgsCaller.run(ZygoteInit.java:865)
      at com.android.internal.os.ZygoteInit.main(ZygoteInit.java:755)
2.1 關於DownloadManager
DownloadManager是一個用於處理長時間HTTP請求的系統服務,客戶端請求的URI可能是將要下載的指定的檔案,處於後臺的下載管理器將控制著下載的任務,並監測下載的狀態,在下載失敗或連線改變以及系統重啟後嘗試重新下載。
- 如何初始化
DownloadManager例項?首先呼叫getSystemService(String)方法,傳入DOWNLOAD_SERVICE常量,來初始化DownloadManager例項,程式碼如下:
mDownloadManager = (DownloadManager) getSystemService(DOWNLOAD_SERVICE);- 如何配置請求引數?首先需要使用到內部類
DownloadManager.Request,檢視原始碼學習該類的各個方法的使用,TeachCourse簡單總結:該類主要用於配置一條新下載任務相關內容,這些內容包括下載任務的儲存路徑,下載任務所處的網路狀態(WiFi或流量狀態)和下載任務通知欄顯示樣式等等,程式碼如下:
/**
 * 設定請求下載的資料
 */
private void initData() {
    //Request內部類配置新下載任務相關內容,比如:儲存路徑,WiFi或流量狀態,下載通知欄樣式
    request = new DownloadManager.Request(Uri.parse(mUrl + mFileName));
    request.setDestinationInExternalPublicDir(Environment.DIRECTORY_DOWNLOADS, mFileName);
    request.setAllowedNetworkTypes(DownloadManager.Request.NETWORK_MOBILE);
    request.setTitle("正在下載應用程式");
    request.setDescription("92回收,就愛回收APP");
    request.setNotificationVisibility(DownloadManager.Request.VISIBILITY_VISIBLE);
}- 如何開啟下載任務?下載任務引數配置完成後,就可以開啟後臺服務下載,同一個
DownloadManager例項,可以開啟多個下載任務,需要上一步中配置多條URI,每個下載任務分配唯一的id,程式碼如下:
/**
 * 下載任務的唯一標識ID,用於查詢下載檔案的相關資訊
 */
private void start() {
    mDownloadUniqueId = mDownloadManager.enqueue(request);
    mDownloadManager_btn.setText("正在下載。。。");
    mDownloadManager_btn.setClickable(false);
}DownloadManager通過兩種狀態的廣播,第一種:任務下載完成後傳送,廣播攔截器過濾action是DownloadManager.ACTION_DOWNLOAD_COMPLETE(關於廣播的知識,不懂的可以參考TeachCourse部落格另外的幾篇文章);第二種:點選通知欄進度條後傳送,廣播攔截器過濾action是DownloadManager.ACTION_NOTIFICATION_CLICKED,程式碼如下:
/**
 * 註冊下載完成廣播接收器,還可以註冊其它監聽器,比如:DownloadManager.ACTION_NOTIFICATION_CLICKED
 */
private void registerReceiverCompleted() {
    IntentFilter intentFilter = new IntentFilter(DownloadManager.ACTION_DOWNLOAD_COMPLETE);
    registerReceiver(mBroadcastReceiver, intentFilter);
}
/**
 * 接收下載完成廣播
 */
private BroadcastReceiver mBroadcastReceiver = new BroadcastReceiver() {
    @Override
    public void onReceive(Context context, Intent intent) {
        long reference = intent.getLongExtra(DownloadManager.EXTRA_DOWNLOAD_ID, -1);
        if (mDownloadUniqueId == reference) {
            query(reference);
            mShowInformation_tv.setText(information);
            mDownloadManager_btn.setText("點選下載");
            mDownloadManager_btn.setClickable(true);
        }
    }
};- 如何查詢下載任務的相關資訊?首先需要使用到內部類
DownloadManager.Query,檢視原始碼學習該類各個方法的使用,TeachCourse簡單總結:該類正如文章開頭樣式的例子,通過分配的id查詢下載任務相關的資訊,這些資訊包括檔案型別、檔案的Uri和檔案的長度等,程式碼如下:
/**
 * 查詢下載任務相關的資訊,比如:檔名、檔案大小、檔案型別等
 *
 * @param reference
 */
private void query(long reference) {
    DownloadManager.Query query = new DownloadManager.Query();
    /**指定查詢條件**/
    query.setFilterById(reference);
    /**查詢正在等待、執行、暫停、成功、失敗狀態的下載任務**/
    query.setFilterByStatus(DownloadManager.STATUS_SUCCESSFUL);

    Cursor cursor = mDownloadManager.query(query);
    if (cursor.moveToFirst()) {
        int fileId = cursor.getColumnIndex(DownloadManager.COLUMN_ID);
        int fileTitleId = cursor.getColumnIndex(DownloadManager.COLUMN_TITLE);
        int fileDescriptionId = cursor.getColumnIndex(DownloadManager.COLUMN_DESCRIPTION);
        int fileTypeId = cursor.getColumnIndex(DownloadManager.COLUMN_MEDIA_TYPE);
        int fileLengthId = cursor.getColumnIndex(DownloadManager.COLUMN_TOTAL_SIZE_BYTES);
        int fileUriId = cursor.getColumnIndex(DownloadManager.COLUMN_LOCAL_URI);
        /**過時的方式:DownloadManager.COLUMN_LOCAL_FILENAME**/
        int fileNameId = cursor.getColumnIndex(DownloadManager.COLUMN_LOCAL_FILENAME);
        int statusCodeId = cursor.getColumnIndex(DownloadManager.COLUMN_STATUS);
        int statusReasonId = cursor.getColumnIndex(DownloadManager.COLUMN_REASON);
        int downloadSizeId = cursor.getColumnIndex(DownloadManager.COLUMN_BYTES_DOWNLOADED_SO_FAR);
        int lastModifiedTimeId = cursor.getColumnIndex(DownloadManager.COLUMN_LAST_MODIFIED_TIMESTAMP);
        int mediaUriId = cursor.getColumnIndex(DownloadManager.COLUMN_MEDIAPROVIDER_URI);

        String id = cursor.getString(fileId);
        String fileTitle = cursor.getString(fileTitleId);
        String description = cursor.getString(fileDescriptionId);
        String type = cursor.getString(fileTypeId);
        String length = cursor.getString(fileLengthId);
        String statusCode = cursor.getString(statusCodeId);
        String statusReason = cursor.getString(statusReasonId);
        String downloadSize = cursor.getString(downloadSizeId);
        String modifiedTime = cursor.getString(lastModifiedTimeId);
        String mediaUri = cursor.getString(mediaUriId);
        String fileUri = cursor.getString(fileUriId);
        String fileName = null;
        if (Build.VERSION.SDK_INT > Build.VERSION_CODES.M) {
            openFile(type, Uri.parse(fileUri));
            fileName = Uri.parse(fileUri).getPath();
        } else {
            /**Android 7.0以上的方式:請求獲取寫入許可權,這一步報錯**/
            fileName = cursor.getString(fileNameId);
            openFile(type, Uri.parse(fileUri));
        }


        /**清空StringBuffer儲存的資料**/
        mStringBuffer.delete(0, mStringBuffer.length());
        mStringBuffer.append("id:" + id + "\n");
        mStringBuffer.append("fileTitle:" + fileTitle + "\n");
        mStringBuffer.append("description:" + description + "\n");
        mStringBuffer.append("type:" + type + "\n");
        mStringBuffer.append("length:" + length + "\n");
        mStringBuffer.append("fileName:" + fileName + "\n");
        mStringBuffer.append("fileUri:" + fileUri + "\n");
        mStringBuffer.append("statusCode:" + statusCode + "\n");
        mStringBuffer.append("statusReason:" + statusReason + "\n");
        mStringBuffer.append("downloadSize:" + downloadSize + "\n");
        mStringBuffer.append("modifiedTime:" + modifiedTime + "\n");
        mStringBuffer.append("mediaUri:" + mediaUri + "\n");
        information = mStringBuffer.toString();


    }
    cursor.close();
}- 程式碼加入判斷語句,如果非Android 7.0系統繼續訪問
COLUMN_LOCAL_FILENAME獲得檔案儲存的絕對路徑(上面中間部分程式碼),openFile()方法程式碼如下:
/**
 * 根據檔案的型別,指定可以開啟的應用程式
 *
 * @param type
 * @param uri
 */
private void openFile(String type, Uri uri) {
    if (type.contains("image/")) {
        try {
            ParcelFileDescriptor descriptor = getContentResolver().openFileDescriptor(uri, "r");
            FileDescriptor fileDescriptor = descriptor.getFileDescriptor();
            Bitmap bitmap = BitmapFactory.decodeFileDescriptor(fileDescriptor);
            mShowPic_iv.setVisibility(View.VISIBLE);
            mShowPic_iv.setImageBitmap(bitmap);
        } catch (FileNotFoundException e) {
            e.printStackTrace();
        }
    }
}現在,我們已經掌握了DownloadManager怎麼例項化、怎麼配置下載任務、怎麼開啟後臺服務以及如何查詢任務相關資訊,想要實現一個應用程式版本更新就變得很簡單,實現多工下載也不是難事,完整原始碼參考文章後臺通過的Demo。
三、關於ParcelFileDescriptor和FileDescriptor總結
官網的文件推薦我們使用ContentResolver.openFileDescriptor()方法,獲得一個ParcelFileDescriptor物件,再通過getFileDescriptor()方法返回一個FileDescriptor,它們之間的關係參考上面的程式碼。
FileDescriptor通常被稱為檔案描述符,可以理解成本地的一個檔案,通過流的方式讀取檔案內容以及通過流的方式寫入資料到檔案,這裡是讀取或寫入資料到FileDescriptor中,假如我們的Uri表示的是一個txt檔案,獲取FileDescriptor物件後,通過下面的程式碼讀取txt檔案的內容:
FileInputStream fis = new FileInputStream(fd);同理,寫入資料到txt檔案,程式碼如下:
FileOutputStream out = new FileOutputStream(fd);
                 out.write('寫入資料到txt檔案中');
out.close();獲取到輸入流或輸出流後,剩下的就是關於流的操作了,劃分為:檔案位元組流、檔案字元流、緩衝流、陣列流等
3.1 改寫上面的例子
openFile()方法使用封裝好的decodeFileDescriptor(),檢視BitmapFactory.decodeFileDescriptor()相關原始碼,學習如何讀取檔案描述符中的內容,這裡TeachCourse根據讀取流的方式,改寫如下:
   ...
Bitmap bitmap = BitmapFactory.decodeStream(getStreamByFileDescriptor(fileDescriptor));
   ...
/**
 * 通過流的方式讀取內容
 *
 * @param fileDescriptor
 * @return
 */
private InputStream getStreamByFileDescriptor(FileDescriptor fileDescriptor) {
    return new FileInputStream(fileDescriptor);
}於是,可以對FileDescriptor進行簡單的封裝成writeData()和readData(),程式碼如下:
/**往FileDescriptor中寫入資料
 * @param fileDescriptor
 * @param content
 */
private void writeData(FileDescriptor fileDescriptor, String content) {
    FileOutputStream fos = new FileOutputStream(fileDescriptor);
    try {
        fos.write(content.getBytes());
    } catch (IOException e) {
        e.printStackTrace();
    } finally {
        try {
            fos.close();
        } catch (IOException e) {
            e.printStackTrace();
        }
    }
}

/**從FileDescriptor中讀取資料
 * @param fileDescriptor
 * @return
 */
private String readData(FileDescriptor fileDescriptor) {
    FileInputStream fis = new FileInputStream(fileDescriptor);
    byte[] b = new byte[1024];
    int read;
    String content=null;
    try {
        while ((read = fis.read(b)) != -1) {
            content = new String(b, 0, read);
        }
    } catch (IOException e) {
        e.printStackTrace();
    } finally {
        try {
            fis.close();
        } catch (IOException e) {
            e.printStackTrace();
        }
    }
    return content;
}
總結:
Android 7.0系統的許可權更改,包括三個方面,文章從第二方面開始講解,著重介紹了FileProvider和DownloadManager兩個類的使用,花了好長時間整理、測試和編輯,如果對你有幫忙,別忘了收藏和分享咯!
