Android 藍芽技術 帶你實現終端間資料傳輸
藍芽技術在智慧硬體方面有很多用武之地,今天我就為大家分享一下藍芽在Android系統下的使用方法技巧,並實現一下兩個終端間資料的傳輸。
藍芽(Bluetooth)是一種短距離的無線通訊技術標準,藍芽協議分為4層,即核心協議層、電纜替代協議層、電話控制協議層和採納的其它協議層。
這4種協議中最重要的是核心協議。藍芽的核心協議包括基帶、鏈路管理、邏輯鏈路控制和適應協議四部分。其中鏈路管理(LMP)負責藍芽元件間連線的建立。邏輯鏈路控制與適應協議(L2CAP)位於基帶協議層上,屬於資料鏈路層,是一個為高層傳輸和應用層協議遮蔽基帶協議的適配協議。
1.開啟和關閉藍芽
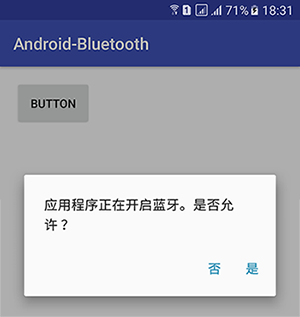
第一種方法相對簡單,直接呼叫系統對話方塊啟動藍芽:
在AndroidManifest檔案中新增需要的許可權,高版本也不需要動態授權:
<uses-permission android:name="android.permission.BLUETOOTH" />- 1
- 1
startActivityForResult(new Intent(BluetoothAdapter.ACTION_REQUEST_ENABLE), 1);- 1
- 1
如果不想讓使用者看到這個對話方塊,那麼我們還可以選擇第二種方法,進行靜默開啟藍芽。
第二種方法,靜默開啟,不會有方法一的對話方塊:
在AndroidManifest檔案中新增需要的許可權:
<!-- 已適配Android6.0 --> - 1
- 2
- 3
- 4
- 5
- 6
- 7
- 8
- 1
- 2
- 3
- 4
- 5
- 6
- 7
- 8
由於藍芽所需要的許可權包含Dangerous Permissions,所以我們需要在Java程式碼中進行動態授權處理:
private static final int REQUEST_BLUETOOTH_PERMISSION=10;

private void requestBluetoothPermission(){
    //判斷系統版本
    if (Build.VERSION.SDK_INT >= 23) {
        //檢測當前app是否擁有某個許可權
        int checkCallPhonePermission = ContextCompat.checkSelfPermission(this,
                Manifest.permission.ACCESS_COARSE_LOCATION);
        //判斷這個許可權是否已經授權過
        if(checkCallPhonePermission != PackageManager.PERMISSION_GRANTED){
            //判斷是否需要 向用戶解釋,為什麼要申請該許可權
            if(ActivityCompat.shouldShowRequestPermissionRationale(this,
                    Manifest.permission.ACCESS_COARSE_LOCATION))
                Toast.makeText(this,"Need bluetooth permission.",
                        Toast.LENGTH_SHORT).show();
            ActivityCompat.requestPermissions(this ,new String[]
                    {Manifest.permission.ACCESS_COARSE_LOCATION},REQUEST_BLUETOOTH_PERMISSION);
            return;
        }else{
        }
    } else {
    }
}- 1
- 2
- 3
- 4
- 5
- 6
- 7
- 8
- 9
- 10
- 11
- 12
- 13
- 14
- 15
- 16
- 17
- 18
- 19
- 20
- 21
- 22
- 23
- 1
- 2
- 3
- 4
- 5
- 6
- 7
- 8
- 9
- 10
- 11
- 12
- 13
- 14
- 15
- 16
- 17
- 18
- 19
- 20
- 21
- 22
- 23
接下來我們就可以靜默開啟藍芽了:
BluetoothAdapter mBluetoothAdapter = BluetoothAdapter.getDefaultAdapter();
mBluetoothAdapter.enable(); //開啟
//mBluetoothAdapter.disable(); //關閉- 1
- 2
- 3
- 1
- 2
- 3
下面我們來看一下如何通過程式碼搜尋藍芽裝置。
2.通過程式碼搜尋藍芽裝置
搜尋分為主動搜尋和被動搜尋。
我們開始進行主動搜尋:
(1)建立BluetoothAdapter物件
TextView tvDevices = (TextView)findViewById(R.id.tv_devices);
BluetoothAdapter mBluetoothAdapter = BluetoothAdapter.getDefaultAdapter();- 1
- 2
- 1
- 2
(2)我們先獲取並顯示一下已經配對的藍芽裝置列表
//獲取已經配對的藍芽裝置
Set<BluetoothDevice> pairedDevices = mBluetoothAdapter.getBondedDevices();
if (pairedDevices.size() > 0) {
    for (BluetoothDevice device : pairedDevices) {
        tvDevices.append(device.getName() + ":" + device.getAddress());
    }
}- 1
- 2
- 3
- 4
- 5
- 6
- 7
- 1
- 2
- 3
- 4
- 5
- 6
- 7
(3)下面我們定義廣播接收器
// 設定廣播資訊過濾
IntentFilter filter = new IntentFilter();
filter.addAction(BluetoothDevice.ACTION_FOUND);//每搜尋到一個裝置就會發送一個該廣播
filter.addAction(BluetoothAdapter.ACTION_DISCOVERY_FINISHED);//當全部搜尋完後傳送該廣播
filter.setPriority(Integer.MAX_VALUE);//設定優先順序
// 註冊藍芽搜尋廣播接收者,接收並處理搜尋結果
this.registerReceiver(receiver, filter);- 1
- 2
- 3
- 4
- 5
- 6
- 7
- 1
- 2
- 3
- 4
- 5
- 6
- 7
藍芽裝置的廣播接收器如下:
/**
 * 定義廣播接收器
 */
private final BroadcastReceiver receiver = new BroadcastReceiver() {
    @Override
    public void onReceive(Context context, Intent intent) {
        String action = intent.getAction();
        if (BluetoothDevice.ACTION_FOUND.equals(action)) {
            BluetoothDevice device = intent.getParcelableExtra(BluetoothDevice.EXTRA_DEVICE);
            if (device.getBondState() != BluetoothDevice.BOND_BONDED) {
                tvDevices.append(device.getName() + ":"+ device.getAddress());
            }
        } else if (BluetoothAdapter.ACTION_DISCOVERY_FINISHED.equals(action)) {
            //已搜素完成
        }
    }
};- 1
- 2
- 3
- 4
- 5
- 6
- 7
- 8
- 9
- 10
- 11
- 12
- 13
- 14
- 15
- 16
- 17
- 1
- 2
- 3
- 4
- 5
- 6
- 7
- 8
- 9
- 10
- 11
- 12
- 13
- 14
- 15
- 16
- 17
(4)我們建立一個Button按鈕,當點選Button時進行搜尋,Button點選事件如下:
//如果當前在搜尋,就先取消搜尋
if (mBluetoothAdapter.isDiscovering()) {
    mBluetoothAdapter.cancelDiscovery();
}
//開啟搜尋
mBluetoothAdapter.startDiscovery();- 1
- 2
- 3
- 4
- 5
- 6
- 1
- 2
- 3
- 4
- 5
- 6
3.藍芽的UUID
兩個藍芽裝置進行連線時需要使用同一個UUID。但很多讀者可能發現,有很多型號的手機(可能是非Android系統的手機)之間使用了不同的程式也可以使用藍芽進行通訊。從表面上看,它們之間幾乎不可能使用同一個UUID。
UUID的格式如下:
xxxxxxxx-xxxx-xxxx-xxxx-xxxxxxxxxxxx
UUID的格式被分成5段,其中中間3段的字元數相同,都是4,第1段是8個字元,最後一段是12個字元。所以UUID實際上是一個8-4-4-4-12的字串。
實際上,UUID和TCP的埠一樣,也有一些預設的值。例如,將藍芽模擬成串列埠的服務就使用了一個標準的UUID:
00001101-0000-1000-8000-00805F9B34FB
除此之外,還有很多標準的UUID,如下面就是兩個標準的UUID:
資訊同步服務:00001104-0000-1000-8000-00805F9B34FB
檔案傳輸服務:00001106-0000-1000-8000-00805F9B34FB
4.藍芽終端間資料傳輸
通過藍芽傳輸資料與Socket類似。在網路中使用Socket和ServerSocket控制客戶端和服務端的資料讀寫。而藍芽通訊也由客戶端和服務端Socket來完成。藍芽客戶端Socket是BluetoothSocket,藍芽服務端Socket是BluetoothServerSocket。這兩個類都在android.bluetooth包中。
無論是BluetoothSocket,還是BluetoothServerSocket,都需要一個UUID(全域性唯一識別符號,Universally Unique Identifier),UUID相當於Socket的埠,而藍芽地址相當於Socket的IP。
我們開始進行模擬一個藍芽資料的傳輸:
首先來看客戶端:
(1)定義全域性常量變數
private ListView lvDevices;
private BluetoothAdapter mBluetoothAdapter;
private List<String> bluetoothDevices = new ArrayList<String>();
private ArrayAdapter<String> arrayAdapter;
private final UUID MY_UUID = UUID
        .fromString("abcd1234-ab12-ab12-ab12-abcdef123456");//隨便定義一個
private BluetoothSocket clientSocket;
private BluetoothDevice device;
private OutputStream os;//輸出流- 1
- 2
- 3
- 4
- 5
- 6
- 7
- 8
- 9
- 1
- 2
- 3
- 4
- 5
- 6
- 7
- 8
- 9
(2)在onCreate方法中做初始化操作
mBluetoothAdapter = BluetoothAdapter.getDefaultAdapter();

lvDevices = (ListView) findViewById(R.id.lv_devices);
//獲取已經配對的藍芽裝置
Set<BluetoothDevice> pairedDevices = mBluetoothAdapter.getBondedDevices();
if (pairedDevices.size() > 0) {
    for (BluetoothDevice device : pairedDevices) {
        bluetoothDevices.add(device.getName() + ":"+ device.getAddress());
    }
}
arrayAdapter = new ArrayAdapter<String>(this,
        android.R.layout.simple_list_item_1, android.R.id.text1,bluetoothDevices);
lvDevices.setAdapter(arrayAdapter);
lvDevices.setOnItemClickListener(this);//Activity實現OnItemClickListener介面

//每搜尋到一個裝置就會發送一個該廣播
IntentFilter filter = new IntentFilter(BluetoothDevice.ACTION_FOUND);
this.registerReceiver(receiver, filter);
//當全部搜尋完後傳送該廣播
filter = new IntentFilter(BluetoothAdapter.ACTION_DISCOVERY_FINISHED);
this.registerReceiver(receiver, filter);- 1
- 2
- 3
- 4
- 5
- 6
- 7
- 8
- 9
- 10
- 11
- 12
- 13
- 14
- 15
- 16
- 17
- 18
- 19
- 20
- 21
- 1
- 2
- 3
- 4
- 5
- 6
- 7
- 8
- 9
- 10
- 11
- 12
- 13
- 14
- 15
- 16
- 17
- 18
- 19
- 20
- 21
藍芽裝置的廣播接收器如下:
/**
 * 定義廣播接收器
 */
private final BroadcastReceiver receiver = new BroadcastReceiver() {
    @Override
    public void onReceive(Context context, Intent intent) {
        String action = intent.getAction();
        if (BluetoothDevice.ACTION_FOUND.equals(action)) {
            BluetoothDevice device = intent.getParcelableExtra(BluetoothDevice.EXTRA_DEVICE);
            if (device.getBondState() != BluetoothDevice.BOND_BONDED) {
                bluetoothDevices.add(device.getName() + ":" + device.getAddress());
                arrayAdapter.notifyDataSetChanged();//更新介面卡
            }

        } else if (BluetoothAdapter.ACTION_DISCOVERY_FINISHED.equals(action)) {
            //已搜素完成
        }
    }
};- 1
- 2
- 3
- 4
- 5
- 6
- 7
- 8
- 9
- 10
- 11
- 12
- 13
- 14
- 15
- 16
- 17
- 18
- 19
- 1
- 2
- 3
- 4
- 5
- 6
- 7
- 8
- 9
- 10
- 11
- 12
- 13
- 14
- 15
- 16
- 17
- 18
- 19
(4)我們建立一個Button按鈕,當點選Button時進行搜尋,Button點選事件如下:
//如果當前在搜尋,就先取消搜尋
if (mBluetoothAdapter.isDiscovering()) {
    mBluetoothAdapter.cancelDiscovery();
}
//開啟搜尋
mBluetoothAdapter.startDiscovery();- 1
- 2
- 3
- 4
- 5
- 6
- 1
- 2
- 3
- 4
- 5
- 6
(5)接下來我們設定列表的點選事件:
@Override
public void onItemClick(AdapterView<?> parent, View view, int position, long id) {
    String s = arrayAdapter.getItem(position);
    String address = s.substring(s.indexOf(":") + 1).trim();//把地址解析出來
    //主動連線藍芽服務端
    try {
        //判斷當前是否正在搜尋
        if (mBluetoothAdapter.isDiscovering()) {
            mBluetoothAdapter.cancelDiscovery();
        }
        try {
            if (device == null) {
                //獲得遠端裝置
                device = mBluetoothAdapter.getRemoteDevice(address);
            }
            if (clientSocket == null) {
                //建立客戶端藍芽Socket
                clientSocket = device.createRfcommSocketToServiceRecord(MY_UUID);
                //開始連線藍芽,如果沒有配對則彈出對話方塊提示我們進行配對
                clientSocket.connect();
                //獲得輸出流(客戶端指向服務端輸出文字)
                os = clientSocket.getOutputStream();
            }
        } catch (Exception e) {
        }
        if (os != null) {
            //往服務端寫資訊
            os.write("藍芽資訊來了".getBytes("utf-8"));
        }
    } catch (Exception e) {
    }
}- 1
- 2
- 3
- 4
- 5
- 6
- 7
- 8
- 9
- 10
- 11
- 12
- 13
- 14
- 15
- 16
- 17
- 18
- 19
- 20
- 21
- 22
- 23
- 24
- 25
- 26
- 27
- 28
- 29
- 30
- 31
- 32
- 1
- 2
- 3
- 4
- 5
- 6
- 7
- 8
- 9
- 10
- 11
- 12
- 13
- 14
- 15
- 16
- 17
- 18
- 19
- 20
- 21
- 22
- 23
- 24
- 25
- 26
- 27
- 28
- 29
- 30
- 31
- 32
接下來看服務端:
服務端使用的是另一部手機,接受上面手機通過藍芽傳送過來的資訊並顯示。
(1)定義全域性常量變數:
private BluetoothAdapter mBluetoothAdapter;
private AcceptThread acceptThread;
private final UUID MY_UUID = UUID
        .fromString("abcd1234-ab12-ab12-ab12-abcdef123456");//和客戶端相同的UUID
private final String NAME = "Bluetooth_Socket";
private BluetoothServerSocket serverSocket;
private BluetoothSocket socket;
private InputStream is;//輸入流- 1
- 2
- 3
- 4
- 5
- 6
- 7
- 8
- 1
- 2
- 3
- 4
- 5
- 6
- 7
- 8
(2)定義服務端執行緒類:
private Handler handler = new Handler() {
    public void handleMessage(Message msg) {
        Toast.makeText(getApplicationContext(), String.valueOf(msg.obj),
                Toast.LENGTH_LONG).show();
        super.handleMessage(msg);
    }
};

//服務端監聽客戶端的執行緒類
private class AcceptThread extends Thread {
    public AcceptThread() {
        try {
            serverSocket = mBluetoothAdapter.listenUsingRfcommWithServiceRecord(NAME, MY_UUID);
        } catch (Exception e) {
        }
    }
    public void run() {
        try {
            socket = serverSocket.accept();
            is = socket.getInputStream();
            while(true) {
                byte[] buffer =new byte[1024];
                int count = is.read(buffer);
                Message msg = new Message();
                msg.obj = new String(buffer, 0, count, "utf-8");
                handler.sendMessage(msg);
            }
        }
        catch (Exception e) {
        }
    }
}- 1
- 2
- 3
- 4
- 5
- 6
- 7
- 8
- 9
- 10
- 11
- 12
- 13
- 14
- 15
- 16
- 17
- 18
- 19
- 20
- 21
- 22
- 23
- 24
- 25
- 26
- 27
- 28
- 29
- 30
- 31
- 32
- 1
- 2
- 3
- 4
- 5
- 6
- 7
- 8
- 9
- 10
- 11
- 12
- 13
- 14
- 15
- 16
- 17
- 18
- 19
- 20
- 21
- 22
- 23
- 24
- 25
- 26
- 27
- 28
- 29
- 30
- 31
- 32
(3)在onCreate方法中初始化執行緒類並開啟
mBluetoothAdapter = BluetoothAdapter.getDefaultAdapter();
acceptThread = new AcceptThread();
acceptThread.start();- 1
- 2
- 3
- 1
- 2
- 3
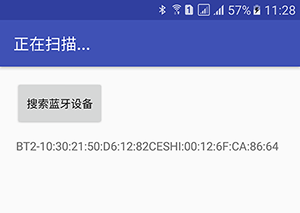
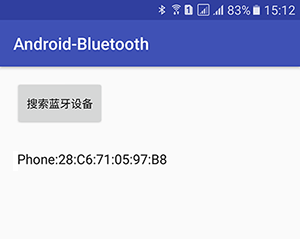
我們執行程式看一下效果圖:
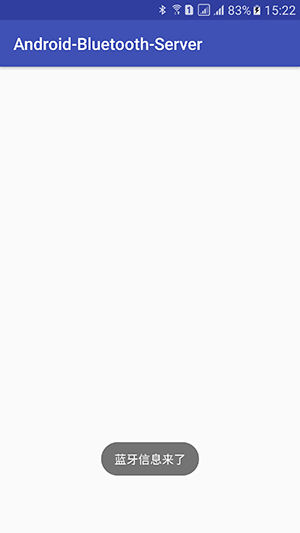
點選“搜尋藍芽裝置”按鈕,就會搜尋到另一臺手機的藍芽資訊,我們點選條目,另一臺手機會出現如下變化:
彈出Toast,此時證明我們的藍芽資料已經傳輸過來了。


