
利用Handler進行網路請求
上一篇理解了Android系統中Handler的機制,見Android中的Handler機制解析,那麼我們就來用Handler製作一個簡易的網路請求框架。
如下圖:
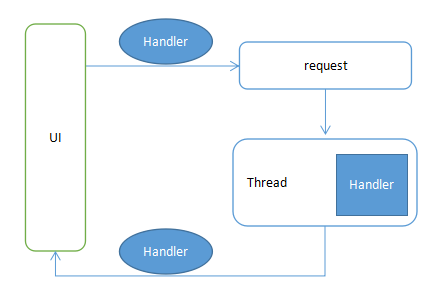
解釋一下:UI在request的時候傳入UI中的Handler,同時將請求的Runnable推入到工作執行緒對應中的Handler,在工作執行緒中的Handler呼叫完畢之後,有通過傳遞過來的UI的Handler將資料傳送到UI,更新頁面。
其實核心就是UI中的Handler和工作執行緒中的Handler,UI中的Handler負責資料的傳遞,工作執行緒中的Handler負責請求的佇列和排程。那麼來看具體的程式碼:
首先是工作執行緒:
public class SvrBgThread extends Thread {
private static String TAG = "SvrBgThread";
private Handler mBgTaskHandler;
public static final class TaskCmd {
/**
* 接收後臺訊息
*/
public static final int ACCEPT_MSG = 1;
/**
* 拒絕後臺訊息
*/
public 這裡在Thread中例項化Handler,這時,Handler中的訊息佇列就準備好了,在Looper.loop()後,Looper就不斷從訊息佇列中取出Message來執行。那麼這種耗時的網路請求的執行就在工作執行緒中了(在主執行緒會ANR),並且請求的佇列也有了,請求的排程方式也有了,利用Android系統的Handler機制,我們免去了自己控制訊息佇列的各種麻煩。
看請求的介面。
public interface IStudentProvider {
    String URL_STUDENT = "datainfo/getStudentInfo";
    /**
     * 統一的學生資訊介面
     *
     * @param reqType
     * @param uiHandler
     * @param requestUrl
     * @param statisticTime
     * @param userName
     */
    boolean requestStudentInfo(Handler uiHandler,String url,int msgType);

}
看到介面中定義了請求一個學生的request的定義。
其中uiHandler就是UI中的Handler,負責資料傳回UI,msgType是該請求的標識,用來匹配請求(在ListView中Item的複用導致的資料變動,解決方法就是setTag後在匹配Tag,一樣的道理)
看實現
public class StudentProvider implements IStudentProvider {

    public static final String TAG = "StudentProvider";
    private SvrBgThread mSvrBgThread;

    private StudentProvider() {
        super();
        mSvrBgThread = new SvrBgThread();
    }

    private static class InstanceHolder {
        static final StudentProvider INSTANCE = new StudentProvider();
    }

    /**
     * 單例模式,延遲載入
     */
    public static StudentProvider getInstance() {
        return InstanceHolder.INSTANCE;
    }

    public void init() {
        mSvrBgThread.setName(TAG);
        mSvrBgThread.start();
    }


    @Override
    public boolean requestStudentInfo(Handler uiHandler, String url, int msgType) {


        if (uiHandler == null || url == null) {
            return false
        }

        HttpGet httpGet = null;
        try {
            // 獲取Post物件,輸入引數以JSON格式放置在body中
            httpGet = HttpClientProxy.getJsonHttpGet(requestUrl);
        } catch (UnsupportedEncodingException e) {
            Log.e(TAG, "Exception", e);
            return false;
        } catch (JSONException e) {
            Log.e(TAG, "Exception", e);
            return false;
        }
        Student student = new Student();
        // 建立http請求物件
        HttpRequestRunnable requestRunnable = new HttpRequestRunnable(uiHandler, student, msgType, httpGet );

        if (mSvrBgThread == null || !mSvrBgThread.isAlive()) {
            Log.e(TAG, "svrBgThread not initialized !");
            return false;
        }
        // 傳送http請求
        return mSvrBgThread.getBgTaskHandler().post(requestRunnable);
    }
}
注意在init()方法中對工作執行緒的例項化,在requestStudentInfo方法中通過構造HttpRequestRunnable 具體的請求,隨後將該具體請求 推入到了工作執行緒中對應的Handler(mSvrBgThread.getBgTaskHandler().post(requestRunnable))中,當Handler取出該Runnable執行後就得到了請求的結果,其中HttpClientProxy提供具體的請求方式,比如post,get,put等
具體的HttpRequestRunnable :
public class HttpRequestRunnable implements Runnable {
    private Handler mMsgHandler;
    private IUserDataBuilder mUserData;
    private int msgType;
    private HttpUriRequest httpUriRequest;

    public HttpRequestRunnable(Handler msgHandler, IUserDataBuilder userData, int msgType, HttpUriRequest httpUriRequest) {
        this.mMsgHandler = msgHandler;
        this.mUserData = userData;
        this.msgType = msgType;
        this.httpUriRequest = httpUriRequest;
    }


    /**
     * 處理 服務端響應資料
     *
     * @param databuilder
     *            使用者資料構造器,解析資料後的結果會填入該類中
     * @param response
     *            http 響應結果
     */
    private void handleResponse(IUserDataBuilder databuilder, HttpResponse response) throws Exception
    {
        int StatusCode = response.getStatusLine().getStatusCode();

        switch (StatusCode)
        {
            case HttpStatus.SC_NOT_FOUND:
                Log.e(TAG, "Response StatusCode:" + StatusCode);
                databuilder.setServerRet(ServerRet.NOTFOUND);
                throw new Exception();
            case HttpStatus.SC_UNAUTHORIZED:
                Log.e(TAG, "Response StatusCode:" + StatusCode);
                databuilder.setServerRet(ServerRet.UNAUTHORIZED);
                throw new Exception();
            case HttpStatus.SC_OK:
                Log.d(TAG, "Response StatusCode:" + StatusCode);
                // 設定預設值,有的介面不會攜帶retCode欄位,平臺統一新增該欄位
                databuilder.setServerRet(ServerRet.OK);
                // 解析返回資料
                JSONObject retJsonObject = createJSONFromHttpEntity(response.getEntity());
                if (retJsonObject == null)
                {
                    // 建立預設的JSON資料,保證解析框架正常
                    Log.e(TAG, "Create default Json data.");
                    retJsonObject = HttpUtil.createHttpJson(ServerRet.ILLEGAL_STATE_EXCEPTION);
                    databuilder.setServerRet(ServerRet.ILLEGAL_STATE_EXCEPTION);
                }
                databuilder.parseJson(retJsonObject);
                break;
            default:
                Log.e(TAG, "Response StatusCode:" + StatusCode);
                throw new Exception();
        }

    }


    /**
     * 提取HTTPEntity中的JSON物件
     *
     * @param httpEntity
     * @return
     */
    private JSONObject createJSONFromHttpEntity(HttpEntity httpEntity)
    {
        JSONObject jsonObj = null;
        String entity = null;
        try
        {
            entity = EntityUtils.toString(httpEntity, HttpClientProxy.ENCODING);
            jsonObj = new JSONObject(entity);
        }
        catch(Exception e)
        {
            Log.e(TAG,"Exception",e);
        }
        return jsonObj;
    }


    @Override
    public void run() {

        if (!isConditionMet()) {
            Log.e(TAG, "Invalid RequestRunnable:" + toString());
            return;
        }

        try {
            // 向遠端服務端傳送資料請求並獲取請求結果
            HttpClient client = HttpClientProxy.httpClientBuilder();

            HttpResponse response = client.execute(mHttpUriRequest);

            handleResponse(mUserDatabuilder, response);

            client.getConnectionManager().shutdown();

        } catch (Exception e) {
            if (httpUriRequest.isAborted()) {
                mUserData.setServerRet(ServerRet.CLIENT_ABORT_REQUEST);
            } else {
                mUserData.setServerRet(transformException(e));
            }

            Log.e(TAG, "Exception", e);
        } finally {
            synchronized (mMsgHandler) {
                Message message = Message.obtain(mMsgHandler, msgType, mUserData);
                boolean success = mMsgHandler.sendMessage(message);
                if (!success) {
                    Log.e(TAG, "send message back to user fail,"
                            + "usually because the looper processing the message queue is exiting");
                }
            }
        }
    }

    private boolean isConditionMet() {
        if (mUserData == null) {
            return false;
        }
        if (mMsgHandler == null) {
            return false;
        }
        if (httpUriRequest == null) {
            return false;
        }
        return true;
    }
}
在HttpRequestRunnable 中其建構函式的引數分別是UI中的Handler,請求結果物件,請求的標誌,和請求的方式。該類主要負責請求的執行,在執行結束後將資料設定到UI的Handler中( Message message = Message.obtain(mMsgHandler, msgType, mUserData);)。
資料是如何解析的:
IUserDataBuilder :
public interface IUserDataBuilder {

    /**
     * 將JSON資料解析成使用者期望的資料型別
     *
     * @param jsonObject
     *            JSON物件
     * @return 解析成功返回true,否則返回時報
     * @throws Exception
     */
    boolean parseJson(JSONObject jsonObject) throws Exception;

    ServerRet getServerRet();

    void setServerRet();
}
public enum ServerRet {
OK(000,"ok");
private int retCode;
private String msg;
ServerRet(int retCode,String msg) {
this.retCode = retCode;
this.msg = msg;
}
}可以看到IUserDataBuilder ,所有實體類需要實現的介面,都必須有對解析Json的過程,還有設定與獲取請求的結果(成功與否)
ServerRet:請求結果的列舉。
Student:
public class Student implements IUserDataBuilder {
    private ServerRet mServerRet;
    private String name;
    private int age;
    private String mAddr;
    @Override
    public boolean parseJson(JSONObject jsonObject) throws Exception {
        if (jsonObject == null){
            return false;
        }
        Student temp = HttpUtils.fromJson(jsonObject.toString(),Student.class);
        name = temp.getName();
        age = temp.getAge();
        mAddr = temp.getAddr();
        return true;
    }

    public String getName() {
        return name;
    }

    public int getAge() {
        return age;
    }

    public String getAddr() {
        return mAddr;
    }

    @Override
    public ServerRet getServerRet() {
        return null;
    }

    @Override
    public void setServerRet() {

    }
    @Override
    public String toString() {
        return "Student{" +
                "mServerRet=" + mServerRet +
                ", name='" + name + '\'' +
                ", age=" + age +
                ", mAddr='" + mAddr + '\'' +
                '}';
    }
}
可以實體類中的parseJson使用Gson來解析json,fromJson如下:
    public static <T> T fromJson(String jsonStr, Class<T> mClass)
    {
        Gson mGson = new Gson();
        T mt = mGson.fromJson(jsonStr, mClass);
        return mt;
    }
至此解析結束,實體類資料已填充。
看看使用:
public class StudentInfoActivity extends Activity {
    public static final String TAG = "StudentInfoActivity";
    public static final String URL = "http://10.10.12.158:8080";
    public static final int MSGTYPE = 1;

    private static Handler handler = new Handler() {
        @Override
        public void handleMessage(Message msg) {
            int what = msg.what;
            if (what == MSGTYPE) {
                Student student = (Student) msg.obj;
                if (student.getServerRet() == ServerRet.OK) {
                    Log.i(TAG, student.toString())
                } else {
                    Log.i(TAG, "student parse failed");
                }

            }
        }
    };


    @Override
    protected void onCreate(Bundle savedInstanceState) {
        super.onCreate(savedInstanceState);
        IStudentProvider studentProvider = StudentProvider.getInstance();
        studentProvider.requestStudentInfo(handler, URL, MSGTYPE);
    }
}
最後記得將StudentProvider .getInstance().init()方法放在Application的onCreate方法中,在程式啟動時將其初始化了。在退出是cancel。
總結:
在UI傳送請求時,將UI中的Handler等傳入到具體的請求方法中(StudentProvider 的requestStudent方法中),在該方法中實現了具體的請求HttpRequestRunnable ,隨後將HttpRequestRunnable推入到工作執行緒的Handler對應的MessageQueue中,在Handler輪訓執行到HttpRequestRunnable後,將執行具體的請求同時將傳遞過來的JsonObject解析為具體的實體類,然後傳遞給UI的Handler,返回給UI。
弊端:相比較Volley,OkHttp,XUtuis等開源庫,使用Handler的請求麻煩,不易擴充套件,同時當連續執行多個請求時,該請求是在工作執行緒中串型執行的,併發性不好。
這裡旨在體會Handler的另外一種不常見的用法。深刻體會Handler機制的原理。