
bootstrap 可編輯表格
現在在做的一款辦公系統,大約用到十來個表格,最開始的需求是滿足顯示功能就ok,這很簡單,根本不用做變動;
然而,我們都懂得使用者的需求是不會停止的,so又來了一個給使用者提供表格編輯的許可權,包括增刪改、編輯下拉列表,我覺得再彈出一個框框或者跳出一個頁面讓使用者修改這樣的設計挺不人性的(除非有必要),所以不到萬不得已不會用這個糊弄使用者;
接著,我把表格差不多重新修改一邊以後,新需求coming,把表格的表頭做成動態的……在把十幾個表格重新翻新了一遍的基礎上,對於這樣的要求,多多少少有了點排斥情緒,因為就剩十幾天結項,這樣總反工效率挺低的。最後還是忍不住嘗試的慾望,開始著手這個功能,沒思考幾分鐘,就發現這個功能似曾相識,一翻看以前的部落格,原來去年的我已經幫忙實現了,只是當時用的EasyUi
一、 顯示資料(基礎功能)
在html頁面中定義表格以及表格的列名,最後把從資料庫中查詢出來的資料,迴圈顯示到頁面中。這個系統用的是PHP語言,裡邊用到了php中的語法,如果是Java語言,把php換成jsp中對應的語法就行
- <div class="containe">
- <table class="table table-striped table-bordered table-hover">
- <thead>
- <tr class="success">
- <th>序號</th>
- <th style="display: none">ActionID</th>
- <th>Category</th>
- <th>SubProcess Name</th>
- <th>Description</th>
- <th>Do Action</th>
- </tr>
- </thead>
- <tbody>
- <?php
- //遍歷傳遞過來的變數$subprocess_info
- $i=1;
- foreach($subprocess_infoas$_v){
- ?>
- <tr id="">
- <td><?php echo$i; ?></td>
- <td style="display: none"><?php echo$_v->ActionID; ?></td>
- <td><?php echo$_v->Category; ?></td>
- <td><a href="#"><?php echo$_v->ActionName; ?></a></td>
- <td><?php echo$_v -> Description; ?></td>
- <td>
- <a href="./index.php?r=subprocess/update&id=<?php echo $_v->ActionID; ?>">修改</a>
- <a href="./index.php?r=subprocess/del&id=<?php echo $_v->ActionID; ?>">刪除</a>
- </td>
- </tr>
- <?php $i++; }?>
- </tbody>
- </table>
- </div>
二、表格編輯(高階功能)
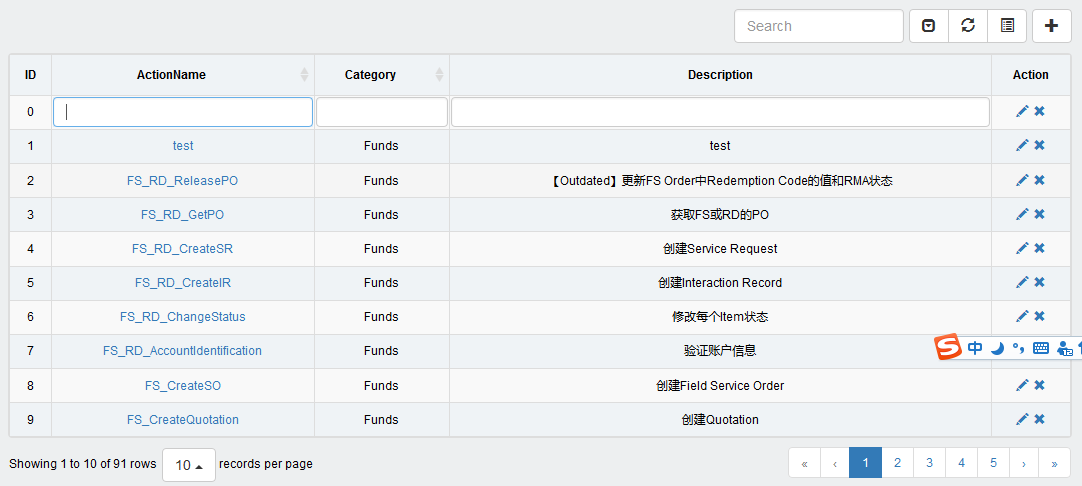
1. 效果展示
表格初始化後

新增新行
2. 在使用時,首先需要引入它的js,我是統一引用到入口檔案中的
- <!--表格編輯-->
- <link href="./assets/tableEdit/css/bootstrap-table.min.css" rel="stylesheet" />
- <script src="./assets/tableEdit/js/bootstrap-table.js"></script>
- <script src="./assets/tableEdit/js/bootstrap-table-edit.js"></script>
- <script src="./assets/tableEdit/js/bootstrap-select.js"></script>
- <script src="./assets/tableEdit/js/bootstrap-datetimepicker.min.js"></script>
- <link href="./assets/tableEdit/css/bootstrap-datetimepicker.min.css" rel="stylesheet" />
[javascript] view plain copy print?
- <script src="./js/subprocess/subprocess.js"></script>
- <div class="col-md-12">
- <div style="float:right;margin:10px 0px 10px 5px">
- <a title="Add" href="./index.php?r=subprocess/add">
- <button type="button"class="btn btn-default" id="addData"<span style="color:#008000;background-color:#efefef;font-weight:bold;"></span>>
- <span class="glyphicon glyphicon-plus"></span>
- </button>
- </a>
- </div>
- <table class="table table-striped table-bordered table-hover" id="subprocessTable"></table>
- </div>
- $(function(){
- //初始化表格
- $('#subprocessTable').bootstrapTable({
- method: 'get',
- url:"./index.php?r=subprocess/subprocessInfo",
- editable:true,//開啟編輯模式
- clickToSelect: true,
- cache: false,
- showToggle:true, //顯示切換按鈕來切換表/卡片檢視。
- showPaginationSwitch:true, //顯示分頁切換按鈕
- pagination: true,
- pageList: [10,25,50,100],
- pageSize:10,
- pageNumber:1,
- uniqueId: 'index', //將index列設為唯一索引
- striped: true,
- search: true,
- showRefresh: true,
- minimumCountColumns: 2,
- smartDisplay:true,
- columns: [
- [
- {field:"index",title:"ID",align:"center",edit:false,formatter:function(value, row, index){
- return row.index=index ; //返回行號
- }},
- {field:"actionName",title:"ActionName",align:"center",order:"asc",sortable:"true",formatter:function(value,row,index){
- var strHtml ='<a href="./index.php?r=subprocess/modify&id='+ row.actionId +'">'+ row.actionName +'</a>';
- return strHtml;
- }},
- {field:"category",title:"Category",align:"center",sortable:"true"},
- {field:"description",title:"Description",align:"center"},
- {field:"action",title:"Action",align:"center",formatter:function(value,row,index){
- var strHtml ='<a href="./index.php?r=subprocess/modify&id='+ row.actionId +'"><li class="glyphicon glyphicon-pencil"></li></a>'+
- '<a href="javascript:void(0);" onclick="removeData('+ index +')" style="margin-left:5px;"><li class="glyphicon glyphicon-remove"></li></a>';
- return strHtml;
- },edit:false},
- {field:"actionId",title:"ActionID",align:"center",edit:false,visible:false,searchable:false}
- ]
- ]
- });
- /**
- * add a new row
- */
- $('#addData').click(function(){
- $('#subprocessTable').bootstrapTable('selectPage', 1); //Jump to the first page
- var data = {actionId: '', actionName: '',category:'', description: ''}; //define a new row data,certainly it's empty
- $('#subprocessTable').bootstrapTable('prepend', data); //the method of prepend must defined all fields,but append needn't
- //$('#dataTable').bootstrapTable('append',data);
- $("#dataTable tr:eq(1) td:eq(0)").trigger("dblclick");
- $("#dataTable input")[0].focus();
- });
- });
- {field:"toRun",title:"Run Flag",align:"center",edit:{
- type:'select',//下拉框
- url:'./index.php?r=dictionary/dictionaryInfo&type='+"run",
- //data:[{id:1,text:'hello'},{id:2,text:'hi'}],
- valueField:'id',
- textField:'text',
- editable : false,
- onSelect:function(val,rec){
- //console.log(val,rec);
- }
- },sortable:true}
效果如下
其它的操作,大家可以到這個外掛的網站上查閱文件,或者看js原始碼
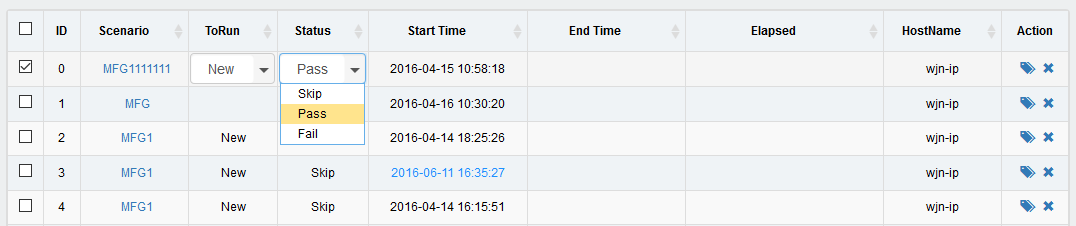
三、動態表頭
動態表頭,說到底就是每次的列資料是不固定的,根據前提條件查詢資料庫,再根據查詢結果載入表頭。有了上邊的修改,實現這個功能已經不在話下,只要把初始化表格的columns替換成我們自定義的資料就可以了,做了個簡單的小demo,具體的可以看【EasyUi DataGrid】動態載入列這篇文章
[javascript] view plain copy print?- $(function(){
- var columnsAll = new Array(); //定義一個新的列集合,用來儲存返回的資料
- //把列資料封裝到一個物件中
- var col = {};
- col["field"] = "index";
- col["title"] = "ID";
- col["align"] = 'center';
- col["formatter"] = function(value, row, index){
- return row.index=index ; //返回行號
- };
- col["edit"] = false;
- columnsAll.push(col); //把這個物件新增到列集合中
- var col2 = {};
- col2["field"] = "scenarioId";
- col2["title"] = "haha";
- col2["align"] = 'center';
- col2["edit"] = false;
- columnsAll.push(col2); //把這個物件新增到列集合中
- //表格資料
- $('#detailTable').bootstrapTable({
- method: 'get',
- url:"./index.php?r=session/sessionInfo",
- editable:true,//開啟編輯模式
- clickToSelect: true,
- cache: false,
- uniqueId: 'index', //將index列設為唯一索引
- striped: true,
- minimumCountColumns: 2,
- smartDisplay:true,
- columns: [
- columnsAll
- ]
- });
- });
效果如下:
