
vue2.x原始碼解析六——元件化--5.生命週期
1.生命週期
Vue例項從建立到銷燬的過程,就是生命週期。詳細來說也就是從開始建立、初始化資料、編譯模板、掛載Dom、渲染→更新→渲染、解除安裝等一系列過程。
首先我們來看一下官網的生命週期圖(我自己做了一點點註釋):
也可以看我之前的部落格 vue生命週期的理解
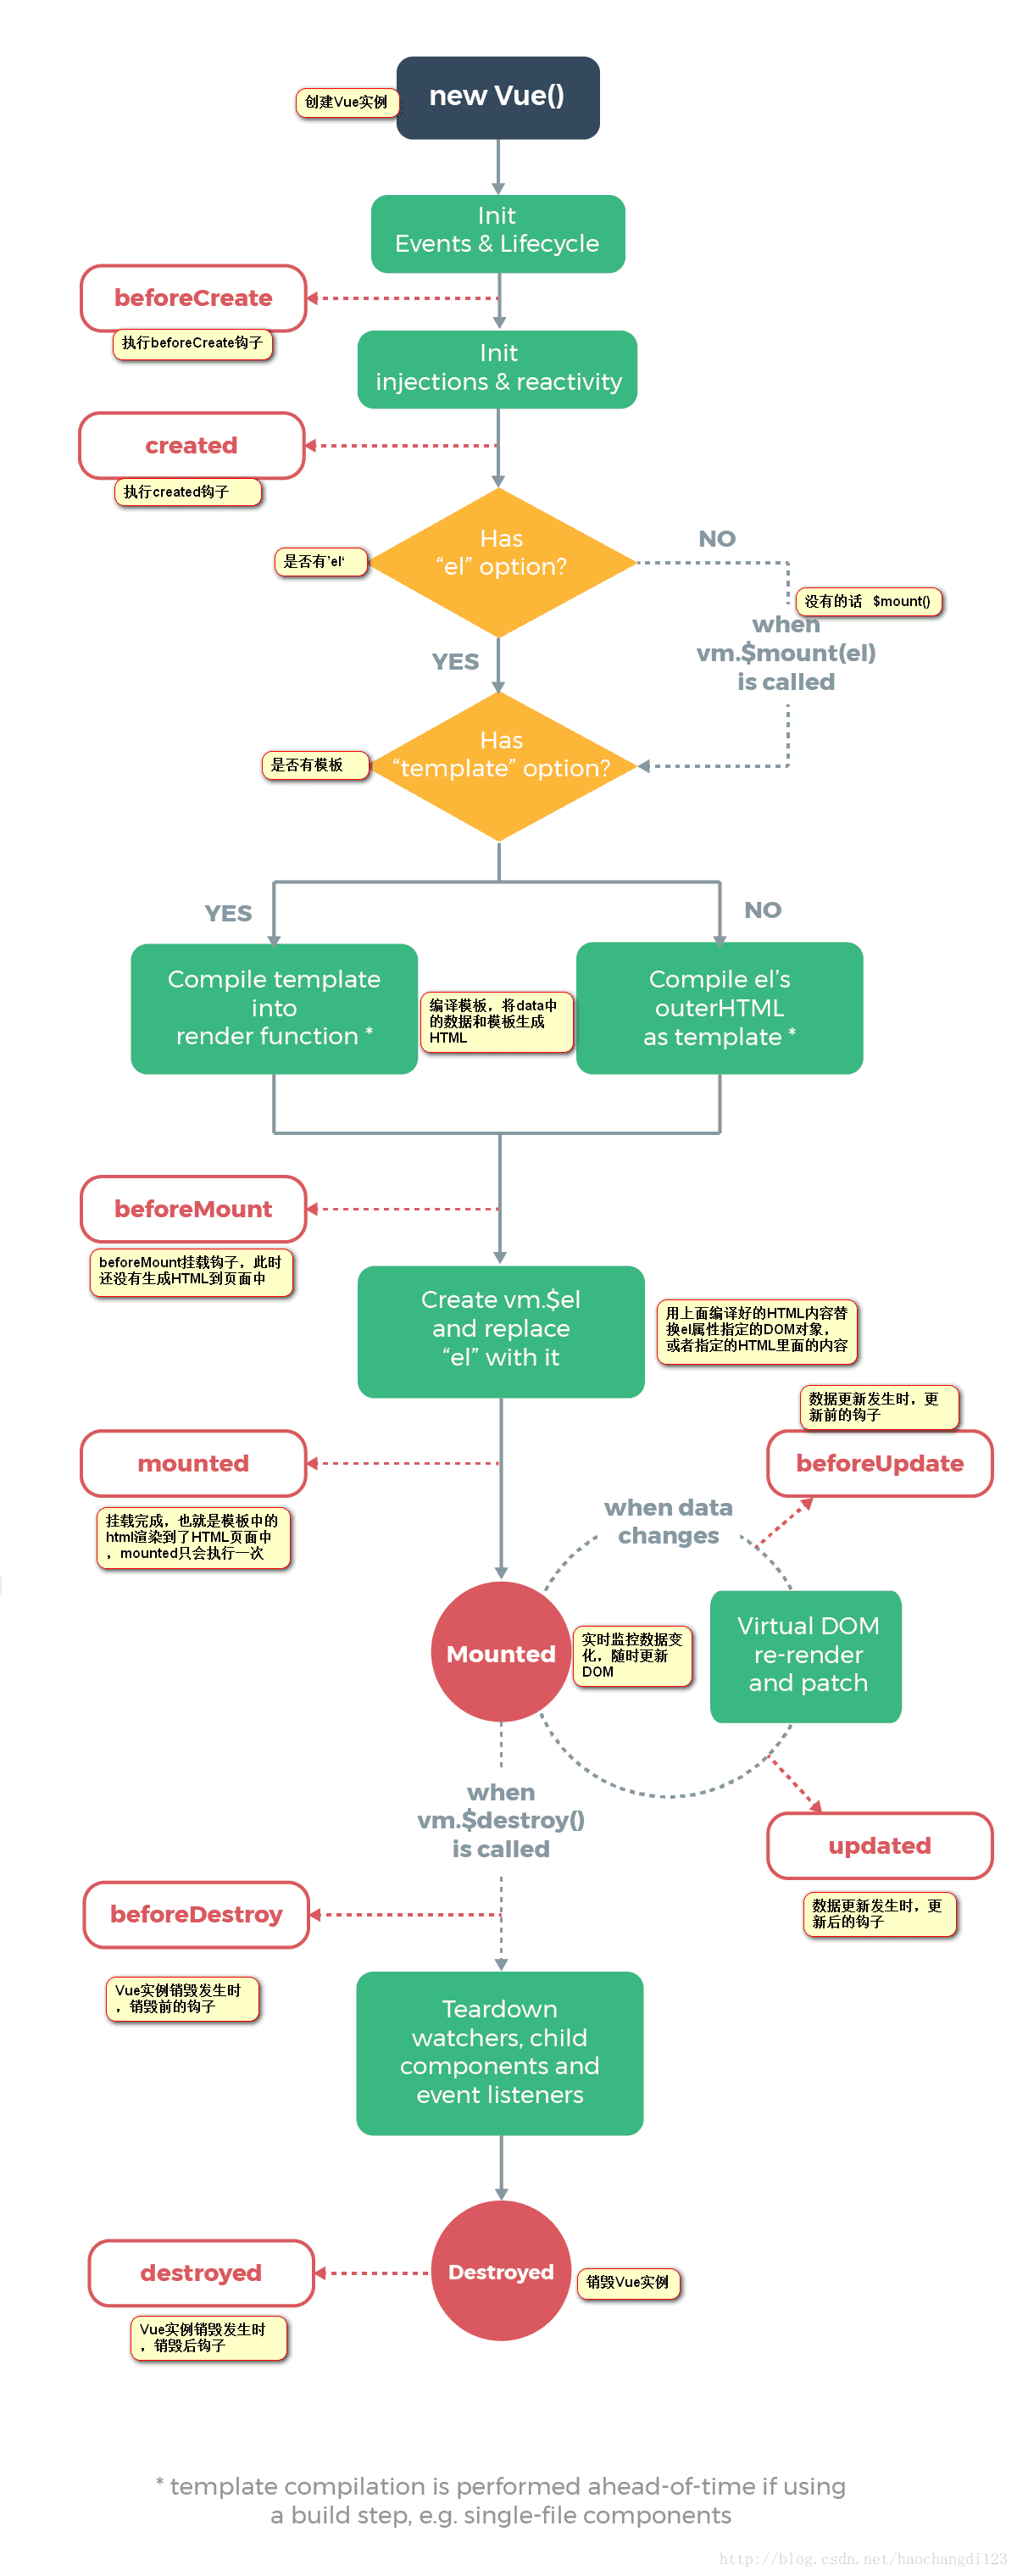
Vue提供給我們的鉤子為上圖的紅色的文字。
生命週期鉤子的函式,給予使用者機會在一些特定的場景下新增他們自己的程式碼。
我們現在用原始碼來分析生命週期的鉤子函式是如何被執行的。
2.瞭解生命週期的執行方式
原始碼中最終執行生命週期的函式都是呼叫 callHook 方法,它的定義在 src/core/instance/lifecycle 中:
export function callHook (vm: Component, hook: string) {
// #7573 disable dep collection when invoking lifecycle hooks
pushTarget()
const handlers = vm.$options[hook]
if (handlers) {
for (let i = 0, j = handlers.length; i < j; i++) {
try {
handlers[i].call(vm)
} catch 引數:
1:Vue例項(元件型別的)
2:hook,String型別的, 比入我們可以傳入 created mounted等生命週期
步驟1:
const handlers = vm.$options[hook]Vue.js 初始化合並 options 的過程,各個階段的生命週期的函式也被合併到 vm.
步驟2:
for (let i = 0, j = handlers.length; i < j; i++) {
      try {
        handlers[i].call(vm)
      } catch (e) {
        handleError(e, vm, `${hook} hook`)
      }
    }
遍歷執傳入的生命週期中所有的所對應的函式,執行的時候把 vm 作為函式執行的上下文。
總結
callhook 函式的功能就是在當前vue元件例項中,呼叫某個生命週期鉤子註冊的所有回撥函式。
3. beforeCreate & created
beforeCreate 和 created 函式都是在例項化 Vue 的階段,在 _init 方法中執行的,它的定義在 src/core/instance/init.js 中:
Vue.prototype._init = function (options?: Object) {
  .
  .
  .
  //主要就是給vm物件添加了$parent、$root、$children屬性,以及一些其它的生命週期相關的標識。
  initLifecycle(vm)
  // 初始化事件相關的屬性
  initEvents(vm)
  // vm添加了一些虛擬dom、slot等相關的屬性和方法
  initRender(vm)

  callHook(vm, 'beforeCreate')

  //下面initInjections(vm)和 initProvide(vm) 兩個配套使用,用於將父元件_provided中定義的值,通過inject注入到子元件,且這些屬性不會被觀察
  initInjections(vm)
   //主要就是操作資料了,props、methods、data、computed、watch,從這裡開始就涉及到了Observer、Dep和Watcher
  initState(vm)
  initProvide(vm)

  callHook(vm, 'created')
  //
  .
  .
  .
}
_init 函式分為3步
1:合併options
2. 呼叫初始化函式
3. 掛載到DOM — $mount
beforeCreate:
是拿不到資料的比如定義在,props、methods、data、computed、watch中的,因為他 initState(vm)之前執行
created
是可以拿到資料的的,因為他在initState(vm)之後執行
總結:
在這倆個鉤子函式執行的時候,並沒有渲染 DOM,所以我們也不能夠訪問 DOM,一般來說,如果元件在載入的時候需要和後端有互動,放在這倆個鉤子函式執行都可以,如果是需要訪問 props、data 等資料的話,就需要使用 created 鉤子函式。
4.beforeMount & mounted
在我們初始化最後回去執行$mount,也就是去執行掛載。
顧名思義,beforeMount 鉤子函式發生在 mount之前,也就是 DOM 掛載之前,它的呼叫時機是在 mountComponent 函式中,定義在 src/core/instance/lifecycle.js 中:
export function mountComponent (
  vm: Component,
  el: ?Element,
  hydrating?: boolean
): Component {
  vm.$el = el
  // 執行beforeMount
  callHook(vm, 'beforeMount')

  let updateComponent
  if (process.env.NODE_ENV !== 'production' && config.performance && mark) {
    updateComponent = () => {
      .
      .
      .
    }
  } else {
    updateComponent = () => {
      vm._update(vm._render(), hydrating)
    }
  }


  new Watcher(vm, updateComponent, noop, {
   .
   .
   .
  }, true /* isRenderWatcher */)
  hydrating = false

  if (vm.$vnode == null) {
    vm._isMounted = true
    // 執行mounted
    callHook(vm, 'mounted')
  }
  return vm
}
過程是
- 渲染
watcher監聽updateComponent方法,在資料初始化和變更的時候呼叫。 updateComponent也就是vm._update(將虛擬DOM對映到真實DM)的函式。vm._update之前會先呼叫vm._render()函式渲染 VNode
4.1 beforeMount
在執行 vm._render() 函式渲染 VNode 之前,執行了 beforeMount 鉤子函式
4.2 mouted
在執行完 vm._update() 把 VNode patch 到真實 DOM 後,執行 mouted 鉤子。
注意:
這是通過外部 new Vue 初始化過程。
因為這裡對 mouted 鉤子函式執行有一個判斷邏輯,vm.$vnode 為 null,因為vm.$vnode的意思是父VNode,如果vue實力沒有父VNode,說明他只有根VNode。則表明這不是一次元件的初始化過程,而是我們通過外部 new Vue 初始化過程。
那麼對於元件,它的 mounted 時機在哪兒呢?
元件 mounted 時機
元件的 VNode patch 到 DOM ,patch的最後會執行 invokeInsertHook 函式,
它的定義在 src/core/vdom/patch.js 中:
invokeInsertHook(vnode, insertedVnodeQueue, isInitialPatch)invokeInsertHook也定義在該 js
function invokeInsertHook (vnode, queue, initial) {
  // delay insert hooks for component root nodes, invoke them after the
  // element is really inserted
  if (isTrue(initial) && isDef(vnode.parent)) {
    vnode.parent.data.pendingInsert = queue
  } else {
    for (let i = 0; i < queue.length; ++i) {
      queue[i].data.hook.insert(queue[i])
    }
  }
}
可以看到把 queue就是insertedVnodeQueue ,invokeInsertHook是將儲存在insertedVnodeQueue的鉤子函式依次執行一遍
insertedVnodeQueue是一個數組,在patch的過程中,會將子元件的子VNode摻入到子元件,這是也會將子元件push到insertedVnodeQueue陣列,子元件插入到父元件的時候也會將父元件push到insertedVnodeQueue陣列,所以是子元件先插入,父元件後插入
我們可以看到遍歷insertedVnodeQueue陣列(裡面放著元件)的時候,會呼叫元件的data中的insert 這個鉤子函式
對於元件而言,insert 鉤子函式的定義在 src/core/vdom/create-component.js 中的 componentVNodeHooks 中:
const componentVNodeHooks = {
  // insert函式
  insert (vnode: MountedComponentVNode) {
    const { context, componentInstance } = vnode
    if (!componentInstance._isMounted) {
      componentInstance._isMounted = true
      // 元件呼叫mounted方法
      callHook(componentInstance, 'mounted')
    }
    //
  },
}
我們可以看到,每個子元件都是在這個鉤子函式中執行 mouted 鉤子函式,並且我們之前分析過,insertedVnodeQueue 的新增順序是先子後父,所以對於同步渲染的子元件而言,mounted 鉤子函式的執行順序也是先子後父。
4.3總結
- 函式渲染 VNode 之前,執行了
beforeMount鉤子函式,也就是說beforeMount函式中是拿不到DOM的 - 對於元件
beforeMount鉤子,是先父後子。
- (因為在元件的的虛擬DOM對映到真實DOM的過程中,顯示父元件對映,這是會走
beforeMount鉤子,再往後發現父元件有子元件就會再執行一遍patch,子元件會再執行beforeMount鉤子,依次類推,最後mounted後分別插入父輩元件)
- (因為在元件的的虛擬DOM對映到真實DOM的過程中,顯示父元件對映,這是會走
- mounted 之後虛擬DOM對映完成,可以拿到DOM
- 對於元件的mounted ,mounted 鉤子函式的執行順序是先子後父。
5.beforeUpdate & updated
顧名思義,beforeUpdate 和 updated 的鉤子函式執行時機都應該是在資料更新的時候。
5.1 beforeUpdate
beforeUpdate 的執行時機是在渲染 Watcher 的 before 函式中,我們剛才提到過:
在mouted的時候呼叫的mountComponent函式中, src/core/instance/lifecycle.js
export function mountComponent (
  vm: Component,
  el: ?Element,
  hydrating?: boolean
): Component {
  // ...

  new Watcher(vm, updateComponent, noop, {
    before () {
    // 先判斷是否mouted完成
      if (vm._isMounted) {
        callHook(vm, 'beforeUpdate')
      }
    }
  }, true /* isRenderWatcher */)
  //
}我們看到有一個before函式,這個函式是在資料變化的時候呼叫flushSchedulerQueue 函式中執行, 它的定義在 src/core/observer/scheduler.js 中:
function flushSchedulerQueue () {
  // ...
  for (index = 0; index < queue.length; index++) {
    watcher = queue[index]
    if (watcher.before) {
      watcher.before()
    }
    id = watcher.id
    has[id] = null
    watcher.run()
  }
}
queue是一個包含所有watcher的陣列,遍歷queue,如果watcher有before函式就會先執行before函式
注意在呼叫before這裡有個判斷,也就是在元件已經 mounted 之後,才會去呼叫這個鉤子函式。也就是說初始化的時候不會呼叫該方法。
我們知道watcher監聽update方法,在變更的時候呼叫。
也就是說會在資料變化前呼叫beforeUpdate這個鉤子
5.2 Update
資料變化的時候呼叫flushSchedulerQueue 函式,
它的定義在 src/core/observer/scheduler.js 中:
function flushSchedulerQueue () {
  // ...
  // 獲取到 updatedQueue
  callUpdatedHooks(updatedQueue)
}

function callUpdatedHooks (queue) {
  let i = queue.length
  while (i--) {
    const watcher = queue[i]
    const vm = watcher.vm
    if (vm._watcher === watcher && vm._isMounted) {
      callHook(vm, 'updated')
    }
  }
}
updatedQueue 是 更新了的 wathcer 陣列,那麼在 callUpdatedHooks 函式中,它對這些陣列做遍歷,只有滿足當前 watcher 為 vm._watcher(也就是當前的渲染watcher) 以及元件已經 mounted 這兩個條件,才會執行 updated 鉤子函式。
我們之前提過,在元件 mount 的過程中,會例項化一個渲染的 Watcher 去監聽 vm 上的資料變化重新渲染,這斷邏輯發生在 mountComponent 函式執行的時候:
export function mountComponent (
  vm: Component,
  el: ?Element,
  hydrating?: boolean
): Component {
  // ...
  // 這裡是簡寫
  let updateComponent = () => {
      vm._update(vm._render(), hydrating)
  }
  new Watcher(vm, updateComponent, noop, {
    before () {
      if (vm._isMounted) {
        callHook(vm, 'beforeUpdate')
      }
    }
  }, true /* isRenderWatcher */)
  // ...
}
那麼在例項化 Watcher 的過程中,在它的建構函式裡會判斷 isRenderWatcher,接著把當前 watcher 的例項賦值給 vm._watcher,定義在 src/core/observer/watcher.js 中:
export default class Watcher {
  // ...
  constructor (
    vm: Component,
    expOrFn: string | Function,
    cb: Function,
    options?: ?Object,
    isRenderWatcher?: boolean
  ) {
    this.vm = vm
    if (isRenderWatcher) {
      vm._watcher = this
    }
    vm._watchers.push(this)
    // ...
  }
}
同時,還把當前 wathcer 例項 push 到 vm._watchers 中,vm._watcher 是專門用來監聽 vm 上資料變化然後重新渲染的,所以它是一個渲染相關的 watcher,因此在 callUpdatedHooks 函式中,只有 vm._watcher 的回撥執行完畢後,才會執行 updated 鉤子函式。
過程:
- 會例項化一個渲染的
Watcher去監聽 vm 上的資料變化 - 例項化
Watcher的過程中,在它的建構函式裡會判斷isRenderWatcher,接著把當前watcher的例項賦值給vm._watcher,vm._watcher是專門用來監聽 vm 上資料變化然後重新渲染的,所以它是一個渲染相關的watcher - 當前
wathcer例項push到vm._watchers中 flushSchedulerQueue函式在資料變化的時候呼叫,再去呼叫callUpdatedHooks函式,並在其中遍歷更新了的 ,只有滿足當前watcher為vm._watcher(也就是當前的渲染watcher) 以及元件已經mounted這兩個條件,才會執行updated鉤子函式。- (只有
vm._watcher的回撥執行完畢後,才會執行 updated 鉤子函式。)
5.2 總結
beforeUpdate發生在資料變化的前,初始化資料並不會觸發update發生在資料變化的後,初始化資料並不會觸發beforeUpdate和update都只會在mounted以後呼叫
6.beforeDestroy & destroyed
顧名思義,beforeDestroy 和 destroyed 鉤子函式的執行時機在元件銷燬的階段,最終會呼叫 $destroy 方法,它的定義在 src/core/instance/lifecycle.js 中:
Vue.prototype.$destroy = function () {
    const vm: Component = this
    if (vm._isBeingDestroyed) {
      return
    }
    // 呼叫beforeDestroy鉤子
    callHook(vm, 'beforeDestroy')
    vm._isBeingDestroyed = true

    // 一些銷燬工作
    const parent = vm.$parent
    if (parent && !parent._isBeingDestroyed && !vm.$options.abstract) {
      remove(parent.$children, vm)
    }
    if (vm._watcher) {
      vm._watcher.teardown()
    }
    let i = vm._watchers.length
    while (i--) {
      vm._watchers[i].teardown()
    }
    if (vm._data.__ob__) {
      vm._data.__ob__.vmCount--
    }
    vm._isDestroyed = true
    // 發現子元件,會先去銷燬子元件
    vm.__patch__(vm._vnode, null)


    // 執行destroyed鉤子
    callHook(vm, 'destroyed')

    vm.$off(
    if (vm.$el) {
      vm.$el.__vue__ = null
    }
    if (vm.$vnode) {
      vm.$vnode.parent = null
    }
}beforeDestroy鉤子函式的執行時機是在$destroy函式執行最開始的地方- 接著執行了一系列的銷燬動作,包括從
parent的$children中刪掉自身,刪除watcher,當前渲染的VNode 執行銷燬鉤子函式等, - 會執行
vm.__patch__(vm._vnode, null)觸發它子元件的銷燬鉤子函式,這樣一層層的遞迴呼叫 - 執行完畢後再呼叫
destroyed鉤子函式。
在 $destroy 的執行過程中,它會執行 vm.__patch__(vm._vnode, null) 觸發它子元件的銷燬鉤子函式,這樣一層層的遞迴呼叫,所以 destroy 鉤子函式執行順序是先子後父,和 mounted 過程一樣。
總結
beforeDestroy鉤子函式的執行時機在元件銷燬的階段前呼叫
destroyed 鉤子函式的執行時機在元件銷燬的階段後呼叫
7.總結
- Vue的生命週期函式就是在初始化及資料更新過程中的不同階段呼叫不通的函式
created鉤子函式可以訪問資料mounted鉤子函式可以訪問DOMdestroyed鉤子函式可以做一些定時器銷燬工作