JavaWEB學習記錄--HtmlUnit爬網頁資料
Java–HtmlUnit爬網頁資料
標籤(空格分隔): java
一直使用免費的SS賬號,但是一定時間都過期,還要手動去換密碼之類的,身為程式設計師,就決定讓這一切都自動化.
htmlunit是一款開源的java 頁面分析工具,讀取頁面後,可以有效的使用htmlunit分析頁面上的內容。專案可以模擬瀏覽器執行,被譽為java瀏覽器的開源實現。最大的優勢可以讓js執行,獲取ajax執行後的結果.
1.抓取準備
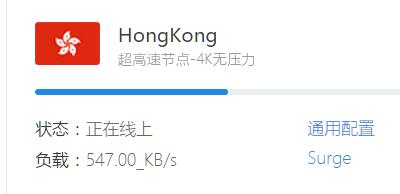
分析:點選Surge後會出來一個模態框,則模態框中顯示配置的連結地址.這個過程並沒傳送請求,所以連結密碼都是js直接生成的.所以後臺要做的事情,模擬點選Surge,然後等js執行後抓取對應dom裡面的內容.
(該連結點選後,會有一個js把modal內容改為正在獲取中,然後再把生成的結果寫入modal中,所以點選後需要配置js延時,不然會獲取不到正確結果)
對應dom:<div class="modal-body" id="watext">
maven引入:
<dependency>
<groupId>net.sourceforge.htmlunit</groupId>
<artifactId>htmlunit</artifactId>
<version 2.配置WebClient
WebClient是htmlunit的內建瀏覽器,理解為一個沒有圖形顯示的瀏覽器.需要配置其一些引數.
waitForBackgroundJavaScript
import com.gargoylesoftware.htmlunit.BrowserVersion;
import com.gargoylesoftware.htmlunit.WebClient;

/**
 * @author Niu Li
 * @date 2016/10/8
 */
public enum  WebClientUtil {

    INSTANCE;

    public WebClient webClient;

    WebClientUtil() {
        webClient = new WebClient(BrowserVersion.CHROME);
        webClient.getOptions().setUseInsecureSSL(true);//支援https
        webClient.getOptions().setJavaScriptEnabled(true); // 啟用JS直譯器,預設為true
        webClient.getOptions().setCssEnabled(false); // 禁用css支援
        webClient.getOptions().setThrowExceptionOnScriptError(false); // js執行錯誤時,是否丟擲異常
        webClient.getOptions().setTimeout(10000); // 設定連線超時時間 ,這裡是10S。如果為0,則無限期等待
        webClient.getOptions().setDoNotTrackEnabled(false);
        webClient.setJavaScriptTimeout(8000);//設定js執行超時時間
        webClient.waitForBackgroundJavaScript(500);//設定頁面等待js響應時間,
    }
}
3.抓取
思路是獲取整個頁面,然後獲取全部的a標籤(因為Surge本質是個a標籤),再對a標籤遍歷找到內容為Surge的標籤,再模擬點選,獲取頁面結果,分析結果,構造ss的配置檔案gui-config.json,寫入到指定路徑.
構造gui-config.json對應實體類
public class SSModel {

    /**
     * configs : [{""}]
     * index : 8
     * random : false
     * global : false
     * enabled : true
     * shareOverLan : false
     * isDefault : false
     * localPort : 1080
     * pacUrl : null
     * useOnlinePac : false
     * reconnectTimes : 0
     * randomAlgorithm : 0
     * TTL : 0
     * proxyEnable : false
     * proxyType : 0
     * proxyHost : null
     * proxyPort : 0
     * proxyAuthUser : null
     * proxyAuthPass : null
     * authUser : null
     * authPass : null
     * autoban : false
     */

    private int index = 0;
    private boolean random = false;
    private boolean global = false;
    private boolean enabled = true;
    private boolean shareOverLan = false;
    private boolean isDefault = false;
    private int localPort = 1080;
    private String pacUrl;
    private boolean useOnlinePac = false;
    private int reconnectTimes = 0;
    private int randomAlgorithm = 0;
    private int TTL = 0;
    private boolean proxyEnable = false;
    private int proxyType = 0;
    private String proxyHost;
    private int proxyPort = 0;
    private String proxyAuthUser = "";
    private String proxyAuthPass = "";
    private String authUser = "";
    private String authPass = "";
    private boolean autoban = false;

    private List<ConfigsBean> configs;
    //省略get和set
}


public class ConfigsBean {
        private String remarks;
        private String server;
        private int server_port;
        private String password;
        private String method;
        private String obfs;
        private String obfsparam = "";
        private String remarks_base64 = "";
        private boolean tcp_over_udp = false;
        private boolean udp_over_tcp = false;
        private String protocol = "origin";
        private boolean obfs_udp = false;
        private boolean enable = true;
        private String id;
        //省略get和set
}
具體獲取方法:
package cn.mrdear.core;

import com.gargoylesoftware.htmlunit.WebClient;
import com.gargoylesoftware.htmlunit.html.DomElement;
import com.gargoylesoftware.htmlunit.html.DomNodeList;
import com.gargoylesoftware.htmlunit.html.HtmlPage;

import java.io.IOException;
import java.util.List;
import java.util.stream.Collectors;

import cn.mrdear.model.ConfigsBean;
import cn.mrdear.util.ModelUtil;

/**
 * @author Niu Li
 * @date 2016/10/8
 */
public class MianVpn {

    private static final java.lang.String HOME_PAGE = "https://www.mianvpn.com";

    public List<ConfigsBean> fetch(WebClient webClient) throws IOException {
        //拿到整個頁面
        final HtmlPage page = webClient.getPage(HOME_PAGE);
        //拿到全部a標籤
        DomNodeList<DomElement> domNodeList = page.getElementsByTagName("a");

        List<ConfigsBean> results = domNodeList.stream()
                //找到內容為Surge的a標籤
                .filter(domElement -> {
                    if (domElement.getTextContent().equals("Surge")) {
                        System.out.println(domElement.getTextContent());
                        return true;
                    }
                    return false;
                })
                //模擬點選,並取出結果
                .map(domElement -> {
                    HtmlPage tempPage = null;
                    try {
                        webClient.waitForBackgroundJavaScript(500);
                        tempPage = domElement.click();
                        //這裡如果仍然獲取不到,可以讓執行緒sleep下,再獲取
                        DomElement surge_url = tempPage.getElementById("surge_url");
                        if (surge_url != null) {
                            String href = surge_url.getAttribute("href");
                            System.out.println(href);
                            //轉換為想要的結果
                            return parseUrl(href);
                        }
                    } catch (IOException e) {
                        e.printStackTrace();
                    }
                    return null;
                })
                //過濾掉為null的結果
                .filter(configsBean -> configsBean != null)
                //轉換為list
                .collect(Collectors.toList());
            return results;
    }

    /**
     * https://user.mianvpn.com/api/ss/surge/?host=47.88.188.62&port=10001&method=rc4-md5&pw=9575
     * 解析得到的結果
     */
    private ConfigsBean parseUrl(String url) {
        String paramStr = url.substring(url.indexOf('?')+1);
        String[] paramArr = paramStr.split("&");

        String host = paramArr[0].substring(paramArr[0].indexOf('=')+1);
        Integer port = Integer.parseInt(paramArr[1].substring(paramArr[1].indexOf('=')+1));
        String method = paramArr[2].substring(paramArr[2].indexOf('=')+1);
        String pwd = paramArr[3].substring(paramArr[3].indexOf('=')+1);

        ConfigsBean configsBean = new ConfigsBean();
        configsBean.setRemarks(host);
        configsBean.setServer(host);
        configsBean.setServer_port(port);
        configsBean.setMethod(method);
        configsBean.setPassword(pwd);
        configsBean.setObfs("http_simple");
        configsBean.setId(ModelUtil.generateId());
        return configsBean;
    }
}
上面方法返回一個list集合,所以另起一個主方法呼叫,這樣的話就可以寫多個抓取方法,最後綜合結果.
主呼叫方法:
寫入檔案和讀取檔案,均使用fastjson
public class Main {

    private static final String SS_PATH = "D:\\tools\\翻牆\\gui-config.json";

    public static void main(String[] args) {

        try (final WebClient webClient = WebClientUtil.INSTANCE.webClient;
             InputStream inputStream = new FileInputStream(new File(SS_PATH));
             OutputStream outputStream = new FileOutputStream(new File(SS_PATH));
        ) {

            MianVpn mianVpn = new MianVpn();
            List<ConfigsBean> mianVpns = mianVpn.fetch(webClient);
            for (ConfigsBean vpn : mianVpns) {
                System.out.println(vpn);
            }
            //讀取原配置檔案
            SSModel model = JSON.parseObject(inputStream, null, SSModel.class);
            if (model == null) {
                model = new SSModel();
                model.setConfigs(mianVpns);
            }
            //寫入config那部分.
            JSON.writeJSONString(outputStream, model);
        } catch (IOException e) {
            e.printStackTrace();
        }
    }

}
抓取結果:
另外可以再抓取其他網站的賬號密碼,一起再主方法中呼叫
4.使用bat指令碼
該專案打包後是一個jar,每次密碼失效的時候都需要去執行一下.這樣的工作完全可以讓指令碼來替代,寫個bat指令碼執行java -jar XX.jar即可.
@echo off
color 1f
cls
echo.
echo 1獲取賬號
echo.
echo 2退出
echo.
SET t=
SET /P t=請選擇1/2:
IF /I '%t:~0,1%'=='1' GOTO start
IF /I '%t:~0,1%'=='2' GOTO stop
exit

:start
echo 正在獲取,請稍後
java -jar E://jar/mrdear-1.0.jar
start D:\tools\翻牆\ShadowsocksR-dotnet4.0.exe
goto finish

:stop
echo 正在退出,請稍後


goto end
:end
exet
5.遇到其他問題
一開始maven打包後引入的其他jar架包打包不進去,每次都找不到主main入口,後來查了下,需要額外一個外掛才可以執行起來.
該外掛會把啟動方法寫入到MANIFEST.MF當中.
        <plugin>
                <groupId>org.apache.maven.plugins</groupId>
                <artifactId>maven-shade-plugin</artifactId>
                <version>1.2.1</version>
                <executions>
                    <execution>
                        <phase>package</phase>
                        <goals>
                            <goal>shade</goal>
                        </goals>
                        <configuration>
                            <transformers>
                            //這裡配置主main方法.
                                <transformer implementation="org.apache.maven.plugins.shade.resource.ManifestResourceTransformer">
                                    <mainClass>cn.mrdear.core.Main</mainClass>
                                </transformer>
                            </transformers>
                        </configuration>
                    </execution>
                </executions>
            </plugin>

