
自定義的頂部標題欄
阿新 • • 發佈:2019-02-03
標題欄一直是使用次數非常多的一個東西,所以把標題欄模組化,更能加快我們的開發效率
本文將自定義一個標題欄,用於複用,只是一個基本的小架子,不過思路很重要,有了這個思路,相信都能做出一個漂亮的模組化的標題欄
首先
在Valus資料夾下面新建一個atts檔案,使用styleable來定義我們的需要實現的一些自定義的屬性,name中放置屬性的名字,frormat設定屬性的型別,比如左邊的textview的文字大小我們用dimen型別來定義
有的人肯定會問為什麼不用button,而用textview呢,因為我覺得textview比button更加靈活,我們在xml中可以通過設定drawleft設定圖片,也能設定點選事件,功能比較靈活
定位好我們需要的屬性之後,新建一個java檔案,去呼叫我們的屬性,並賦值
*首先定義好我們需要的控制元件,一般一個ToolBar分為3個部分,左邊中間和右邊,我們用3個TextView來表示,同時把屬性也先初始化好<?xml version="1.0" encoding="utf-8"?> <resources> <declare-styleable name="CstTopView"> <attr name="LeftText" format="string" /> <attr name="LeftTextSize" format="dimension" /> <attr name="LeftTextColor" format="color|reference" /> <attr name="RightText" format="string" /> <attr name="RightTextSize" format="dimension" /> <attr name="RightTextColor" format="color|reference" /> <attr name="TitleText" format="string" /> <attr name="TitleSize" format="dimension" /> <attr name="TitleColor" format="reference|color" /> <attr name="leftBG" format="color|reference" /> <attr name="rightBg" format="reference|color" /> <attr name="titleBG" format="reference|color" /> </declare-styleable> </resources>
 //3個對應的控制元件
    private TextView LeftTv, RightTv, TitleTv;

    //控制元件相對應的一些屬性
    private float LeftSize, RightSize, TltleSize;
    private String LeftText, RightText, TtleText;
    private Drawable TitlebgColor, LeftTextbgColor, RightTexbgtColor;
    private ToolListener listener;
    private Drawable LeftBg, RightBg, TitleBg;

    //控制元件的位置屬性
    private LayoutParams LeftParams, RightParams, TitleParams;
public class CstTopView extends RelativeLayout {程式碼如下
  public CstTopView(Context context, AttributeSet attrs) {
        super(context, attrs);
        //使用TypedArray來儲存我們在atts中設定的屬性,通過context獲取我們相對應的xml檔案的屬性陣列
        TypedArray ta = context.obtainStyledAttributes(attrs, R.styleable.CstTopView);
        //在TypedArray中,屬性是通過鍵值對的形式存在的,所以我們在取相對應的屬性的時候,通過我們在xml中設定的屬性型別來獲取
        //第一個屬性是我們在xml中設定的,第二個是預設屬性,就是在第一個屬性為空的時候,預設展示出來的,這裡我設定為0
        LeftSize = ta.getDimension(R.styleable.CstTopView_LeftTextSize, 0);
        RightSize = ta.getDimension(R.styleable.CstTopView_RightTextSize, 0);
        TltleSize = ta.getDimension(R.styleable.CstTopView_TitleSize, 0);
        LeftText = ta.getString(R.styleable.CstTopView_LeftText);
        RightText = ta.getString(R.styleable.CstTopView_RightText);
        TtleText = ta.getString(R.styleable.CstTopView_TitleText);
        TitlebgColor = ta.getDrawable(R.styleable.CstTopView_TitleColor);
        LeftTextbgColor = ta.getDrawable(R.styleable.CstTopView_RightTextColor);
        RightTexbgtColor = ta.getDrawable(R.styleable.CstTopView_RightTextColor);
        LeftBg = ta.getDrawable(R.styleable.CstTopView_leftBG);
        RightBg = ta.getDrawable(R.styleable.CstTopView_rightBg);
        TitleBg = ta.getDrawable(R.styleable.CstTopView_titleBG);
        //使用完記得回收,放置快取引起的bug
        ta.recycle();
//獲得這些屬性之後,把相對應的控制元件New出來並設定上這些屬性;
LeftTv = new TextView(context);
RightTv = new TextView(context);
TitleTv = new TextView(context);
LeftTv.setText(LeftText);
LeftTv.setTextSize(LeftSize);
LeftTv.setBackground(LeftTextbgColor);
LeftTv.setBackground(LeftBg);
RightTv.setText(RightText);
RightTv.setTextSize(RightSize);
RightTv.setBackground(RightTexbgtColor);
RightTv.setBackground(RightBg);
TitleTv.setText(TtleText);
TitleTv.setTextSize(TltleSize);
TitleTv.setBackground(TitlebgColor);
TitleTv.setGravity(Gravity.CENTER);
TitleTv.setBackground(TitleBg);
//給我們的topview設定一個背景,用來區分
setBackgroundResource(R.color.yellow); //設定控制元件的位置資訊,並新增到viewgroup中
LeftParams = new LayoutParams(ViewGroup.LayoutParams.WRAP_CONTENT, ViewGroup.LayoutParams.MATCH_PARENT);
LeftParams.addRule(RelativeLayout.ALIGN_PARENT_LEFT, TRUE);
LeftParams.addRule(RelativeLayout.CENTER_VERTICAL, TRUE);
RightParams = new LayoutParams(ViewGroup.LayoutParams.WRAP_CONTENT, ViewGroup.LayoutParams.MATCH_PARENT);
RightParams.addRule(RelativeLayout.ALIGN_PARENT_RIGHT, TRUE);
RightParams.addRule(RelativeLayout.CENTER_VERTICAL);
TitleParams = new LayoutParams(ViewGroup.LayoutParams.WRAP_CONTENT, ViewGroup.LayoutParams.MATCH_PARENT);
TitleParams.addRule(RelativeLayout.CENTER_HORIZONTAL, TRUE);
addView(LeftTv, LeftParams);
addView(RightTv, RightParams);
addView(TitleTv, TitleParams); //然後我們給這些控制元件加上監聽首先我們定義一個介面,實現倆個方法,左邊的監聽和右邊的監聽
public interface ToolListener {
void LeftClick();
void RightClick();
}
//然後對外部暴露一個方法,通過介面回撥來呼叫,這樣就連線起來了
public void SetTopListener(ToolListener listener) {
this.listener = listener;
} private ToolListener listener; //通過內部的物件物件,加監聽
LeftTv.setOnClickListener(new OnClickListener() {
@Override
public void onClick(View view) {
listener.LeftClick();
}
});
RightTv.setOnClickListener(new OnClickListener() {
@Override
public void onClick(View view) {
listener.RightClick();
}
});這樣程式碼的部分就完成了,接下來在xml中使用我們的自定義控制元件
<?xml version="1.0" encoding="utf-8"?>
<LinearLayout xmlns:android="http://schemas.android.com/apk/res/android"
    xmlns:app="http://schemas.android.com/apk/res-auto"
    xmlns:tools="http://schemas.android.com/tools"
    android:id="@+id/activity_main"
    android:layout_width="match_parent"
    android:layout_height="match_parent"
    android:orientation="vertical"
    tools:context="com.anlaiye.swt.csttopview.MainActivity">

    <com.anlaiye.swt.csttopview.CstTopView
        android:id="@+id/csttopview"
        android:layout_width="match_parent"
        android:layout_height="40dp"
        app:LeftText="我是左邊"
        app:leftBG="@color/colorPrimary"
        app:LeftTextSize="5sp"
        app:RightText="我是右邊"
        app:RightTextSize="5sp"
        app:rightBg="@color/colorAccent"
        app:TitleSize="10sp"
        app:TitleText="我是中間">

    </com.anlaiye.swt.csttopview.CstTopView>


</LinearLayout>
xmlns:app="http://schemas.android.com/apk/res-auto"比如app:leftBG,通過這個方式,來為我們的自定義屬性賦值,也可以取其他的名字,
比如
xmlns:lll="http://schemas.android.com/apk/res-auto"lll:leftBG
效果圖如下
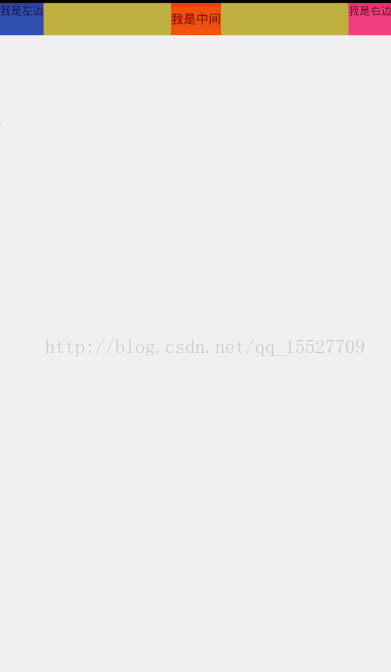
效果很簡陋,但是這個模型的方式設計師可以繼續深入研究優化的,可以在自定義的這個類中定位更多需要用到的屬性
比如設定左邊加個圖片,左邊的隱藏,都是可以的