
WIN7 搭建TensorFlow框架 Anaconda +TensorFlow+PyCharm
阿新 • • 發佈:2019-02-11
因為論文中要使用中GAN(對抗式生成網路),找了幾篇論文,程式碼都使用了TensorFlow框架,沒辦法,開始搭建環境。網上有很多教程,但WIN10的為多,我的系統是WIN7,環境的搭建費了一功夫,於是決定把搭建過程及遇到的問題和方法都記錄下來。
第一步:下載安裝包
Anaconda下載地址:https://repo.continuum.io/archive/(可以看看我的另一篇部落格)
第二步:安裝Anaconda
雙擊 Anaconda安裝包,我一般只修改安裝路徑,其他的都是預設。
第三步:確認Python的版本
進行dos(“開始”下執行“cmd”),輸入:
python

Python的版本為3.5.2
第四步:安裝TensorFlow
TensorFlow分為兩個版本,cpu和gpu。如果要安裝gpu版本,則需要安裝cuda8.0以及對應的cudnn。安裝cuda的時候,要注意自己的顯示卡是否支援cuda8.0。我是使用GPU-Z工具檢視顯示是否支援cuda,網上有很多方法。我的顯示卡不支援,所以裝了cpu版本的TensorFlow。
TensorFlow-cpu的一鍵安裝,在DOS下輸入:
pip3 install --upgrade --ignore-installed tensorflow 第五步:測試TensorFlow是否安裝成功
python
import tensorflow as tf
hello = tf.constant('Hello, TensorFlow!')
sess = tf.Session()
print(sess.run(hello))
輸入結果:Hello,TensorFlow!a = tf.constant(10)
b = tf.constant(32)
print(sess.run(a + b))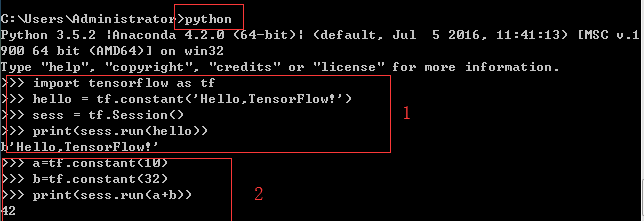
第六步:安裝PyCharm
安裝教程網上有很多,這裡不再重述,可以參考這篇https://jingyan.baidu.com/article/90895e0f28a32064ec6b0bc7.html