
Eclipse Commands 指南(一)
本文介紹了使用Eclipse Commands。它描述瞭如何建立命令,處理程式,新增到選單命令,彈出視窗,檢視和編輯器和表示式的使用限制使用者介面的貢獻。該快捷鍵的使用和解釋。
本文是基於Eclipse Helios(3.6)。
1。 Eclipse的命令 - 概述
1.1。概述
Eclipse的一個commands是一個元件的說明和宣告的實施細則,從獨立。一個commands可以被歸類,分配給使用者介面和一鍵繫結可以為命令定義。commands的行為可以通過定義一個處理程式。
因此,你必須要定義和使用一個commands
.你需要 - 描述該元件的宣告
Handler - 定義行為
UI的分配 - 在哪裡,怎樣的commands包含在使用者介面
commands是通過定義擴充套件點org.eclipse.ui.commands。
下面的例子使用的是基於Eclipse RCP的,但這個概念也適用於一般的Eclipse外掛開發。
1.2。位置的URI - 使用者介面
命令可以用來在選單,工具欄和/或上下文選單。在何處以及如何顯示這些命令的定義是通過一個位置的URI。
Table 1.
| Contribution to | Description | Uri |
| Application menu | Displays the command in the menu of the application | "menu:org.eclipse.ui.main.menu" |
| Application toolbar | displays the command in the toolbar of the application | "toolbar:org.eclipse.ui.main.toolbar" |
| View toolbar | displays the command in the toolbar of the view | "toolbar:viewId". For example to display a menu to view with the Id "View1" use "toolbar:Views1". |
| Content menu / pop-up | Command is displayed in a content menu, e.g. right mouse click on an object | n.a |
Uri
Application menu Displays the command in the menu of the application "menu:org.eclipse.ui.main.menu"
Application toolbar displays the command in the toolbar of the application "toolbar:org.eclipse.ui.main.toolbar"
c"toolbar:viewId". For example to display a menu to view with the Id "View1" use "toolbar:Views1".
1.3. Command Handler
一個command行為是通過handler定義的,您可以一個command定義幾個handlers,但只有唯一的handler可以是在某點有效的command,否則該command是不活躍。handler是將執行一次該command的類呼叫。一個command handler必須實現該介面org.eclipse.core.commands.IHandler。
IHandler(由org.eclipse.core.commands.AbstractHandler實施)定義了可實現以下重要的方法:
isEnabled: 例項化過程中呼叫,定義 這個動作是否啟用
isHandled: 定義handler可以不可以呼叫
execute: 執行操作的編碼
fireHandlerChanged: isEnabled改變時需要呼叫
類HandlerUtil提供訪問的方法是Eclipse重要的服務。
handler可以定義與其它條件下它們是有效command的處理程式,如果不能選擇一個有效的handler, Eclipse執行時不能有效決定哪一個要使用,該command將無法啟用。
2. Commands and menus
2.1. 假設
我假設你已經知道如何建立一個Eclipse RCP應用程式.可以看Eclipse RCP - 詳細教程。
2.2。command定義
我們將建立一個command將退出該應用程式。建立一個新的RCP工程專案“de.vogella.rcp.commands.first”使用的“Hello RCP”的模板。點選plugin.xml中,選擇擴充套件選項卡。按“新增”按鈕。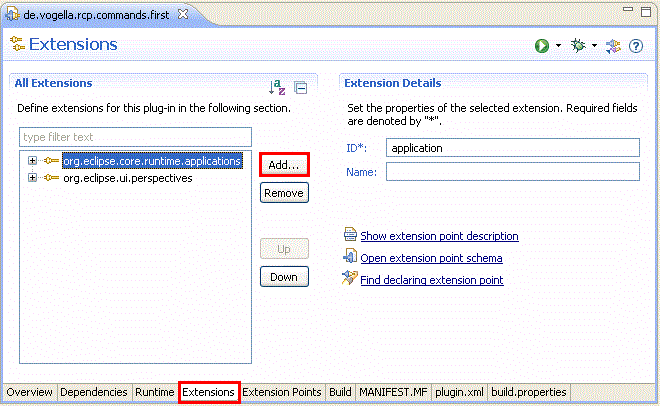
在擴充套件點搜尋 "org.eclipse.ui.commands". 選擇它,然後按完成
右鍵點選你的擴充套件點建立一個command,選擇new - >command
如果你只看到一個“Generic”項你最有可能還沒有下載"Eclipse for RCP/Plug-in Developers".請查詢Eclipse安裝方法

設定ID為“de.vogella.rcp.commands.first.commands.Exit”和name為Exit輸入類“de.vogella.rcp.commands.first.commands.ExitHandler”為defaultHandler。按超連結“defaultHandler”建立這個類,然後選擇“org.eclipse.core.commands.AbstractHandler作為超類”。
2.3. 在menus裡使用commands
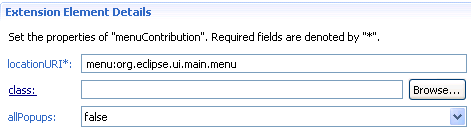
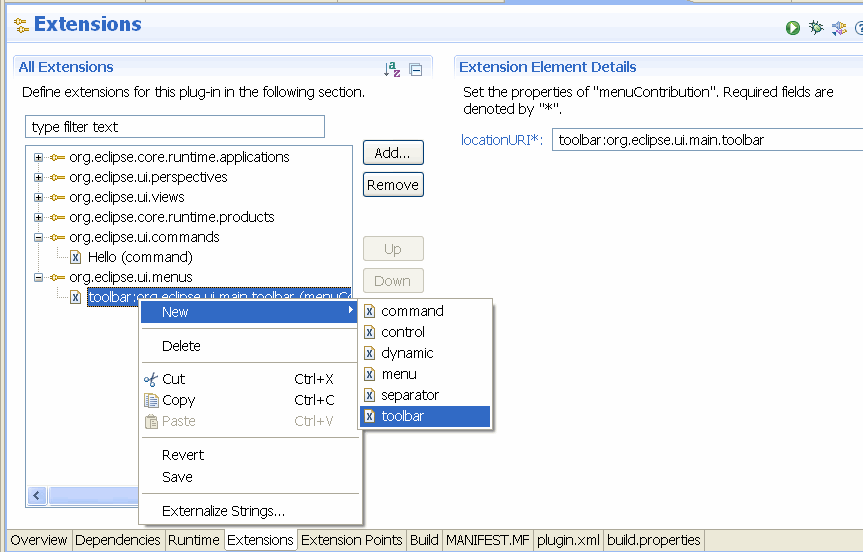
我們定義的command應該在選單使用。新增擴充套件點“org.eclipse.ui.menus”到你的應用程式類似新增副檔名“org.eclipse.ui.commands”。右鍵單擊擴充套件點,並選擇new - > menuContribution。

建立一個新的選單確認URI位置為“menu:org.eclipse.ui.main.menu”。確保這個網址是正確的,否則你的選單將不會顯示.
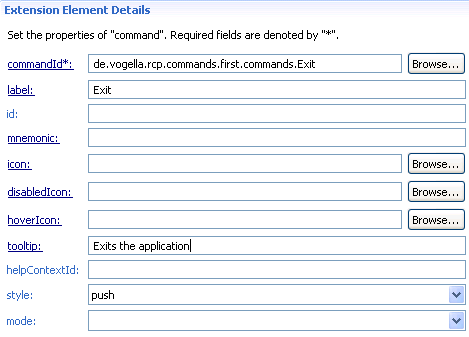
右鍵單擊您menucontribution並選擇new - >menu。新增一個標籤選單“File”和id“fileMenu”。
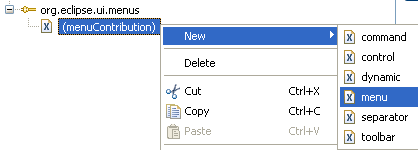
選擇你的選單,右鍵點選它,選擇New ->command。保持你的commandID。設定label為“exit”和tooltip標籤“Exits the application”。
你上面工作應生成的plugin.xml檔案,該檔案看起來像下面那樣。
<?xml version="1.0" encoding="UTF-8"?>
<?eclipse version="3.4"?>
<plugin>
<extension
id="application"
point="org.eclipse.core.runtime.applications">
<application>
<run
class="de.vogella.rcp.commands.first.Application">
</run>
</application>
</extension>
<extension
point="org.eclipse.ui.perspectives">
<perspective
name="RCP Perspective"
class="de.vogella.rcp.commands.first.Perspective"
id="de.vogella.rcp.commands.first.perspective">
</perspective>
</extension>
<extension
point="org.eclipse.ui.commands">
<command
defaultHandler="de.vogella.rcp.commands.first.commands.ExitHandler"
id="de.vogella.rcp.commands.first.commands.Exit"
name="Exit">
</command>
</extension>
<extension
point="org.eclipse.ui.menus">
<menuContribution
locationURI="menu:org.eclipse.ui.main.menu">
<menu
id="fileMenu"
label="File">
<command
commandId="de.vogella.rcp.commands.first.commands.Exit"
label="Exit"
style="push"
tooltip="Exit the application">
</command>
</menu>
</menuContribution>
</extension>
</plugin>
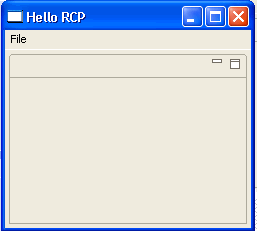
執行該示例。您應該看到的檔案選單,如果你選擇“exit”項你應該退出程式。
3. Commands and toolbars
3.1。概述
您可以新增command到應用程式工具欄,或者到一個檢視的工具欄上。
您可以通過使用模式定義了一個command的相對位置?前= id或?後=id。該ID可以是現有的分隔符的名稱,menu ID或item ID。該command將被放置之前或之後與相應對應的id元素。
3.2. 應用程式工具欄 (coolbar)
建立一個新的專案“de.vogella.rcp.intro.commands.toolbar”。選擇使用“RCP application with a view“模板.
建立一個command為“de.vogella.rcp.intro.commands.toolbar.Hello”同時建立default handler為“de.vogella.rcp.intro.commands.toolbar.handler.Hello”。
package de.vogella.rcp.intro.commands.toolbar.handler;
import org.eclipse.core.commands.AbstractHandler;
import org.eclipse.core.commands.ExecutionEvent;
import org.eclipse.core.commands.ExecutionException;
import org.eclipse.jface.dialogs.MessageDialog;
import org.eclipse.ui.handlers.HandlerUtil;
public class Hello extends AbstractHandler {
@Override
public Object execute(ExecutionEvent event) throws ExecutionException {
MessageDialog.openInformation(HandlerUtil.getActiveWorkbenchWindow(
event).getShell(), "Info", "Info for you");
return null;
}
}
新增一個menucontribution在“org.eclipse.ui.menus”擴充套件點上。在URI位置上設定為“toolbar:org.eclipse.ui.main.toolbar”。將其新增到您的工具欄選單。
在工具欄上新增command“de.vogella.rcp.intro.commands.toolbar.Hello”的。在標籤欄輸入標籤名,並在圖示欄輸入一個圖示。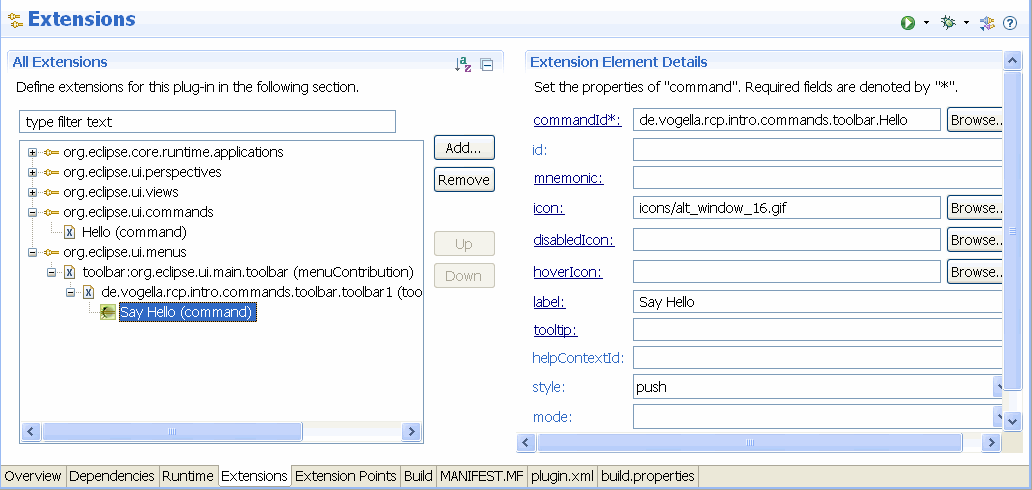
開啟應用程式中ApplicationWorkbenchWindowAdvisor.java類檔案,設定configurer.setShowCoolBar(true);
package de.vogella.rcp.intro.commands.toolbar;
import org.eclipse.swt.graphics.Point;
import org.eclipse.ui.application.ActionBarAdvisor;
import org.eclipse.ui.application.IActionBarConfigurer;
import org.eclipse.ui.application.IWorkbenchWindowConfigurer;
import org.eclipse.ui.application.WorkbenchWindowAdvisor;
public class ApplicationWorkbenchWindowAdvisor extends WorkbenchWindowAdvisor {
public ApplicationWorkbenchWindowAdvisor(
IWorkbenchWindowConfigurer configurer) {
super(configurer);
}
public ActionBarAdvisor createActionBarAdvisor(
IActionBarConfigurer configurer) {
return new ApplicationActionBarAdvisor(configurer);
}
public void preWindowOpen() {
IWorkbenchWindowConfigurer configurer = getWindowConfigurer();
configurer.setInitialSize(new Point(400, 300));
configurer.setShowStatusLine(false);
configurer.setShowCoolBar(true);
configurer.setTitle("RCP Application");
}
}
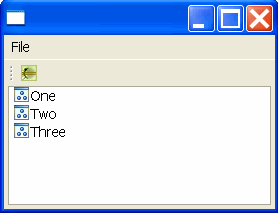
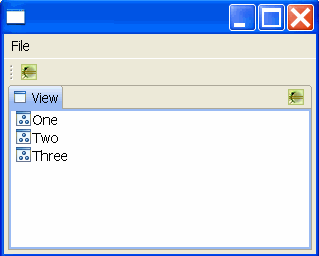
結果應該如下所示:
3.3. 將工具欄展示在檢視上
您也可以直接新增一個command到一個檢視工具欄。為此,我們將擴充套件前面的例子。
更改Perspective.java如下(一個獨立的檢視並沒有自己的工具欄)。
package de.vogella.rcp.intro.commands.toolbar;
import org.eclipse.ui.IPageLayout;
import org.eclipse.ui.IPerspectiveFactory;
public class Perspective implements IPerspectiveFactory {
public void createInitialLayout(IPageLayout layout) {
String editorArea = layout.getEditorArea();
layout.setEditorAreaVisible(false);
layout.setFixed(true);
layout.addView(View.ID, IPageLayout.LEFT, 1.0f, editorArea);
}
}
同樣在"org.eclipse.ui.menus"點上擴充套件一個新的menucontribution ,在URI位置上輸入"toolbar:de.vogella.rcp.intro.commands.toolbar.view".
工具欄告訴系統將它新增到工具欄,而第二個引數是你的檢視id
然後為這個menucontribution建立一個新的command並設定command ID為“de.vogella.rcp.intro.commands.toolbar.Hello”。標籤欄輸入“Say Hello”。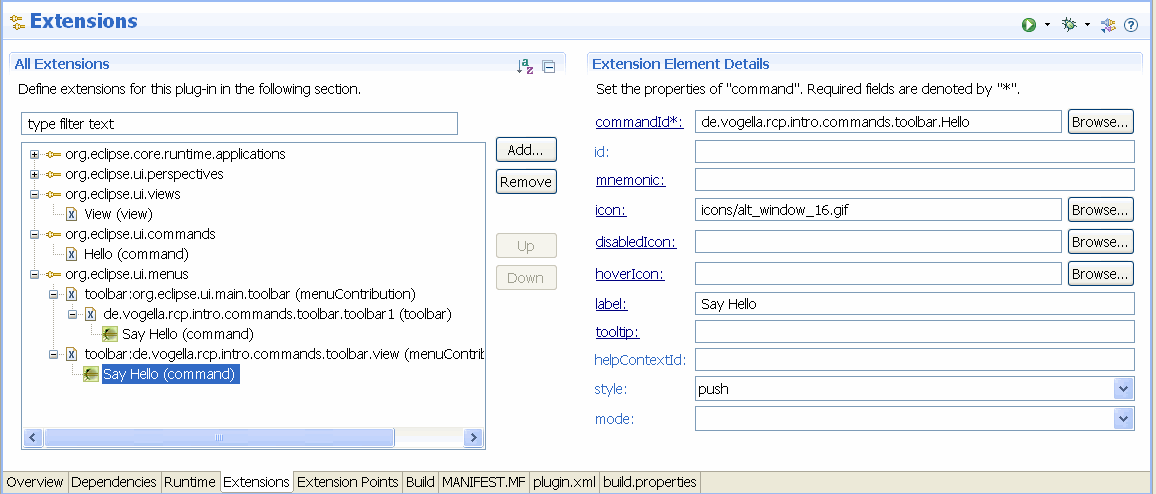
執行應用程式,將看你的新檢視的效果。
3.4. 下拉列表
下面的下拉列表中新增一個CoolBar欄中的應用程式。
這個創舉,是有點奇怪。您建立一個幫助下拉命令後來其他(真實)的command將被分配到。
因此,建立一個command ID為“referenceToMenuId”。同此也是default handler。對於你這個樣例可以重新使用“de.vogella.rcp.intro.commands.toolbar.handler.Hello”。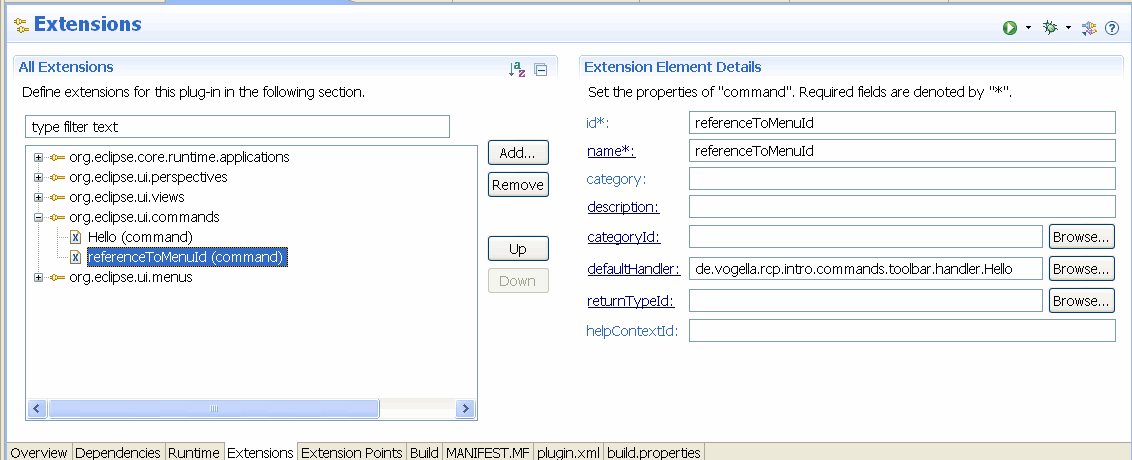
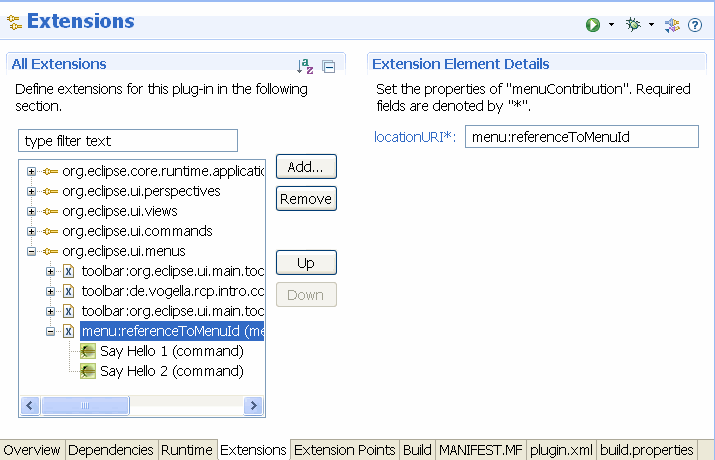
基於“org.eclipse.ui.menus”新增新menucontribution擴充套件點。設定URI位置為的“toolbar:org.eclipse.ui.main.toolbar”。新增這個擴充套件工具欄和一個新的command,以這個新的工具欄。ID使用“referenceToMenuId”同時給它一個標籤和一個圖示和更改樣式為“pull down”。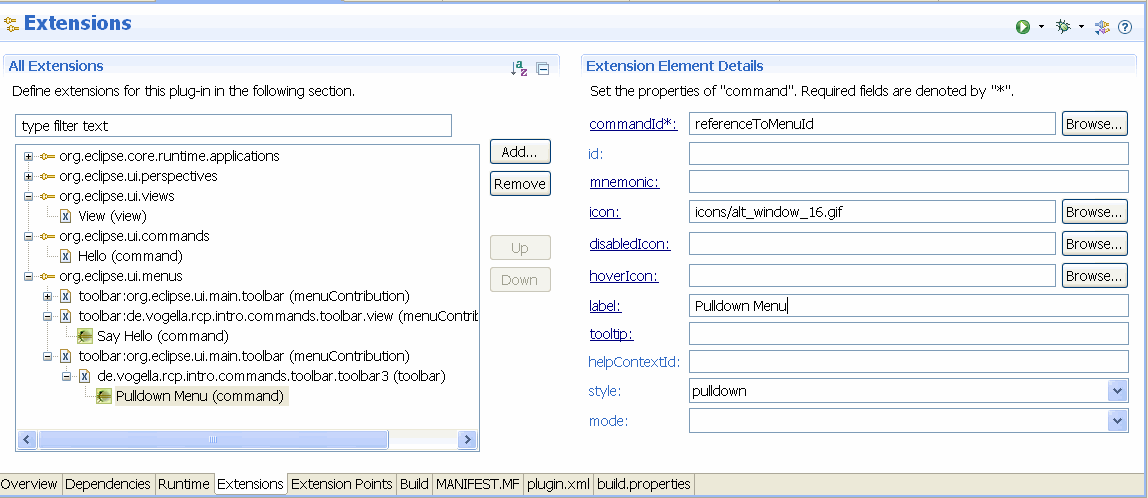
建立一個新的menucontribution並設定locationURI為:“menu:referenceToMenuId
referenceToMenuId是我們較早使用ID在命令中
在這個選單裡新增您的exit命令“de.vogella.rcp.intro.commands.toolbar.Hello”兩次。並使用不同的標籤。
執行您的應用程式,現在應用程式應該有一個工具欄下拉列表的。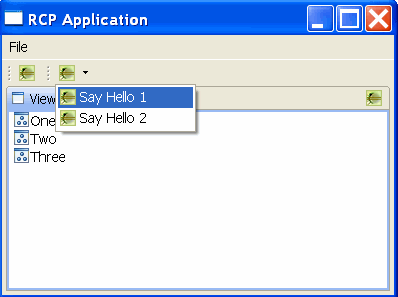
同樣你也能將該下拉工具欄命令“referenceToMenuId“新增到你的檢視工具欄上。
(版權歸原作者所有)