
Python——檢視安裝位置和安裝的庫
檢視Python 安裝位置和安裝的庫
步驟一:
1. Start 一個command prompt
2. 找到電腦中已經安裝的Python 位置:
where python- 1
開啟路徑, cd 到輸出的路徑,之後
start.- 1

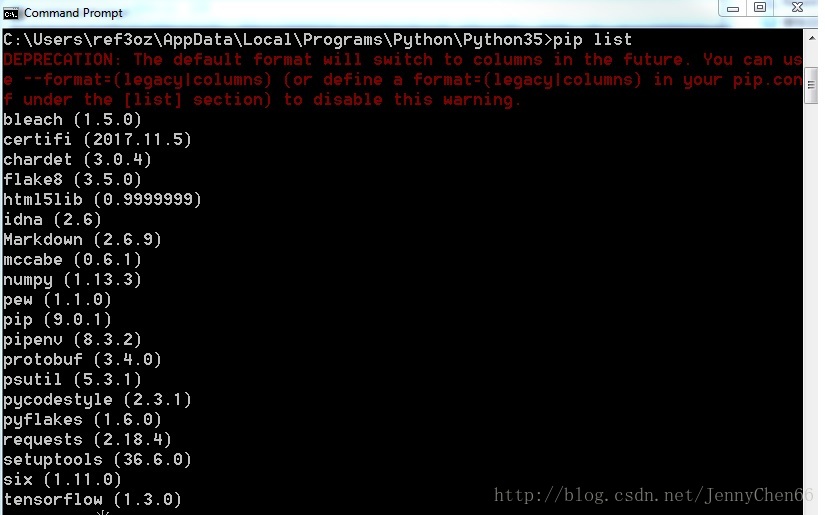
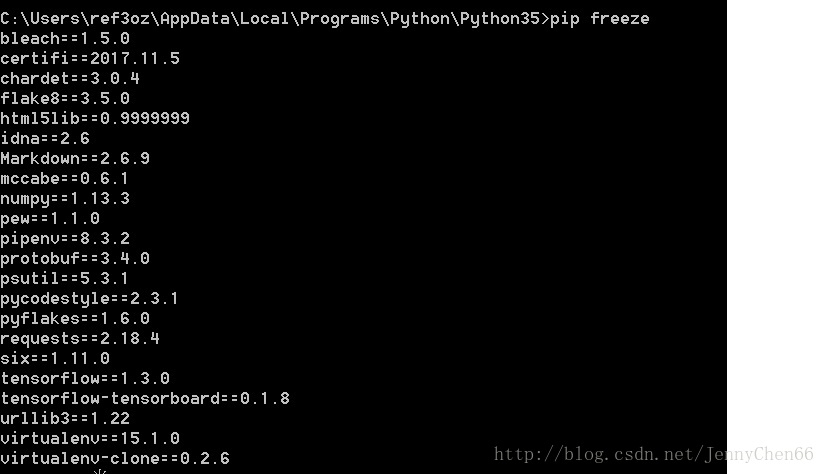
顯示pip安裝的所有庫
pip list <or> pip freeze- 1
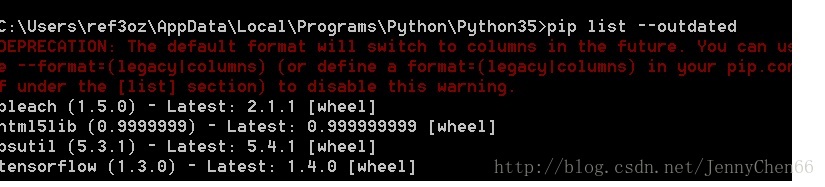
檢視過時的庫
pip list --outdated- 1
步驟二:
如果是從python 的command line 裡面檢視,可以使用如下命令(python 3.x)
import sys
print(sys.path)- 1
- 2

python 標準庫位置: %python安裝路徑%\Lib
Example: C:\Users\ref3oz\AppData\Local\Programs\Python\Python35\Lib
第三方庫位置: %python安裝路徑%\Lib\site-packages
Example: C:\Users\ref3oz\AppData\Local\Programs\Python\Python35\Lib\site-packages
相關推薦
Python——檢視安裝位置和安裝的庫
檢視Python 安裝位置和安裝的庫 步驟一: 1. Start 一個command prompt 2. 找到電腦中已經安裝的Python 位置: where python 1 開啟路徑, cd 到輸出的路徑,之後 start. 1 顯示pip安裝的所有庫
如何檢視PYTHON的安裝位置以及安裝第三方庫的位置
當我們需要檢視PYTHON安裝位置或者第三方包的位置時候,記不清楚原來安裝到哪裡可以使用以下命令來檢視 進入PYTHON後 import sys sys.path 則會打印出你的當前版本安裝包的
python安裝pip和requests庫
在使用python的時候,會需要安裝很多第三方的庫。 一、pip可以用來安裝其他第三方庫,python安裝pip的步驟如下: 步驟1:先下載pip(下載過後不需要解壓) 也可以在我的分享資源下載。 步驟2:開啟命令提示符介面——>到python安裝目錄的Script
Windows下python安裝easy_install和pip&安裝requests和BeautifulSoup庫
Windows下python安裝easy_install和pip並安裝requests和BeautifulSoup 當我們使用Python爬取網頁內容的時候往往需要用到requests和Beauti
多個版本的Python同時連線Oracle和安裝cx_Oracle問題解決
前兩篇文章中講述了在同一臺機器上安裝和配置Python2.x和3.x版本的環境,並使它們共存以及在VS中編輯和執行Python的方法,這篇文章來說一說用Python操作Oracle要做的準備工作——cx_Oracle模組在Python2.x和3.x中的安裝方法。 當電腦中同時安裝了Pytho
檢視nginx版本和安裝的模組
檢視nginx版本 # nginx -v nginx version: nginx/1.12.2 檢視nginx配置了哪些模組 # nginx -V nginx version: nginx/1.12.2 built by gcc 5.4.0 20160609 (Ubuntu 5.4.0-6ubuntu
python學習 ( 一 ) :安裝基礎和安裝環境時需要注意的地方
常用:使用workon 時要在envs下使用 1. pip使用報錯 ‘pip’ 不是內部或外部命令,也不是可執行的程式或批處理檔案。 解決方法: 將python的環境新增到pathon中例如:Python27\Scripts 2.使用豆瓣原來安裝dj
Mac 安裝brew和安裝composer
homebrew fss bin getc mac 安裝 highlight install ont pos 一.安裝brew /usr/bin/ruby -e "$(curl -fsSL https://raw.githubusercontent.com/Homebre
ubuntu下安裝selenium和安裝chromedriver
權限 工作 ubun sele ali ubuntu storage phantomjs enter selenium安裝 sudo apt install selenium phantomjs安裝 sudo apt-get install phantomjs 檢查是否正常
linux下怎麼編寫指令碼讓虛擬機器自動安裝系統和安裝軟體
1.我們需要手動配置好ckf檔案 cfk檔案是儲存了安裝虛擬機器的設定 用同樣的cfk檔案會安裝出一模一樣的虛擬機器 設定好yum源 mkdir /var/www/html/1建立一個共享的資料夾 mount /dev/loop0p1 /var/www/html/iso修
Linux系統openssl安裝步驟和安裝過程問題解決
安裝步驟,首先解壓安裝檔案openssl-1.0.0d.tar ,然後進入目錄執行config命令 ./config --prefix=/home/alipms/lib/openssl (64位作業系統:./config --prefix=/home/alipms/lib/
初探:Python中使用request和BeautifulSoup庫進行網路爬蟲
說起網路爬蟲,Python中最底層的應該是urllib,但是語法結構有些繁瑣,需要使用正則。而使用request和BeautifulSoup庫進行網路爬蟲,發現這真的是web開發人員的福音。凡是懂一些前端知識的人來說,使用request和BeautifulSoup庫進行爬蟲,真的有一種開心而愉快
Oracle 12c安裝過程和安裝中的幾點說明
Oracle 12c安裝過程和安裝中的幾點說明 推薦的Oracle資料庫安裝先決條件檢查失敗解決方案: 1.首先需要合併兩個資料夾中的檔案。 2.在這一步中可能會報錯 報錯的解決方案: 這三個服務一般預設是開啟的。(需要保證這三個服務開啟) 需要
linux deepin下安裝JDK和安裝tomcat
安裝JDK( deepin版本 ) 1, sudo apt-get install openjdk-7jdk -安裝JDK1.7版本 2, 重新啟動,輸入java -version檢視安裝是否成功。 3,在etc/profile檔案追加 export JAVA
Ubuntu 安裝過程和安裝後分辨率問題
安裝系統:Ubuntu 14.04 顯示卡型號:Nvidia GTX745 機器型號:HP 500-351cn 安裝光碟:UltraISO刻錄的u盤安裝 問題: 1.安裝過程中文字看不清問題, 解析度應該是800x600(4x3),螢幕是1920x1080的,直接把800x
一種簡潔的在win7和Anaconda3環境下安裝TensorFlow和安裝OpenCV的方法
一、安裝Tensorflow Step1.安裝純淨版win7-64位系統。 Step3.安裝Anaconda3(4.2.0版本),安裝過程中,勾選新增路徑、註冊預設版本。檢測python環境配置是否成功,在Cmd中輸入python,顯示為3.5.2 版本。(A
mac/linux 安裝tensorflow和安裝Anaconda
無論是在mac 還是在Linux下安裝tensorflow 都需要如下步驟: 1:安裝python 2:安裝pip 3:安裝tensorflow Linux 安裝tensorflow 下安裝比較簡單(Linux 下的環境為python2.7.5
linux解除安裝QT4和安裝QT5的方法
由於專案中需要用到QT的程式,因此安裝QT5的軟體支援庫和QT開發環境是必須的: apt-get insatall qt5-default apt-get insatall qt-creator
【轉】mysql檢視日誌位置和開啟日誌
修改 my.ini檔案加入以下語句(在沒有設定的前提下)log-error=d:/log/mysql/mysql_log_err.txtlog=d:/log/mysql/mysql_log.txt#log-bin=d:/log/mysql/mysql_log_binlog-slow-queries= d:/
Windows 10 安裝ElasticSearch(2)- MSI安裝ElasticSearch和安裝Kibana
文章 .cn ide artifacts 加載 tty 下載 with -h 翻閱上篇文章:Windows 10 安裝 ElasticSearch 上次寫的是下載Zip包安裝的,在下載頁面 發現有 MSI (BETA) 的下載可選項。了解之後發現MSI安裝也值得嘗試。 MS