ASP.NET Core Razor Pages 教程六 處理表單
處理表單
任何成功的電子商務網站都需要能夠處理訂單。如果你沒有客戶的聯系方式和送貨地址就很難做到這一點。網站收集這類信息的方式是使用表單。
在本節中,你將向 Order 頁面添加一個表單,同時還將向表單中添加驗證,以確保信息的收集是有效和完整的。
準備工作
首先,添加以下的樣式聲明到 wwwroot/css 中的 site.css 文件:
label[for="OrderQuantity"]{
  padding-left: 15px;
}

#OrderQuantity{
  margin: 0 15px;
  max-width: 100px;
}

.order-calc{
  display: inline-block;
  margin: 0 10px;
}

.input-validation-error, .input-validation-error:focus {
  background: #ffccba;
  color: #d63301;
}

.form-control.input-validation-error:focus{
  border-color: #d63301;
  box-shadow: 0 0 0 0.2rem rgba(255, 123, 123, 0.5);
}

.field-validation-error {
  color: #be3e16;
}

.validation-summary-errors {
  color: #be3e16;
}
前三種風格純粹是裝飾性的。最後四種樣式將有助於輕松地識別字段驗證錯誤的位置。現在,將以下突出顯示的行添加到 Order.cshtml.cs 文件中:
using System;
using System.ComponentModel.DataAnnotations;
using System.Threading.Tasks;
using Bakery.Data;
using Bakery.Models;
using Microsoft.AspNetCore.Mvc;
using Microsoft.AspNetCore.Mvc.RazorPages;

namespace Bakery.Pages
{
    public class OrderModel : PageModel
    {
        private BakeryContext db;

        public OrderModel(BakeryContext db) => this.db = db;

        [BindProperty(SupportsGet =true)]
        public int Id { get; set; }
        public Product Product { get; set;}
        [BindProperty, EmailAddress, Required, Display(Name="Your Email Address")]
        public string OrderEmail { get; set; }
        [BindProperty, Required(ErrorMessage="Please supply a shipping address"), Display(Name="Shipping Address")]
        public string OrderShipping { get; set; }
        [BindProperty, Display(Name="Quantity")]
        public int OrderQuantity { get; set; } = 1;

        public async Task OnGetAsync() => Product = await db.Products.FindAsync(Id);
    }
}
額外的 using 指令使用 DataAnnotations 命名空間。這個命名空間包含許多的屬性,其中一些屬性用於裝飾已添加到 PageModel 的屬性。OrderEmail 屬性應用了 DataAnnotation 屬性(以及 BindProperty屬性):
EmailAddress- 電子郵件地址-它驗證字符串是否與電子郵件地址的模式匹配Required- 指定的值是必需的Display- 允許您自定義屬性在 UI 中使用的值
其中兩個屬性在驗證中發揮作用,稍後你就可以看到了。OrderQuantity 屬性分配的默認值為 1。
添加表單
在 Order.cshtml 的底部添加以下幾行:
<form method="post">
    <div class="row">
        <div class="col-3">
            <img src="~/Images/Products/Thumbnails/@Model.Product.ImageName" class="img-fluid img-thumbnail" alt="Image of @Model.Product.Name"/>
        </div>
        <div class="col-9">
            <ul class="orderPageList" data-role="listview">
                <li>
                    <div>
                        <p class="description">@Model.Product.Description</p>
                    </div>
                </li>
                <li class="email">
                    <div class="form-group">
                        <label asp-for="OrderEmail"></label>
                        <input asp-for="OrderEmail" class="form-control form-control-sm" />
                        <span asp-validation-for="OrderEmail"></span>
                    </div>
                </li>
                <li class="shipping">
                    <div class="form-group">
                        <label asp-for="OrderShipping"></label>
                        <textarea rows="4" asp-for="OrderShipping" class="form-control form-control-sm"></textarea>
                        <span asp-validation-for="OrderShipping"></span>
                    </div>
                </li>
                <li class="quantity">
                    <div class="form-group row">
                        <label asp-for="OrderQuantity" class="col-1 col-form-label"></label>
                        <input asp-for="OrderQuantity" class="form-control form-control-sm"/>
                        x
                        <span class="order-calc" id="orderPrice">@Model.Product.Price.ToString("f")</span>
                        =
                        <span class="order-calc" id="orderTotal">@Model.Product.Price.ToString("f")</span>
                        <span asp-validation-for="OrderQuantity"></span>
                    </div>
                </li>
            </ul>
            <p class="actions">
                <input type="hidden" asp-for="Product.Id" />
                <button class="btn btn-danger order-button">Place Order</button>
            </p>
        </div>
    </div>
</form>


@section scripts{
<script type="text/javascript">
    $(function () {
        var price = parseFloat($("#orderPrice").text()).toFixed(2),
            total = $("#orderTotal"),
            orderQty = $("#OrderQuantity");

        orderQty.on(‘change‘, function () {
            var quantity = parseInt(orderQty.val());
            if (!quantity || quantity < 1) {
                orderQty.val(1);
                quantity = 1;
            } else if (quantity.toString() !== orderQty.val()) {
                orderQty.val(quantity);
            }
            total.text("$" + (price * quantity).toFixed(2));
        });
    });
</script>
}
表單使用標記幫助器來呈現標簽,輸入和驗證消息。 目標輸入元素的標記助手特別強大。 PageModel 屬性傳遞給輸入標記助手上的 asp-for 屬性。 然後,輸入標記幫助程序根據屬性呈現正確的 name 屬性,以便模型綁定可以無縫地工作。 分配給屬性的任何值都將分配給輸入。 輸入的 type 屬性是根據屬性的數據類型生成的。
表單本身也將由標記幫助器作為目標,它將確保呈現請求驗證令牌。
代碼以JavaScript塊結尾,根據訂購的商品數量計算總價。 <script> 標記放在名為 scripts 的 @section 塊中,該塊被小心地放置在布局頁面中,以便在其他站點範圍的腳本(包括腳本塊所依賴的 jQuery)下面呈現其內容。
接下來,您需要一個處理程序方法來處理表單。將以下內容添加到 Order.cshtml.cs 文件中:
public async Task<IActionResult> OnPostAsync()
{
    Product = await db.Products.FindAsync(Id);
    if(ModelState.IsValid){
        return RedirectToPage("OrderSuccess");
    }
    return Page();
}
目前,這個方法所做的只是檢查 ModelState.IsValid。 這確保模型綁定特性得到滿足, 所有提交的值都通過驗證檢查, 並且所有需要的值都存在。 如果驗證中有任何錯誤, 則向 ModelState 對象添加條目,並重新顯示當前頁面(return page())。 如果提交是有效的, 用戶將被重定向到 OrderSuccess 頁面, 接下來您將添加該頁面。
此模式稱為 Post-Redirect-Get(PRG),旨在最大程度地減少雙重發布導致重復提交的可能性。
如果表單中存在錯誤,則會再次顯示該頁面,驗證標記幫助程序將顯示驗證錯誤的詳細信息。
現在使用以下命令將 OrderSuccess 頁面添加到應用程序:
dotnet new page --name OrderSuccess --output Pages --namespace Bakery.Pages使用以下的代碼來替換 OrderSuccess.cshtml 文件的內容:
@page
@model Bakery.Pages.OrderSuccessModel
@{
}
<ol id="orderProcess">
<li><span class="step-number">1</span>Choose Item</li>
<li><span class="step-number">2</span>Details & Submit</li>
<li class="current"><span class="step-number">3</span>Receipt</li>
</ol>
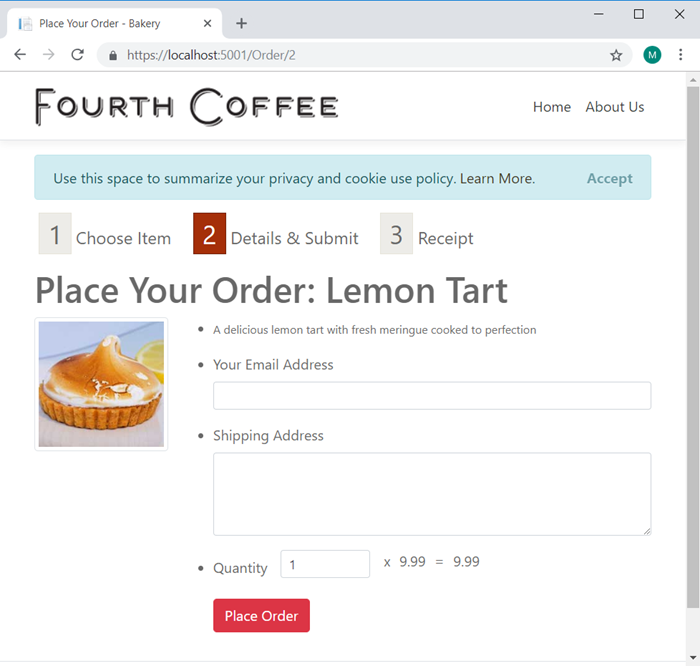
<h1>Order Confirmation</h1>現在是測試表單是否正常工作和處理的時候了。輸入 dotnet run 啟動應用程序,然後導航到 https://localhost:5001。選擇 Lemon Tart 產品,並確保表單顯示正確:

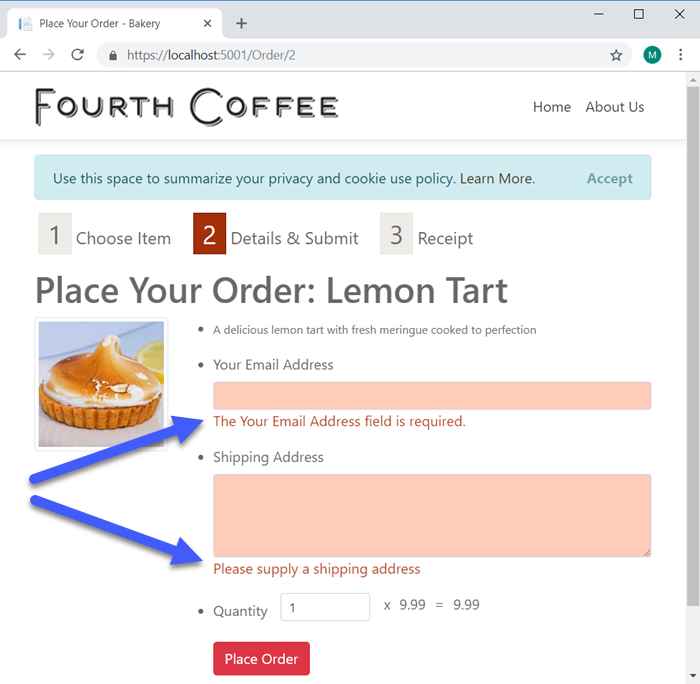
現在,在不輸入電子郵件或送貨地址的情況下按下 Place Order 按鈕, 這樣您就可以測試驗證了。 兩個字段都應該變成粉紅色,錯誤消息應該出現在它們下面:

您可以執行進一步的測試,比如刪除 Quantity 框中的值, 或者在電子郵件輸入中輸入一個隨機字符串。 每次提交表單後, 錯誤消息都會出現。
添加客戶端驗證
此時,所有驗證都在服務器上執行。表單被發布,整個頁面被重新呈現以向用戶提供反饋。在開發站點時,您並不會真正註意到這種往返,因為客戶機和服務器在同一臺機器上。然而,在實際應用程序中,在用戶收到任何反饋之前可能會有一些延遲。在客戶端驗證將為用戶提供即時反饋。
在客戶機上驗證應該只被看作是對用戶的一種禮貌。它永遠不應該取代服務器端驗證。對於具有少量 HTML/JavaScript 知識的人來說,繞過客戶端驗證是非常容易的。
Razor Pages 默認包含客戶端驗證(Client side validation),但需要啟用它。 您可以通過在頁面中包含 jQuery Validation 和 jQuery Unobtrusive Validation 庫來實現。 包含這些腳本的代碼已在名為 _ValidationScriptsPartial.cshtml 的部分中提供,該部分位於 Pages/Shared 文件夾中。 要包含它,只需將部分標記助手添加到 Order.cshtml 中的腳本部分,如下面突出顯示的代碼行所示:
@section scripts{
<partial name="_ValidationScriptsPartial"></partial>
<script type="text/javascript">
    $(function () {
        var price = parseFloat($("#orderPrice").text()).toFixed(2),
            total = $("#orderTotal"),
            orderQty = $("#OrderQuantity");

        orderQty.on(‘change‘, function () {
            var quantity = parseInt(orderQty.val());
            if (!quantity || quantity < 1) {
                orderQty.val(1);
                quantity = 1;
            } else if (quantity.toString() !== orderQty.val()) {
                orderQty.val(quantity);
            }
            total.text("$" + (price * quantity).toFixed(2));
        });
    });
</script>
}
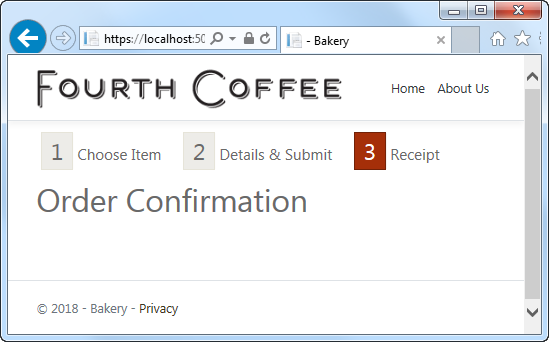
現在,如果您嘗試提交缺少值的表單,則會顯示錯誤,而不會將表單實際發布到服務器。 如果您提供滿足驗證的值,您應該進入 OrderSuccess 頁面:

接要
在本節中,您已經使用標記助手創建了一個表單,並添加了服務器端和客戶端驗證。您已經成功地測試了表單。到目前為止,您還沒有對發布的值做任何有意義的事情。在下一節中,您將使用已發布的值來構造電子郵件並發送它。
ASP.NET Core Razor Pages 教程六 處理表單
