
CTPN CRNN-Pytorch 銀行卡號識別
通過利用keras以及一些自定義函式進行資料增強, CTPN進行文字定位,CRNN進行文字識別以及Flask Web實現銀行卡號碼識別
Github地址
由於我並不是機器學習方向,完成此專案只是學校課程需要
所以文章可能只是如何開始並完成這個專案,至於深層次的原理,推薦兩篇中文博文
【OCR技術系列之五】自然場景文字檢測技術綜述(CTPN, SegLink, EAST)
【OCR技術系列之七】端到端不定長文字識別CRNN演算法詳解
構建基礎執行環境
硬體裝置以及部分驅動和依賴如下:
Ubuntu18.04 + CUDA 8.0.61 + GeForce GTX 960M + NVIDIA Driver 430.14 + Python3.6 + Tensorflow-gpu
NVIDIA 430.14驅動下載
CUDA 8.0下載
安裝完成後,可以通過下面命令在你的裝置中檢查

克隆原始碼,並生成Python3虛擬環境
git clone https://github.com/bay1/card-crnn-ctpn.git

python3 -m virtualenv venv

source venv/bin/activate # 啟用虛擬環境

pip install -r requirements.txt -i https://pypi.tuna.tsinghua.edu.cn/simple some-package # 安裝專案依賴,指定清華源
配置warpctc-pytorch
專案中用到了warpctc-pytorch,需要我們手動安裝
注意這裡的命令需要在Python虛擬環境中執行
git clone https://github.com/SeanNaren/warp-ctc.git
cd warp-ctc
mkdir build; cd build
cmake ..
make
你可能會遇到如下錯誤,這是因為你的gcc版本過高,需要低於5.0版本
/usr/local/cuda-8.0/include/host_config.h:119:2: error: #error -- unsupported GNU version! gcc versions later than 5 are not supported!
 #error -- unsupported GNU version! gcc versions later than 5 are not supported!
  ^~~~~
如果你係統中有多個gcc版本,你可以執行下面的命令指定"gcc"命令連結的具體指令
比如我指定我係統中存在的另一個gcc版本: gcc-4.9
sudo rm /usr/bin/gcc
sudo ln -s /usr/bin/gcc-4.9  /usr/bin/gcc
你也可能會遇到如下錯誤
/usr/bin/ld: CMakeFiles/test_gpu.dir/tests/test_gpu_generated_test_gpu.cu.o: relocation R_X86_64_32S against `.bss' can not be used when making a PIE object; recompile with -fPIC
/usr/bin/ld: 最後的鏈結失敗: 輸出不可表示的節
collect2: error: ld returned 1 exit status
CMakeFiles/test_gpu.dir/build.make:98: recipe for target 'test_gpu' failed
make[2]: *** [test_gpu] Error 1
CMakeFiles/Makefile2:146: recipe for target 'CMakeFiles/test_gpu.dir/all' failed
make[1]: *** [CMakeFiles/test_gpu.dir/all] Error 2
Makefile:129: recipe for target 'all' failed
make: *** [all] Error 2
根據報錯內容,我們可以直接修改目錄下的CMakeCache.txt
CMAKE_CXX_FLAGS:STRING=-fPIC # 39 行
然後我們根據warp-ctc說明,執行下面命令
cd ../pytorch_binding
python setup.py install
此時你可能會遇到如下錯誤
src/binding.cpp:6:10: fatal error: torch/extension.h: 沒有那個檔案或目錄
 #include <torch/extension.h>
          ^~~~~~~~~~~~~~~~~~~
compilation terminated.
error: command 'x86_64-linux-gnu-gcc' failed with exit status 1
根據前人的經驗,https://github.com/SeanNaren/warp-ctc/issues/101
我們直接切換以前的版本即可
git checkout ac045b6CTPN
文字位置定位,我直接借用的此專案以及其訓練的模型text-detection-ctpn
其實作者訓練的模型效果不算很好,不過我手裡並沒有模型資料,自己訓練還是需要下載這位作者的訓練資料
所以乾脆直接使用作者訓練好的模型資料即可,可以從下面兩種方式下載作者的ckpt file
googl drive
baidu雲
將此資料夾放到ctpn/,然後執行如下命令
cd ctpn/utils/bbox
chmod +x make.sh
./make.sh
PS: 如果你想要自己訓練CTPN模型資料,你可以執行ctpn資料夾下的train.py檔案
其中text-detection-ctpn只是針對文字進行位置的定位
而我們針對銀行卡號進行具體定位,所以還是需要進行一些自定義的處理
我的思路是對選取出來的所有Box進行長寬的計算,然後根據長寬的比例來進行擷取卡號區域
當然這種效果的前提是,我們能夠將卡號部分檢測出來,不過這樣實現的效果還是相當不錯的
def get_wh(box_coordinate):
    """
    計算box座標寬高
    box格式: [xmin, ymin, xmax, ymin, xmax, ymax, xmin, ymax, score]
    """
    xmin = box_coordinate[0]
    xmax = box_coordinate[2]
    ymin = box_coordinate[1]
    ymax = box_coordinate[5]
    width = xmax - xmin
    height = ymax - ymin
    return width, height
CRNN
此時需要回到專案根目錄,首先對我得到的圖片資料進行簡單的處理
即將原始圖片資料,即data/images的圖片,轉化為生成lmdb需要的形式
python crnn/handle_images.py
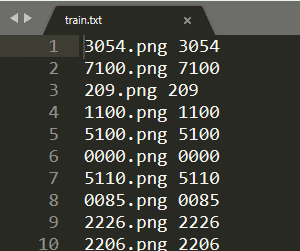
圖片路徑以及正確標籤文字:
- crnn/to_lmdb/train.txt
- crnn/to_lmdb/test.txt
處理後的圖片新路徑:
- crnn/to_lmdb/train_images
- crnn/to_lmdb/test_images
然後我們就需要將我們手中的資料轉換成train所需要的lmdb檔案
執行下面命令
python crnn/to_lmdb/to_lmdb.py -i crnn/to_lmdb/train_images -l crnn/to_lmdb/train.txt -s crnn/to_lmdb/train_lmdb/
python crnn/to_lmdb/to_lmdb.py -i crnn/to_lmdb/test_images -l crnn/to_lmdb/test.txt -s crnn/to_lmdb/test_lmdb/
生成的lmdb檔案目錄:
- crnn/to_lmdb/train_lmdb
- crnn/to_lmdb/test_lmdb
這時候我們就可以具體訓練我們手中的資料
python crnn/train.py
模型儲存目錄: crnn/expr
自定義引數
這個專案有各種自定義的資料目錄,以及訓練模型的引數
如果你想修改這些引數或者資料路徑,你可以到下面兩個檔案中
- ctpn/params.py
- crnn/params.py
其中crnn訓練模型的引數詳解
--random_sample      是否使用隨機取樣器對資料集進行取樣, action='store_true'
--keep_ratio         設定圖片保持橫縱比縮放, action='store_true'
--adam               使用adma優化器, action='store_true'
--adadelta           使用adadelta優化器, action='store_true'
--saveInterval       設定多少次迭代儲存一次模型
--valInterval        設定多少次迭代驗證一次
--n_test_disp        每次驗證顯示的個數
--displayInterval    設定多少次迭代顯示一次
--experiment         模型儲存目錄
--alphabet           設定檢測分類
--crnn               選擇預訓練模型
--beta1
--lr                 學習率
--niter              訓練回合數
--nh                 LSTM隱藏層數
--imgW               圖片寬度
--imgH               圖片高度, default=32
--batchSize          設定batchSize大小, default=64
--workers            工作核數, default=2
--trainroot          訓練集路徑
--valroot            驗證集路徑
--cuda               使用GPU, action='store_true'
視覺化
訓練CRNN完成之後,crnn測試載入模型路徑預設是: crnn/trained_models/crnn_Rec_done.pth
即我們需要把我們訓練好的模型重新命名放到這個目錄
然後我們就可以在專案根目錄執行如下命令
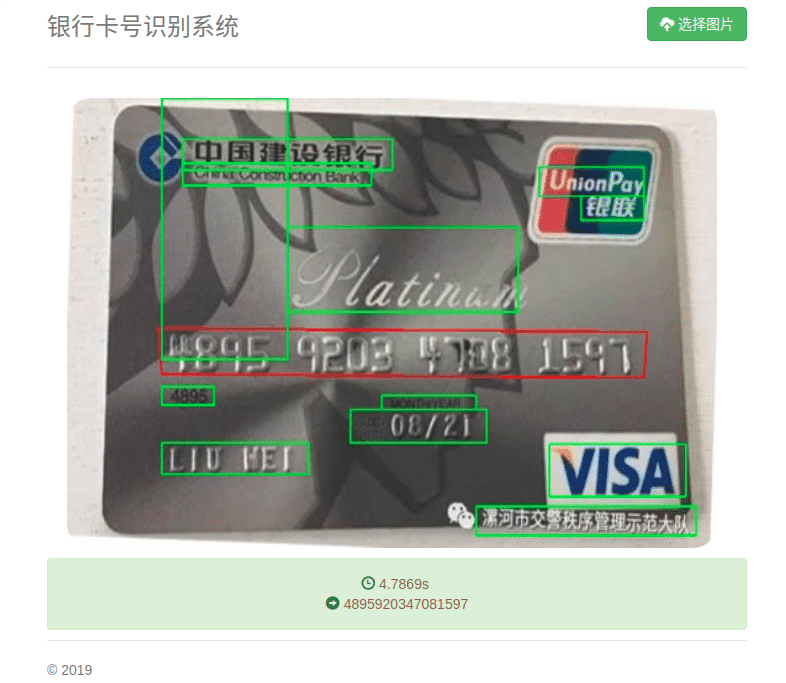
python run.py瀏覽器開啟連結:http://127.0.0.1:5000


效果展示
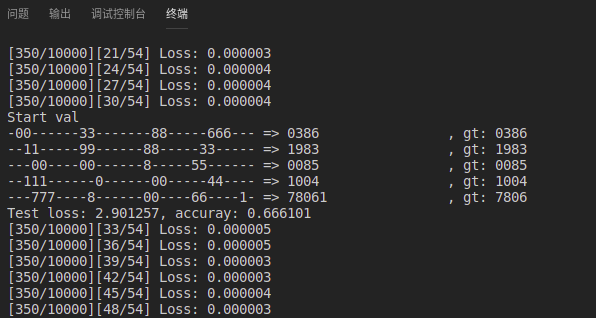
這是本地迭代了300次的效果,有待繼續改進
測試集圖片, 識別其中的一張銀行卡號
後續
資料增強
百度百科-資料增強
深度學習與計算機視覺(PB-02)-資料增強
資料增強模組,將資料集中的每一張圖片使用資料增強方式拓展為n張圖片(n,設定crnn/params.py中的total_num)
這樣做的好處還可以為之後的影象識別訓練提供充足的資料樣本
而我們要做的目的是識別銀行卡卡號,對於現有資料和實際識別中卡號的樣式
個人認為,我們需要做的資料增強方式不應該包括角度旋轉,水平翻轉,大幅度平移
同時銀行卡較不容易識別的是帶有複雜背景圖的卡面,所以雜色,噪點的增加是必要的
所以在keras的基礎上我們自定義一些其他函式
完成上述設定之後,在handle_images.py之前執行下面的命令
python crnn/augmentation.py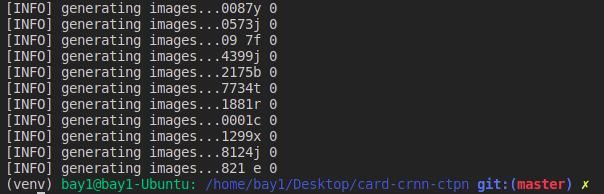
生成的資料資料夾如下,理論上會生成86720項(猜測是檔名重複導致)

效果
data資料夾中的測試圖片,幾乎能夠識別所有的銀行卡號,預估測試正確率達85%+
訓練過程中的acc,最高升至0.77
PS:
參考crnn.pytorch
why my accuracy is alway