基礎分類網路VGG
vgg16是牛津大學視覺幾何組(Oxford Visual Geometry Group)2014年提出的一個模型. vgg模型也得名於此.
2014年,vgg16拿了Imagenet Large Scale Visual Recognition Challenge 2014 (ILSVRC2014)
比賽的冠軍.
論文連線:https://arxiv.org/abs/1409.1556
http://www.robots.ox.ac.uk/~vgg/research/very_deep/牛津大學視覺研究小組在這裡放出了他們在ImageNet比賽訓練得到的模型檔案.
網上有很多vgg16的實現,下面
https://github.com/machrisaa/tensorflow-vgg/blob/master/vgg16.py
這個是推理的實現,即載入權重檔案,實現影象預測https://github.com/ppplinday/tensorflow-vgg16-train-and-test/blob/master/train_vgg.py
這個是訓練的實現,即如何得到權重檔案
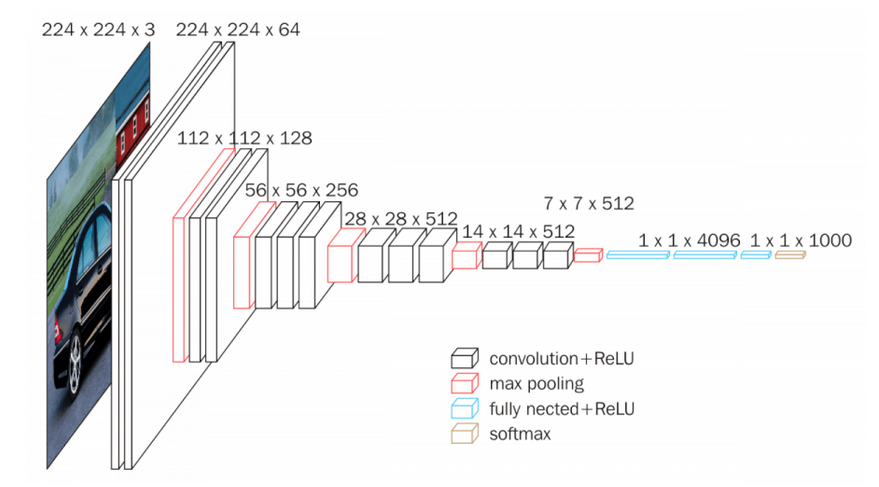
vgg的模型結構如下:


每一層的卷積核的大小都是3*3.

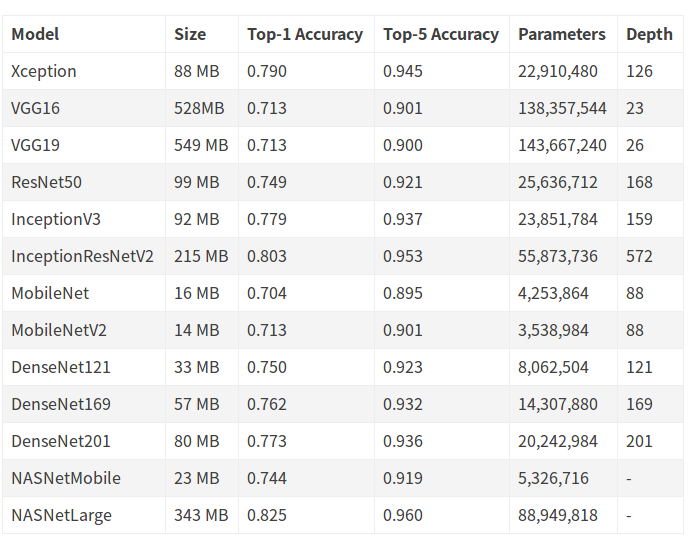
現在的keras裡已經集成了很多模型,具體可以參考keras的文件.
https://keras.io/applications/#models-for-image-classification-with-weights-trained-on-imagenet
下面是keras_applications/vgg16.py的實現.比tensorflow的程式碼更易於理解.
"""VGG16 model for Keras.

# Reference

- [Very Deep Convolutional Networks for Large-Scale Image Recognition](
    https://arxiv.org/abs/1409.1556) (ICLR 2015)

"""
from __future__ import absolute_import
from __future__ import division
from __future__ import print_function

import os

from . import get_submodules_from_kwargs
from . import imagenet_utils
from .imagenet_utils import decode_predictions
from .imagenet_utils import _obtain_input_shape

preprocess_input = imagenet_utils.preprocess_input

WEIGHTS_PATH = ('https://github.com/fchollet/deep-learning-models/'
                'releases/download/v0.1/'
                'vgg16_weights_tf_dim_ordering_tf_kernels.h5')
WEIGHTS_PATH_NO_TOP = ('https://github.com/fchollet/deep-learning-models/'
                       'releases/download/v0.1/'
                       'vgg16_weights_tf_dim_ordering_tf_kernels_notop.h5')


def VGG16(include_top=True,
          weights='imagenet',
          input_tensor=None,
          input_shape=None,
          pooling=None,
          classes=1000,
          **kwargs):
    """Instantiates the VGG16 architecture.

    Optionally loads weights pre-trained on ImageNet.
    Note that the data format convention used by the model is
    the one specified in your Keras config at `~/.keras/keras.json`.

    # Arguments
        include_top: whether to include the 3 fully-connected
            layers at the top of the network.
        weights: one of `None` (random initialization),
              'imagenet' (pre-training on ImageNet),
              or the path to the weights file to be loaded.
        input_tensor: optional Keras tensor
            (i.e. output of `layers.Input()`)
            to use as image input for the model.
        input_shape: optional shape tuple, only to be specified
            if `include_top` is False (otherwise the input shape
            has to be `(224, 224, 3)`
            (with `channels_last` data format)
            or `(3, 224, 224)` (with `channels_first` data format).
            It should have exactly 3 input channels,
            and width and height should be no smaller than 32.
            E.g. `(200, 200, 3)` would be one valid value.
        pooling: Optional pooling mode for feature extraction
            when `include_top` is `False`.
            - `None` means that the output of the model will be
                the 4D tensor output of the
                last convolutional block.
            - `avg` means that global average pooling
                will be applied to the output of the
                last convolutional block, and thus
                the output of the model will be a 2D tensor.
            - `max` means that global max pooling will
                be applied.
        classes: optional number of classes to classify images
            into, only to be specified if `include_top` is True, and
            if no `weights` argument is specified.

    # Returns
        A Keras model instance.

    # Raises
        ValueError: in case of invalid argument for `weights`,
            or invalid input shape.
    """
    backend, layers, models, keras_utils = get_submodules_from_kwargs(kwargs)

    if not (weights in {'imagenet', None} or os.path.exists(weights)):
        raise ValueError('The `weights` argument should be either '
                         '`None` (random initialization), `imagenet` '
                         '(pre-training on ImageNet), '
                         'or the path to the weights file to be loaded.')

    if weights == 'imagenet' and include_top and classes != 1000:
        raise ValueError('If using `weights` as `"imagenet"` with `include_top`'
                         ' as true, `classes` should be 1000')
    # Determine proper input shape
    input_shape = _obtain_input_shape(input_shape,
                                      default_size=224,
                                      min_size=32,
                                      data_format=backend.image_data_format(),
                                      require_flatten=include_top,
                                      weights=weights)

    if input_tensor is None:
        img_input = layers.Input(shape=input_shape)
    else:
        if not backend.is_keras_tensor(input_tensor):
            img_input = layers.Input(tensor=input_tensor, shape=input_shape)
        else:
            img_input = input_tensor
    # Block 1
    x = layers.Conv2D(64, (3, 3),
                      activation='relu',
                      padding='same',
                      name='block1_conv1')(img_input)
    x = layers.Conv2D(64, (3, 3),
                      activation='relu',
                      padding='same',
                      name='block1_conv2')(x)
    x = layers.MaxPooling2D((2, 2), strides=(2, 2), name='block1_pool')(x)

    # Block 2
    x = layers.Conv2D(128, (3, 3),
                      activation='relu',
                      padding='same',
                      name='block2_conv1')(x)
    x = layers.Conv2D(128, (3, 3),
                      activation='relu',
                      padding='same',
                      name='block2_conv2')(x)
    x = layers.MaxPooling2D((2, 2), strides=(2, 2), name='block2_pool')(x)

    # Block 3
    x = layers.Conv2D(256, (3, 3),
                      activation='relu',
                      padding='same',
                      name='block3_conv1')(x)
    x = layers.Conv2D(256, (3, 3),
                      activation='relu',
                      padding='same',
                      name='block3_conv2')(x)
    x = layers.Conv2D(256, (3, 3),
                      activation='relu',
                      padding='same',
                      name='block3_conv3')(x)
    x = layers.MaxPooling2D((2, 2), strides=(2, 2), name='block3_pool')(x)

    # Block 4
    x = layers.Conv2D(512, (3, 3),
                      activation='relu',
                      padding='same',
                      name='block4_conv1')(x)
    x = layers.Conv2D(512, (3, 3),
                      activation='relu',
                      padding='same',
                      name='block4_conv2')(x)
    x = layers.Conv2D(512, (3, 3),
                      activation='relu',
                      padding='same',
                      name='block4_conv3')(x)
    x = layers.MaxPooling2D((2, 2), strides=(2, 2), name='block4_pool')(x)

    # Block 5
    x = layers.Conv2D(512, (3, 3),
                      activation='relu',
                      padding='same',
                      name='block5_conv1')(x)
    x = layers.Conv2D(512, (3, 3),
                      activation='relu',
                      padding='same',
                      name='block5_conv2')(x)
    x = layers.Conv2D(512, (3, 3),
                      activation='relu',
                      padding='same',
                      name='block5_conv3')(x)
    x = layers.MaxPooling2D((2, 2), strides=(2, 2), name='block5_pool')(x)

    if include_top:
        # Classification block
        x = layers.Flatten(name='flatten')(x)
        x = layers.Dense(4096, activation='relu', name='fc1')(x)
        x = layers.Dense(4096, activation='relu', name='fc2')(x)
        x = layers.Dense(classes, activation='softmax', name='predictions')(x)
    else:
        if pooling == 'avg':
            x = layers.GlobalAveragePooling2D()(x)
        elif pooling == 'max':
            x = layers.GlobalMaxPooling2D()(x)

    # Ensure that the model takes into account
    # any potential predecessors of `input_tensor`.
    if input_tensor is not None:
        inputs = keras_utils.get_source_inputs(input_tensor)
    else:
        inputs = img_input
    # Create model.
    model = models.Model(inputs, x, name='vgg16')

    # Load weights.
    if weights == 'imagenet':
        if include_top:
            weights_path = keras_utils.get_file(
                'vgg16_weights_tf_dim_ordering_tf_kernels.h5',
                WEIGHTS_PATH,
                cache_subdir='models',
                file_hash='64373286793e3c8b2b4e3219cbf3544b')
        else:
            weights_path = keras_utils.get_file(
                'vgg16_weights_tf_dim_ordering_tf_kernels_notop.h5',
                WEIGHTS_PATH_NO_TOP,
                cache_subdir='models',
                file_hash='6d6bbae143d832006294945121d1f1fc')
        model.load_weights(weights_path)
        if backend.backend() == 'theano':
            keras_utils.convert_all_kernels_in_model(model)
    elif weights is not None:
        model.load_weights(weights)

    return model
可以清楚地看出來,所用的卷積核全部是3*3的.
用keras做預測也很簡單,
from keras.applications.vgg16 import VGG16
model = VGG16()
print(model.summary())
上面程式碼會把權重檔案下載到
這裡貼一段網上找的程式碼
from keras.applications.vgg16 import VGG16, preprocess_input, decode_predictions

from keras.preprocessing.image import load_img, img_to_array
import numpy as np
# VGG-16 instance
model = VGG16(weights='imagenet', include_top=True)

image = load_img('C:/Pictures/Pictures/test_imgs/golden.jpg', target_size=(224, 224))
image_data = img_to_array(image)

# reshape it into the specific format
image_data = image_data.reshape((1,) + image_data.shape)
print(image_data.shape)

# prepare the image data for VGG
image_data = preprocess_input(image_data)

# using the pre-trained model to predict
prediction = model.predict(image_data)

# decode the prediction results
results = decode_predictions(prediction, top=3)

print(results)
很簡單
- 載入模型
- 載入圖片,預處理
- 前向傳播
- 解釋輸出tensor
vgg19和vgg16結構基本一致的,就是多了幾個卷積層.

相關推薦
基礎分類網路VGG
vgg16是牛津大學視覺幾何組(Oxford Visual Geometry Group)2014年提出的一個模型. vgg模型也得名於此. 2014年,vgg16拿了Imagenet Large Scale Visual Recognition Challenge 2014 (ILSVRC2014) 比賽的
1.CNN圖片單標籤分類(基於TensorFlow實現基礎VGG16網路)
本文所使用的開源資料集(kaggle貓狗大戰): www.kaggle.com/c/dogs-vs-c… 國內百度網盤下載地址: pan.baidu.com/s/12ab32UNY… 利用本文程式碼訓練並生成的模型(對應專案中的model資料夾): pan.baidu.com/s/1tBkVQKoH
深度學習基礎--不同網路種類--VGG(visual geometry group,超解析度測試序列)
VGG(visual geometry group,超解析度測試序列) test過程 採用multi-scale輸入尺寸的形式(輸入尺寸介於[256:512]),具體執行流程如下: 1)採用不同規格的圖片作為輸入(4種或6種規格); 2)最後一個ma
keras面向小資料集的影象分類(VGG-16基礎上fine-tune)實現(附程式碼)
參考譯文地址:http://keras-cn.readthedocs.io/en/latest/blog/image_classification_using_very_little_data/ 本文作者:Francois Chollet 概述 在本文中,將使用VGG-16模型提供一種面向小資料集(幾百
ANN人工神經網路基礎分類
如上圖所示,所有節點都是分層的,每一層節點可以通過有向弧指向上一層節點,但是同層節點間沒有弧互相連線, 每一節點不能越過一層連線到上上層的節點。實際應用中一般不會設計超過5層的網路(層數越多,計算越複雜)。每條弧上的值稱為權重或權值,S1=(X1,X2,W11,W21)。 (ads
****** 三十七 ******、軟設筆記【網路基礎】-網路分類、組成-計算機網路定義、分類、組成
網路分類、組成一、計算機網路定義計算機網路是指將地理位置不同的具有獨立功能的多臺計算機及其外部裝置,通過通訊線路連線起來,在網路作業系統、網路管理軟體及網路通訊協議的管理和協調下,實現資源共享和資訊傳遞的計算機系統。二、計算機網路的分類按傳輸距離分為*區域網(LAN)一般分佈
html學習——基礎分類總結
rect log 內容 sem ron text html pid 頁面 1. html 超文本標記語言HyperText Markup Language。html文檔基本結構: <!DOCTYPE html><head> &
分類網路
具體解釋: 1.A類IP地址 一個A類IP地址由1位元組(每個位元組是8位)的網路地址和3個位元組主機地址組成,網路地址的最高位必須是“0”,即第一段數字範圍為0~127。 2.B類IP地址 一個B類IP地址由2個位元組的網路地址和2個位元組的主機地址組成,網路地址的最高位必
學習筆記之——基於深度學習的分類網路
之前博文介紹了基於深度學習的常用的檢測網路《學習筆記之——基於深度學習的目標檢測演算法》,本博文為常用的CNN分類卷積網路介紹,本博文的主要內容來自於R&C團隊的成員的調研報告以及本人的理解~如有不當之處,還請各位看客賜教哈~好,下面
深度學習基礎--不同網路種類--前饋深度網路(feed-forwarddeep networks, FFDN)
深度神經網路可以分為3類: 1)前饋深度網路(feed-forwarddeep networks, FFDN) 2)反饋深度網路(feed-back deep networks, FBDN) 3)雙向深度網路(bi-directionaldeep networks, BDDN
深度學習基礎--不同網路種類--Highway Network
Highway Network 受LSTM啟發,增加了一個門函式,讓網路的輸出由兩部分組成,分別是網路的直接輸入以及輸入變形後的部分。 假設定義一個非線性變換為y=H(x,W_h),定義門函式T(x,W_t),攜帶函式C(x,W_c)=1-T(x,W_t)。對於門函式取極端的情況
Python之路(十四):網路程式設計基礎 Python基礎之網路程式設計
Python基礎之網路程式設計 學習網路程式設計之前,要對計算機底層的通訊實現機制要有一定的理解。 OSI 網際網路協議按照功能不同分為osi七層或tcp/ip五層或tcp/ip四層 可以將應用層,表示層,會
Tensorflow+SSD使用原始權重並修改分類網路進行單目標檢測
本文的原始碼地址是https://github.com/balancap/SSD-Tensorflow 由於專案需要,需要對場景中的人體進行檢測,但是原始的SSD網路是20種類別的網路,而只需要獲取人的分類即可,當我按照其說明在具有兩塊1080Ti的伺服器上訓練8個小時,損失值降低到10左右
Pytorch實現PointNet中的點雲分類網路。
下面是PointNet論文中分類模型的結構: 但是對於模型的細節,PointNet論文中並沒有詳細的解釋,尤其是T-Net,可以參考PointNet的supplemental部分。如果找不到,可以留言找我要。 話不多說,下面是程式碼,基本上完全還原了論文中的PointNet分類模型
CNN分類網路架構演進:從LeNet到Densnet解析及其keras實現
文章轉自:http://www.cnblogs.com/skyfsm/p/8451834.html 卷積神經網路可謂是現在深度學習領域中大紅大紫的網路框架,尤其在計算機視覺領域更是一枝獨秀。CNN從90年代的LeNet開始,21世紀初沉寂了10年,直到12年AlexNet開始又再煥發第二春,從Z
分類網路中為影象類別打標籤
#labels=[‘cube’,‘fourpyramid’,‘quadrangular’,‘tripyramid’] #labels字串長為400 from sklearn.preprocessing import LabelBinarizer lb = LabelBinarizer(
階段01Java基礎day25網路程式設計
26.01_網路程式設計(網路程式設計概述) A:計算機網路 是指將地理位置不同的具有獨立功能的多臺計算機及其外部裝置,通過通訊線路連線起來,在網路作業系統,網路管理軟體及網路通訊協議的管理和協調下,實現資源共享和資訊傳遞的計算機系統。 B:網路程式設計
基於Tensorflow的cifar10分類網路模型
Tensorflow算是老牌深度學習框架了,但是相比Pytorch來說,會稍微顯得有些笨重,主要是計算必須在session中進行,在編寫某些更為靈活的網路結構時,會比較麻煩。不過Tensorflow對分散式訓練的支援較好,所以如果是需要使用分散式
基於Pytorch的cifar10分類網路模型
Pytorch作為新興的深度學習框架,目前的使用率正在逐步上升。相比TensorFlow,Pytorch的上手難度更低,同時Pytorch支援對圖的動態定義,並且能夠方便的將網路中的tensor格式資料與numpy格式資料進行轉換,使得其對某些特
keras實現多種分類網路的實現
Keras應該是最簡單的一種深度學習框架了,入門非常的簡單. 簡單記錄一下keras實現多種分類網路:如AlexNet、Vgg、ResNet 採用kaggle貓狗大戰的資料作為資料集. 由於AlexNet採用的是LRN標準化,Keras沒有內建函式實現,這裡用batchNormali
