
Spring Cloud Alibaba | Sentinel:分散式系統的流量防衛兵進階實戰
Spring Cloud Alibaba | Sentinel:分散式系統的流量防衛兵進階實戰
在閱讀本文前,建議先閱讀《Spring Cloud Alibaba | Sentinel:分散式系統的流量防衛兵基礎實戰》。
1. Sentinel整合Feign和RestTemplate
Sentinel目前已經同時支援Feign和RestTemplate,需要我們引入對應的依賴,在使用Feign的時候需要在配置檔案中開啟Sentinel對Feign的支援:feign.sentinel.enabled=true,同時需要加入openfeign starter依賴使sentinel starter中的自動化配置類生效。在使用RestTemplate的時候需要在構造RestTemplate的Bean的時候加上@SentinelRestTemplate
1.1 建立父工程sentinel-springcloud-high:
父工程pom.xml如下:
程式碼清單:Alibaba/sentinel-springcloud-high/pom.xml
***
<dependency>
    <groupId>org.springframework.boot</groupId>
    <artifactId>spring-boot-starter-actuator</artifactId>
</dependency>
<dependency>
    <groupId>org.springframework.boot</groupId>
    <artifactId>spring-boot-starter-web</artifactId>
</dependency>
<dependency>
    <groupId>com.alibaba.cloud</groupId>
    <artifactId>spring-cloud-starter-alibaba-sentinel</artifactId>
</dependency>
<dependency>
    <groupId>com.alibaba.cloud</groupId>
    <artifactId>spring-cloud-starter-alibaba-nacos-discovery</artifactId>
</dependency>
公共元件中引入Sentinel做流量控制,引入Nacos做服務中心。
1.2 建立子工程provider_server:
配置檔案application.yml如下:
程式碼清單:Alibaba/sentinel-springcloud-high/provider_server/pom.xml
***
server:
  port: 8000
spring:
  application:
    name: spring-cloud-provider-server
  cloud:
    nacos:
      discovery:
        server-addr: 192.168.44.129:8848
    sentinel:
      transport:
        dashboard: localhost:8080
        port: 8720
management:
  endpoints:
    web:
      cors:
        allowed-methods: '*'
介面測試類HelloController.java如下:
程式碼清單:Alibaba/sentinel-springcloud-high/provider_server/src/main/java/com/springcloud/provider_server/controller/HelloController.java
***
@RestController
public class HelloController {
    @GetMapping("/hello")
    public String hello(HttpServletRequest request) {
        return "Hello, port is: " + request.getLocalPort();
    }
}
1.3 建立子工程consumer_server:
子工程依賴pom.xml如下:
程式碼清單:Alibaba/sentinel-springcloud-high/consumer_server/pom.xml
***
<dependency>
    <groupId>org.springframework.cloud</groupId>
    <artifactId>spring-cloud-starter-openfeign</artifactId>
</dependency>
配置檔案application.yml如下:
程式碼清單:Alibaba/sentinel-springcloud-high/consumer_server/src/main/resources/application.yml
***
server:
  port: 9000
spring:
  application:
    name: spring-cloud-consumer-server
  cloud:
    nacos:
      discovery:
        server-addr: 192.168.44.129:8848
    sentinel:
      transport:
        dashboard: localhost:8080
        port: 8719
management:
  endpoints:
    web:
      cors:
        allowed-methods: '*'
feign:
  sentinel:
enabled: true這裡使用feign.sentinel.enabled=true開啟Sentinel對Feign的支援。
介面測試類HelloController.java
程式碼清單:Alibaba/sentinel-springcloud-high/consumer_server/src/main/java/com/springcloud/consumer_server/controller/HelloController.java
***
@RestController
public class HelloController {
    @Autowired
    HelloRemote helloRemote;

    @Autowired
    RestTemplate restTemplate;

    @GetMapping("/helloByFeign")
    public String helloByFeign() {
        return helloRemote.hello();
    }

    @GetMapping("/helloByRestTemplate")
    public String helloByRestTemplate() {
        return restTemplate.getForObject("http://spring-cloud-provider-server/hello/", String.class);
    }
}Sentinel已經對做了整合,我們使用Feign的地方無需額外的註解。同時,@FeignClient註解中的所有屬性,Sentinel都做了相容。
啟動主類Ch122ConsumerServerApplication.java如下:
程式碼清單:Alibaba/sentinel-springcloud-high/consumer_server/src/main/java/com/springcloud/consumer_server/ConsumerServerApplication.java
***
@SpringBootApplication
@EnableDiscoveryClient
@EnableFeignClients
public class Ch122ConsumerServerApplication {

    public static void main(String[] args) {
        SpringApplication.run(Ch122ConsumerServerApplication.class, args);
    }

    @Bean
    @LoadBalanced
    @SentinelRestTemplate
    public RestTemplate restTemplate() {
        return new RestTemplate();
    }

}在使用RestTemplate的時候需要增加@SentinelRestTemplate來開啟Sentinel對RestTemplate的支援。
1.4 測試
啟動工程provider_server和consumer_server,provider_server修改啟動配置,啟動兩個例項,開啟瀏覽器訪問:http://localhost:9000/helloByFeign 和 http://localhost:9000/helloByRestTemplate ,重新整理幾次,可以看到頁面交替顯示Hello, port is: 8000和Hello, port is: 8001,說明目前負載均衡正常,現在檢視Sentinel控制檯,如圖:

1.5 流量控制測試
這時選擇左側的簇點流控,點選流控,如圖:

這裡我們配置一個最簡單的規則,配置QPS限制為1,點選新增,如圖:
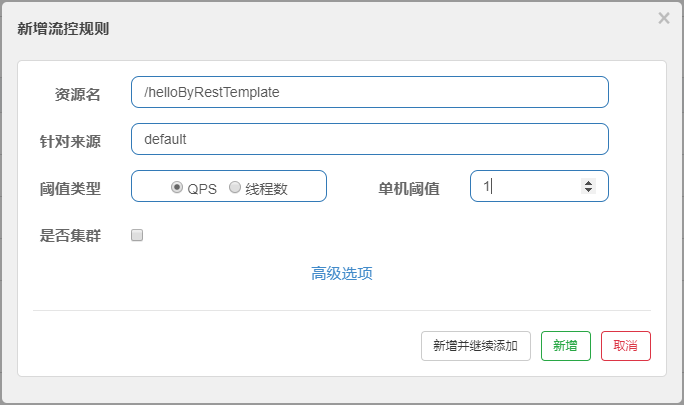
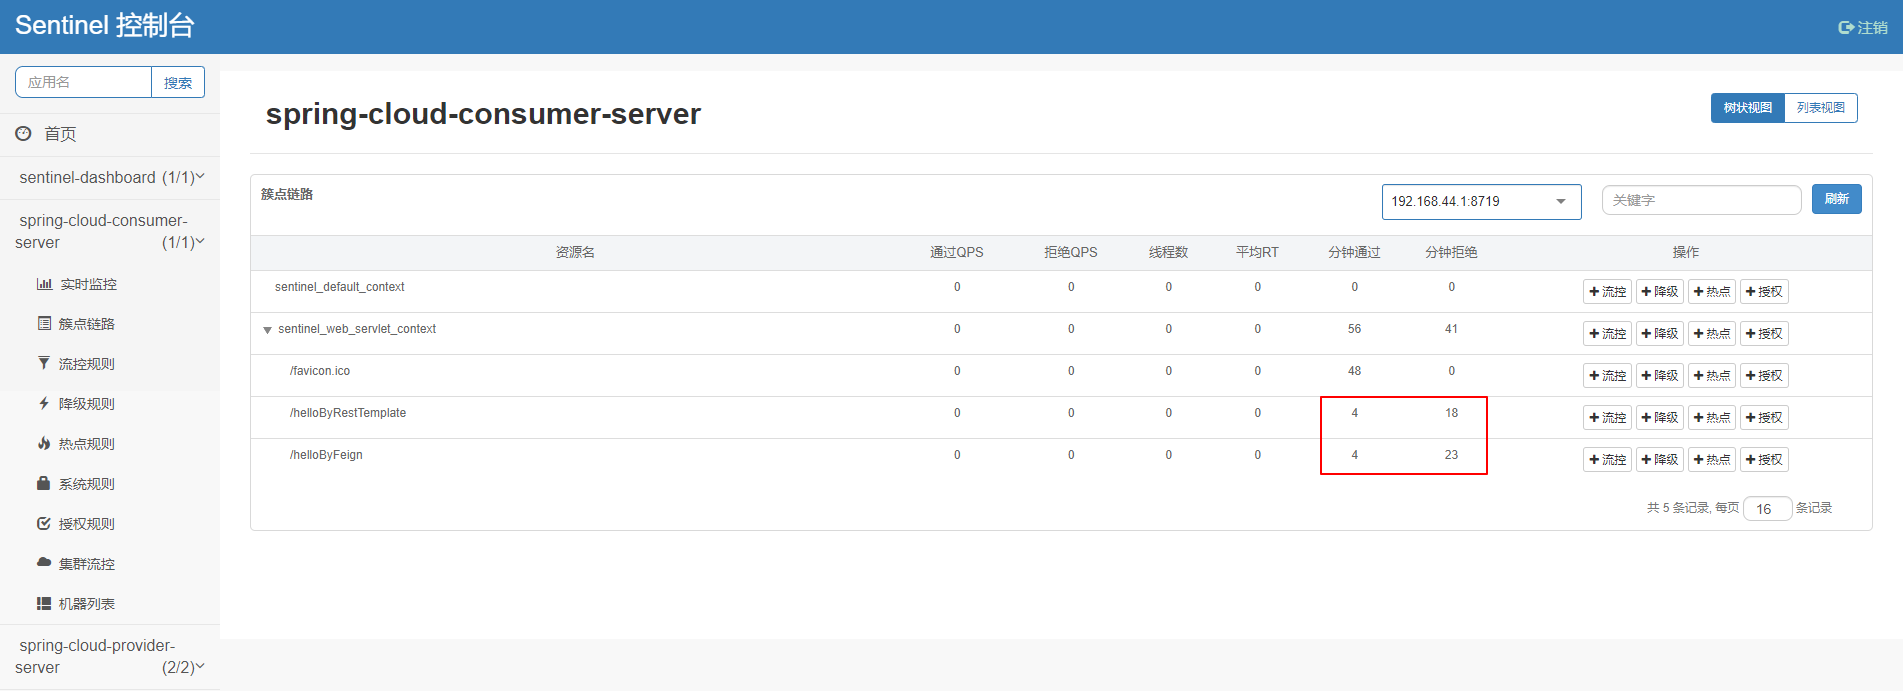
這裡解釋一下什麼是QPS,簡單來說QPS是一個每秒訪問數,這裡我們測試時需要重複快速重新整理http://localhost:9000/helloByFeign 和 http://localhost:9000/helloByRestTemplate ,在重新整理的過程中,我們可以看到頁面會顯示錯誤資訊,如:Blocked by Sentinel (flow limiting),說明我們配置Sentinel已經限流成功,這時我們再看一下Sentinel的控制檯,可以看到我們剛才訪問的成功和限流的數量,如圖:
2. 服務降級
在上一小結,我們介紹了Feign和RestTemplate整合Sentinel使用,並且在Sentinel控制檯上做了QPS限流,並且限流成功,限流成功後,預設情況下,Sentinel對控制資源的限流處理是直接丟擲異常。在沒有合理的業務承接或者前端對接情況下可以這樣,但是正常情況為了更好的使用者業務,都會實現一些被限流之後的特殊處理,我們不希望展示一個生硬的報錯。這一小節,我們介紹一下服務降級處理。
2.1 建立子工程consumer_fallback
Feign服務降級類HelloRemoteFallBack.java如下:
程式碼清單:Alibaba/sentinel-springcloud-high/consumer_fallback/src/main/java/com/springcloud/consumer_fallback/fallback/HelloRemoteFallBack.java
***
@Component
public class HelloRemoteFallBack implements HelloRemote {
    @Override
    public String hello() {
        return "Feign FallBack Msg";
    }
}
相對應的,這裡需要在HelloRemote.java上做一部分配置,使得限流後,觸發服務降級執行我們的服務降級類,程式碼如下:
程式碼清單:ch12_2/ch12_2_consumer_fallback/src/main/java/com/springcloud/book/ch12_2_consumer_fallback/remote/HelloRemote.java
***
@FeignClient(name = "spring-cloud-provider-server", fallback = HelloRemoteFallBack.class)
public interface HelloRemote {
    @GetMapping("/hello")
    String hello();
}
fallback = HelloRemoteFallBack.class指定服務降級的處理類為HelloRemoteFallBack.class。
RestTemplate服務降級工具類ExceptionUtil.java如下:
程式碼清單:Alibaba/sentinel-springcloud-high/consumer_fallback/src/main/java/com/springcloud/consumer_fallback/remote/HelloRemote.java
***
public class ExceptionUtil {

    private final static Logger logger = LoggerFactory.getLogger(ExceptionUtil.class);

    public static SentinelClientHttpResponse handleException(HttpRequest request, byte[] body, ClientHttpRequestExecution execution, BlockException ex) {
        logger.error(ex.getMessage(), ex);
        return new SentinelClientHttpResponse("RestTemplate FallBack Msg");
    }
}
這裡同樣需要修改RestTemplate註冊成為Bean的地方,使得RestTemplate觸發服務降級以後程式碼執行我們為它寫的處理類,Ch122ConsumerFallbackApplication.java程式碼如下:
程式碼清單:Alibaba/sentinel-springcloud-high/consumer_fallback/src/main/java/com/springcloud/consumer_fallback/ConsumerFallbackApplication.java
***
@Bean
@LoadBalanced
@SentinelRestTemplate(blockHandler = "handleException", blockHandlerClass = ExceptionUtil.class)
public RestTemplate restTemplate() {
    return new RestTemplate();
}這裡需要注意,@SentinelRestTemplate註解的屬性支援限流(blockHandler, blockHandlerClass)和降級(fallback, fallbackClass)的處理。
其中blockHandler或fallback屬性對應的方法必須是對應blockHandlerClass或fallbackClass屬性中的靜態方法。
@SentinelRestTemplate註解的限流(blockHandler, blockHandlerClass)和降級(fallback, fallbackClass)屬性不強制填寫。
當使用RestTemplate呼叫被Sentinel熔斷後,會返回RestTemplate request block by sentinel資訊,或者也可以編寫對應的方法自行處理返回資訊。這裡提供了 SentinelClientHttpResponse用於構造返回資訊。
2.2 測試
順次啟動provider_server和consumer_fallback兩個子工程。先在瀏覽器中交替訪問http://localhost:9090/helloByFeign 和 http://localhost:9090/helloByRestTemplate ,而後開啟Sentinel控制檯,在這兩個介面上增加限流資訊,注意,這裡要將限流資訊加在資源上,具體如圖:
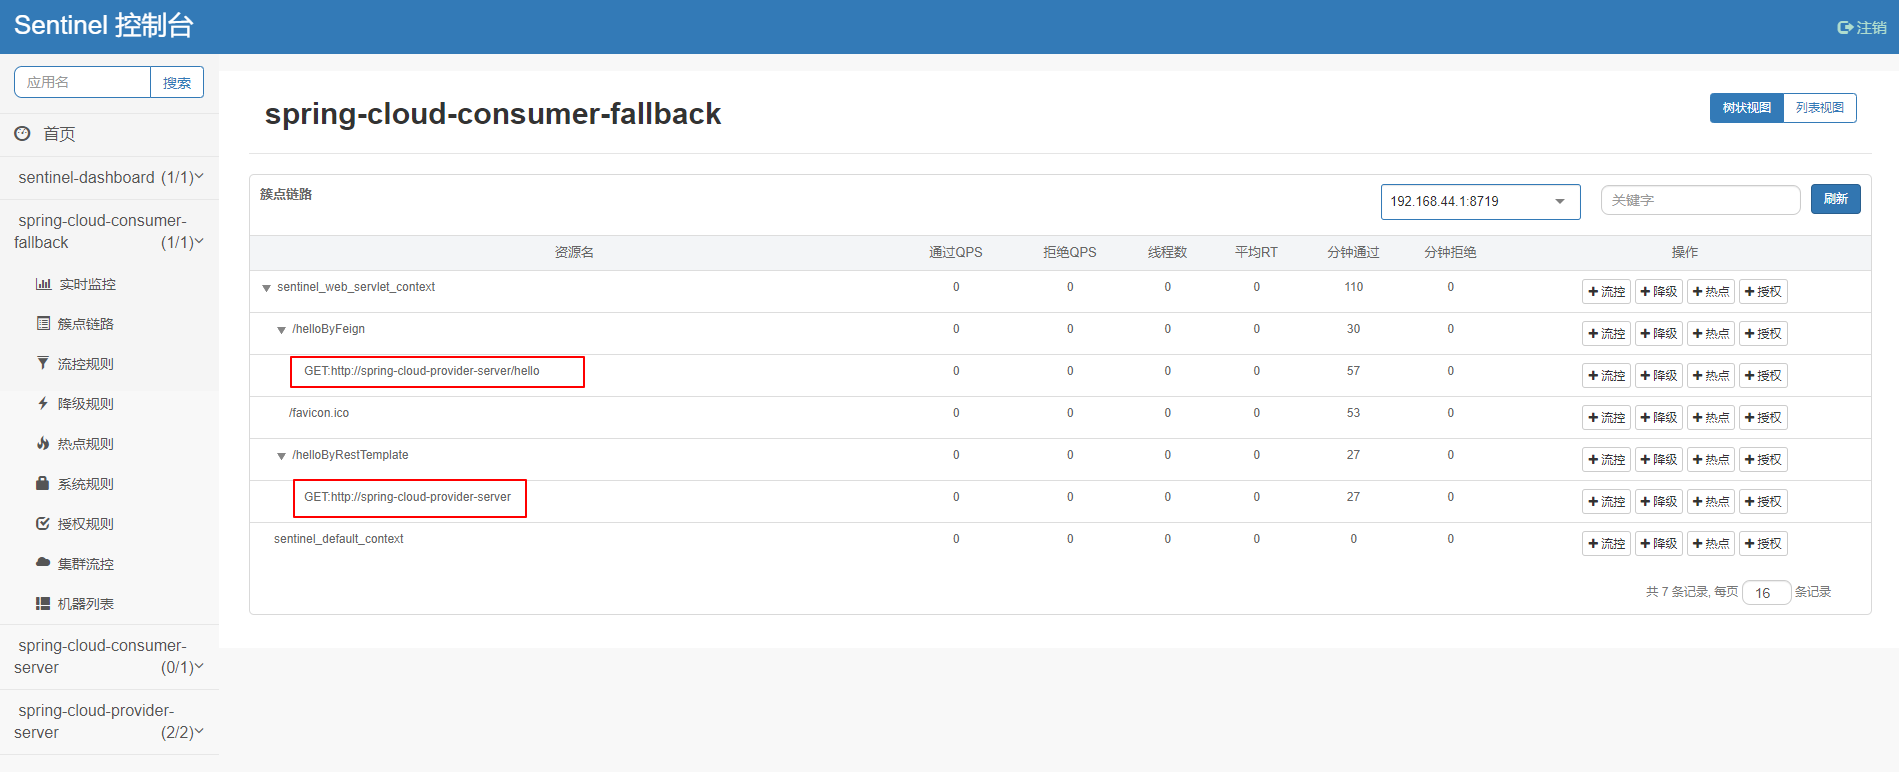
在瀏覽器中重新整理兩個連結,兩個限流資訊都可以正常瀏覽器中顯示,測試成功,再次檢視Sentinel控制檯,也可以看到被拒接的流量統計,如圖:

3. Sentinel整合服務閘道器限流
Sentinel目前支援Spring Cloud Gateway、Zuul 等主流的 API Gateway 進行限流。看一下官方的結構圖,如圖:
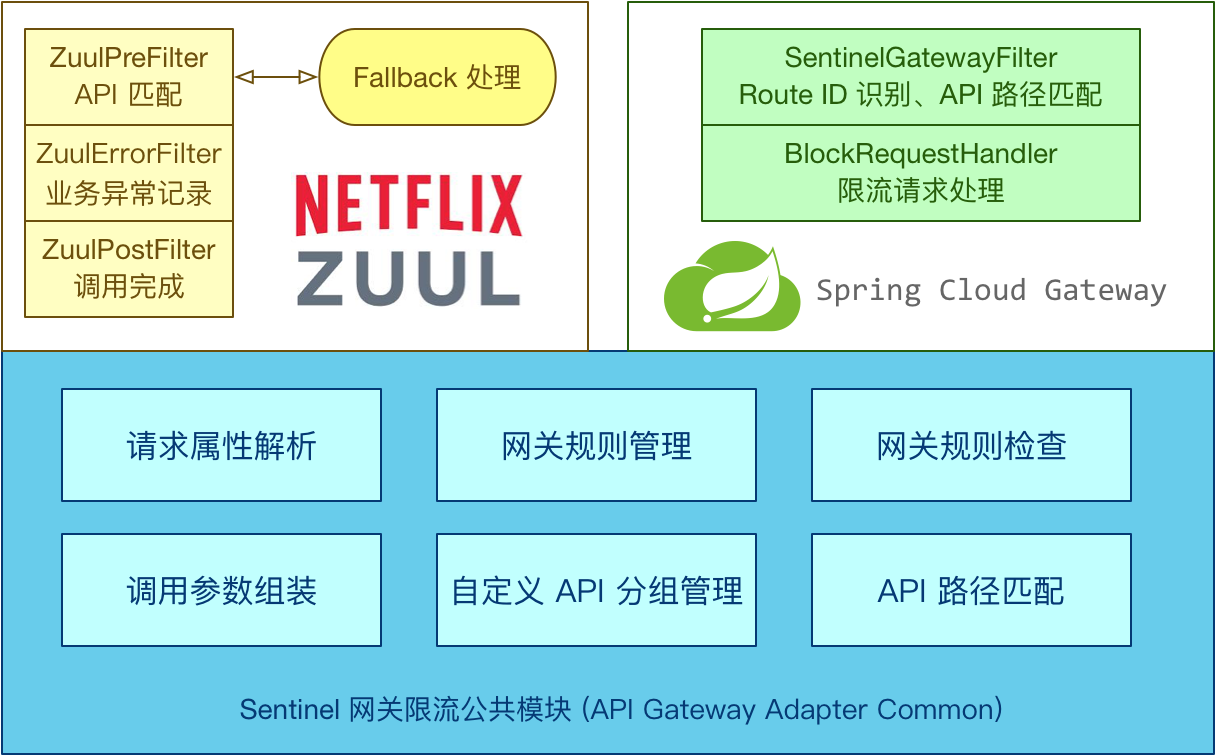
從這張官方的圖中,可以看到,Sentinel對Zuul的限流主要是通過3個Filter來完成的,對Spring Cloud Gateway則是通過一個SentinleGatewayFilter和一個BlockRequestHandler來完成的。
Sentinel 1.6.0 引入了 Sentinel API Gateway Adapter Common 模組,此模組中包含閘道器限流的規則和自定義 API 的實體和管理邏輯:
- GatewayFlowRule:閘道器限流規則,針對 API Gateway 的場景定製的限流規則,可以針對不同 route 或自定義的 API 分組進行限流,支援針對請求中的引數、Header、來源 IP 等進行定製化的限流。
- ApiDefinition:使用者自定義的 API 定義分組,可以看做是一些 URL 匹配的組合。比如我們可以定義一個 API 叫 my_api,請求 path 模式為 /foo/** 和 /baz/** 的都歸到 my_api 這個 API 分組下面。限流的時候可以針對這個自定義的 API 分組維度進行限流。
3.1 Zuul 1.x
Sentinel 提供了 Zuul 1.x 的適配模組,可以為 Zuul Gateway 提供兩種資源維度的限流:
- route 維度:即在 Spring 配置檔案中配置的路由條目,資源名為對應的 route ID(對應 RequestContext 中的 proxy 欄位)
- 自定義 API 維度:使用者可以利用 Sentinel 提供的 API 來自定義一些 API 分組
3.1.1 建立子工程zuul_server
工程依賴pom.xml如下:
程式碼清單:Alibaba/sentinel-springcloud-high/zuul_server/pom.xml
***
<dependency>
    <groupId>org.springframework.cloud</groupId>
    <artifactId>spring-cloud-starter-netflix-zuul</artifactId>
</dependency>
<dependency>
    <groupId>com.alibaba.csp</groupId>
    <artifactId>sentinel-zuul-adapter</artifactId>
</dependency>這裡因為sentinel-zuul-adapter未包含在spring-cloud-starter-alibaba-sentinel,需要手動單獨引入。
3.1.2 配置檔案application.yml如下:
程式碼清單:Alibaba/sentinel-springcloud-high/zuul_server/src/main/resources/application.yml
***
server:
  port: 18080
spring:
  application:
    name: spring-cloud-zuul-server
  cloud:
    nacos:
      discovery:
        server-addr: 192.168.44.129:8848
    sentinel:
      transport:
        dashboard: localhost:8080
        port: 8720
zuul:
  routes:
    consumer-route:
      path: /consumer/**
      serviceId: spring-cloud-consumer-fallback
3.1.3 定義降級處理類ZuulFallbackProvider.java如下:
程式碼清單:Alibaba/sentinel-springcloud-high/zuul_server/src/main/java/com/springcloud/zuul_server/fallback/ZuulFallbackProvider.java
***
public class ZuulFallbackProvider implements ZuulBlockFallbackProvider {
    @Override
    public String getRoute() {
        return "*";
    }

    @Override
    public BlockResponse fallbackResponse(String route, Throwable cause) {
        RecordLog.info(String.format("[Sentinel DefaultBlockFallbackProvider] Run fallback route: %s", route));
        if (cause instanceof BlockException) {
            return new BlockResponse(429, "Sentinel block exception", route);
        } else {
            return new BlockResponse(500, "System Error", route);
        }
    }
}
3.1.4 同時,我們需要將3個Sentinel的Filter注入Spring,配置類如下:
程式碼清單:Alibaba/sentinel-springcloud-high/zuul_server/src/main/java/com/springcloud/zuul_server/config/ZuulConfig.java
***
@Configuration
public class ZuulConfig {
    @Bean
    public ZuulFilter sentinelZuulPreFilter() {
        // We can also provider the filter order in the constructor.
        return new SentinelZuulPreFilter();
    }

    @Bean
    public ZuulFilter sentinelZuulPostFilter() {
        return new SentinelZuulPostFilter();
    }

    @Bean
    public ZuulFilter sentinelZuulErrorFilter() {
        return new SentinelZuulErrorFilter();
    }

    /**
     * 註冊 ZuulFallbackProvider
     */
    @PostConstruct
    public void doInit() {
        ZuulBlockFallbackManager.registerProvider(new ZuulFallbackProvider());
    }

}最終,啟動前需要配置JVM啟動引數,增加-Dcsp.sentinel.app.type=1,來告訴Sentinel控制檯我們啟動的服務是為 API Gateway 型別。
3.1.5 測試
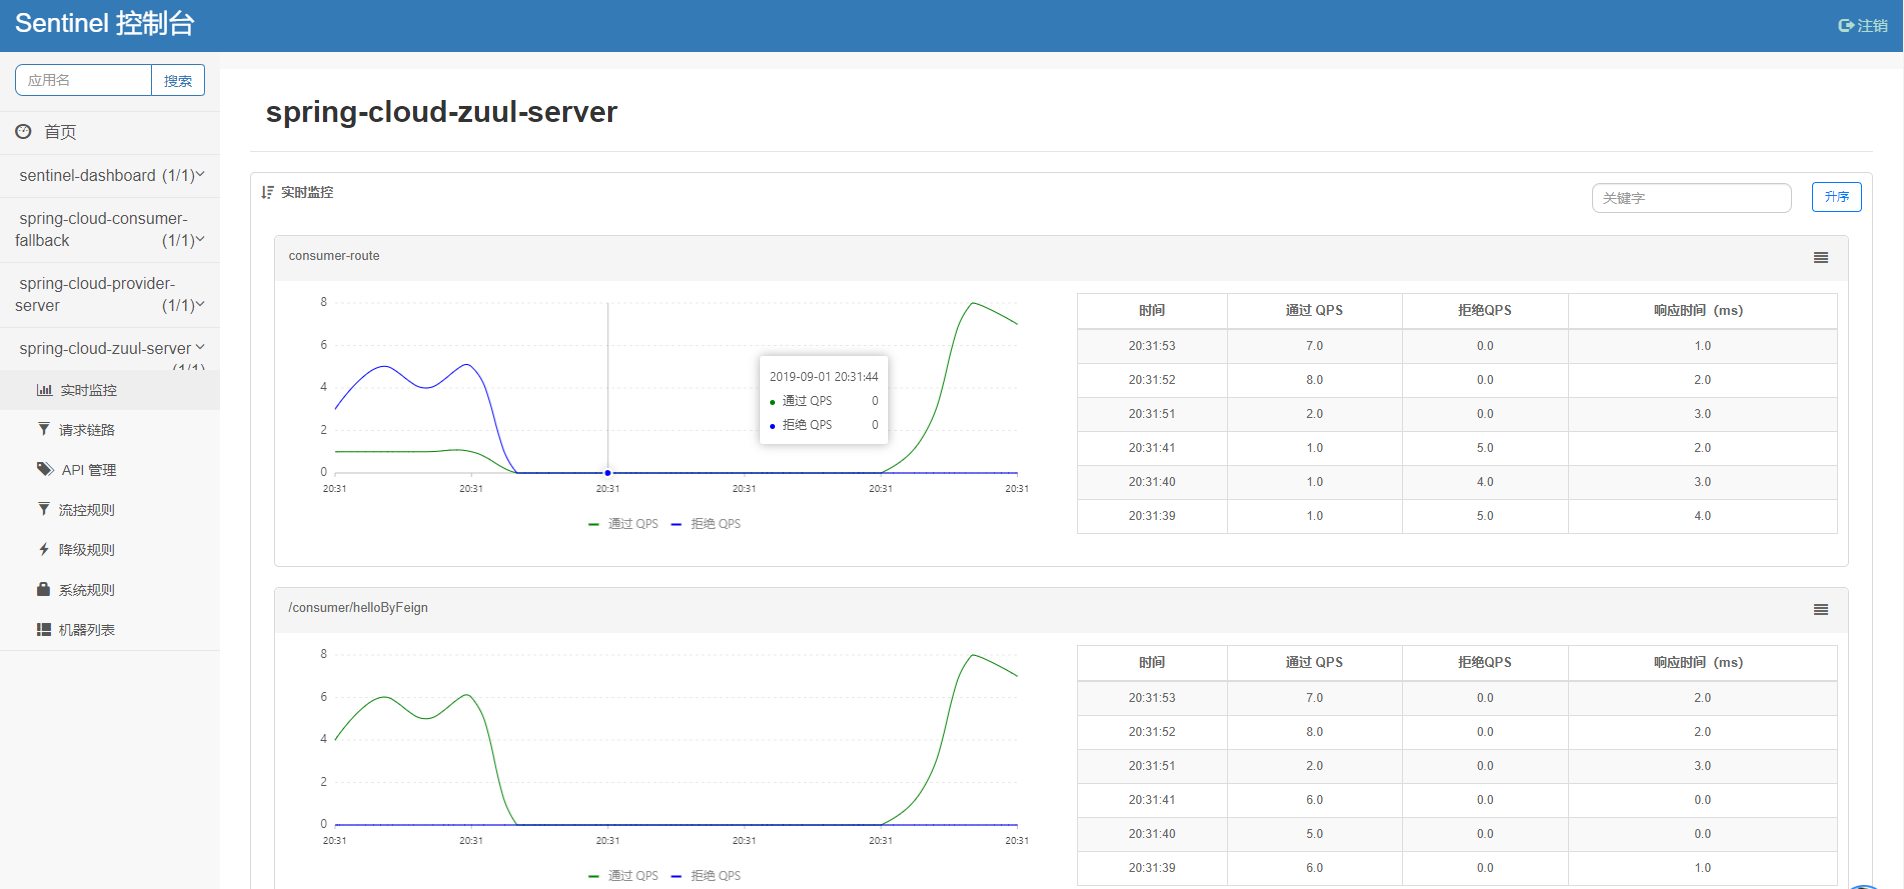
順次啟動子工程provider_server、consumer_fallback、zuul_server,開啟瀏覽器訪問:http://localhost:18080/consumer/helloByFeign ,然後我們開啟Sentinel控制檯,檢視zuul_server服務,如圖:
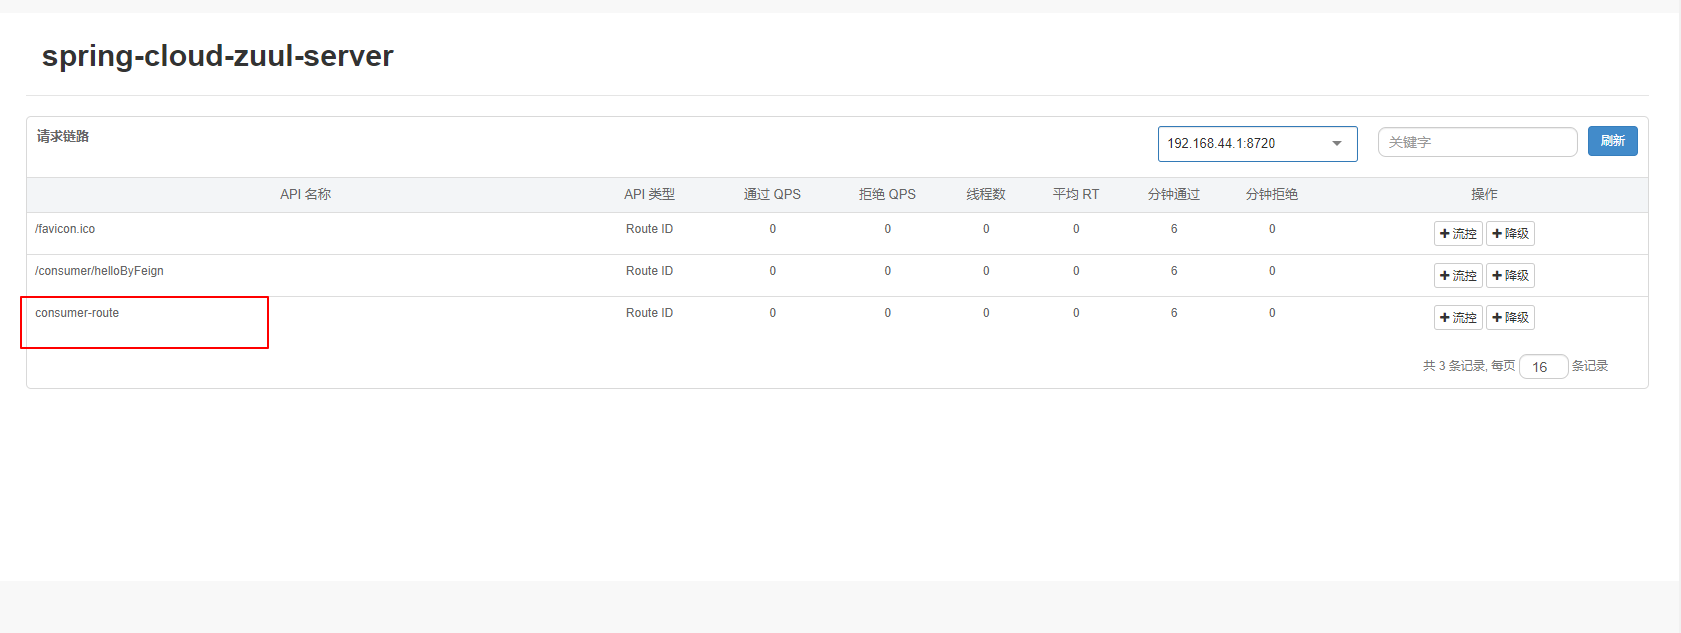
我們定製限流策略,依舊是QPS為1,我們再次重新整理http://localhost:18080/consumer/helloByFeign 頁面,這時,頁面上已經可以正產限流了,限流後顯示的內容為:
{"code":429, "message":"Sentinel block exception", "route":"consumer-route"}這裡注意,定義限流的是資源,千萬不要定義錯地方,限流定義如圖:
3.2 Spring Cloud Gateway
從 1.6.0 版本開始,Sentinel 提供了 Spring Cloud Gateway 的適配模組,可以提供兩種資源維度的限流:
- route 維度:即在 Spring 配置檔案中配置的路由條目,資源名為對應的 routeId
- 自定義 API 維度:使用者可以利用 Sentinel 提供的 API 來自定義一些 API 分組
3.2.1 建立子工程gateway_server
工程依賴pom.xml如下:
程式碼清單:Alibaba/sentinel-springcloud-high/gateway_server/pom.xml
***
<dependency>
    <groupId>org.springframework.boot</groupId>
    <artifactId>spring-boot-starter-webflux</artifactId>
</dependency>
<dependency>
    <groupId>org.springframework.cloud</groupId>
    <artifactId>spring-cloud-starter-gateway</artifactId>
</dependency>
<dependency>
    <groupId>com.alibaba.csp</groupId>
    <artifactId>sentinel-spring-cloud-gateway-adapter</artifactId>
</dependency>
3.2.2 配置檔案application.yml如下:
程式碼清單:Alibaba/sentinel-springcloud-high/gateway_server/src/main/resources/application.yml
***
server:
  port: 28080
spring:
  application:
    name: spring-cloud-gateway-server
  cloud:
    nacos:
      discovery:
        server-addr: 192.168.44.129:8848
    sentinel:
      transport:
        dashboard: localhost:8080
        port: 8720
    gateway:
      enabled: true
      discovery:
        locator:
          lower-case-service-id: true
      routes:
        - id: consumer_server
          uri: lb://spring-cloud-consumer-fallback
          predicates:
            - Method=GET
3.2.3 全域性配置類GatewayConfig.java如下:
同上一小節介紹的Zuul,這裡我們同樣需要將兩個Sentinel有關Spring Cloud Gateway的Filter注入Spring:SentinelGatewayFilter和SentinelGatewayBlockExceptionHandler,這裡因為在Sentinel v1.6.0版本才加入Spring Cloud Gateway的支援,很多地方還不是很完善,異常處理SentinelGatewayBlockExceptionHandler目前只能返回一個異常資訊,在我們的系統中無法和上下游很好的結合,這裡筆者自己重新實現了SentinelGatewayBlockExceptionHandler,並命名為JsonSentinelGatewayBlockExceptionHandler,返回引數定義成為JSON,這裡不再注入Sentinel提供的SentinelGatewayBlockExceptionHandler,而是改為筆者自己實現的JsonSentinelGatewayBlockExceptionHandler。
程式碼清單:Alibaba/sentinel-springcloud-high/gateway_server/src/main/java/com/springcloud/gateway_server/config/GatewayConfig.java
***
@Configuration
public class GatewayConfig {
    private final List<ViewResolver> viewResolvers;
    private final ServerCodecConfigurer serverCodecConfigurer;

    public GatewayConfig(ObjectProvider<List<ViewResolver>> viewResolversProvider, ServerCodecConfigurer serverCodecConfigurer) {
        this.viewResolvers = viewResolversProvider.getIfAvailable(Collections::emptyList);
        this.serverCodecConfigurer = serverCodecConfigurer;
    }

    @Bean
    @Order(Ordered.HIGHEST_PRECEDENCE)
    public JsonSentinelGatewayBlockExceptionHandler jsonSentinelGatewayBlockExceptionHandler() {
        // Register the block exception handler for Spring Cloud Gateway.
        return new JsonSentinelGatewayBlockExceptionHandler(viewResolvers, serverCodecConfigurer);
    }

    @Bean
    @Order(-1)
    public GlobalFilter sentinelGatewayFilter() {
        return new SentinelGatewayFilter();
    }
}
3.2.4 降級處理類JsonSentinelGatewayBlockExceptionHandler.java如下:
程式碼清單:Alibaba/sentinel-springcloud-high/gateway_server/src/main/java/com/springcloud/gateway_server/exception/JsonSentinelGatewayBlockExceptionHandler.java
***
public class JsonSentinelGatewayBlockExceptionHandler implements WebExceptionHandler {
    private List<ViewResolver> viewResolvers;
    private List<HttpMessageWriter<?>> messageWriters;

    public JsonSentinelGatewayBlockExceptionHandler(List<ViewResolver> viewResolvers, ServerCodecConfigurer serverCodecConfigurer) {
        this.viewResolvers = viewResolvers;
        this.messageWriters = serverCodecConfigurer.getWriters();
    }

    private Mono<Void> writeResponse(ServerResponse response, ServerWebExchange exchange) {
        ServerHttpResponse serverHttpResponse = exchange.getResponse();
        serverHttpResponse.getHeaders().add("Content-Type", "application/json;charset=UTF-8");
        byte[] datas = "{\"code\":403,\"msg\":\"Sentinel block exception\"}".getBytes(StandardCharsets.UTF_8);
        DataBuffer buffer = serverHttpResponse.bufferFactory().wrap(datas);
        return serverHttpResponse.writeWith(Mono.just(buffer));
    }

    @Override
    public Mono<Void> handle(ServerWebExchange exchange, Throwable ex) {
        if (exchange.getResponse().isCommitted()) {
            return Mono.error(ex);
        }
        // This exception handler only handles rejection by Sentinel.
        if (!BlockException.isBlockException(ex)) {
            return Mono.error(ex);
        }
        return handleBlockedRequest(exchange, ex)
                .flatMap(response -> writeResponse(response, exchange));
    }

    private Mono<ServerResponse> handleBlockedRequest(ServerWebExchange exchange, Throwable throwable) {
        return GatewayCallbackManager.getBlockHandler().handleRequest(exchange, throwable);
    }

    private final Supplier<ServerResponse.Context> contextSupplier = () -> new ServerResponse.Context() {
        @Override
        public List<HttpMessageWriter<?>> messageWriters() {
            return JsonSentinelGatewayBlockExceptionHandler.this.messageWriters;
        }

        @Override
        public List<ViewResolver> viewResolvers() {
            return JsonSentinelGatewayBlockExceptionHandler.this.viewResolvers;
        }
    };
}筆者這裡僅重寫了writeResponse()方法,講返回資訊簡單的更改成了json格式,各位讀者有需要可以根據自己的需求進行修改。
3.2.5 測試
順次啟動provider_server、consumer_server和gateway_server,配置gateway_server jvm啟動引數-Dcsp.sentinel.app.type=1,如圖:
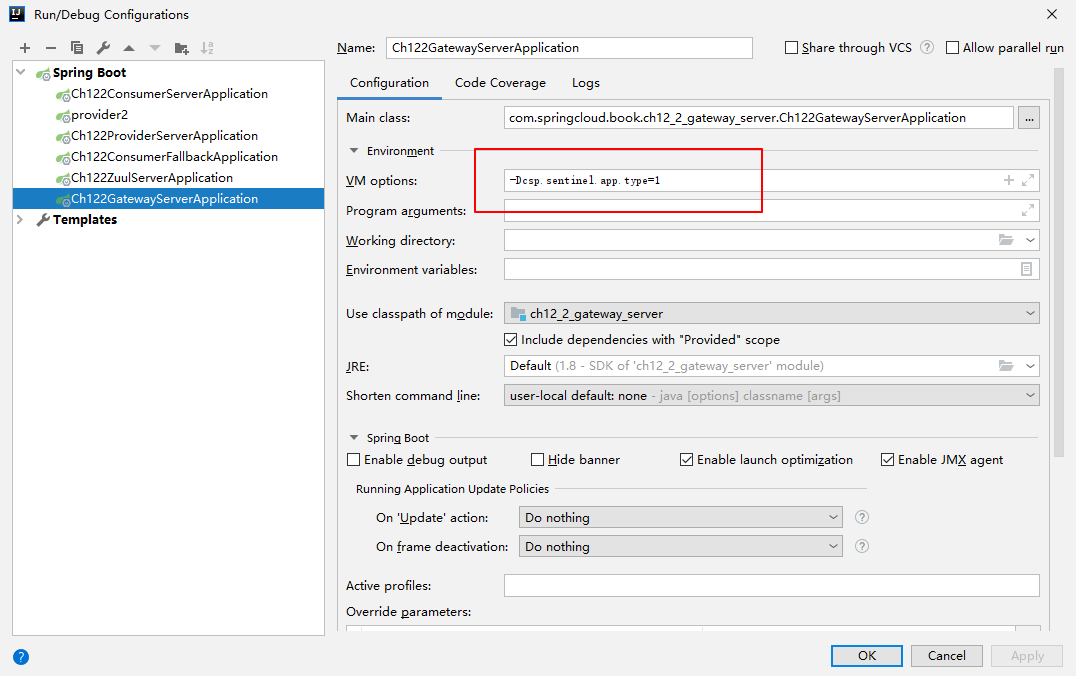
開啟瀏覽器訪問:http://localhost:28080/helloByFeign ,重新整理幾次,頁面正常返回Hello, port is: 8000,開啟Sentinel控制檯,配置限流策略,QPS限制為1,再重新整理瀏覽器頁面,這時,我們可以看到瀏覽器返回限流資訊:
{"code":403,"msg":"Sentinel block exception"}測試成功