
如何學習uni-app?
uni-app 是一個使用 Vue.js 開發跨平臺應用的前端框架。
開發者通過編寫 Vue.js 程式碼,uni-app 將其編譯到iOS、Android、微信小程式、H5等多個平臺,保證其正確執行並達到優秀體驗。
<template>
 <view class="content">
 </view>
</template>
<script>
 export default {
  data: {
  }
 }
</script>
methods: {
 openinfo() {
  var newsid = e.currentsTarget.dataset.newsid;
	uni.navigateTo({
	 url: '../info/info?newsid='+newsid
	})
 }
}
export defaults {
 onLoad: function(e){
  uni.request({
	 url: ''+e.newsid,
	 method: 'GET',
	 data: {},
	 success: res => {
	 }
	 fail: () => {},
	 complete: () => {}
	})
 }
}
<template>
 <view class="content">
  <view class="title"></view>
</view>
</template>

<rich-text class="richTest" :nodes="strings"></rich-text>
列表
返回資料格式 post_id 新聞id title 標題 created_at 建立時間 author_avatar 圖示
詳情 地址:
https://unidemo.dcloud.net.cn/api/news/36kr/ + id
使用rich-text來展示新聞內容
<rich-text class="richText" :nodes="strings"></rich-text>
2018年,uni-app,Dcloud推出uni-app,下載了官方提供的hello示例教程
空白的專案要拷貝uni.css和uni.js,儲存到common目錄 開啟pages.json將檔案中的navigationBarTitleText
v-for表示要迴圈的語句 @tap表示繫結點選事件 :data-postid表示繫結一個動態的資料 而postid表示這個動態的資料屬性是這個名字
編寫js程式碼的時候,編譯器會自動用eslint對程式碼進行檢查 onLoad是頁面的生命週期
<template>
<view class="content">
<view class="uni-list">
<view class="uni-list-cell" hover-class="uni-list-cell-hover" v-for="(item,index) in news" :key="index" @tap="opennews" :data-postid="item.post_id">
<view class="uni-media-list">
<image class="uni-media-list-logo" :src="item.author_avatar"></image>
<view class="uni-media-list-body">
<view class="uni-media-list-text-top">{{item.title}}</view>
<view class="uni-media-list-text-bottom uni-ellipsis">{{item.created_at}}</view>
</view>
</view>
</view>
</view>
</view>
</template>
<script>
export default {
data() {
return {
news: []
};
},
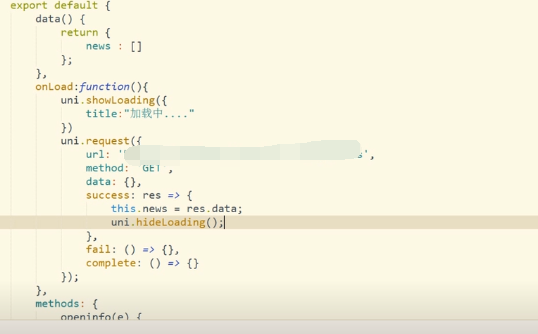
onLoad: function() {
uni.request({
url: 'https://',
method: 'GET',
data: {},
success: res => {
this.news = res.data;
},
fail: () => {},
complete: () => {}
});
},
methods: {
opennews(e){
uni.navigateTo({
url: '../news/new?postid='+e.currentTarget.dataset.postid
});
}
}
}
</script>
<style>
.uni-media-list-body{height:auto;}
.uni-media-list-text-top{line-height: 1.6em;}
</style>
<template>
    <view class="wrap">
        <view class="title">
            {{title}}
        </view>
        <view class="content">
            <rich-text :nodes="content"></rich-text>
        </view>
    </view>
</template>

<script>
    export default {
        data() {
            return {
                title: '',
                content: ''
            };
        },
        onLoad:function(e){
            uni.request({
                url: 'https://'+ e.postid,
                method: 'GET',
                data: {},
                success: res => {
                    this.title = res.data.title;
                    this.content = res.data.content;
                },
                fail: () => {},
                complete: () => {}
            });
        }
    }
</script>

<style>
    .wrap{padding: 10upx 2%;width: 96%;flex-wrap: wrap;}
    .title{line-height: 2em;font-weight: bold;font-size: 40upx;}
    .content{line-height: 2em;}
</style>
網頁大多是b/s 服務端程式碼混合在頁面裡 現在是c/s
<!DOCTYPE html>
<html>
    <head>
        <meta charset="utf-8" />
        <title></title>
        <script type="text/javascript">

        </script>
        <style type="text/css">

        </style>
    </head>
    <body>

    </body>
</html>
<template>
    <view>

    </view>
</template>

<script>
    export default {

    }
</script>

<style>

</style>
<script>
var util = require('../../../common/util.js');  //require這個js模組
var formatedPlayTime = util.formatTime(playTime); //呼叫js模組的方法
</script>
function formatTime(time) {
    return time;//這裡沒寫邏輯
}

module.exports = {
    formatTime: formatTime
}
var dateUtils = require('../../../common/util.js').dateUtils;
import * as echarts from '/components/echarts.simple.min.js';
<style>
 @import "./common/uni.css";
 .uni-hello-text {
  color: #7A7E83;
	}
</style>
匯入一個角標的元件庫
<template>
 <view>
  <uni-badge text="abc" :inverted="true"></uni-badge>
</view>
</template>

<script>
 import uniBadge from '../../../components/uni-badge.vue";
 export default {
  data() {
	 return {
	 }
	},
	components: {
	 uniBadge
	}
}
</script>
// main.js
import pageHead from './components/page-head.vue' // 匯入
Vue.component('page-head', pageHead)
div改view
span, font 改 text
a 改成 navigator
img 改 image
input, form, button, checkbox, radio, label, textarea, canvas, video
select 改 picker
iframe 改 web-view
scroll-view swiper icon rich-text progress slider switch camera live-player map cover-view
覆蓋原生元件,在map上加個遮罩,則需要使用cover-view元件
js變化,分為執行環境變化,資料繫結模式變化,api 瀏覽器中的js是w3c組織基於js規範補充了window、document、navigator、location等專用物件。
<html>
 <head>
  <script type="text/javascript">
	 document.addEventListener("DOMContentLoaded",function(){
	  document.getElementById("spana").innerText="456"
	 })
	 function changtextvalue() {
	  document.getElementById("spana").innerText="789"
	 }
	 </script>
	</head>
	<body>
	 <span id="spana">123</span>
	 <button type="button onclick="changetextvalue()">111</button>
	 </body>
</html>
<template>
 <view>
  <text>{{textvalue}}</text>
	<button :type="buttontype" @click="changetextvalue()"></button>
	</view>
</template>
<script>
export default{
data() {
 return {
  textvalue: "123",
	buttontype: "primary"
 };
 },
 onLoad() {
  this.textvalue="456"
},
methods: {
 changetextvalue() {
  this.textvalue="789"
	}
	}
}
</script>
alert, confirm改成 uni.showmodel ajax 改成 uni.request
cookie, session, rem只能用於h5 注意背景圖和字型檔案儘量不要大於40k。
vue和微信小程式
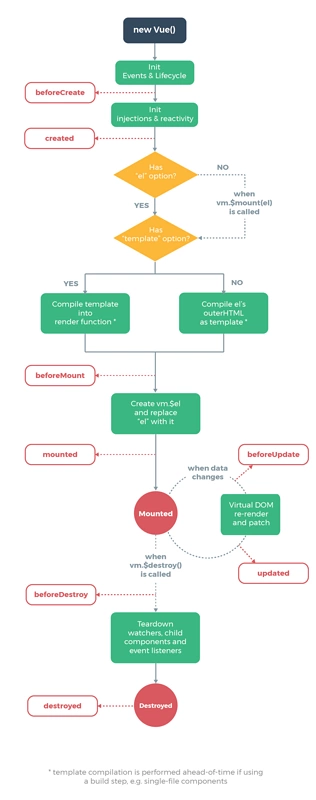
小程式生命週期

onLoad: 頁面載入 一個頁面只會呼叫一次,在onLoad中獲取開啟當前也邁進所呼叫的query引數
onShow頁面顯示 每次開啟頁面都會呼叫一次
onReady: 頁面初次渲染完成 一個頁面只會呼叫一次,代表頁面已經準備妥當,可以和檢視層進行互動
onHide: 頁面隱藏 當navigateTo或底部tab切換時呼叫
onUnload: 頁面解除安裝 當redirectTo或navigateBack的時候呼叫
vue一般會在created或者mounted中請求資料 在小程式,會在onLoad或者onShow中請求資料
<img :src="imgSrc"/>
<image src="{{imgSrc}}"></image>
VUE
<img :src="imgSrc"/>
小程式
<image src="{{imgSrc}}"></image>
<ul id="example-1">
  <li v-for="item in items">
    {{ item.message }}
  </li>
</ul>

var example1 = new Vue({
  el: '#example-1',
  data: {
    items: [
      { message: 'Foo' },
      { message: 'Bar' }
    ]
  }
})
<ul id="example-1">
  <li v-for="item in items">
    {{ item.message }}
  </li>
</ul>

var example1 = new Vue({
  el: '#example-1',
  data: {
    items: [
      { message: 'Foo' },
      { message: 'Bar' }
    ]
  }
})
顯示與隱藏元素
vue中,使用v-if 和v-show控制元素的顯示和隱藏
小程式中,使用wx-if和hidden控制元素的顯示和隱藏
<button v-on:click="counter += 1">Add 1</button>
<button v-on:click.stop="counter+=1">Add1</button>  //阻止事件冒泡
<button bindtap="noWork">明天不上班</button>
<button catchtap="noWork">明天不上班</button>  //阻止事件冒泡
<div id="app">
    <input v-model="reason" placeholder="填寫理由" class='reason'/>
</div>

new Vue({
  el: '#app',
  data: {
   reason:''
  }
})
<div id="app">
    <input v-model="reason" placeholder="填寫理由" class='reason'/>
</div>

new Vue({
  el: '#app',
  data: {
   reason:''
  }
})
<div id="app">
    <input v-model="reason" placeholder="填寫理由" class='reason'/>
</div>

new Vue({
  el: '#app',
  data: {
   reason:''
  }
})
vue中,通過this.reason取值
小程式中,通過this.data.reason取值
<button @click="say('明天不上班')"></button>

new Vue({
  el: '#app',
  methods:{
    say(arg){
    consloe.log(arg)
    }
  }
})
通過e.currentTarget.dataset.*的方式獲取
<view class='tr' bindtap='toApprove' data-id="{{item.id}}"></view>
Page({
data:{
    reason:''
},
toApprove(e) {
    let id = e.currentTarget.dataset.id;
  }
})
//子元件 bar.vue
<template>
  <div class="search-box">
    <div @click="say" :title="title" class="icon-dismiss"></div>
  </div>
</template>
<script>
export default{
props:{
    title:{
       type:String,
       default:''
      }
    }
},
methods:{
    say(){
       console.log('明天不上班');
       this.$emit('helloWorld')
    }
}
</script>

// 父元件 foo.vue
<template>
  <div class="container">
    <bar :title="title" @helloWorld="helloWorld"></bar>
  </div>
</template>

<script>
import Bar from './bar.vue'
export default{
data(){
    return{
        title:"我是標題"
    }
},
methods:{
    helloWorld(){
        console.log('我接收到子元件傳遞的事件了')
    }
},
components:{
    Bar
}
</script>
{
  "component": true
}
"usingComponents": {
    "tab-bar": "../../components/tabBar/tabBar"
  }

<tab-bar currentpage="index"></tab-bar>
//子元件 bar.vue
<template>
  <div class="search-box">
    <div @click="say" :title="title" class="icon-dismiss"></div>
  </div>
</template>
<script>
export default{
props:{
    title:{
       type:String,
       default:''
      }
    }
},
methods:{
    say(){
       console.log('明天不上班');
       this.$emit('helloWorld')
    }
}
</script>

// 父元件 foo.vue
<template>
  <div class="container">
    <bar :title="title" @helloWorld="helloWorld"></bar>
  </div>
</template>

<script>
import Bar from './bar.vue'
export default{
data(){
    return{
        title:"我是標題"
    }
},
methods:{
    helloWorld(){
        console.log('我接收到子元件傳遞的事件了')
    }
},
components:{
    Bar
}
</script>
// 父元件 foo.vue
<template>
  <div class="container">
    <bar :title="title"></bar>
  </div>
</template>
<script>
import Bar from './bar.vue'
export default{
data(){
    return{
        title:"我是標題"
    }
},
components:{
    Bar
}
</script>

// 子元件bar.vue
<template>
  <div class="search-box">
    <div :title="title" ></div>
  </div>
</template>
<script>
export default{
props:{
    title:{
       type:String,
       default:''
      }
    }
}
</script>
properties: {
    // 彈窗標題
    currentpage: {            // 屬性名
      type: String,     // 型別(必填),目前接受的型別包括:String, Number, Boolean, Object, Array, null(表示任意型別)
      value: 'index'     // 屬性初始值(可選),如果未指定則會根據型別選擇一個
    }
  }

//子元件中
methods: {
    // 傳遞給父元件
    cancelBut: function (e) {
      var that = this;
      var myEventDetail = { pickerShow: false, type: 'cancel' } // detail物件,提供給事件監聽函式
      this.triggerEvent('myevent', myEventDetail) //myevent自定義名稱事件,父元件中使用
    },
}

//父元件中
<bar bind:myevent="toggleToast"></bar>

// 獲取子元件資訊
toggleToast(e){
    console.log(e.detail)
}
若本號內容有做得不到位的地方(比如:涉及版權或其他問題),請及時聯絡我們進行整改即可,會在第一時間進行處理。
請點贊!因為你們的贊同/鼓勵是我寫作的最大動力!
歡迎關注達叔小生的簡書!
這是一個有質量,有態度的部落格
相關推薦
如何學習uni-app?
uni-app 是一個使用 Vue.js 開發跨平臺應用的前端框架。 開發者通過編寫 Vue.js 程式碼,uni-a
uni-app官方教程學習手記
本人微信公眾號: 前端修煉之路,歡迎關注 背景介紹 大概在今年的十月份左右,我瞭解到Dcloud推出了uni-app。當時下載了一個Hbuilder X,下載了官方提供的hello示例教程。經過一番努力,在雲端打包成功了。當時這個軟體還不夠完善,用iphone真機模擬執行時,還會存在中文亂碼問題。
04 uni-app框架學習:禁用頂部原生導航欄
原生 禁用 page info img .com ima app框架 alt 1.在pages.json中配置 比如要首頁禁用 就在首頁這個選項裏 加上這幾句代碼 2.效果如下 04 uni-app框架學習:禁用頂部原生導航欄
關於uni-app框架的學習-2
ext 數據 實現 學習 解決 image -a 準備 通過 學習text.vue時,學到的技巧 功能:通過兩個按鈕來實現點擊添加和刪除一行一行的內容,一次只能添加刪除一個 做法: 提前準備好一個數據數組texts,準備一個空數組extraLine,將添加的內容存進去 通
Erlang學習記錄:app demo
avi art ++ .config tco 結構 conf std lose 目錄結構 │ Emakefile │ make.bat │ start.bat ├─config │ config.config │ server.app ├─ebin
Flask學習-Flask app啟動過程
als sock 一個 sources host .html 執行 session targe 因為0.1版本整體代碼大概只有350行,比較簡單。所以本篇文章會以Flask 0.1版本源碼為基礎進行剖析Flask應用的啟動過程。 Flask參考資料flask,官網有一個最
Android學習之APP點擊功能閃退問題的處理一
分享 com info png 事件 測試 問題: 代碼 src java代碼如下: activity_main.xml代碼如下: APP測試問題:安裝好APP後,點擊“點擊事件”,APP會閃退 檢查方向: 1.查看java代碼中的成員變量textview是否初始化 2
uni-app 下拉至指定高度固定view
reat cti .exe con ava [1] bound ati ons uni.createSelectorQuery().select(‘#salyt’).boundingClientRect(function(rects){ console.log(
uni-app圖片壓縮轉base64位 利用遞歸來實現多張圖片壓縮
form raw zip nbsp trunc ucc 1.9 兩個文件 gettime //選擇圖片 chooseImage(){ let that =this uni.chooseImage({ sizeType: [‘original‘,‘c
uni-app圖片壓縮轉base64位 利用遞迴來實現多張圖片壓縮
//選擇圖片 chooseImage(){ let that =this uni.chooseImage({ sizeType: ['original','compressed'], //可以指定是原圖還是壓縮圖,預設二者都有 count: 9,//預設9 suc
uni-app呼叫原生的檔案系統管理器(可選取附件上傳)
<!DOCTYPE html> <html> <head> <meta charset="UTF-8"> <title></title> <style type="tex
uni-app - 如何打包
H5,spa應用,必須在伺服器環境下執行 多看官方文件,打包涉及到支付、以及各平臺相容性,通過 官方API連結如下: https://uniapp.dcloud.io/platform H5打包 &nbs
uni-app - Class 與 Style 繫結
參考uni文件:https://uniapp.dcloud.io/use?id=class-%E4%B8%8E-style-%E7%BB%91%E5%AE%9A 參考vue文件:https://cn.vuejs.org/v2/guide/class-and-style.html#%E7%BB%91%E5%A
uni-app 1.2釋出,iOS、Android、小程式、H5主流四端全覆蓋
多端氾濫、精力有限,是很多前端開發者每日的夢魘。 uni-app遵循Vue.js語法規範,一套程式碼,多端發行,切實解決了眾多開發者的痛點; 故自8月份釋出以來,已有上萬名開發人員擁抱uni-app,目前已累計建立了數萬個應用,活躍的開發者們每天在QQ群中產生數萬條交流記錄。 奔跑的腳步不會停止,歷時一
uni-app 地圖初用 map
一、uni-app 地圖初用 map 程式碼如下: <template> <view> <!-- <page-head :title="title"></page-head> --> <view
uni-app 建立的第一個應用
本人微信公眾號: 前端修煉之路,歡迎關注 背景介紹 經過上一篇文章uni-app官方教程學習手記的學習之後,我就著手做這個專案了。 目前已經初步搭出了整體的框架,秉著取之於社會,回饋於社會的原則,我將這個專案開源到GitHub uni-shop,發展壯大uni-app社群。專案肯定有不足和考慮不
uni-app 小程式如何預覽和真機除錯
這是本猿第一次開始接觸uni-app,聽說可以編譯到iOS、Android、微信小程式等多個平臺。那豈不是一個前端開發人員一個工程專案就可以做app 和小程式了? 還真是,下載了HBuilder X試了一下,到小程式執行後(要預先有安裝後小程式開發工具),發現小程式的預覽跟真
2018學習通app創業基礎爾雅課答案
學習通app創業基礎網路課答案,創業基礎章節測驗答案 課程概況 1 【單選題】普通本科學校創業教育的示範教材《創業基礎》的作者是()。D A、王興義 B、鄭開顯 C、李一夫 D、李家華 2 【單選題】以下敘述中正確的是()。D A、創業基礎課程是一門發散性
uni-app 加easymock 小案例
效果: 原始碼: <!-- 設定不使用uni-app的原生標題欄之後,為了不讓介面顯示到介面的頂端,但是這樣就不是沉浸式標題欄--> <template> <view v-bind:class="bodyCla
uni-app 小案例解析
效果: 1.Fly官網地址:https://wendux.github.io/dist/#/doc/flyio/readme &nb