VTD與SUMO聯合模擬說明
1 概述
1.1 目的
說明SUMO的安裝方法以及VTD和SUMO聯合模擬時的配置過程。
1.2 參考文件
1) https://redmine.vires.com/projects/vtd/wiki/ModuleManager#Linking-to-SUMO
2) https://blog.csdn.net/zhixiting5325/article/details/79302244
3) https://www.cnblogs.com/saworld/p/7698563.html
4) https://blog.csdn.net/qq_26130991/article/details/82595572
2 軟體環境配置
2.1 軟體環境
本文選用的軟體環境為:
Ubuntu 16.04
VTD 2.1
SUMO 0.32.0
2.2 SUMO的安裝
2.2.1 編譯環境和依賴庫的安裝
安裝SUMO前需要安裝:g++、cmake、autoconf、Proj、GDAL、Xerces-C、Fox Toolkit,在終端視窗輸入如下命令:
sudo apt-get install cmake g++ autoconf
sudo apt-get install libgdal1h libgdal-dev libxerces-c3.1 libxerces-c-dev libicu-dev libproj-dev libfox-1.6-dev libgl1-mesa-dev libglu1-mesa-dev
2.2.2 SUMO的安裝
- 如果之前運用apt-get 安裝了sumo的話, 用以下語句解除安裝:
apt-get --purge remove sumo
apt-get --purge remove sumo-tools
apt-get --purge remove sumo-docs
- 在如下連結下載安裝包,預設下載至/home/Downloads/:
https://sourceforge.net/projects/sumo/postdown - 解壓並進入SUMO資料夾(可以提前將壓縮檔案移動到自己定義的位置):
cd Downloads
tar xzf sumo-src-0.32.0.tar.gz
cd sumo-0.32.0
- Subversion checkout:
svn co https://svn.code.sf.net/p/sumo/code/trunk/sumo
cd sumo
make -f Makefile.cvs
- SUMO_HOME 環境變數的配置:
gedit ~/.bashrc
在開啟的檔案的最後加上sumo-0.32.0的位置,如下所示:

(圖片來自https://blog.csdn.net/zhixiting5325/article/details/79302244)
修改完畢儲存退出後,要通過source來使環境變數生效:
source ~/.bashrc
可以通過 echo $SUMO_HOME 來初步檢測有沒有修改成功:
echo $SUMO_HOME
若如下圖所示,返回設定的SUMO_HOME的路徑,則說明修改成功:

(圖片來自https://blog.csdn.net/zhixiting5325/article/details/79302244)
- Building the SUMO binaries:
./configure --prefix=$HOME
make
- SUMO binaries 最終安裝:
make install
- 測試安裝結果:
在終端中輸入sumo-gui,若彈出sumo視窗則說明安裝成功。
3 VTD和SUMO聯合模擬
3.1 配置VTD
1)在SUMO工程的moduleManager.xml檔案(一般位於:/VTD/VTD.2.1/Data/Projects/SUMO/Config)中新增下面<Sensor…Sensor>之間的語句:
<Debug    enable="false"
          lightSource="false"
          driver="false" />

<Sensor name="sumo" type="video">
    <Load lib="libModuleSUMOGateway.so" path="" persistent="true" />
    <Port name="SUMOout" number="8813" type="TCP" sendEgo="true" client="true" server="127.0.0.1" />
   <Port name="RDBout" number="49175" type="TCP" sendEgo="false" />
    <SUMO    radiusIn="1500.0" radiusOut="1550.0"
              radiusFar="100000.0" verbose="false" showTrace="false" sendVehicleFrontEdge="true"
	          pathEndAction="stop"
startArgs="SmartDB.2011/SmartDB.2011.sumo.cfg"  globalHdgOffsetDeg="-90" globalHdgScale="-1"/>
    <Player   default="true" />
    <Config   useSyncMask="true" synchronizeInit="true" />
    <Debug    enable="false"/>
</Sensor>

<DynamicsPlugin name="viTrafficDyn">
其中startArgs=" "的內容可以暫不設定。
2)點選VTD主介面的配置按鈕,並設定RDB:

3)為了實時性,注意在GUI中將Sensor中的perfect sensor去掉。
4)Ego車的起始位置和路徑,在ScenarioEditor中設定。
3.2 由opendrive道路生成SUMO所需檔案
1) 將opendrive格式的道路生成SUMO的.net檔案:
將路徑切換到道路檔案所在資料夾,並使用netconvert工具轉換格式:
cd townGer
netconvert --opendrive-files townGer.xodr -o townGer.net.xml --offset.x 0.0 --offset.y 0.0
在同文件夾下生成townGer.net.xml檔案
2) 使用randomTrips.py生成隨機交通流:
/home/SJN/SUMO/sumo-0.32.0/sumo/tools/randomTrips.py -n townGer.net.xml -b 0 -e 30 -p 1 -o townGer.trips.xml
下劃線處為randomTrips.py檔案的絕對位置。
其中:
-b 0,表示生成車輛的開始時刻為t0=0時刻;
-e 30,表示生成車輛的結束時刻為t1=30s時;
-p 1,表示生成車輛間隔為p=1s。
以上引數可以根據需要設定,生成車輛的總數n=(t1-t0)/p.
3) 生成路徑檔案rou.xml:
duarouter -n townGer.net.xml --route-files townGer.trips.xml -o townGer.rou.xml --ignore-errors
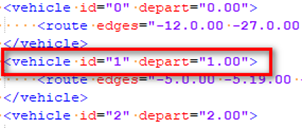
生成的.rou檔案中沒有vehicle type的內容,如下圖所示:

使用“vehicle type=“alltypes” id”全部替換“vehicle id”,並儲存。如下圖所示:

4) 編寫配置檔案sumo.cfg:
新建townGer.sumo.cfg檔案,並在其中輸入:
<configuration>
    <input>
        <net-file value="townGer.net.xml"/>
        <route-files value="townGer.rou.xml"/>
        <additional-files value="vtd_vehicle_types.add.xml"/>
        <remote-port value="8813"/>
        <step-length value="1"/>
    </input>
</configuration>
注意將vtd_vehicle_types.add.xml檔案放置到同一資料夾下。
3.3 執行
首先在終端啟動sumo:
cd townGer
sumo-gui townGer.sumo.cfg
sumo gui啟動,並在狀態列顯示如下資訊:

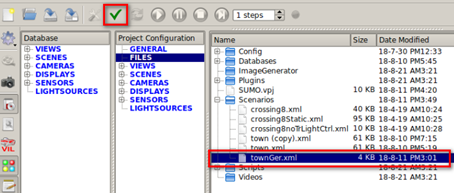
在VTD中選中對應檔案並確認,如下圖所示:

VTD的ModuleManager和sumo狀態列顯示如下資訊,說明連線正常:

依次點選VTD的執行按鈕和sumo的執行按鈕,開始進行模擬。
