自定義View實現五子棋遊戲
成功的路上一點也不擁擠,因為堅持的人太少了。
---簡書上看到的一句話
- 1
- 2
未來請假三天順帶加上十一回家結婚,不得不說真是太坑了,去年婚假還有10天,今年一下子縮水到了3天,只能趕著十一辦事了。
最近還在看資料結構,打算用java實現一遍,所以沒著急寫讀書筆記,不過前段時間看了一個簡單的五子棋遊戲,記錄一下。
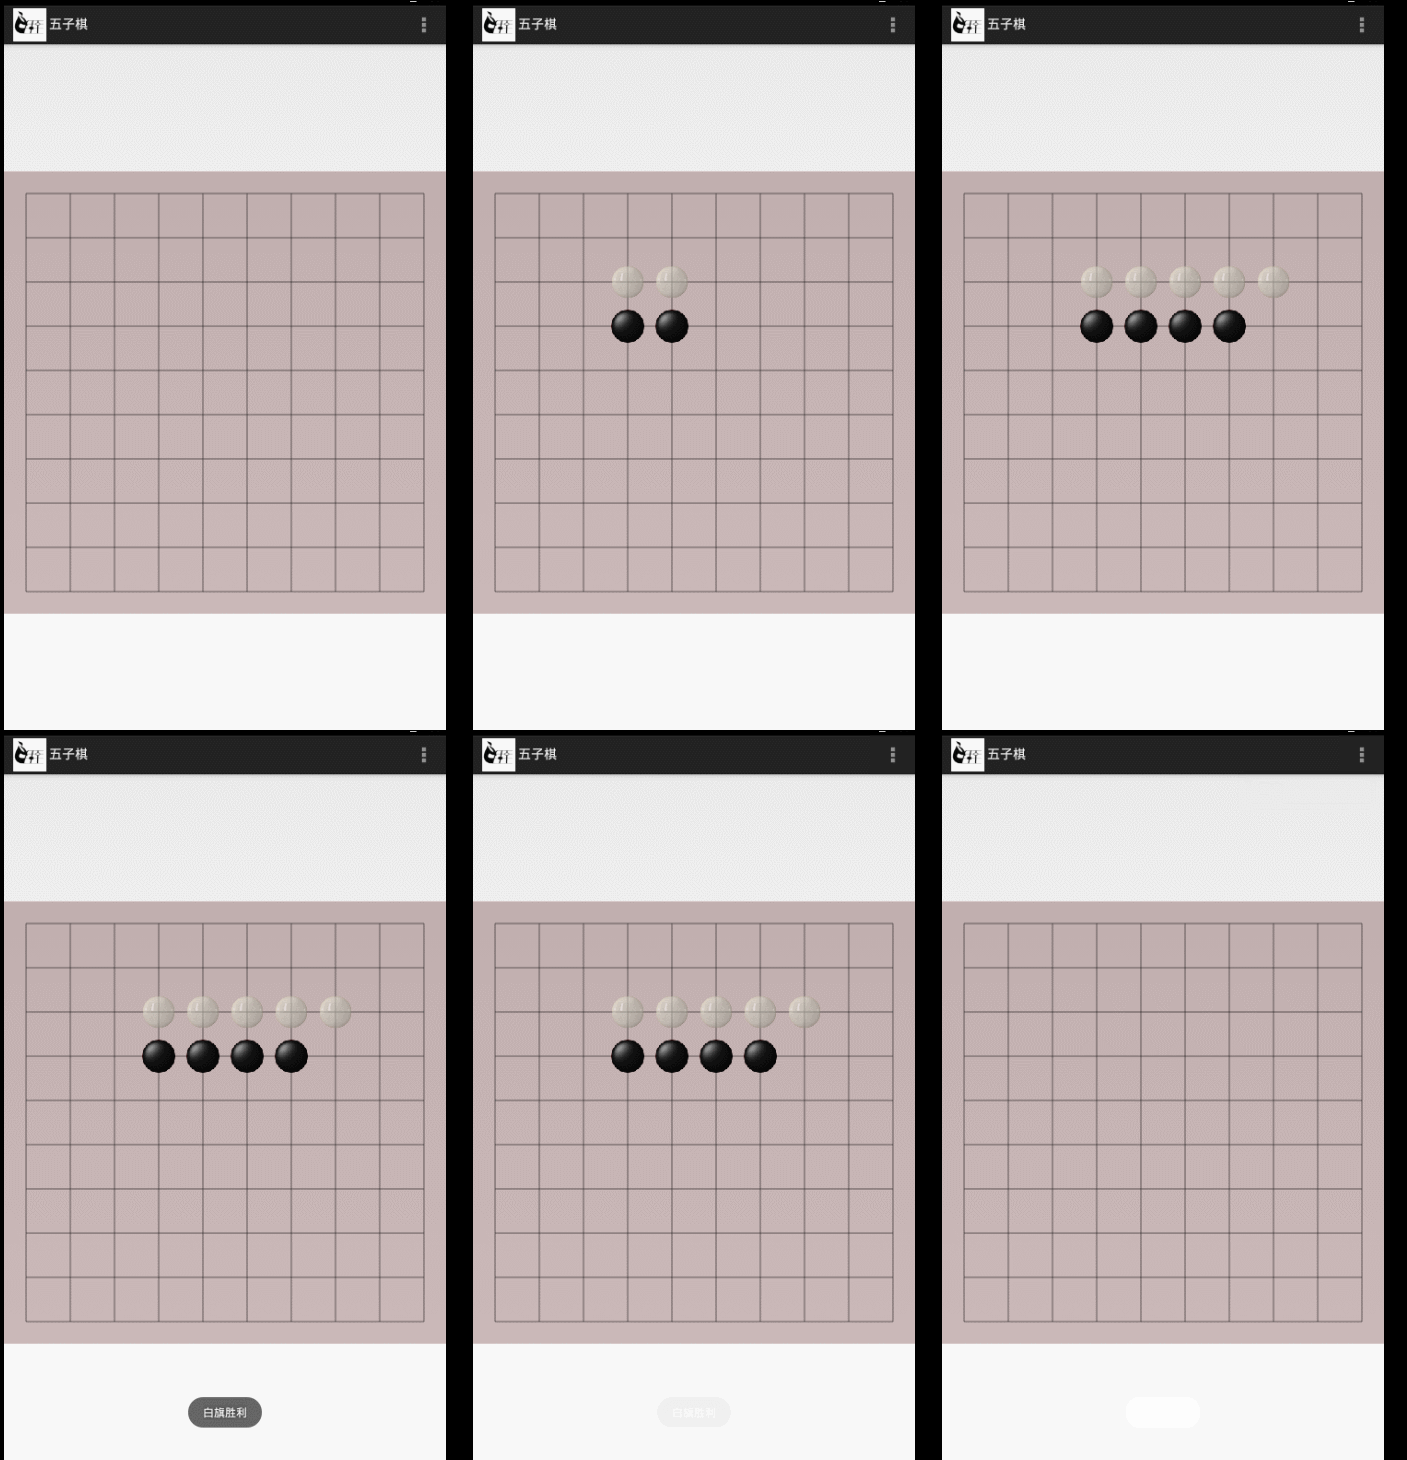
整體效果如下,整個功能在一個自定義View裡面實現:
由於主activity比較簡單直接列出來:
public - 1
- 2
- 3
- 4
- 5
- 6
- 7
- 8
- 9
- 10
- 11
- 12
- 13
- 14
- 15
- 16
- 17
- 18
- 19
- 20
- 21
- 22
- 23
- 24
- 25
- 26
- 27
- 28
- 29
- 30
- 31
<RelativeLayout xmlns:android="http://schemas.android.com/apk/res/android"
    xmlns:tools="http://schemas.android.com/tools"
    android:layout_width="match_parent"
    android:layout_height="match_parent" >

    <com.lly.simple_five.FiveView
        android:id="@+id/five"
        android:layout_centerInParent="true"
        android:layout_width="match_parent"
        android:layout_height="match_parent">

    </com.lly.simple_five.FiveView>

</RelativeLayout>- 1
- 2
- 3
- 4
- 5
- 6
- 7
- 8
- 9
- 10
- 11
- 12
- 13
- 14
上面只有一點 android:layout_centerInParent=”true” 設定自定義view居中,這樣看起來比較美觀。
主要程式碼在FiveView中實現,
考慮五子棋遊戲一共有幾個步驟:
1、畫棋盤
2、根據使用者選擇在指定位置畫棋子
3、判定輸贏
4、需要有個重新開始的選單,當確定輸贏後重新開始遊戲。
1、畫棋盤
棋盤需要手動畫出來,所以這裡自定義了一個view
public class FiveView extends View {
    public FiveView(Context context, AttributeSet attrs) {
            super(context, attrs);
            mPaint = new Paint();
            mPaint.setAntiAlias(true);
            mPaint.setStyle(Paint.Style.FILL);
            mPaint.setColor(0x88000000);
            setBackgroundColor(0x44440000);
            mBlackList = new ArrayList<Point>();
            mWhileList = new ArrayList<Point>();


        }
    ...
}- 1
- 2
- 3
- 4
- 5
- 6
- 7
- 8
- 9
- 10
- 11
- 12
- 13
- 14
- 15
然後重新他的兩個引數的構造方法,為什麼要寫兩個構造引數的方法呢,這是因為這裡只需要用自定義view的佈局,不需要自定義屬性。
在構造方法裡面我們初始化了畫筆,棋盤的背景,並例項化儲存棋子的list。
這裡設定了這個view的背景顏色,以方便看出這個view的位置
小知識:
一般情況下view有三個構造方法,其中帶一個引數的構造方法是在activity中new一個控制元件時呼叫的。如TextView tv = new TextView(mContext);
在xml中使用不帶自定義屬性的自定義控制元件時會呼叫兩個引數的構造方法,如本例。
在xml中使用帶自定義屬性的自定義控制元件時,會呼叫帶三個引數的構造方法。
這裡想想,我們前面定義的view寬和高都是佔滿了整個螢幕,所以在手機上看到的就是一個長方行的佈局,但是一般我們在現實中看到的棋盤都是正方形的,這也很好實現,
自定義view裡面的測量方法能很好的解決這個問題:
    @Override
    protected void onMeasure(int widthMeasureSpec, int heightMeasureSpec) {
        super.onMeasure(widthMeasureSpec, heightMeasureSpec);
        Width = MeasureSpec.getSize(widthMeasureSpec);
        Hight = MeasureSpec.getSize(heightMeasureSpec);
        int WidthMode = MeasureSpec.getMode(widthMeasureSpec);

        Width = Math.min(Width, Hight);
        int measuredWidth = MeasureSpec.makeMeasureSpec(Width, WidthMode);
        setMeasuredDimension(measuredWidth, measuredWidth);

}- 1
- 2
- 3
- 4
- 5
- 6
- 7
- 8
- 9
- 10
- 11
- 12
如上程式碼 我們只需要取出測量的寬高,然後以寬高中較小的值作為棋盤的寬高,這樣不管是橫屏或豎屏都能得到一個正方形的棋盤了,
小知識
view中的測試模式有三種也就是上面getMode取出來的值,分別對應
match_parent
wrap_content
xxxxxdp
規範的操作在自定義測量方法裡面要對這三種模式分別去出來,這裡比較簡單就不做出來了。
如上我們得到了棋盤的寬高。
在畫棋盤之前還需要考慮下,我們棋盤應該怎麼畫 ,畫多少條線,
這裡我們在棋盤的大小發生改變時初始化一些初始化棋盤的操作
...
    private static final int MAX_LINE = 10;
...
@Override
    protected void onSizeChanged(int w, int h, int oldw, int oldh) {
        super.onSizeChanged(w, h, oldw, oldh);
        mBroad = Width;
        mLineWidth = mBroad * 1.0f / MAX_LINE;
        mBlackPiece = BitmapFactory.decodeResource(getResources(),
                R.drawable.stone_b1);
        mWhilePiece = BitmapFactory.decodeResource(getResources(),
                R.drawable.stone_w2);
        int dstpoint = (int)(mLineWidth*roation);
        mBlackPiece = Bitmap.createScaledBitmap(mBlackPiece, dstpoint, dstpoint, false);
        mWhilePiece = Bitmap.createScaledBitmap(mWhilePiece, dstpoint, dstpoint, false);
    }
- 1
- 2
- 3
- 4
- 5
- 6
- 7
- 8
- 9
- 10
- 11
- 12
- 13
- 14
- 15
- 16
- 17
上面程式碼 ,我們定義了棋盤的寬高為測量時的寬高,
定義了兩條線之間的寬度,即10平分整個區域
另外初始化了黑白棋子這個在畫棋子的時候具體說明。
接著就需要去畫棋盤了
    protected void onDraw(Canvas canvas) {
        DrawBroad(canvas);
        DrawPiece(canvas);
        checkGameOver();
    }
    private void DrawBroad(Canvas canvas) {
        for (int i = 0; i < MAX_LINE; i++) {
            float startX = mLineWidth / 2;
            float stopX = mBroad - (mLineWidth / 2);
            float startY = (float) ((0.5 + i) * mLineWidth);
            float stopY = (float) ((0.5 + i) * mLineWidth);
            canvas.drawLine(startX, startY, stopX, stopY, mPaint);

            canvas.drawLine(startY, startX, stopY, stopX, mPaint);
        }
}- 1
- 2
- 3
- 4
- 5
- 6
- 7
- 8
- 9
- 10
- 11
- 12
- 13
- 14
- 15
- 16
- 17
可以發現在上面程式碼中,呼叫DrawBroad 去畫棋盤,分別橫豎畫了十條線,組成了棋盤,這裡發現在橫豎開始的時候都是從0.5*mLineWidth開始的,這是為了留出上面一點空隙,可以使棋子可以顯示完整,這裡用來一個for迴圈就完成了橫豎線,歸功於這是一個正方形,x,y座標互換一下就可以實現畫橫豎線了。
到這裡棋盤就已經畫好了
- 1
- 2
- 3
2、畫棋子
這個比較複雜 我們在分幾步實現;
1)、首先要例項化兩種顏色的棋子
2)、想想在現實中下五子棋的時候每人手邊有一個盒子裝著自己的棋子,這裡我們要有我們的盒子來儲存我們的棋子,
3)、畫棋子是根據客戶手指按下的位置進行畫的,所以要實現onTouchEvent方法
4)、畫棋子

1)、例項和兩種顏色的棋子
- 1
- 2
- 3
- 4
- 5
- 6
- 7
這個其實上在上面初始化變數的時候就已經做過了。
private static final float roation = 3*1.0f/4;
mBlackPiece = BitmapFactory.decodeResource(getResources(),
                R.drawable.stone_b1);
        mWhilePiece = BitmapFactory.decodeResource(getResources(),
int dstpoint = (int)(mLineWidth*roation);
        mBlackPiece = Bitmap.createScaledBitmap(mBlackPiece, dstpoint, dstpoint, false);
mWhilePiece = Bitmap.createScaledBitmap(mWhilePiece, dstpoint, dstpoint, false);- 1
- 2
- 3
- 4
- 5
- 6
- 7
這裡的一個小技巧就是讓棋子佔每格的3/4,這樣不管我們傳多大棋子圖片都能正確的顯示出來,並且只佔3/4的格子。
2)、實現黑白棋的棋盒
- 1
- 2
其實我們在建構函式裡面已經例項化了兩個盒子
        mBlackList = new ArrayList<Point>();
mWhileList = new ArrayList<Point>();- 1
- 2
只不過這裡還沒有棋子,這裡我們的棋盒裡面的棋子其實都是下在棋盤上的棋子。
3)、使用者下棋也就是觸發onTouchEvent方法
@Override
    public boolean onTouchEvent(MotionEvent event) {
        if(IsGameOver) return false;
        int x = (int) event.getX();
        int y = (int) event.getY();
        Point p = getPoint(x,y);

        if(event.getAction()==MotionEvent.ACTION_UP){
            if(mWhileList.contains(p)||mBlackList.contains(p)){
                return false;
            }
            if(isWhile){
                mWhileList.add(p);
            }else{
                mBlackList.add(p);
            }
            invalidate();
            isWhile=!isWhile;
        }
        return true;
    }

    private Point getPoint(int x, int y) {

        return new Point((int)(x/mLineWidth),(int)(y/mLineWidth));
}- 1
- 2
- 3
- 4
- 5
- 6
- 7
- 8
- 9
- 10
- 11
- 12
- 13
- 14
- 15
- 16
- 17
- 18
- 19
- 20
- 21
- 22
- 23
- 24
- 25
- 26
這裡當用戶下棋時,獲取所下的位置的座標,這裡有一個小技巧
在儲存所下棋子的x,y座標時我們讓x,y分別除每個格子的大小,這樣所獲得的位置一定在棋盤橫豎的交界點上,這個可以去體會一下,
然後當用戶擡起手指時我們去判斷下這個位置是不是已經有棋子了,有的話直接return false;什麼都不做,沒有的話,看下當前該誰下了,把這個棋子新增到對應的棋盒裡,並通知重新整理棋盤
4)、畫棋子
最後就是把現在棋盒裡面的棋子畫到棋盤中
private void DrawPiece(Canvas canvas) {
        for(int i=0,n=mWhileList.size();i<n;i++){
            Point WhilePiece = mWhileList.get(i);
            canvas.drawBitmap(mWhilePiece, (WhilePiece.x+(1-roation)/2)*mLineWidth,
                    (WhilePiece.y+(1-roation)/2)*mLineWidth, mPaint);

        }
        for(int i=0,n=mBlackList.size();i<n;i++){
            Point BlackPiece = mBlackList.get(i);
            canvas.drawBitmap(mBlackPiece, (BlackPiece.x+(1-roation)/2)*mLineWidth,
                    (BlackPiece.y+(1-roation)/2)*mLineWidth, null);
        }


    }
- 1
- 2
- 3
- 4
- 5
- 6
- 7
- 8
- 9
- 10
- 11
- 12
- 13
- 14
- 15
- 16
這步就很簡單了 迴圈遍歷棋盒裡面的棋子並把它畫出來,唯一要注意的就是棋子的位置,
 (WhilePiece.x+(1-roation)/2)*mLineWidth,
(WhilePiece.y+(1-roation)/2)*mLineWidth- 1
- 2
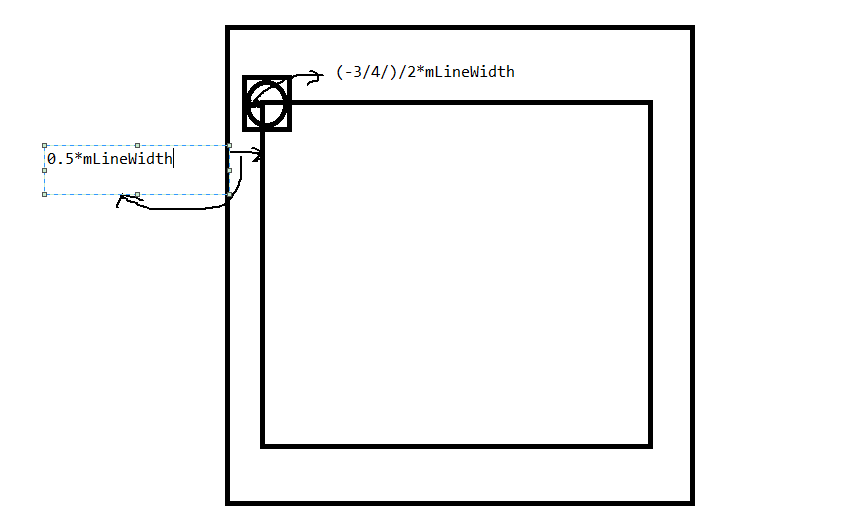
看下圖:
以第一個點的x座標為例:
因為開始的時候設定的棋盤開始的x座標離我們View的左邊距是0.5*mLineWidth,然後在初始化棋子的時候棋子的大小是3/4*mLineWidth,現在我們要計算棋子的左邊距到view左邊距的距離
所以棋子的x位置就應該是(0.5-3/4/2)*mLineWidth,第二個點就是(1.5-3/4/2)*mLineWidht,其中0.5,1.5是我們下子的位置係數即WhilePiece.x,所以最後提取出來就是(WhilePiece.x+(1-roation)/2)*mLineWidth,,豎座標也是同意道理,這個要好好理解一下
3、判定輸贏
首先要確定在哪裡判斷是否遊戲一方勝利,可以看出在畫棋子的時候是最好的時機了 當遊戲結束後就不再畫棋子。
    private void checkGameOver() {
        boolean Whilewin = checkWhileFive(mWhileList);
        boolean Blackwin = checkWhileFive(mBlackList);
        if(Whilewin){
            IsGameOver=true;
            Toast.makeText(getContext(), "白旗勝利", Toast.LENGTH_SHORT).show();
        }
        if(Blackwin){
            IsGameOver=true;
            Toast.makeText(getContext(), "黑棋勝利", Toast.LENGTH_SHORT).show();
        }
    }


    private boolean checkWhileFive(List<Point> points) {
        for(Point p:points){
            int x = p.x;
            int y = p.y;

             boolean Horizewin =checkHorizefive(x,y,points);
             boolean verwin =checkverfive(x,y,points);
             boolean leftwin =checkleftfive(x,y,points);
             boolean reghitwin =checkreghitfive(x,y,points);
             if(Horizewin||verwin||leftwin||reghitwin){
                 return true;
             }

        }
        return false;
    }
    private boolean checkHorizefive(int x, int y, List<Point> points) {
        int count=1;
        for(int i=1;i<FIVE_WIN;i++){
            if(points.contains(new Point(x+i,y))){
                count++;
            }else{
                break;
            }
        }
        if(count ==FIVE_WIN) return true;
        for(int i=1;i<FIVE_WIN;i++){
            if(points.contains(new Point(x-i,y))){
                count++;
            }else{
                break;
            }
        }
        if(count ==FIVE_WIN) return true;
        return false;

}- 1
- 2
- 3
- 4
- 5
- 6
- 7
- 8
- 9
- 10
- 11
- 12
- 13
- 14
- 15
- 16
- 17
- 18
- 19
- 20
- 21
- 22
- 23
- 24
- 25
- 26
- 27
- 28
- 29
- 30
- 31
- 32
- 33
- 34
- 35
- 36
- 37
- 38
- 39
- 40
- 41
- 42
- 43
- 44
- 45
- 46
- 47
- 48
- 49
- 50
- 51
- 52
上面程式碼首先在ondraw中呼叫checkGameover方法檢查遊戲是否結束
檢查的方法就是分別去判斷白棋和黑球是否達到五子連珠的效果。
上面貼出來了橫向五子連珠的判斷,取出當前棋子迴圈檢查他的左邊是否有五個相同顏色的棋子,有就返回遊戲結束,沒有的話在去檢查右邊是否有五個相同顏色的棋子,有的話返回遊戲結束,這樣橫豎,左斜,右斜都判斷後就可以確定遊戲是否結束,
結束的話在onTouchEvent方法中直接返回false表示我們不需要這個事件了。
到此這個簡單的五子棋差不多就完成了。
4、新增重新開始選單
為了使它更完善一點我們加入了 重新開始的選單鍵,
這個應該沒什麼難度,主要就是按下重新開始的時候
修改一些變數的初始值
public void setrestart() {
        IsGameOver=false;
        mWhileList.clear();
        mBlackList.clear();
        invalidate();
}- 1
- 2
- 3
- 4
- 5
- 6
最後的最後當app異常退出的時候,發現下了半天的棋子沒有儲存,因此這裡加入
    private String INSTANCE = "instaNce";
    private String INSTANCE_GEMEOVER = "instance_gameover";
    private String INSTANCE_WHILEARRAY = "instance_whilearray";
    private String INSTANCE_BLACKARRAY = "instance_blackarray";

    @Override
    protected Parcelable onSaveInstanceState() {
        Bundle bundle = new Bundle();
        bundle.putParcelable(INSTANCE, super.onSaveInstanceState());
        bundle.putBoolean(INSTANCE_GEMEOVER, IsGameOver);
        bundle.putParcelableArrayList(INSTANCE_WHILEARRAY, mWhileList);
        bundle.putParcelableArrayList(INSTANCE_BLACKARRAY, mBlackList);

        return bundle;
    }

    @Override
    protected void onRestoreInstanceState(Parcelable state) {
        if(state instanceof Bundle){
            Bundle bundle = (Bundle) state;
            IsGameOver = bundle.getBoolean(INSTANCE_GEMEOVER);
            mWhileList = bundle.getParcelableArrayList(INSTANCE_WHILEARRAY);
            mBlackList = bundle.getParcelableArrayList(INSTANCE_BLACKARRAY);
            super.onRestoreInstanceState(bundle.getBundle(INSTANCE));
            return;
        }
        super.onRestoreInstanceState(state);
}- 1
- 2
- 3
- 4
- 5
- 6
- 7
- 8
- 9
- 10
- 11
- 12
- 13
- 14
- 15
- 16
- 17
- 18
- 19
- 20
- 21
- 22
- 23
- 24
- 25
- 26
- 27
- 28
處理異常退出的情況。
GAME OVER。。。。


