
Opencv---通過形態學操作提取水平和垂直線
阿新 • • 發佈:2018-12-12
OpenCV通過使用形態學操作來提取水平和垂直線
目標
在本教程中,您將學習如何:
- 應用兩個非常常見的形態運算子(即擴張和侵蝕),建立自定義核心,以便在水平軸和垂直軸上提取直線。為此,您將使用以下OpenCV功能:CV ::侵蝕CV ::擴張CV :: getStructuringElement在一個例子中,您的目標是從音樂表中提取音樂筆記。
理論
形態操作
形態學是一組影象處理操作,其基於預定義的也稱為核心的結構元素來處理影象。輸出影象中的每個畫素的值基於輸入影象中的對應畫素與其鄰居的比較。通過選擇核心的大小和形狀,您可以構建對輸入影象的特定形狀敏感的形態操作。
兩個最基本的形態操作是擴張和侵蝕。擴散將畫素新增到影象中物件的邊界,而侵蝕恰恰相反。新增或刪除的畫素數量分別取決於用於處理影象的結構元素的大小和形狀。一般來說,這兩個操作遵循的規則如下:
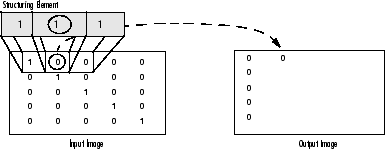
- 擴充套件:輸出畫素的值是屬於結構元素大小和形狀的所有畫素的最大值。例如,在二進位制影象中,如果落入核心範圍內的輸入影象的任何畫素被設定為值1,則輸出影象的相應畫素也將被設定為1。後者適用於任何型別的影象(例如灰度,bgr等)。

二進位制影象的擴張

灰度影象的擴張
-
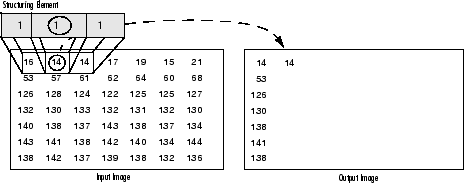
侵蝕:反之亦然適用於侵蝕作業。輸出畫素的值是落在結構元素的大小和形狀內的所有畫素的最小值。看下面的例子:
侵蝕二進位制影象
灰度影象侵蝕
結構元素
如上所述,通常在任何形態學操作中,用於探測輸入影象的結構元素是最重要的部分。
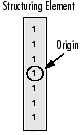
一個結構化元素是一個由只有0和1組成的矩陣,可以有任意的任意形狀和大小。通常比正在處理的影象小得多,而值為1的畫素定義鄰域。稱為原點的結構元素的中心畫素標識感興趣的畫素 - 正在處理的畫素。
例如,下面示出了7×7尺寸的菱形結構元件。
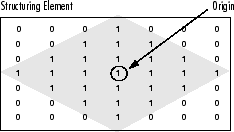
鑽石形結構元件及其起源
結構元素可以具有許多常見的形狀,例如線,菱形,圓盤,週期線以及圓和尺寸。您通常選擇與要在輸入影象中處理/提取的物件相同的大小和形狀的結構元素。例如,要在影象中查詢行,請建立一個線性結構元素,您將在後面看到。
Code
本教程程式碼如下所示:
#include <iostream>
#include <opencv2/opencv.hpp>
using namespace std;
using namespace cv;
int main(int, char** argv)
{
    // Load the image
    Mat src = imread(argv[1]);
    // Check if image is loaded fine
    if(!src.data)
        cerr << "Problem loading image!!!" << endl;
    // Show source image
    imshow("src", src);
    // Transform source image to gray if it is not
    Mat gray;
    if (src.channels() == 3)
    {
        cvtColor(src, gray, CV_BGR2GRAY);
    }
    else
    {
        gray = src;
    }
    // Show gray image
    imshow("gray", gray);
    // Apply adaptiveThreshold at the bitwise_not of gray, notice the ~ symbol
    Mat bw;
    adaptiveThreshold(~gray, bw, 255, CV_ADAPTIVE_THRESH_MEAN_C, THRESH_BINARY, 15, -2);
    // Show binary image
    imshow("binary", bw);
    // Create the images that will use to extract the horizontal and vertical lines
    Mat horizontal = bw.clone();
    Mat vertical = bw.clone();
    // Specify size on horizontal axis
    int horizontalsize = horizontal.cols / 30;
    // Create structure element for extracting horizontal lines through morphology operations
    Mat horizontalStructure = getStructuringElement(MORPH_RECT, Size(horizontalsize,1));
    // Apply morphology operations
    erode(horizontal, horizontal, horizontalStructure, Point(-1, -1));
    dilate(horizontal, horizontal, horizontalStructure, Point(-1, -1));
    // Show extracted horizontal lines
    imshow("horizontal", horizontal);
    // Specify size on vertical axis
    int verticalsize = vertical.rows / 30;
    // Create structure element for extracting vertical lines through morphology operations
    Mat verticalStructure = getStructuringElement(MORPH_RECT, Size( 1,verticalsize));
    // Apply morphology operations
    erode(vertical, vertical, verticalStructure, Point(-1, -1));
    dilate(vertical, vertical, verticalStructure, Point(-1, -1));
    // Show extracted vertical lines
    imshow("vertical", vertical);
    // Inverse vertical image
    bitwise_not(vertical, vertical);
    imshow("vertical_bit", vertical);
    // Extract edges and smooth image according to the logic
    // 1. extract edges
    // 2. dilate(edges)
    // 3. src.copyTo(smooth)
    // 4. blur smooth img
    // 5. smooth.copyTo(src, edges)
    // Step 1
    Mat edges;
    adaptiveThreshold(vertical, edges, 255, CV_ADAPTIVE_THRESH_MEAN_C, THRESH_BINARY, 3, -2);
    imshow("edges", edges);
    // Step 2
    Mat kernel = Mat::ones(2, 2, CV_8UC1);
    dilate(edges, edges, kernel);
    imshow("dilate", edges);
    // Step 3
    Mat smooth;
    vertical.copyTo(smooth);
    // Step 4
    blur(smooth, smooth, Size(2, 2));
    // Step 5
    smooth.copyTo(vertical, edges);
    // Show final result
    imshow("smooth", vertical);
    waitKey(0);
    return 0;
}
說明/結果
- 載入源影象並檢查它是否載入沒有任何問題,然後顯示:
    // Load the image
    Mat src = imread(argv[1]);
    // Check if image is loaded fine
    if(!src.data)
        cerr << "Problem loading image!!!" << endl;
    // Show source image
    imshow("src", src);
- 然後將影象轉換為灰度,如果還沒有:
    // Transform source image to gray if it is not
    Mat gray;
    if (src.channels() == 3)
    {
        cvtColor(src, gray, CV_BGR2GRAY);
    }
    else
    {
        gray = src;
    }
    // Show gray image
    imshow("gray", gray);
- 然後將灰度影象轉換為二進位制。注意〜符號,表示我們使用它的逆(即bitwise_not)版本:
    // Apply adaptiveThreshold at the bitwise_not of gray, notice the ~ symbol
    Mat bw;
    adaptiveThreshold(~gray, bw, 255, CV_ADAPTIVE_THRESH_MEAN_C, THRESH_BINARY, 15, -2);
    // Show binary image
    imshow("binary", bw);
- 現在,我們準備應用形態學操作來提取水平和垂直線,並將音樂筆記與樂譜分開,但首先讓我們初始化我們將使用的輸出影象:
    // Create the images that will use to extract the horizontal and vertical lines
    Mat horizontal = bw.clone();
    Mat vertical = bw.clone();
正如我們在理論中指定的,為了提取我們想要的物件,我們需要建立相應的結構元素。因為這裡我們要提取水平線,所以用於此目的的相應結構元素將具有以下形狀:

在原始碼中,它由以下程式碼片段代表:
   // Specify size on horizontal axis
    int horizontalsize = horizontal.cols / 30;
    // Create structure element for extracting horizontal lines through morphology operations
    Mat horizontalStructure = getStructuringElement(MORPH_RECT, Size(horizontalsize,1));
    // Apply morphology operations
    erode(horizontal, horizontal, horizontalStructure, Point(-1, -1));
    dilate(horizontal, horizontal, horizontalStructure, Point(-1, -1));
    // Show extracted horizontal lines
    imshow("horizontal", horizontal);
- 同樣適用於垂直線,具有相應的結構元素:
這又表示如下:
    // Specify size on vertical axis
    int verticalsize = vertical.rows / 30;
    // Create structure element for extracting vertical lines through morphology operations
    Mat verticalStructure = getStructuringElement(MORPH_RECT, Size( 1,verticalsize));
    // Apply morphology operations
    erode(vertical, vertical, verticalStructure, Point(-1, -1));
    dilate(vertical, vertical, verticalStructure, Point(-1, -1));
    // Show extracted vertical lines
    imshow("vertical", vertical);
- 你可以看到我們幾乎在那裡 但是,在這一點上你會注意到這些筆記的邊緣有點粗糙。為此,我們需要細化邊緣以獲得更平滑的結果:
    // Inverse vertical image
    bitwise_not(vertical, vertical);
    imshow("vertical_bit", vertical);
    // Extract edges and smooth image according to the logic
    // 1. extract edges
    // 2. dilate(edges)
    // 3. src.copyTo(smooth)
    // 4. blur smooth img
    // 5. smooth.copyTo(src, edges)
    // Step 1
    Mat edges;
    adaptiveThreshold(vertical, edges, 255, CV_ADAPTIVE_THRESH_MEAN_C, THRESH_BINARY, 3, -2);
    imshow("edges", edges);
    // Step 2
    Mat kernel = Mat::ones(2, 2, CV_8UC1);
    dilate(edges, edges, kernel);
    imshow("dilate", edges);
    // Step 3
    Mat smooth;
    vertical.copyTo(smooth);
    // Step 4
    blur(smooth, smooth, Size(2, 2));
    // Step 5
    smooth.copyTo(vertical, edges);
    // Show final result
    imshow("smooth", vertical);
