Tensorflow資料讀取機制及tfrecords高效讀取資料
1. tensorflow 的資料讀取機制
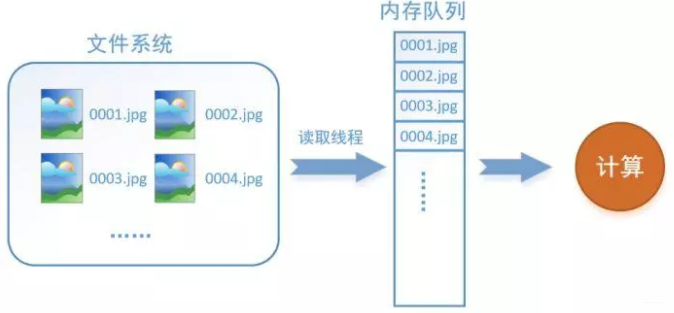
以影象資料為例,資料讀取過程如下所示:

假設我們的硬碟中有一個圖片資料集0001.jpg,0002.jpg,0003.jpg……我們只需要把它們讀取到記憶體中,然後提供給GPU或是CPU進行計算就可以了。這聽起來很容易,但事實遠沒有那麼簡單。事實上,我們必須要把資料先讀入後才能進行計算,假設讀入用時0.1s,計算用時0.9s,那麼就意味著每過1s,GPU都會有0.1s無事可做,這就大大降低了運算的效率。
如何解決這個問題?方法就是將讀入資料和計算分別放在兩個執行緒中,將資料讀入記憶體的一個佇列,如下圖所示:

讀取執行緒源源不斷地將檔案系統中的圖片讀入到記憶體佇列中,而負責計算的是另一個執行緒,計算需要資料時,直接從記憶體佇列中取就可以了。這樣就可以解決GPU因為IO而空閒的問題!
而在tensorflow中,為了方便管理,在記憶體佇列前又添加了一層所謂的“檔名佇列”。
為什麼要新增這一層檔名佇列?首先得了解機器學習中的一個概念:epoch。對於一個數據集來講,執行一個epoch就是將這個資料集中的圖片全部計算一遍。如一個數據集中有三張圖片A.jpg、B.jpg、C.jpg,那麼跑一個epoch就是指對A、B、C三張圖片都計算了一遍。兩個epoch就是指先對A、B、C各計算一遍,然後再全部計算一遍,也就是說每張圖片都計算了兩遍。
tensorflow使用檔名佇列+記憶體佇列雙佇列的形式讀入檔案,可以很好地管理epoch。下面用圖片的形式來說明這個機制的執行方式。還是以資料集A.jpg, B.jpg, C.jpg為例,假定我們要跑一個epoch,那麼就在檔名佇列中把A、B、C各放入一次,並在之後標註佇列結束,如下圖。

程式執行後,記憶體佇列首先讀入A(此時A從檔名佇列中出隊),然後再讀取B和C。


此時,如果再嘗試讀入,系統由於檢測到了“結束”,就會自動丟擲一個異常(OutOfRange)。外部捕捉到這個異常後就可以結束程式了。這就是tensorflow中讀取資料的基本機制。如果我們要跑2個epoch而不是1個epoch,那隻要在檔名佇列中將A、B、C依次放入兩次再標記結束就可以了。
2. TensorFlow資料讀取機制對應的函式
如何在TensorFlow中建立這兩個記憶體?
- 建立檔名佇列 - tf.train.string_input_producer 阻塞態 + tf.train.start_queue_runners 啟用態
tf.train.string_input_producer(
    string_tensor,
    num_epochs=None,
    shuffle=True,
    seed=None,
    capacity=32,
    shared_name=None,
    name=None,
    cancel_op=None
)
把輸入的資料進行按照要求排序成一個佇列。最常見的是把一堆檔名整理成一個佇列。如下操作:
filenames = [os.path.join(data_dir,'data_batch%d.bin' % i ) for i in xrange(1,6)]
filename_queue = tf.train.string_input_producer(filenames)tf.train.string_input_producer有兩個重要的引數,一個是num_epochs,它就是上文中提到的epoch數。另一個是shuffle,shuffle是指在epoch內檔案順序是否被打亂。若設定shuffle=False,如下圖,每個epoch內,資料還是按照A、B、C的順序進入檔名佇列,這個順序不會改變。如果設定shuffle=True,那麼在epoch內,資料的前後順序就會被打亂,具體如下圖所示。


其實,僅僅應用tf.train.string_input_producer構建的檔名佇列是處於阻塞態的,並沒有真正的將檔名讀入到相應的檔名佇列記憶體中,如下左圖所示。為了完成在檔名佇列記憶體中構建檔名佇列(也就是我們說的讀入資料),我們還需要tf.train.start_queue_runners進行啟動,如下右圖所示。


我們通常也把tf.train.start_queue_runners叫做‘入棧執行緒啟動器’,使用tf.train.start_queue_runners之後,才會真正啟動填充佇列的執行緒,這時系統就不再“阻塞”。此後計算單元就可以拿到資料並進行計算,整個程式也就跑起來了。
- 建立資料記憶體序列
在tensorflow中,資料記憶體佇列不需要自己建立,我們只需要使用reader物件從檔名佇列中讀取資料就可以了。所以TensorFlow高效讀取資料機制中,最重要的是完成檔名佇列的設計。
3. 為什麼要使用TFRecords來進行檔案的讀寫?
在tensorflow中資料的傳入方式主要包含以下幾種:
- 供給資料(feed): 在tensorflow程式執行的每一步, 讓Python程式碼來供給資料。
- 從檔案讀取資料: 在tensorflow graph的起始, 讓一個輸入pipeline從檔案中讀取資料。
- 預載入資料: 在tensorflow graph中定義常量或變數來儲存所有資料(僅適用於資料量比較小的情況)。
當我們遇到資料集比較大的情況時,第一種和最後一種方法會極其佔記憶體,效率很差。那麼為什麼使用TFRecords會比較快?在於其使用二進位制儲存檔案,也就是將資料儲存在一個記憶體塊中,相比其它檔案格式要快很多,特別是如果你使用hdd(Hard Disk Drive)而不是ssd(Solid State Disk),因為它涉及移動磁碟閱讀器頭並且需要相當長的時間。總體而言,通過使用二進位制檔案,可以更輕鬆地分發資料,使資料更好地對齊,以實現高效的讀取。
- 官方文件:
Another approach is to convert whatever data you have into a supported format. This approach makes it easier to mix and match data sets and network architectures. The recommended format for TensorFlow is a TFRecords file containing tf.train.Example protocol buffers (which contain Features as a field). You write a little program that gets your data, stuffs it in an Example protocol buffer, serializes the protocol buffer to a string, and then writes the string to a TFRecords file using the tf.python_io.TFRecordWriter. For example, tensorflow/examples/how_tos/reading_data/convert_to_records.py converts MNIST data to this format.
To read a file of TFRecords, use tf.TFRecordReader with the tf.parse_single_example decoder. The parse_single_example op decodes the example protocol buffers into tensors. An MNIST example using the data produced by convert_to_records can be found in tensorflow/examples/how_tos/reading_data/fully_connected_reader.py, which you can compare with the fully_connected_feed version.
整個過程其實兩部分,一是使用tf.train.Example協議流將檔案儲存成TFRecords格式的.tfrecords檔案,這裡主要涉及到使用tf.python_io.TFRecordWriter("train.tfrecords")和tf.train.Example以及tf.train.Features三個函式,第一個是生成需要對應格式的檔案,後面兩個函式主要是將我們要傳入的資料按照一定的格式進行規範化。
另一部分就是在訓練模型時將我們生成的.tfrecords檔案讀入並傳到模型中進行使用。這部分主要涉及到使用tf.TFRecordReader("train.tfrecords")和tf.parse_single_example兩個函式。第一個函式是將我們的二進位制檔案讀入,第二個則是進行解析然後得到我們想要的資料。
#### 生成train.tfrecords檔案 ####
import os
import tensorflow as tf
from PIL import Image

cwd = os.getcwd()

''' 資料目錄
-- img1.jpg
     img2.jpg
     img3.jpg
     ...
-- img1.jpg
     img2.jpg
     ...
-- ...
'''
writer = tf.python_io.TFRecordWriter("train.tfrecords") # 定義train.tfrecords檔案
for index, name in enumerate(classes): # 遍歷每一個資料夾
    class_path = cwd + name + "/"      # 每一個資料夾的路徑
    for img_name in os.listdir(class_path):  # 遍歷每個資料夾中所有的影象
        img_path = class_path + img_name  # 每一張影象的路徑
        img = Image.open(img_path)    # 開啟影象
        img = img.resize((224, 224))  # 影象裁剪
        img_raw = img.tobytes()       # 將影象轉化為bytes

        # 呼叫Example 和 Feature函式將資料格式化儲存起來
        # 注意:Features 傳入引數為一個字典,方便後續讀取資料時的操作
        example = tf.train.Example(features=tf.train.Features(feature={
            "label": tf.train.Feature(int64_list=tf.train.Int64List(value=[index])),
            'img_raw': tf.train.Feature(bytes_list=tf.train.BytesList(value=[img_raw]))
        }))
        #序列化為字串,並寫入資料
        writer.write(example.SerializeToString())
writer.close()基本的,一個Example中包含Features,Features裡包含Feature(這裡沒s)的字典。最後,Feature裡包含有一個 FloatList,或者ByteList,或者Int64List
就這樣,我們把相關的資訊都存到了一個檔案中,不用單獨的label檔案,讀取也很方便。
# 從tfrecords檔案中讀取記錄的迭代器
for serialized_example in tf.python_io.tf_record_iterator("train.tfrecords"):
    example = tf.train.Example()
    example.ParseFromString(serialized_example)

    image = example.features.feature['image'].bytes_list.value
    label = example.features.feature['label'].int64_list.value
    # 可以做一些預處理之類的
    print( image, label )
3. 使用佇列讀取tfrecords資料
從TFRecords檔案中讀取資料, 首先需要用tf.train.string_input_producer生成一個解析佇列。之後呼叫tf.TFRecordReader的tf.parse_single_example解析器。其原理如下圖:

解析器首先讀取解析佇列,返回serialized_example物件,之後呼叫tf.parse_single_example操作將Example協議緩衝區(protocol buffer)解析為張量。
def read_and_decode(filename):
    # 根據檔名生成檔名佇列
    filename_queue = tf.train.string_input_producer([filename])
    # 定義reader
    reader = tf.TFRecordReader()
    # 返回檔名和檔案
    _, serialized_example = reader.read(filename_queue)
    # 將協議緩衝區Protocol Buffer解析為張量tensor
    # 注意到:我們寫檔案就是採用了字典的方式進行儲存的,所以解析的時候依然用字典進行資料提取
    features = tf.parse_single_example(serialized_example,
                                       features={
                                           'label': tf.FixedLenFeature([], tf.int64),
                                           'img_raw' : tf.FixedLenFeature([], tf.string),
                                       })
    # 將編碼為字串的變數重新變回來,因為寫進tfrecord裡用to_bytes的形式,也就是字串
    img = tf.decode_raw(features['img_raw'], tf.uint8)
    # 檢查張量形狀是否對齊
    img = tf.reshape(img, [224, 224, 3])
    # 影象資料格式化為tf.float32
    img = tf.cast(img, tf.float32) * (1. / 255) - 0.5
    # 標籤資料格式化為tf.int32
    label = tf.cast(features['label'], tf.int32)

    return img, label
之後,在訓練模型過程中,我們就會很方便用這些資料了,例如:
# 解析tfrecords檔案的資料
img, label = read_and_decode("train.tfrecords")

# 通過隨機打亂張量的順序建立batch
# capacity = ( min_after_dequeue + (num_threads + aSmallSafetyMargin * batch_size) )
img_batch, label_batch = tf.train.shuffle_batch(
                           [img, label],  # 入隊的張量列表
                           batch_size=30, # 進行一次批處理的tensor數
                           capacity=2000, # 佇列中最大的元素數
                           min_after_dequeue=1000,# 一次出列操作完成後,佇列中元素的最小數量
                           num_threads=4  #使用多個執行緒在tensor_list中讀取檔案
                           )
init = tf.initialize_all_variables()

with tf.Session() as sess:
    sess.run(init)
    # 佇列-入棧執行緒啟動器
    threads = tf.train.start_queue_runners(sess=sess)
    for i in range(3):
        val, loss= sess.run([img_batch, label_batch])
三個要點作為總結:
- tensorflow裡的graph能夠記住狀態,這使得TFRecordReader能夠記住tfrecord的位置,並且始終能返回下一個。而這就要求我們在使用之前,必須初始化整個graph,這裡使用了函式tf.initialize_all_variables()來進行初始化
- tensorflow中的佇列和普通的佇列差不多,不過它裡面的operation和tensor都是符號型的,在呼叫sess.run()時才執行。
- TFRecordReader會一直彈出佇列中檔案的名字,直到佇列為空
4. 參考文章
1. https://zhuanlan.zhihu.com/p/27238630
2. https://blog.csdn.net/liuchonge/article/details/73649251
3. https://www.cnblogs.com/upright/p/6136265.html
4. https://blog.csdn.net/happyhorizion/article/details/77894055
