
pytorch+yolov3(4)
如何在PyTorch中從頭開始實現YOLO(v3)物件檢測器:第4部分
圖片來源:Karol Majek。在這裡檢視他的YOLO v3實時檢測視訊
這是從頭開始實現YOLO v3探測器的教程的第4部分。在最後一部分,我們實施了網路的前向傳遞。在這一部分中,我們通過物件置信度和非最大抑制來閾值檢測。
本教程的程式碼旨在在Python 3.5和PyTorch 0.4上執行
本教程分為5個部分:
-
第4部分(本例):置信度閾值和非最大抑制
先決條件
- 本教程的第1-3部分。
- PyTorch的基本工作知識,包括如何使用nn.Module,nn.Sequential和torch.nn.parameter類建立自定義體系結構。
- NumPy的基礎知識
如果您缺少任何正面,帖子下面有連結供您關注。
在前面的部分中,我們構建了一個模型,該模型在給定輸入影象的情況下輸出多個物件檢測。確切地說,我們的輸出是一個形狀的張量B x 10647 x 85
但是,如第1部分所述,我們必須使輸出符合物件分數閾值和非最大抑制,以獲得我將在本文的其餘部分中稱為真實檢測的內容。為此,我們將建立一個write_results在檔案中呼叫的函式util.py
def write_results(prediction, confidence, num_classes, nms_conf = 0.4):
這些函式作為輸入prediction,confidence(物件性得分閾值),num_classes(在我們的例子中為80)和nms_conf(NMS IoU閾值)。
物件置信度閾值
我們的預測張量包含有關B x 10647邊界框的資訊。對於具有低於閾值的物件性得分的每個邊界框,我們將其每個屬性(表示邊界框的整行)的值設定為零。
    conf_mask = (prediction[:,:,4] > confidence).float().unsqueeze(2)
    prediction = prediction*conf_mask
執行非最大抑制
注意:我假設您瞭解IoU(聯合交叉)是什麼,以及非最大抑制是什麼。如果不是這種情況,請參閱帖子末尾的連結)。
我們現在擁有的邊界框屬性由中心座標以及邊界框的高度和寬度來描述。但是,使用每個盒子的一對診斷角的座標來計算兩個盒子的IoU更容易。因此,我們將框的(中心x,中心y,高度,寬度)屬性轉換為(左上角x,左上角y,右下角x,右下角y)。
    box_corner = prediction.new(prediction.shape)
    box_corner[:,:,0] = (prediction[:,:,0] - prediction[:,:,2]/2)
    box_corner[:,:,1] = (prediction[:,:,1] - prediction[:,:,3]/2)
    box_corner[:,:,2] = (prediction[:,:,0] + prediction[:,:,2]/2)
    box_corner[:,:,3] = (prediction[:,:,1] + prediction[:,:,3]/2)
    prediction[:,:,:4] = box_corner[:,:,:4]
每個影象中的真實檢測數可能不同。例如,批量為3的批次,其中影象1,2和3分別具有5,2,4個真實檢測。因此,必須一次對一個影象進行置信度閾值處理和NMS。這意味著,我們無法對所涉及的操作進行向量化,並且必須遍歷第一維prediction(包含批處理中的影象索引)。
    batch_size = prediction.size(0)

    write = False

    for ind in range(batch_size):
        image_pred = prediction[ind]          #image Tensor
           #confidence threshholding
           #NMS
如前所述,writeflag用於表示我們尚未初始化output,我們將使用一個張量來收集整個批次中的真實檢測。
一旦進入迴圈,讓我們清理一下。請注意,每個邊界框行有85個屬性,其中80個是類別分數。此時,我們只關注具有最大值的班級分數。因此,我們從每一行中刪除80個類分數,而是新增具有最大值的類的索引,以及該類的類分數。
        max_conf, max_conf_score = torch.max(image_pred[:,5:5+ num_classes], 1)
        max_conf = max_conf.float().unsqueeze(1)
        max_conf_score = max_conf_score.float().unsqueeze(1)
        seq = (image_pred[:,:5], max_conf, max_conf_score)
        image_pred = torch.cat(seq, 1)
還記得我們已經將具有小於閾值的物件置信度的邊界框行設定為零嗎?讓我們擺脫他們。
        non_zero_ind =  (torch.nonzero(image_pred[:,4]))
        try:
            image_pred_ = image_pred[non_zero_ind.squeeze(),:].view(-1,7)
        except:
            continue

        #For PyTorch 0.4 compatibility
        #Since the above code with not raise exception for no detection
        #as scalars are supported in PyTorch 0.4
        if image_pred_.shape[0] == 0:
            continue
try-except塊用於處理我們沒有檢測到的情況。在這種情況下,我們使用continue跳過此影象的迴圈體的其餘部分。
現在,讓我們在影象中檢測出類。
        #Get the various classes detected in the image
        img_classes = unique(image_pred_[:,-1]) # -1 index holds the class index
由於可以對同一個類進行多次真正的檢測,因此我們使用一個函式呼叫unique來獲取任何給定影象中的類。
def unique(tensor):
    tensor_np = tensor.cpu().numpy()
    unique_np = np.unique(tensor_np)
    unique_tensor = torch.from_numpy(unique_np)

    tensor_res = tensor.new(unique_tensor.shape)
    tensor_res.copy_(unique_tensor)
    return tensor_res
然後,我們按類別執行NMS。
        for cls in img_classes:
            #perform NMS
一旦我們進入迴圈,我們要做的第一件事是提取特定類的檢測(由變量表示cls)。
以下程式碼在原始程式碼檔案中縮進了三個塊,但我沒有在此處縮排,因為此頁面上的空間有限。
#get the detections with one particular class
cls_mask = image_pred_*(image_pred_[:,-1] == cls).float().unsqueeze(1)
class_mask_ind = torch.nonzero(cls_mask[:,-2]).squeeze()
image_pred_class = image_pred_[class_mask_ind].view(-1,7)

#sort the detections such that the entry with the maximum objectness
s#confidence is at the top
conf_sort_index = torch.sort(image_pred_class[:,4], descending = True )[1]
image_pred_class = image_pred_class[conf_sort_index]
idx = image_pred_class.size(0)   #Number of detections
現在,我們執行NMS。
for i in range(idx):
    #Get the IOUs of all boxes that come after the one we are looking at
    #in the loop
    try:
        ious = bbox_iou(image_pred_class[i].unsqueeze(0), image_pred_class[i+1:])
    except ValueError:
        break

    except IndexError:
        break

    #Zero out all the detections that have IoU > treshhold
    iou_mask = (ious < nms_conf).float().unsqueeze(1)
    image_pred_class[i+1:] *= iou_mask

    #Remove the non-zero entries
    non_zero_ind = torch.nonzero(image_pred_class[:,4]).squeeze()
    image_pred_class = image_pred_class[non_zero_ind].view(-1,7)
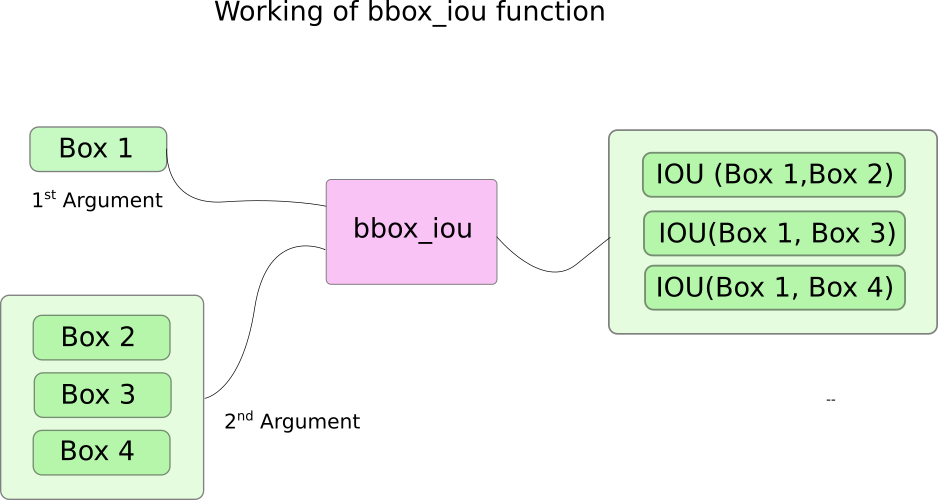
在這裡,我們使用一個函式bbox_iou。第一個輸入是由i迴圈中的變數索引的邊界框行。
第二個輸入bbox_iou是多行邊界框的張量。函式的輸出bbox_iou是包含由第一輸入表示的邊界框的IoU的張量,其中每個邊界框存在於第二輸入中。
如果我們有兩個具有大於閾值的IoU的同一類的邊界框,則消除具有較低類置信度的邊界框。我們已經整理出了具有更高置信度的邊界框。
在迴圈體中,以下行給出了框的IoU,索引為i所有具有高於的索引的邊界框i。
ious = bbox_iou(image_pred_class[i].unsqueeze(0), image_pred_class[i+1:])
每次迭代,如果任何具有索引大於具有大於閾值i的IoU(具有索引框i)的邊界框,nms_thresh則消除該特定框。
#Zero out all the detections that have IoU > treshhold
iou_mask = (ious < nms_conf).float().unsqueeze(1)
image_pred_class[i+1:] *= iou_mask

#Remove the non-zero entries
non_zero_ind = torch.nonzero(image_pred_class[:,4]).squeeze()
image_pred_class = image_pred_class[non_zero_ind]
另請注意,我們已經ious在try-catch塊中放置了程式碼行來計算。這是因為迴圈被設計為執行idx迭代(行數image_pred_class)。但是,當我們繼續迴圈時,可以從中刪除許多邊界框image_pred_class。這意味著,即使刪除了一個值image_pred_class,我們也無法進行idx迭代。因此,我們可能會嘗試索引超出bounds(IndexError)的值,或者切片image_pred_class[i+1:]可能返回一個空張量,指定觸發a的值ValueError。此時,我們可以確定NMS不能刪除任何進一步的邊界框,並且我們打破了迴圈。
計算IoU
這是功能bbox_iou。
def bbox_iou(box1, box2):
    """
    Returns the IoU of two bounding boxes


    """
    #Get the coordinates of bounding boxes
    b1_x1, b1_y1, b1_x2, b1_y2 = box1[:,0], box1[:,1], box1[:,2], box1[:,3]
    b2_x1, b2_y1, b2_x2, b2_y2 = box2[:,0], box2[:,1], box2[:,2], box2[:,3]

    #get the corrdinates of the intersection rectangle
    inter_rect_x1 =  torch.max(b1_x1, b2_x1)
    inter_rect_y1 =  torch.max(b1_y1, b2_y1)
    inter_rect_x2 =  torch.min(b1_x2, b2_x2)
    inter_rect_y2 =  torch.min(b1_y2, b2_y2)

    #Intersection area
    inter_area = torch.clamp(inter_rect_x2 - inter_rect_x1 + 1, min=0) * torch.clamp(inter_rect_y2 - inter_rect_y1 + 1, min=0)

    #Union Area
    b1_area = (b1_x2 - b1_x1 + 1)*(b1_y2 - b1_y1 + 1)
    b2_area = (b2_x2 - b2_x1 + 1)*(b2_y2 - b2_y1 + 1)

    iou = inter_area / (b1_area + b2_area - inter_area)

    return iou
寫預測
該函式write_results輸出形狀D x 8的張量。這裡D是所有影象中的真實檢測,每個影象由一行表示。每個檢測具有8個屬性,即檢測所屬批次中的影象的索引,4個角座標,物件得分,具有最大置信度的類的得分,以及該類的索引。
和以前一樣,我們不會初始化輸出張量,除非我們有一個檢測分配給它。一旦初始化,我們將後續檢測連線到它。我們使用該write標誌來指示張量是否已經初始化。在遍歷類的迴圈結束時,我們將結果檢測新增到張量output。
            batch_ind = image_pred_class.new(image_pred_class.size(0), 1).fill_(ind)
            #Repeat the batch_id for as many detections of the class cls in the image
            seq = batch_ind, image_pred_class

            if not write:
                output = torch.cat(seq,1)
                write = True
            else:
                out = torch.cat(seq,1)
                output = torch.cat((output,out))
在函式結束時,我們檢查是否output已經初始化。如果沒有手段,則批次的任何影象中都沒有單一檢測。在那種情況下,我們返回0。
    try:
        return output
    except:
        return 0
這是這篇文章的內容。在這篇文章的最後,我們最終得到了一個張量形式的預測,它將每個預測列為行。現在唯一剩下的就是建立一個輸入管道來從磁碟讀取影象,計算預測,在影象上繪製邊界框,然後顯示/寫入這些影象。這是我們將在下一部分中做的。
進一步閱讀
Ayoosh Kathuria目前是印度國防研究與發展組織的實習生,他正致力於改善粒狀視訊中的物體檢測。當他不工作時,他正在睡覺或者在他的吉他上玩粉紅色弗洛伊德。您可以在LinkedIn上與他聯絡,或者檢視他在GitHub上做的更多內容
的收件箱
訂閱