機器學習2-迴歸演算法
文章目錄
線性迴歸和梯度下降演算法
機器學習的基本問題
- 迴歸問題:由已知的分佈於連續域中的輸入和輸出,通過不斷地模型訓練,找到輸入和輸出之間的聯絡,通常這種聯絡可以通過一個函式方程被形式化,如:y=w0+w1x+w2x^2…,當提供未知輸出的輸入時,就可以根據以上函式方程,預測出與之對應的連續域輸出。
- 分類問題:如果將回歸問題中的輸出從連續域變為離散域,那麼該問題就是一個分類問題。
- 聚類問題:從已知的輸入中尋找某種模式,比如相似性,根據該模式將輸入劃分為不同的叢集,並對新的輸入應用同樣的劃分方式,以確定其歸屬的叢集。
- 降維問題:從大量的特徵中選擇那些對模型預測最關鍵的少量特徵,以降低輸入樣本的維度,提高模型的效能。
一元線性迴歸
預測函式
輸入 輸出
0 1
1 3
2 5
3 7
4 9
…
y=1+2 x
10 -> 21
y=w0+w1x
任務就是尋找預測函式中的模型引數w0和w1,以滿足輸入和輸出之間的聯絡。
預測函式: y=w0 +w1x
xm ->ym'   =   w0+w1xm ym   (ym-y'm)^2
           |                               |             |
   預測輸出                 實際輸出       單樣本誤差
   總樣本誤差:
   (y1'-y1)^2+(y2'-y2)^2+......+(ym'-ym)^2
   ---------------------------------------------------------=E
                    2(除以2的目的是微分的時候約掉2)
損失函式:E=Loss(w0,w1)
損失函式體現了總樣本誤差即損失值隨著模型引數的變化而變化
梯度下降法尋優
推導:
計算損失函式在該模型引數處的梯度<-+
計算與該梯度反方向的修正步長 |
[-nDLoss/Dwo, -nDLoss/Dw1] |
計算下一組模型引數 |
w0=w0-nDLoss/Dw0 |
w1=w1-nDLoss/Dw1---------------+
直到滿足迭代終止條件:
迭代足夠多次;
損失值已經足夠小;
損失值已經不再明顯減少。
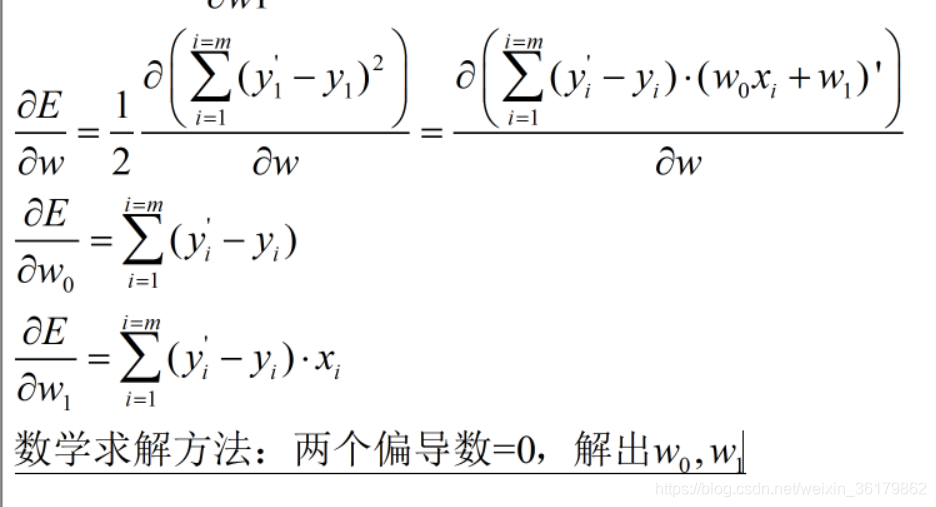
由於:
python程式碼:
import numpy as np
import matplotlib.pyplot as mp
from mpl_toolkits.mplot3d import axes3d
train_x = 線性迴歸器
import sklearn.linear_model as lm 線性迴歸迴歸器的引入
線性迴歸器 = lm.LinearRegression()
線性迴歸器.fit(已知輸入, 已知輸出) # 計算模型引數
線性迴歸器.predict(新的輸入)->新的輸出
import sklearn.metrics as sm該模組主要用於計算誤差值?
import numpy as np
import sklearn.linear_model as lm
import sklearn.metrics as sm
import matplotlib.pyplot as mp
# 採集資料
x, y = [], []
with open(r'C:\Users\Cs\Desktop\機器學習\ML\data\single.txt', 'r') as f:
    for line in f.readlines():
        data = [float(substr) for substr in line.split(',')]
        x.append(data[:-1])
        y.append(data[-1])
x = np.array(x)
y = np.array(y)
# 建立線型迴歸器模型:
model = lm.LinearRegression()
# 訓練模型
model.fit(x, y)
# 根據輸入預測輸出
pred_y = model.predict(x)
# 輸出實際值
mp.figure("ML")
mp.xlabel('x1', fontsize=20)
mp.ylabel('y1')

mp.scatter(x, y, label="truth", c="blue")
mp.plot(x, pred_y, label="model", c="orange")
print("標準差:", np.std(y-pred_y, ddof=1))
# 衡量誤差,R2得分,將誤差從[0,+∞)誤差對映到[1,0),越接近1,越好,越接近0,越差。
# 去掉了引數量級對誤差的影響
print("r2:", sm.r2_score(y, pred_y))
# 其他誤差求解,大多都受引數量級影響:
# sm.coverage_error
# sm.mean_absolute_error
# sm.mean_squared_error
# sm.mean_squared_log_error
# sm.median_absolute_error
# sm.explained_variance_score
mp.legend()
mp.show()
模型的轉儲與載入
模型的轉儲與載入:pickle
將記憶體物件存入磁碟或者從磁碟讀取記憶體物件。
import pickle
存入:pickle.dump
讀取: pickle.load
# 儲存,注意是二進位制格式
with open('線性迴歸.pkl','wb') as f:
   pickle.dump(model,f)
# 讀取
with open('..pkl','rb') as f:
model=pickle.load(f)
嶺迴歸
Ridge
Loss(w0, w1)=SIGMA[1/2(y-(w0+w1x))^2]
+正則強度 * f(w0, w1)
普通線性迴歸模型使用基於梯度下降的最小二乘法,在最小化損失函式的前提下,尋找最優模型引數,於此過程中,包括少數異常樣本在內的全部訓練資料都會對最終模型引數造成程度相等的影響,異常值對模型所帶來的影響無法在訓練過程中被識別出來。為此,嶺迴歸在模型迭代過程所依據的損失函式中增加了正則項,以限制模型引數對異常樣本的匹配程度,進而提高模型對多數正常樣本的擬合精度。
嶺迴歸:model2 = lm.Ridge(300, fit_intercept=True)
第一個引數(300)越大,最後擬合效果收異常影響越小,但是整體資料對擬合線也越小。所以這個值需要好好測試。
擬合:lm.fit(x,y)
model2 = lm.Ridge(300, fit_intercept=True)
fit_intercept:如果為True,有節距,為False,則過原點,預設為true
# -*- coding: utf-8 -*-
from __future__ import unicode_literals
import numpy as np
import sklearn.linear_model as lm
import matplotlib.pyplot as mp
x, y = [], []
with open(r'C:\Users\Cs\Desktop\機器學習\ML\data\abnormal.txt', 'r') as f:
    for line in f.readlines():
        data = [float(substr) for substr
                in line.split(',')]
        x.append(data[:-1])
        y.append(data[-1])
x = np.array(x)
y = np.array(y)
model1 = lm.LinearRegression()
model1.fit(x, y)
pred_y1 = model1.predict(x)
model2 = lm.Ridge(300, fit_intercept=True)
model2.fit(x, y)
pred_y2 = model2.predict(x)
mp.figure('Linear & Ridge Regression',
          facecolor='lightgray')
mp.title('Linear & Ridge Regression', fontsize=20)
mp.xlabel('x', fontsize=14)
mp.ylabel('y', fontsize=14)
mp.tick_params(labelsize=10)
mp.grid(linestyle=':')
mp.scatter(x, y, c='dodgerblue', alpha=0.75, s=60,
           label='Sample')
sorted_indices = x.ravel().argsort()
mp.plot(x[sorted_indices], pred_y1[sorted_indices],
        c='orangered', label='Linear')
mp.plot(x[sorted_indices], pred_y2[sorted_indices],
        c='limegreen', label='Ridge')
mp.legend()
mp.show()
RidgeCV
Ridge的升級版,通過一次輸入多個正則強度,返回最優解。
使用方法:
reg=RidgeCV(alphas=[1,2,3],fit_intercept=True)
#或:reg=RidgeCV([1,2,3])
reg.alpha_#獲取權重
Lasso 套索
Lasso:使用結構風險最小化=損失函式(平方損失)+正則化(L1範數)
多項式迴歸
將一元的多項式迴歸,變成多元的線性迴歸。每一個不同的x^n都視作一個元
多元線性:    y=w0+w1x1+w2x2+w3x3+...+wnxn
                       ^ x1 = x^1
                        | x2 = x^2
                        | ...
                        | xn = x^n

一元多項式:y=w0+w1x+w2x^2+w3x^3+...+wnx^n
用多項式特徵擴充套件器轉換,用線型迴歸器訓練。
x->多項式特徵擴充套件器 -x1...xn-> 線性迴歸器->w0...wn
      \______________________________________/
                                   管線
程式碼:
# -*- coding: utf-8 -*-
from __future__ import unicode_literals
import numpy as np
import sklearn.pipeline as pl
import sklearn.preprocessing as sp
import sklearn.linear_model as lm
import sklearn.metrics as sm
import matplotlib.pyplot as mp

train_x, train_y = [], []
with open(r'C:\Users\Cs\Desktop\機器學習\ML\data\single.txt', 'r') as f:
    for line in f.readlines():
        data = [float(substr) for substr in line.split(',')]
        train_x.append(data[:-1])
        train_y.append(data[-1])
train_x = np.array(train_x)
train_y = np.array(train_y)
# sp.PolynomialFeatures(10)多項式特徵擴充套件器,將單項x擴充套件為多個x^i,然後傳遞到線性迴歸器
model = pl.make_pipeline(sp.PolynomialFeatures(10),
                         lm.LinearRegression())
model.fit(train_x, train_y)
pred_train_y = model.predict(train_x)
print(sm.r2_score(train_y, pred_train_y))
test_x = np.linspace(train_x.min(), train_x.max(),
                     1000).reshape(-1, 1)
pred_test_y = model.predict(test_x)
mp.figure('Polynomial Regression',
          facecolor='lightgray')
mp.title('Polynomial Regression', fontsize=20)
mp.xlabel('x', fontsize=14)
mp.ylabel('y', fontsize=14)
mp.tick_params(labelsize=10)
mp.grid(linestyle=':')
mp.scatter(train_x, train_y, c='dodgerblue',
           alpha=0.75, s=60, label='Sample')
mp.plot(test_x, pred_test_y, c='orangered',
        label='Regression')
mp.legend()
mp.show()


