
基於OpenPose的人體姿態檢測
一、概述
- OpenPose最開始由卡內基梅隆大學提出,其主要基於先後發表的幾篇文章中提出的模型中進行實現:
- CVPR 2016: Convolutional Pose Machine(CPM)
- CVPR2017 : realtime multi-person pose estimation
- CVPR2017 : Hand Keypoint Detection in Single Images using Multiview Bootstrapping
- 但執行計算量非常大,通常得在GPU上執行,並且幀率較低(低於5fps),在此後也陸續出現了一些改進版
- 改進版主要在模型上進行了一些改進或裁剪,另外移動端(如各種尬舞app) 為能夠跑通OpenPose,在改網路結構的同時,對演算法本身也進行了優化,減少了計算量,但與此同時準確性也有相應地降低。
二、簡化版OpenPose實現程式碼
- 程式碼來源GitHub:human-pose-estimation-opencv
- 其程式碼較為簡單,模型(較小:7.8M)已經訓練好在graph_opt.pb檔案中,其中全部實現程式碼在openpose.py檔案中,下面是實現程式碼及測試效果:
# To use Inference Engine backend, specify location of plugins: 檢測效果如下:
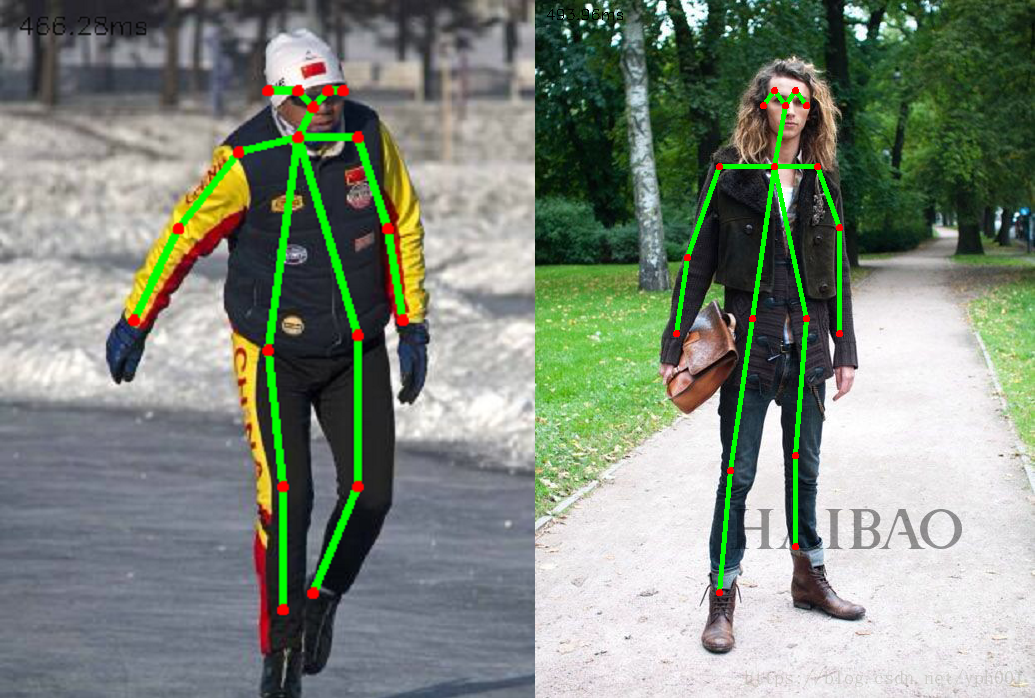
- 下面兩張圖中體現出單人且姿態展開時較好的檢測效果:
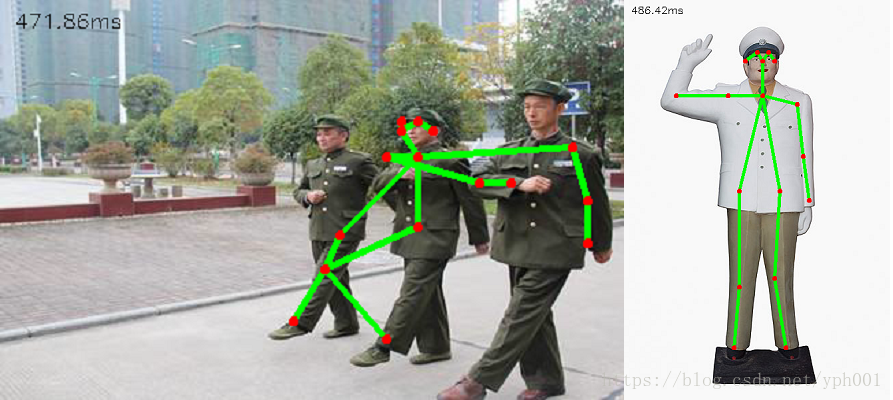
- 下面兩張圖中體現出多人或特殊姿態時較差的檢測效果(如亂連線或者遺漏關鍵點等):
- 從左上角顯示的處理時間可看到,處理較慢,基本一張圖片需耗時0.5S
三、較複雜版OpenPose實現程式碼
- 程式碼來源GitHub:camera-openpose-keras
- 其程式碼比起前面這個更復雜一些,模型(更大:200M)已經訓練好在可自行下載,但在外網不易下載,因此也可在百度雲下載:model.h5
- 其中全部實現程式碼在demo_camera.py檔案中,下面是修改了一點點程式碼,採取讀入圖片的方式進行了測試:
import argparse
import cv2
import math
import time
import numpy as np
import util
from config_reader import config_reader
from scipy.ndimage.filters import gaussian_filter
from model import get_testing_model
tic=0
# find connection in the specified sequence, center 29 is in the position 15
limbSeq = [[2, 3], [2, 6], [3, 4], [4, 5], [6, 7], [7, 8], [2, 9], [9, 10], \
[10, 11], [2, 12], [12, 13], [13, 14], [2, 1], [1, 15], [15, 17], \
[1, 16], [16, 18], [3, 17], [6, 18]]
# the middle joints heatmap correpondence
mapIdx = [[31, 32], [39, 40], [33, 34], [35, 36], [41, 42], [43, 44], [19, 20], [21, 22], \
[23, 24], [25, 26], [27, 28], [29, 30], [47, 48], [49, 50], [53, 54], [51, 52], \
[55, 56], [37, 38], [45, 46]]
# visualize
colors = [[255, 0, 0], [255, 85, 0], [255, 170, 0], [255, 255, 0], [170, 255, 0], [85, 255, 0],
[0, 255, 0], \
[0, 255, 85], [0, 255, 170], [0, 255, 255], [0, 170, 255], [0, 85, 255], [0, 0, 255],
[85, 0, 255], \
[170, 0, 255], [255, 0, 255], [255, 0, 170], [255, 0, 85]]
def process (input_image, params, model_params):
oriImg = cv2.imread(input_image) # B,G,R order
multiplier = [x * model_params['boxsize'] / oriImg.shape[0] for x in params['scale_search']]
heatmap_avg = np.zeros((oriImg.shape[0], oriImg.shape[1], 19))
paf_avg = np.zeros((oriImg.shape[0], oriImg.shape[1], 38))
#for m in range(len(multiplier)):
for m in range(1):
scale = multiplier[m]
imageToTest = cv2.resize(oriImg, (0, 0), fx=scale, fy=scale, interpolation=cv2.INTER_CUBIC)
imageToTest_padded, pad = util.padRightDownCorner(imageToTest, model_params['stride'],
model_params['padValue'])
input_img = np.transpose(np.float32(imageToTest_padded[:,:,:,np.newaxis]), (3,0,1,2)) # required shape (1, width, height, channels)
output_blobs = model.predict(input_img)
# extract outputs, resize, and remove padding
heatmap = np.squeeze(output_blobs[1]) # output 1 is heatmaps
heatmap = cv2.resize(heatmap, (0, 0), fx=model_params['stride'], fy=model_params['stride'],
interpolation=cv2.INTER_CUBIC)
heatmap = heatmap[:imageToTest_padded.shape[0] - pad[2], :imageToTest_padded.shape[1] - pad[3],
:]
heatmap = cv2.resize(heatmap, (oriImg.shape[1], oriImg.shape[0]), interpolation=cv2.INTER_CUBIC)
paf = np.squeeze(output_blobs[0]) # output 0 is PAFs
paf = cv2.resize(paf, (0, 0), fx=model_params['stride'], fy=model_params['stride'],
interpolation=cv2.INTER_CUBIC)
paf = paf[:imageToTest_padded.shape[0] - pad[2], :imageToTest_padded.shape[1] - pad[3], :]
paf = cv2.resize(paf, (oriImg.shape[1], oriImg.shape[0]), interpolation=cv2.INTER_CUBIC)
heatmap_avg = heatmap_avg + heatmap / len(multiplier)
paf_avg = paf_avg + paf / len(multiplier)
all_peaks = []
peak_counter = 0
prinfTick(1)
for part in range(18):
map_ori = heatmap_avg[:, :, part]
map = gaussian_filter(map_ori, sigma=3)
map_left = np.zeros(map.shape)
map_left[1:, :] = map[:-1, :]
map_right = np.zeros(map.shape)
map_right[:-1, :] = map[1:, :]
map_up = np.zeros(map.shape)
map_up[:, 1:] = map[:, :-1]
map_down = np.zeros(map.shape)
map_down[:, :-1] = map[:, 1:]
peaks_binary = np.logical_and.reduce(
(map >= map_left, map >= map_right, map >= map_up, map >= map_down, map > params['thre1']))
peaks = list(zip(np.nonzero(peaks_binary)[1], np.nonzero(peaks_binary)[0])) # note reverse
peaks_with_score = [x + (map_ori[x[1], x[0]],) for x in peaks]
id = range(peak_counter, peak_counter + len(peaks))
peaks_with_score_and_id = [peaks_with_score[i] + (id[i],) for i
相關推薦
基於OpenPose的人體姿態檢測
一、概述
OpenPose最開始由卡內基梅隆大學提出,其主要基於先後發表的幾篇文章中提出的模型中進行實現:
CVPR 2016: Convolutional Pose Machine(CPM)
CVPR2017 : realtime
基於OpenCV使用OpenPose進行多個人體姿態估計
目錄
7. 結果
之前我們使用OpenPose模型對單個人體進行姿態估計。本文討論瞭如何同時對多人體進行姿態估計。
假如圖片中具有多個人體,姿態估計會生成多個獨立的關鍵點。我們需要對關鍵點分類,找出屬於同一個人的關鍵點。
我
【姿態估計】DeepPose: 基於深度神經網路的人體姿態估計 Human Pose Estimation via Deep Neural Networks
Alexander Toshev Christian Szegedy
Google
1600 Amphitheatre Pkwy
Mountain View, CA 94043
toshev,[e
基於樹莓派與YOLOv3模型的人體目標檢測小車(一)
#### 專案介紹:
本科畢業選的深度學習的畢設,一開始只是學習了一下YOLOv3模型, 按照作者的指示在官網上下載下來權重,配好環境跑出來Demo,後來想著只是跑模型會不會太單薄,於是想了能不能做出來個比較實用的東西(因為模型優化做不了)。於是乎做一個可以檢測人體的可操控移動小車的想法就誕生了。
微信域名檢測防封,基於微信域名檢測接口的跳轉系統
hand null clas match subst highlight www callback escape 先到www.weixin139.com開通接口權限
新建一個url.html代碼如下
訪問地址:url.html?user=yourname(此處為你的用戶
基於FPGA的頻率檢測與LCD顯示
大於 等精度測頻 pll info 技術 進制 測試 方案 mod 基於FPGA的信號測頻器說明文檔
設計要求
利用FPGA設計一個信號測頻器,要求:
(1)測量脈沖信號;
(2)頻率測量1-10MHz以及占空比10%-99% 精確到1%;
(3)將測出頻率和占空比顯示在L
人體姿態估計在網約車風控系統中的應用
姿態估計 卷積神經網絡 網約車公司在運營過程中經常會遇到一個問題,就是如果司機不接單,卻把車開出去接乘客,相當於開黑車。那麽系統如何發現這種行為,其中就需要人體姿態估計。
相對於傳統方法,只識別人體來數人數有一個問題,就是如果乘客之間發生遮擋,或者後排乘客沒有露出面部,就會找不到乘客。
使用人體姿態估
基於Python3的漏洞檢測工具 ( Python3 插件式框架 )
lang gin detection print shel load nec list auto [TOC]
Python3 漏洞檢測工具 -- lance
lance, a simple version of the vulnerability detection fra
soft-argmax將熱點圖轉換為數值坐標應用於人體姿態估計
sum 緩解 mat 漸變 圖標 bubuko 訓練 分組 參考
人體姿態估計常用預測熱點圖的方法預測x和y的坐標值,熱點圖可以理解為概率響應圖,通過求熱點圖最大值所在位置坐標,就可以得到該關鍵點的位置坐標
熱點圖法的缺點
量化產生的精度損失:卷積網絡下采樣使模型的
【BBC micro:bit基礎教程】02-micro:bit與人體運動檢測傳感器
bbc image strong img spa www 訪問 info bit 【所需材料】
BBC micro:bit 主板 x 1
Micro USB 線 x 1
能容納2節7號(AAA)電池的電池盒 x 1
7號(AAA)電池 x 2
人體運動檢測傳感器 x
【機器學習】最容易實現的基於OpenCV的人臉檢測程式碼、檢測器及檢測效果
基於opencv自帶的人臉檢測模型,實現簡單的人臉檢測功能,可作為機器學習初學者練手使用。簡單易學,具體的方法及程式碼如下。
1、執行結果
輸入原圖
輸出結果
2、工程需要載入的opencv庫如下:
3、用到的人臉檢測器
4、具體實現程式碼
#
【電腦科學】【2016】單目視訊三維人體姿態估計的深度學習模型
本文為立陶宛維爾紐斯格迪米納斯技術大學(作者:Agnė Grinciūnaitė)的碩士論文,共68頁。
有一種視覺系統,它可以很容易地識別、跟蹤人體的位置、運動和行為,而不需要任何額外的感知手段。這個系統擁有一個稱為大腦的處理器,只經過幾個月的訓練就能稱職地完成以上任務。通過更多
基於Tensorflow的目標檢測(Detection)的程式碼案例詳解
這篇博文我主要闡述了基於Tensorflow的Faster RCNN在Windows上的一個Demo程式,其中,分為兩個部分,一個是訓練資料匯入部分,一個是網路架構部分開始。源程式git地址我會放在文章最後,下載後可以參考對應看一下。
一、程式執行環境說明
首先,我想闡述一堆巨坑,下面只要有
Mask RCNN 實現視訊和圖片中的多人姿態檢測
Mask RCNN是目標分割檢測框架--擴充套件到人體關鍵點檢測
對於原理不清晰的同學,建議你去看一下Kaming He的論文:https://arxiv.org/pdf/1703.06870.pdf
我的部落格裡也有論文的翻譯版:Mask R-CNN 論文翻譯
對於視訊中的多人進行姿態估計,
基於DL的目標檢測技術:R-CNN、Fast R-CNN、Faster R-CNN
目標檢測:在給定的圖片中精確找到物體所在位置,並標註出物體的類別。 目標檢測=影象識別(CNN)+定位(迴歸問題/取影象視窗)
遇到多物體識別+定位多個物體? 用選擇性搜尋找出可能含有物體的框(候選框)判定得分。這些框之間是可以互相重疊互相包含的,從而避免暴力列舉的所有框了。
1.R
TOP高校創新科技大賽【人像精細分割||人臉識別||人體關鍵點檢測】
競賽資訊
任務與資料
競賽圈
提交結果
排行榜
參賽人員
參賽團隊
我的隊伍
任務
1
快速人體姿態估計--Pose Proposal Networks
Pose Proposal Networks
ECCV2018
本文使用 YOLO + bottom-up greedy parsing 進行人體姿態估計
its total runtime using a GeForce GTX1080Ti card reaches
人體姿態估計(Human Pose Estimation)---優質學習資源
目錄
0、簡介
這是一個簡單的資源僅供參考,Just for Xiuyun-Mo
0、簡介
姿態估計的目標是在RGB影象或視訊中描繪出人體的形狀,這是一種多方面任務,其中包含了目標檢測、姿
人體姿態識別研究綜述(詳細歸納!)
一,人體姿態識別資料集
1,2D資料集:
LSP
地址:http://sam.johnson.io/research/lsp.html
樣本數:2K
關節點個數:14
全身,單人
FLIC
地址:https://bensapp.github.io/flic-d
人體姿態估計Alphapose配置安裝教程(GPU,超詳細,親測有效!)
首先簡單介紹一下Alposepose
該模型提出的論文:《RMPE: Regional Multi-Person Pose Estimation》ICCV 2017,是由上海交通大學提出的,目前在多人自討估計的效果最好。
文章的寫作背景是單人姿態估計的方法不能用在多人