
android高仿京東快報(垂直迴圈滾動新聞欄)
京東的垂直滾動新聞欄的實現原理:
就是一個自定義的LinearLayout,並且textView能夠迴圈垂直滾動,而且條目可以點選,顯示區域最多顯示2個條目,並且還有交替的屬性垂直移動的動畫效果,通過執行緒來控制滾動的實現。
不多說看效果:
程式碼實現
我們先來為控制元件設定自定義屬性:
<?xml version="1.0" encoding="utf-8"?>
<resources>
<declare-styleable name="JDAdverView">
<attr name="gap" format 自定義控制元件的獲取屬性方法都一樣:
//獲取自定義屬性
TypedArray array = context.obtainStyledAttributes(attrs, R.styleable.JDAdverView);
mAdverHeight = TypedValue.applyDimension(TypedValue.COMPLEX 然後呢,我們來看一下條目的佈局:
<?xml version="1.0" encoding="utf-8"?>
<LinearLayout xmlns:android="http://schemas.android.com/apk/res/android"
android:layout_width="match_parent"
android:layout_height="60dp"
android:background="#ffffff"
android:gravity="center_vertical"
android:orientation="horizontal">
<TextView
android:id="@+id/tag"
android:textColor="#ff0000"
android:layout_marginLeft="10dp"
android:text="最新"
android:background="@drawable/corner"
android:textSize="18sp"
android:padding="5dp"
android:layout_width="wrap_content"
android:layout_height="wrap_content"/>
<TextView
android:id="@+id/title"
android:layout_marginLeft="10dp"
android:singleLine="true"
android:ellipsize="end"
android:textSize="20sp"
android:text="價格驚呆!電信千兆光纖上市"
android:textColor="#000000"
android:layout_width="wrap_content"
android:layout_height="wrap_content"/>
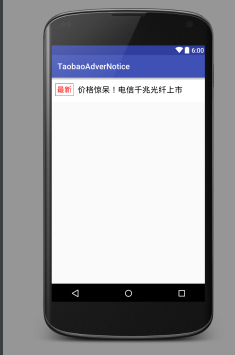
</LinearLayout>佈局很簡單,效果呢:
不解釋,我們來寫介面卡了:
package com.example.jdadvernotice;
import android.view.LayoutInflater;
import android.view.View;
import android.widget.TextView;
import android.widget.Toast;
import com.example.jdadvernotice.entity.AdverNotice;
import com.example.jdadvernotice.view.JDAdverView;
import java.util.List;
/**
 * Created by Administrator on 2016/3/20.
 * 京東廣告欄資料介面卡
 *
 */

public class JDViewAdapter {
    private List<AdverNotice> mDatas;
    public JDViewAdapter(List<AdverNotice> mDatas) {
        this.mDatas = mDatas;
        if (mDatas == null || mDatas.isEmpty()) {
            throw new RuntimeException("nothing to show");
        }
    }
    /**
     * 獲取資料的條數
     * @return
     */
    public int getCount() {
        return mDatas == null ? 0 : mDatas.size();
    }

    /**
     * 獲取摸個數據
     * @param position
     * @return
     */
    public AdverNotice getItem(int position) {
        return mDatas.get(position);
    }
    /**
     * 獲取條目佈局
     * @param parent
     * @return
     */
    public View getView(JDAdverView parent) {
        return LayoutInflater.from(parent.getContext()).inflate(R.layout.item, null);
    }

    /**
     * 條目資料適配
     * @param view
     * @param data
     */
    public void setItem(final View view, final AdverNotice data) {
        TextView tv = (TextView) view.findViewById(R.id.title);
        tv.setText(data.title);
        TextView tag = (TextView) view.findViewById(R.id.tag);
        tag.setText(data.url);
        //你可以增加點選事件
        view.setOnClickListener(new View.OnClickListener() {
            @Override
            public void onClick(View v) {
                //比如開啟url
                Toast.makeText(view.getContext(), data.url, Toast.LENGTH_SHORT).show();
            }
        });
    }
}
然後我們就來自定義view:
package com.example.jdadvernotice.view;
import android.animation.Animator;
import android.animation.AnimatorListenerAdapter;
import android.animation.AnimatorSet;
import android.animation.ObjectAnimator;
import android.content.Context;
import android.content.res.Configuration;
import android.content.res.TypedArray;
import android.graphics.Canvas;
import android.graphics.Color;
import android.graphics.Paint;
import android.util.AttributeSet;
import android.util.TypedValue;
import android.view.View;
import android.widget.LinearLayout;
import com.example.jdadvernotice.JDViewAdapter;
import com.example.jdadvernotice.R;
/**
 * Created by zengyu on 2016/3/20.
 */
public class JDAdverView extends LinearLayout {
    //控制元件高度
    private float mAdverHeight = 0f;
    //間隔時間
    private final int mGap = 4000;
    //動畫間隔時間
    private final int mAnimDuration = 1000;
    //顯示文字的尺寸
    private final float TEXTSIZE = 20f;
    private JDViewAdapter mAdapter;
    private final float jdAdverHeight = 50;
    //顯示的view
    private View mFirstView;
    private View mSecondView;
    //播放的下標
    private int mPosition;
    //執行緒的標識
    private boolean isStarted;
    //畫筆
    private Paint mPaint;

    public JDAdverView(Context context) {
        this(context, null);
    }

    public JDAdverView(Context context, AttributeSet attrs) {
        this(context, attrs, 0);
    }

    public JDAdverView(Context context, AttributeSet attrs, int defStyleAttr) {
        super(context, attrs, defStyleAttr);
        init(context, attrs, defStyleAttr);
    }

    /**
     * 初始化屬性
     * @param context
     * @param attrs
     * @param defStyleAttr
     */
    private void init(Context context, AttributeSet attrs, int defStyleAttr) {
        //設定為垂直方向
        setOrientation(VERTICAL);
        //抗鋸齒效果
        mPaint = new Paint(Paint.ANTI_ALIAS_FLAG);
        //獲取自定義屬性
        TypedArray array = context.obtainStyledAttributes(attrs, R.styleable.JDAdverView);
        mAdverHeight = TypedValue.applyDimension(TypedValue.COMPLEX_UNIT_DIP, jdAdverHeight, getResources().getDisplayMetrics());
        int gap = array.getInteger(R.styleable.JDAdverView_gap, mGap);
        int animDuration = array.getInteger(R.styleable.JDAdverView_animDuration, mAnimDuration);

        if (mGap <= mAnimDuration) {
            gap = mGap;
            animDuration = mAnimDuration;
        }
        //關閉清空TypedArray
        array.recycle();
    }

    /**
     * 設定資料
     */
    public void setAdapter(JDViewAdapter adapter) {
        this.mAdapter = adapter;
        setupAdapter();
    }

    /**
     * 開啟執行緒
     */
    public void start() {

        if (!isStarted && mAdapter.getCount() > 1) {
            isStarted = true;
            postDelayed(mRunnable, mGap);//間隔mgap重新整理一次UI
        }
    }

    /**
     * 暫停滾動
     */
    public void stop() {
        //移除handle更新
        removeCallbacks(mRunnable);
        //暫停執行緒
        isStarted = false;
    }
    /**
     * 設定資料適配
     */
    private void setupAdapter() {
        //移除所有view
        removeAllViews();
        //只有一條資料,不滾東
        if (mAdapter.getCount() == 1) {
            mFirstView = mAdapter.getView(this);
            mAdapter.setItem(mFirstView, mAdapter.getItem(0));
            addView(mFirstView);
        } else {
            //多個數據
            mFirstView = mAdapter.getView(this);
            mSecondView = mAdapter.getView(this);
            mAdapter.setItem(mFirstView, mAdapter.getItem(0));
            mAdapter.setItem(mSecondView, mAdapter.getItem(1));
            //把2個新增到此控制元件裡
            addView(mFirstView);
            addView(mSecondView);
            mPosition = 1;
            isStarted = false;
        }
    }
    /**
     * 測量控制元件的寬高
     *
     * @param widthMeasureSpec
     * @param heightMeasureSpec
     */
    @Override
    protected void onMeasure(int widthMeasureSpec, int heightMeasureSpec) {
        super.onMeasure(widthMeasureSpec, heightMeasureSpec);
        if (LayoutParams.WRAP_CONTENT == getLayoutParams().height) {
            getLayoutParams().height = (int) mAdverHeight;
        } else {
            mAdverHeight = getHeight();
        }

        if (mFirstView != null) {
            mFirstView.getLayoutParams().height = (int) mAdverHeight;
        }
        if (mSecondView != null) {
            mSecondView.getLayoutParams().height = (int) mAdverHeight;
        }
    }

    /**
     * 畫布局
     *
     * @param canvas
     */
    @Override
    protected void onDraw(Canvas canvas) {
        super.onDraw(canvas);
        mPaint.setColor(Color.WHITE);
mPaint.setTextSize(TypedValue.applyDimension(TypedValue.COMPLEX_UNIT_SP, TEXTSIZE, getResources().getDisplayMetrics()));
        mPaint.setStyle(Paint.Style.STROKE);
        canvas.drawText("瑞士維氏軍刀", TEXTSIZE, getHeight() * 2 / 3, mPaint);//寫文字2/3的高度
    }
    /**
     * 垂直滾蛋
     */
    private void performSwitch() {
        //屬性動畫控制控制元件滾動,y軸方向移動
        ObjectAnimator animator1 = ObjectAnimator.ofFloat(mFirstView, "translationY", mFirstView.getTranslationY() - mAdverHeight);
        ObjectAnimator animator2 = ObjectAnimator.ofFloat(mSecondView, "translationY", mSecondView.getTranslationY() - mAdverHeight);
        //動畫集
        AnimatorSet set = new AnimatorSet();
        set.playTogether(animator1, animator2);//2個動畫一起
        set.addListener(new AnimatorListenerAdapter() {
            @Override
            public void onAnimationEnd(Animator animation) {//動畫結束
                mFirstView.setTranslationY(0);
                mSecondView.setTranslationY(0);
                View removedView = getChildAt(0);//獲得第一個子佈局
                mPosition++;
                //設定顯示的佈局
                mAdapter.setItem(removedView, mAdapter.getItem(mPosition % mAdapter.getCount()));
                //移除前一個view
                removeView(removedView);
                //新增下一個view
                addView(removedView, 1);
            }
        });
        set.setDuration(mAnimDuration);//持續時間
        set.start();//開啟動畫
    }
    private AnimRunnable mRunnable = new AnimRunnable();
    private class AnimRunnable implements Runnable {
        @Override
        public void run() {
            performSwitch();
            postDelayed(this, mGap);
        }
    }

    /**
     * 銷燬View的時候呼叫
     */
    @Override
    protected void onDetachedFromWindow() {
        super.onDetachedFromWindow();
        //停止滾動
        stop();
    }
    /**
     * 螢幕 旋轉
     *
     * @param newConfig
     */
    @Override
    protected void onConfigurationChanged(Configuration newConfig) {
        super.onConfigurationChanged(newConfig);
    }
}
從上面可以看出,控制元件最多可以顯示2個條目,並且用執行緒控制,根據條目的下標輪流滾動顯示。
具體使用程式碼:
初始化資料:
private void initData() {
        datas.add(new AdverNotice("瑞士維氏軍刀 新品滿200-50","最新"));
        datas.add(new AdverNotice("家居家裝煥新季,講199減100!","最火爆"));
        datas.add(new AdverNotice("帶上相機去春遊,尼康低至477","HOT"));
        datas.add(new AdverNotice("價格驚呆!電信千兆光纖上市","new"));
    }
繫結介面卡開啟滾動執行緒:
        initData();
        final JDViewAdapter adapter = new JDViewAdapter(datas);
        final JDAdverView tbView = (JDAdverView) findViewById(R.id.jdadver);
        tbView.setAdapter(adapter);
        //開啟執行緒滾東
        tbView.start();
就寫到這裡吧,很晚了睡覺,歡迎大家前來拍磚。
自定義JDViewdemo傳送門
++++++++++++++++++++++++++++++++++++++++++++++++++++++++++++++++++++++++++++++++++++++++
新加ViewFlipper實現京東快報
看了大家的評論,然後覺得又學到了新的知識,這裡就用ViewFlipper來實現這個功能,哈哈,果斷很簡單。
來看下簡單的程式碼:
    <ViewFlipper
        android:id="@+id/flipper"
        android:layout_width="match_parent"
        android:layout_height="wrap_content"
        android:autoStart="true"
        android:flipInterval="900"
        android:inAnimation="@anim/push_up_in"
        android:outAnimation="@anim/push_up_out" >
        <include layout="@layout/news_one" />
        <include layout="@layout/news_two" />
        <include layout="@layout/news_three" />
        <include layout="@layout/news_four"/>
    </ViewFlipper>
是不是很簡單利用autoStart 就不需要開執行緒了,flipInterval設定滾動的時間,inAnimation和outAnimation使用切入切出動畫。
傳送門:JDViewFlipper.rar
新加TextSwitcher實現京東快報
這也是第一使用TextSwitcher,再次感謝大家的幫助讓我學到了新的東西。
TextSwitcher集成了ViewSwitcher, 因此它具有與ViewSwitcher相同的特性:可以在切換View元件時使用動畫效果。與ImageSwitcher相似的是,使用TextSwitcher也需要設定一個ViewFactory。與ImageSwitcher不同的是,TextSwitcher所需要的ViewFactory的makeView()方法必須返回一個TextView元件。
TextSwitcher與TextView的功能有點類似,它們都可用於顯示文字內容,區別在於TextSwitcher的效果更炫,它可以指定文字切換時的動畫效果。現在控制元件的效果還是不錯的,inAnimation和outAnimation可以直接設定滾動動畫。
<?xml version="1.0" encoding="utf-8"?>
<RelativeLayout xmlns:android="http://schemas.android.com/apk/res/android"
    xmlns:tools="http://schemas.android.com/tools"
    android:layout_width="match_parent"
    android:layout_height="match_parent"
    android:background="#ffffff"
    android:orientation="vertical"
    tools:context=".MainActivity">

    <LinearLayout
        android:layout_width="match_parent"
        android:layout_height="60dp"
        android:layout_centerInParent="true"
        android:layout_marginLeft="10dp"
        android:layout_marginRight="10dp"
        android:background="@drawable/bg"
        android:gravity="center_vertical"
        android:orientation="horizontal"
        >

        <TextView
            android:layout_width="wrap_content"
            android:layout_height="wrap_content"
            android:paddingLeft="5dp"
            android:text="京東"
            android:textSize="16sp"
            android:textStyle="bold" />

        <TextView
            android:layout_width="wrap_content"
            android:layout_height="wrap_content"
            android:background="#ff0000"
            android:padding="5dp"
            android:paddingLeft="5dp"
            android:text="快報"
            android:textColor="#ffffff"
            android:textSize="16sp"
            android:textStyle="bold" />

        <View
            android:layout_width="1dp"
            android:layout_height="50dp"
            android:layout_marginLeft="5dp"
            android:layout_marginRight="5dp"
            android:background="#e0e0e0" />
        <!-- flipInterval可能是一次切換的時間 -->
        <LinearLayout
            android:layout_width="match_parent"
            android:layout_height="50dp"
            android:gravity="center_vertical"
            android:layout_gravity="center_vertical"
            android:orientation="horizontal">
               <TextSwitcher
                android:id="@+id/textSwitcher_tag"
                android:layout_width="match_parent"
                android:layout_height="50dp"
                android:layout_weight="3"
                android:padding="0dp"
                android:gravity="center_vertical"
                android:layout_gravity="center_vertical"
                android:inAnimation="@anim/push_up_in"
                android:outAnimation="@anim/push_up_out">
                </TextSwitcher>
                <TextSwitcher
                android:id="@+id/textSwitcher_title"
                android:layout_width="match_parent"
                android:layout_height="50dp"
                android:layout_weight="1"
                android:padding="0dp"
                android:gravity="center_vertical"
                android:layout_gravity="center_vertical"
                android:inAnimation="@anim/push_up_in"
                android:outAnimation="@anim/push_up_out">
                </TextSwitcher>
        </LinearLayout>
    </LinearLayout>
</RelativeLayout>
佈局也就是這麼簡單,然後呢為TextSwitcher設定ViewFactory,該TextSwitcher即可正常工作。唯一不足的是
textSwitcher.setFactory(new ViewFactory() {

      @Override
      public View makeView() {
        TextView tv = new TextView(context);
         ......
        return tv;
      }
    });
只能返回textView不能載入自己想要的控制元件。然後需要使用執行緒來滾動textSwitcher實現你想要的功能。
下面看具體程式碼:
package com.losileeya.jdtextswitcher;
import android.graphics.Color;
import android.os.Bundle;
import android.os.Handler;
import android.support.v7.app.AppCompatActivity;
import android.util.TypedValue;
import android.view.View;
import android.widget.TextSwitcher;
import android.widget.TextView;
import android.widget.ViewSwitcher;
public class MainActivity extends AppCompatActivity {
    private TextSwitcher textSwitcher_tag,textSwitcher_title;
    // 要顯示的文字
    String[] tags = new String[]
            {
                    "最新",
                    "最火爆",
                    "HOT",
                    "new"
            };
    // 要顯示的文字
    String[] titles = new String[]
            {
                    "瑞士維氏軍刀 新品滿200-50",
                    "家居家裝煥新季,講199減100!",
                    "帶上相機去春遊,尼康低至477",
                    "價格驚呆!電信千兆光纖上市"
            };
    private int curStr;
    @Override
    protected void onCreate(Bundle savedInstanceState) {
        super.onCreate(savedInstanceState);
        setContentView(R.layout.activity_main);
        textSwitcher_tag= (TextSwitcher) findViewById(R.id.textSwitcher_tag);
        textSwitcher_title= (TextSwitcher) findViewById(R.id.textSwitcher_title);
        textSwitcher_title.setFactory(new ViewSwitcher.ViewFactory() {
            @Override
            public View makeView() {
                final TextView tv = new
                TextView(MainActivity.this);
                tv.setTextSize(TypedValue.COMPLEX_UNIT_SP, 14);
                tv.setPadding(20, 20, 20, 20);
                return tv;
            }
        });
        textSwitcher_tag.setFactory(new ViewSwitcher.ViewFactory() {
            @Override
            public View makeView() {
                final TextView tv = new
                TextView(MainActivity.this);
                tv.setTextSize(TypedValue.COMPLEX_UNIT_SP, 18);
                tv.setPadding(30, 20, 20,20);
                tv.setTextColor(Color.RED);
               tv.setBackgroundResource(R.drawable.corner);
                return tv;
            }
        });
        final Handler handler = new Handler();
        handler.postDelayed(new Runnable() {
            @Override
            public void run() {
                textSwitcher_tag.setText(tags[curStr++ %
                tags.length]);
                textSwitcher_title.setText(titles[curStr++
                % titles.length]);
                handler.postDelayed(this, 1000);
            }
        }, 1000);
    }
}