通過領域濾波(卷積)來實現影象濾鏡效果
這篇文章中主要是通過python對卷積的濾鏡效果實現,在效能上並未做任何優化。如果對濾鏡的呼叫感興趣的朋友可以直接參考程式碼後面部分影象濾鏡函式的呼叫
===================================================================================
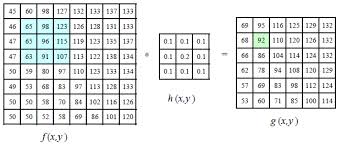
領域運算元是利用給定畫素周圍的畫素值決定此畫素的最終輸出值。領域運算元除了用於區域性色調調整還可以用於影象濾波,實現影象的平滑和銳化,影象邊緣的增強或者影象噪聲的去除
如上圖所示運算元h(x,y)對影象f(x,y)中的(1,1)~(3,3)區域進行卷積操作得到新影象g(x,y)上(1,1)上的影象資訊,這裡的卷積是指的運算元h(x,y)中每個元素與影象f(x,y)中某塊大小一致的區域進行一對一的乘操作並將結果累加作為新影象的結果,具體公式如下:
有了以上基礎概念就可以開始程式碼實現的工作了,這裡先介紹下已有的影象濾鏡函式
以上程式碼的呼叫可以參考PIL中ImageFilter#模糊 imgfilted = im_source.filter(ImageFilter.BLUR) #輪廓 imgfilted = im_source.filter(ImageFilter.CONTOUR) #邊緣增強 imgfilted = im_source.filter(ImageFilter.EDGE_ENHANCE) imgfilted = im_source.filter(ImageFilter.EDGE_ENHANCE_MORE) #浮雕 imgfilted = im_source.filter(ImageFilter.EMBOSS) imgfilted = im_source.filter(ImageFilter.FIND_EDGES) #平滑 imgfilted = im_source.filter(ImageFilter.SMOOTH) imgfilted = im_source.filter(ImageFilter.SMOOTH_MORE) imgfilted = im_source.filter(ImageFilter.SHARPEN)
以下就是卷積操作的核心程式碼這裡函式引數分別為imdata影象資料,opedata運算元資料,offset操作結果的偏移量
如果你看完程式碼可能會有這樣的疑問,如果一個100×100的影象在操作完成後會變為一個98×98的影象這樣的操作會影響影象的大小。這裡確實沒有對空缺的外圍畫素做補全,當然對應的演算法還是比較多比如用運算元中心對應的影象做補全,用所有有效畫素均值補全,用最靠近的畫素補全等方式。# 卷積函式,卷積運算元為3*3或5*5矩陣 def convolution(imdata, opedata, offset=0, packing=None): end_w = len(imdata[0]) end_h = len(imdata) start_w = 0 start_h = 0 run_start_w = 0 # 運算元寬度 opedata_w = len(opedata[0]) opedata_h = len(opedata) if packing == None: run_start_w = math.floor(opedata_w/2) end_w -= run_start_w end_h -= run_start_w start_w = run_start_w start_h = run_start_w pass im_result = [] while start_h < end_h: im_line = [] while start_w < end_w : # 開始卷積操作 step_w = step_h = 0 r = g = b = 0 while step_h < opedata_h: while step_w < opedata_w: p_r, p_g, p_b = imdata[start_h+step_h-run_start_w][start_w+step_w-run_start_w] op_v = opedata[step_h][step_w] r += p_r*op_v g += p_g*op_v b += p_b*op_v step_w += 1 pass step_h += 1 step_w = 0 pass r = min(max(int(r + offset), 0), 255) g = min(max(int(g + offset), 0), 255) b = min(max(int(b + offset), 0), 255) im_line.append([r, g, b]) start_w += 1 pass im_result.append(im_line) start_h += 1 start_w = run_start_w pass return im_result
第二個問題主要是對於效能,這裡用3×3的運算元進行運算時速度還可以忍受5×5就明顯感覺很慢了,如果對於更大的運算元其速度將會是運算元直徑的平方來n^2增加這對大運算元來說是不能忍受的。解決這個問題的方法是使用奇異值分解也就是說可以可以將目前的2維核分解為水平方向和垂直方向的兩個卷積這樣運算複雜度可以降為2n。
當你對卷積計算完成後由於結果有可能會超出影象應有的範圍值如:<0 or >255,再有可能由於不同的運算元特點可能需要給值增加一個偏移值所以需要對結果進行修正
r = min(max(int(r + offset), 0), 255)
g = min(max(int(g + offset), 0), 255)
b = min(max(int(b + offset), 0), 255)之後就可以將結果放到一個新的影象內了,下面是完整的呼叫程式碼:
# -*- coding: utf-8 -*-
# 線性濾波例子
from PIL import Image, ImageFilter
from numpy import *
#from matplotlib import pyplot
from scipy.misc import lena, toimage
from pylab import *
import math
# 卷積函式,卷積運算元為3*3或5*5矩陣
def convolution(imdata, opedata, offset=0, packing=None):
    end_w = len(imdata[0])
    end_h = len(imdata)
    start_w = 0
    start_h = 0
    run_start_w = 0

    # 運算元寬度
    opedata_w = len(opedata[0])
    opedata_h = len(opedata)

    if packing == None:
        run_start_w = math.floor(opedata_w/2)
        end_w -= run_start_w
        end_h -= run_start_w
        start_w = run_start_w
        start_h = run_start_w
        pass

    im_result = []
    while start_h < end_h:
        im_line = []
        while start_w < end_w :
            # 開始卷積操作
            step_w = step_h = 0
            r = g = b = 0
            while step_h < opedata_h:
                while step_w < opedata_w:
                    p_r, p_g, p_b = imdata[start_h+step_h-run_start_w][start_w+step_w-run_start_w]
                    op_v   = opedata[step_h][step_w]
                    r += p_r*op_v
                    g += p_g*op_v
                    b += p_b*op_v
                    step_w += 1
                    pass
                step_h += 1
                step_w = 0
                pass

            r = min(max(int(r + offset), 0), 255)
            g = min(max(int(g + offset), 0), 255)
            b = min(max(int(b + offset), 0), 255)

            im_line.append([r, g, b])
            start_w += 1
        pass

        im_result.append(im_line)
        start_h += 1
        start_w = run_start_w
    pass

    return im_result
if __name__ == '__main__':
im_source = Image.open('images/902127300357814245.jpg')
arr_im_source = array(im_source);
w = len(arr_im_source[0])
h = len(arr_im_source)
im_half_source = im_source.resize([w/6, h/6])
arr_im_source = array(im_half_source);
if False:
imgfilted = im_source.filter(ImageFilter.BLUR)
imgfilted.show()
imgfilted = im_source.filter(ImageFilter.CONTOUR)
imgfilted.show()
imgfilted = im_source.filter(ImageFilter.EDGE_ENHANCE)
imgfilted.show()
imgfilted = im_source.filter(ImageFilter.EDGE_ENHANCE_MORE)
imgfilted.show()
imgfilted = im_source.filter(ImageFilter.EMBOSS)
imgfilted.show()
imgfilted = im_source.filter(ImageFilter.FIND_EDGES)
imgfilted.show()
imgfilted = im_source.filter(ImageFilter.SMOOTH)
imgfilted.show()
imgfilted = im_source.filter(ImageFilter.SMOOTH_MORE)
imgfilted.show()
imgfilted = im_source.filter(ImageFilter.SHARPEN)
imgfilted.show()
exit()
# 設定卷積運算元
# 模糊效果
operator1 = [[0.1, 0.1, 0.1],[0.1, 0.2, 0.1], [0.1, 0.1, 0.1]]
# 高斯模糊
operator2 = [[1.0/256, 4.0/256, 6.0/256, 4.0/256, 1.0/256],
[4.0/256, 16.0/256, 24.0/256, 16.0/256, 4.0/256],
[6.0/256, 24.0/256, 36.0/256, 24.0/256, 6.0/256],
[4.0/256, 16.0/256, 24.0/256, 16.0/256, 4.0/256],
[1.0/256, 4.0/256, 6.0/256, 4.0/256, 1.0/256]]
# 角點
operator3 = [[0.25, -0.5, 0.25], [-0.5, 1, -0.5], [0.25, -0.5, 0.25]]
# Sobel
operator4 = [[-0.125, 0, 0.125], [-0.25, 0, 0.25], [-0.125, 0, 0.125]]
operator5 = [[0, 1, 0], [1, -4, 1], [0, 1, 0]]
# 對於Sobel過濾各點和值為零,所以將偏移量設為128
#convert_im = convolution(arr_im_source, operator4, 128)
convert_im = convolution(arr_im_source, operator5)
arr_im_half = array(im_half_source)
figure()
imShow = toimage(array(convert_im), 255)
imShow.show()
im_half_source.show()
由於用python來實現確實性能比較差,而且也沒有做過效能優化所以在處理原圖的時候直接先縮小到1/6再來處理。
對於第四個運算元由於其運算元各部分和為0所以需要將偏移量設為128,不然你將會看到大片的黑色。
最後附上處理後圖像的不同效果
第一行分別是原圖,平滑模糊,高斯模糊,第二行分別是角點,Sobel。


