
RecyclerView ItemDecoration 完全解析
我們都知道,使用 RecyclerView 時 ,我們不能像 ListView 那樣通過 setDivider() 的方式來設定分割線,好在 Android 為我們提供了定製性更強的 ItemDecoration 來為 RecyclerView 設定分割線。
什麼是 ItemDecoration ?
顧名思義 ItemDecoration 就是 Item 的裝飾,我們可以在 Item 的上下左右新增自定義的裝飾,比如 橫線,圖案。同時系統已經為我們提供了一個 DividerItemDecoration, 如果這個 DividerItemDecoration 不滿足我們的需求,我們就可以通過自定義 ItemDecoration 來實現了。
下面我們看下系統的 DividerItemDecoration :
DividerItemDecoration(系統提供)
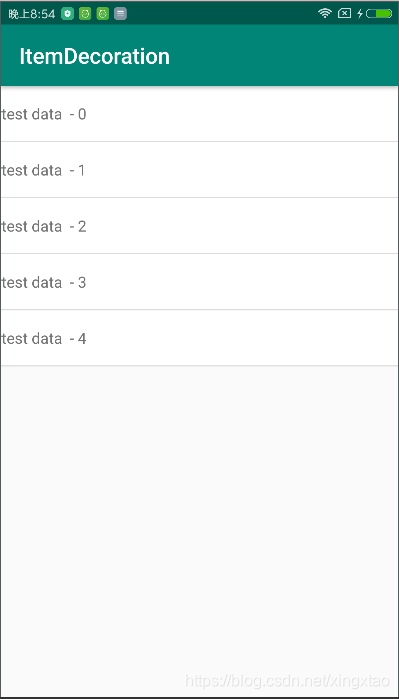
DividerItemDecoration 的使用非常簡單,只需新增下面程式碼即可:
DividerItemDecoration decoration = new DividerItemDecoration(this,DividerItemDecoration.VERTICAL);
recyclerView.addItemDecoration(decoration);
效果:
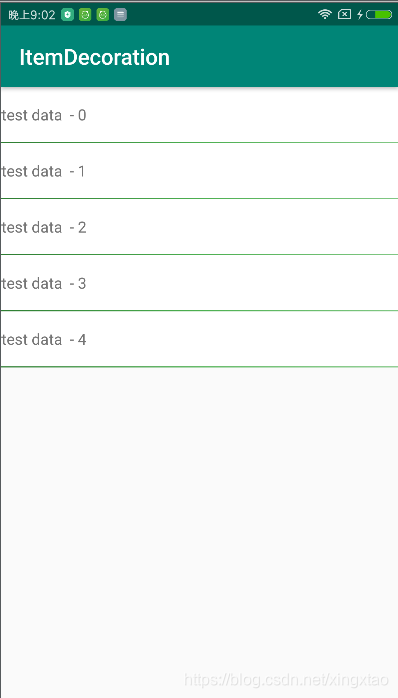
如果想要修改 DividerItemDecoration 的顏色和高度,可以呼叫它的 setDrawable(drawable) 設定一個 Drawable 物件
// MainActivity.java
DividerItemDecoration decoration = new DividerItemDecoration(this, DividerItemDecoration.VERTICAL);
Drawable dividerDrawable = getResources().getDrawable(R.drawable.drawable_divider);
decoration.setDrawable(dividerDrawable);
recyclerView.addItemDecoration(decoration);
// res/drawable/drawable_divider.xml
<?xml version="1.0" encoding="utf-8"?> 效果:
自定義 ItemDecoration
如果上述 DividerItemDecoration 不能滿足我們的需求,那麼我們就可以自定義 ItemDecoration ,ItemDecoration 的自定義主要需要重寫以下三個方法:
/**
 * 自定義 ItemDecoration
 */
public class LinearItemDecoration extends RecyclerView.ItemDecoration {

    @Override
    public void getItemOffsets(@NonNull Rect outRect, @NonNull View view, @NonNull RecyclerView parent, @NonNull RecyclerView.State state) {
        super.getItemOffsets(outRect, view, parent, state);
    }

    @Override
    public void onDraw(@NonNull Canvas c, @NonNull RecyclerView parent, @NonNull RecyclerView.State state) {
        super.onDraw(c, parent, state);
    }

    @Override
    public void onDrawOver(@NonNull Canvas c, @NonNull RecyclerView parent, @NonNull RecyclerView.State state) {
        super.onDrawOver(c, parent, state);
    }
1. getItemOffsets()
getItemOffsets() 主要作用是在 item 的四周留下邊距,效果和 margin 類似,item 的四周留下邊距後,我們就可以通過 onDraw() 在這個邊距上繪製了。
public void getItemOffsets(@NonNull Rect outRect, @NonNull View view, @NonNull RecyclerView parent, @NonNull RecyclerView.State state)
(1) 引數 Rect outRect : 表示 item 的上下左右所留下的邊距。其中 outRect 的 left, top,right,bottom 即為 item 四周留下的邊距的距離,預設都為 0 ;示意圖如下:

(2) 引數 View view : 指當前 item 的 View 物件;
(3) 引數 RecyclerView parent : 指 RecyclerView 本身;
(4) RecyclerView.State state : 指 RecyclerView 當前的狀態;
1.1 getItemOffsets() 應用例子:
既然 getItemOffsets(Rect outRect) 方法可以設定 item 四周的邊距大小,那就可以設定 recyclerview 背景色和 item 四周的邊距,使得 item 四周的邊距透出 recyclerview 背景色來達到分割線的目的。
當然 item 的背景色需要和 recyclerview 的背景色不一致才有效果;
首先將 recyclerview 的背景色設定為 colorAccent 紅色, 將 item 的背景色設定為 白色:
<!--- activity_main.xml ----->
<?xml version="1.0" encoding="utf-8"?>
<android.support.constraint.ConstraintLayout xmlns:android="http://schemas.android.com/apk/res/android"
    xmlns:app="http://schemas.android.com/apk/res-auto"
    xmlns:tools="http://schemas.android.com/tools"
    android:layout_width="match_parent"
    android:layout_height="match_parent"
    tools:context=".MainActivity">

    <android.support.v7.widget.RecyclerView
        android:id="@+id/rv_recycler"
        android:layout_width="match_parent"
        android:layout_height="match_parent"
        android:background="@color/colorAccent" />

</android.support.constraint.ConstraintLayout>
<!--- item_recycler.xml ----->
<?xml version="1.0" encoding="utf-8"?>
<LinearLayout xmlns:android="http://schemas.android.com/apk/res/android"
    android:layout_width="match_parent"
    android:layout_height="50dp"
    android:background="#fff"
    android:gravity="center_vertical"
    android:orientation="vertical">

    <TextView
        android:id="@+id/tv_title"
        android:layout_width="match_parent"
        android:layout_height="40dp"
        android:gravity="center_vertical" />

</LinearLayout>
然後繼承 ItemDecoration 類,重寫 getOffsets() 方法,將 outRect 的上邊距 top 設定為 10px;
/**
 * 自定義 ItemDecoration
 */
public class LinearItemDecoration extends RecyclerView.ItemDecoration {

    @Override
    public void getItemOffsets(@NonNull Rect outRect, @NonNull View view, @NonNull RecyclerView parent, @NonNull RecyclerView.State state) {
        super.getItemOffsets(outRect, view, parent, state);
        outRect.top = 10;   // 10px
    }
}
最後將這個 LinearItemDecoration 新增到 RecyclerView 中:
LinearItemDecoration decoration = new LinearItemDecoration();
recyclerView.addItemDecoration(decoration);
效果如下(下方的紅色是 因為RecyclerView 高度為 match_parent ,但 item 資料只有 5 條):

從效果圖可以看出:每一個 item 的 頂部都有一個紅色的背景線,包括第一個 item 頂部也有(怎麼解決呢?見 2.1 節詳解),
同理,我們可以設定為 底部 10px,左側 20px ,右側 40px;
public class LinearItemDecoration extends RecyclerView.ItemDecoration {

    @Override
    public void getItemOffsets(@NonNull Rect outRect, @NonNull View view, @NonNull RecyclerView parent, @NonNull RecyclerView.State state) {
        super.getItemOffsets(outRect, view, parent, state);
        outRect.bottom = 10;
        outRect.left = 20;
        outRect.right = 40;
    }
}
效果:

可以看到:每個 item 的左測,底部,右側都有了間距,露出了 RecyclerView 的背景色了。
2. onDraw()
@Override
public void onDraw(@NonNull Canvas canvas, @NonNull RecyclerView parent, @NonNull RecyclerView.State state) {
   super.onDraw(canvas, parent, state);
}
onDraw() 函式中的 parent , state 引數和 getItemOffsets() 方法中的引數含義是一樣的,canvas 引數是 getItemOffsets() 函式所留下的左右上下的空白區域對應的 Canvas 畫布物件。我們可以在這個區域中利用 Paint 畫筆繪製任何圖形。
比如在 item 左側繪製一個 空心圓。
/**
 * 自定義 ItemDecoration
 */
public class LinearItemDecoration extends RecyclerView.ItemDecoration {

    private static final String TAG = "LinearItemDecoration";
    private Paint paint;

    public LinearItemDecoration() {
        paint = new Paint(Paint.ANTI_ALIAS_FLAG);
        paint.setColor(Color.BLUE);
        paint.setStyle(Paint.Style.STROKE);
        paint.setStrokeWidth(5);
    }

    @Override
    public void getItemOffsets(@NonNull Rect outRect, @NonNull View view, @NonNull RecyclerView parent, @NonNull RecyclerView.State state) {
        super.getItemOffsets(outRect, view, parent, state);
        Log.e(TAG, "getItemOffsets: " );
        outRect.bottom = 10;
        outRect.left = 100;
        outRect.right = 40;
    }

    @Override
    public void onDraw(@NonNull Canvas canvas, @NonNull RecyclerView parent, @NonNull RecyclerView.State state) {
        super.onDraw(canvas, parent, state);
        Log.e(TAG, "onDraw: ");
        for (int i = 0; i < parent.getChildCount(); i++) {
            View childView = parent.getChildAt(i);
            canvas.drawCircle(50, childView.getTop() + childView.getHeight() / 2, 20, paint);
        }

    }
}
效果:

我們在 getItemOffsets() 和 onDraw() 方法中都添加了日誌,日誌列印如下:

從日誌中可以看出: getItemOffsets() 方法執行了 5 遍,和 資料來源個數是一樣的,但 onDraw() 方法只執行了一遍,由此我們知道, getItemOffsets() 是針對每個 item 都會執行一次,也就是說 每個 item 的 outRect 可以設定為不同值,但是 onDraw(),onDrawOver() 是針對 ItemDecoration 的,不是針對 item 的,只執行一次。所以我們在 onDraw() ,onDrawOver() 中繪製的時候,需要遍歷每個 item 進行繪製。
優雅獲取 outRect 中的值
在上面例子中,我們在 onDraw 中獲取 outRect 中的值都是寫成計算好的固定值,顯然這種硬編碼的方式不利於擴充套件,其實,我們可以通過 LayoutManager 來獲取 getItemOffsets() 中設定的 outRect 的值。
@Override
public void onDraw(@NonNull Canvas canvas, @NonNull RecyclerView parent, @NonNull RecyclerView.State state) {
    super.onDraw(canvas, parent, state);
    Log.e(TAG, "onDraw: ");
    RecyclerView.LayoutManager layoutManager = parent.getLayoutManager();
    for (int i = 0; i < parent.getChildCount(); i++) {
        View childView = parent.getChildAt(i);
         int leftDecorationWidth = layoutManager.getLeftDecorationWidth(childView);
         int topDecorationHeight = layoutManager.getTopDecorationHeight(childView);
         int rightDecorationWidth = layoutManager.getRightDecorationWidth(childView);
         int bottomDecorationHeight = layoutManager.getBottomDecorationHeight(childView);
    }
}
上面硬編碼可以改成:
@Override
public void onDraw(@NonNull Canvas canvas, @NonNull RecyclerView parent, @NonNull RecyclerView.State state) {
    super.onDraw(canvas, parent, state);
    Log.e(TAG, "onDraw: ");
    RecyclerView.LayoutManager layoutManager = parent.getLayoutManager();
    for (int i = 0; i < parent.getChildCount(); i++) {
        View childView = parent.getChildAt(i);
        int leftDecorationWidth = layoutManager.getLeftDecorationWidth(childView);
        int left = leftDecorationWidth / 2;
        canvas.drawCircle(left, childView.getTop() + childView.getHeight() / 2, 20, paint);
    }
}
2.1 擴充套件1 – 減少背景設定,避免過度繪製
為了減少過度繪製,我們將 activity_main 中 RecyclerView , item_recycler 中的背景全部去掉,不設定任何背景,然後在 LinearItemDecoration 中進行純繪製分割線,程式碼如下:
public class LinearItemDecoration extends RecyclerView.ItemDecoration {

    private static final String TAG = "LinearItemDecoration";
    private Paint paint;
    private Paint dividerPaint;

    public LinearItemDecoration() {
        paint = new Paint(Paint.ANTI_ALIAS_FLAG);
        paint.setColor(Color.BLUE);
        paint.setStyle(Paint.Style.STROKE);
        paint.setStrokeWidth(5);

        dividerPaint = new Paint(Paint.ANTI_ALIAS_FLAG);
        dividerPaint.setColor(Color.parseColor("#e6e6e6"));
        dividerPaint.setStyle(Paint.Style.FILL);
    }

    @Override
    public void getItemOffsets(@NonNull Rect outRect, @NonNull View view, @NonNull RecyclerView parent, @NonNull RecyclerView.State state) {
        super.getItemOffsets(outRect, view, parent, state);
        Log.e("ItemOffsets", "getItemOffsets: ");
        outRect.bottom = 5;
        outRect.left = 100;
    }

    @Override
    public void onDraw(@NonNull Canvas canvas, @NonNull RecyclerView parent, @NonNull RecyclerView.State state) {
        super.onDraw(canvas, parent, state);
        Log.e(TAG, "onDraw: ");
        RecyclerView.LayoutManager layoutManager = parent.getLayoutManager();
        for (int i = 0; i < parent.getChildCount(); i++) {
            View childView = parent.getChildAt(i);
            int leftDecorationWidth = layoutManager.getLeftDecorationWidth(childView);
            int topDecorationHeight = layoutManager.getTopDecorationHeight(childView);
            int rightDecorationWidth = layoutManager.getRightDecorationWidth(childView);
            int bottomDecorationHeight = layoutManager.getBottomDecorationHeight(childView);
            int left = leftDecorationWidth / 2;
            canvas.drawCircle(left, childView.getTop() + childView.getHeight() / 2, 20, paint);
            // getItemOffsets()中的設定的是 bottom = 5px;所以在 drawRect 時,top 為 childView.getBottom,bottom為top+bottomDecorationHeight
            canvas.drawRect(new Rect(
                    leftDecorationWidth,
                    childView.getBottom(),
                    childView.getWidth() + leftDecorationWidth,
                    childView.getBottom() + bottomDecorationHeight
            ), dividerPaint);
        }
    }

    @Override
    public void onDrawOver(@NonNull Canvas canvas, @NonNull RecyclerView parent, @NonNull RecyclerView.State state) {
        super.onDrawOver(canvas, parent, state);
    }
}
效果:

注意: 上面 getItemOffsets() 中設定的是 bottom = 5px; 所以在 onDraw() 方法的 drawRect 時,top值為 childView.getBottom, bottom值為 top+bottomDecorationHeight。

同理:getItemOffsets() 中設定是 top = 5px, 那麼在 onDraw() 方法 drawRect 時,bottom 值為 childView.getTop() , top 值為 bottom - topDecorationHeight
2.2 擴充套件2 – 實現豎直進度分割線
在 getItemOffsets() 方法中左側留下空白區域,然後在 onDraw() 方法中繪製 圓和 豎線。程式碼如下:
<!--- item_recycler.xml ---->
<?xml version="1.0" encoding="utf-8"?>
<LinearLayout xmlns:android="http://schemas.android.com/apk/res/android"
xmlns:tools="http://schemas.android.com/tools"
android:layout_width="match_parent"
android:layout_height="wrap_content"
android:background="@android:color/white"
android:gravity="center_vertical"
android:orientation="vertical"
android:padding="10dp">
<TextView
android:id="@+id/tv_title"
android:layout_width="match_parent"
android:layout_height="wrap_content"
android:textColor="#332"
android:textSize="16sp"
tools:text="我是 title" />
<TextView
android:id="@+id/tv_time"
android:layout_width="match_parent"
android:layout_height="wrap_content"
android:layout_marginTop="5dp"
android:gravity="center_vertical"
android:textColor="#666"
android:textSize="14sp"
tools:text="woshi" />
</LinearLayout>
<!--- activity_main.xml --->
<?xml version="1.0" encoding="utf-8"?>
<android.support.constraint.ConstraintLayout xmlns:android="http://schemas.android.com/apk/res/android"
xmlns:app="http://schemas.android.com/apk/res-auto"
xmlns:tools
相關推薦
RecyclerView ItemDecoration 完全解析
我們都知道,使用 RecyclerView 時 ,我們不能像 ListView 那樣通過 setDivider() 的方式來設定分割線,好在 Android 為我們提供了定製性更強的 ItemDecoration 來為 RecyclerView 設定分割線。
什麼是 ItemDeco
Android RecyclerView 使用完全解析 體驗藝術般的控制元件
概述
RecyclerView出現已經有一段時間了,相信大家肯定不陌生了,大家可以通過匯入support-v7對其進行使用。
據官方的介紹,該控制元件用於在有限的視窗中展示大量資料集,其實這樣功能的控制元件我們並不陌生,例如:ListView、Gri
Android RecyclerView 使用完全解析
概述
RecyclerView出現已經有一段時間了,相信大家肯定不陌生了,大家可以通過匯入support-v7對其進行使用。
據官方的介紹,該控制元件用於在有限的視窗中展示大量資料集,其實這樣功能的控制元件我們並不陌生,例如:ListView、GridView。
那麼有了ListVie
CardView完全解析與RecyclerView結合使用
轉載請標明出處:
(一).前言:
【好訊息】個人網站已經上線執行,後面部落格以及技術乾貨等精彩文章會同步更新,請大家關注收藏:http://www.lcode.org
作為Android L開始,Google更新的除
【FastDev4Android框架開發】CardView完全解析與RecyclerView結合使用(三十二)
轉載請標明出處:(一).前言: 【好訊息】個人網站已經上線執行,後面部落格以及技術乾貨等精彩文章會同步更新,請大家關注收藏:http://www.lcode.org作為Android L開始,Google更新的除了RecyclerView之外的另一控制元件
RecyclerView完全解析之下拉重新整理與上拉載入
(一).前言:
話說RecyclerView已經面市很久,也在很多應用中得到廣泛的使用,在整個開發者圈子裡面也擁有很不錯的口碑,那說明RecyclerView擁有比ListView,GridView之類控制元件有很多的優點,例如:資料繫結,Item View建立,View的回收以及重用等機制。前三三篇文
【FastDev4Android框架開發】RecyclerView完全解析之打造新版類Gallery效果(二十九)
轉載請標明出處:(一).前言: 【好訊息】個人網站已經上線執行,後面部落格以及技術乾貨等精彩文章會同步更新,請大家關注收藏:http://www.lcode.org 話說RecyclerView已經面市很久,也在很多應用中得到廣泛的使
Android屬性動畫完全解析(上),初識屬性動畫的基本用法
fcm 操作 fad 擴展性 改變 內部使用 如果 轉載 @override 轉載請註明出處:http://blog.csdn.net/guolin_blog/article/details/43536355
在手機上去實現一些動畫效果算是件比較炫酷的事情,因此Andr
C++中的const完全解析--轉
blog 函數參數 區別 混合 分配 傳遞 含義 類對象 檢查 1. const修飾普通變量和指針
const修飾變量,一般有兩種寫法:const TYPE value;TYPE const value;這兩種寫法在本質上是一樣的。它的含義是:const修飾的類型為TY
Android studio 2.2新特性介紹,ConstraintLayout完全解析
穩定 iss 項目 ide 了解 需要 應用 let 左右 轉載郭霖大神的文章,轉載請註明出處:http://blog.csdn.net/guolin_blog/article/details/53122387
我正常寫隨筆,都是看了別人的文章,自己使用,把自己的體驗心得,
Android ToolBar 使用完全解析
都是 主題 image 需要 oid primary 調用 blank ast
ToolBar簡介
ToolBar是Android 5.0推出的一個新的導航控件用於取代之前的ActionBar,由於其高度的可定制性、靈活性、具有Material Design風格等優點,
Python - 靜態函數(staticmethod), 類函數(classmethod), 成員函數 區別(完全解析)
assm self log -i 邏輯 int -a spa 構造 原文地址:http://blog.csdn.net/caroline_wendy/article/details/23383995
靜態函數(staticmethod), 類函數(classmethod),
RecyclerView源碼解析 - 分割線
div 要去 png inf bubuko class rec 源碼解析 gpo 猜想: 既然考慮了分割線,那麽子View在測量時候肯定要去考慮分割線留出的位置 直接measureChild()方法
猜想: 分割線會調用繪制的方法 onDraw()
Recy
Android Service完全解析,關於服務你所需知道的一切(下)
並且 無法 數據類型 界面 其它 wid logcat listen 程序崩潰 文章轉載至:http://blog.csdn.net/guolin_blog/article/details/9797169
這是郭霖寫的.......就是寫 "第一行代碼"的那個厲害人物,大
Android新特性介紹,ConstraintLayout完全解析
mat 區別 界面 -s 自己 解決 match roo pre 本篇文章的主題是ConstraintLayout。其實ConstraintLayout是Android Studio 2.2中主要的新增功能之一,也是Google在去年的I/O大會上重點宣傳的一個功能。我們都
Android OkHttp完全解析 是時候來了解OkHttp了
JD rect eat serve 功能 sessions 文件名 -h 適合 一、概述
最近在群裏聽到各種討論okhttp的話題,可見okhttp的口碑相當好了。再加上Google貌似在6.0版本裏面刪除了HttpClient相關API,對於這個行為不做評價。為了更好的在
【轉】C語言 printf格式控制符 完全解析
china int 數字 大於 轉換 OS 組成 字符數 無符號
printf的格式控制的完整格式:% - 0 m.n l或h 格式字符下面對組成格式說明的各項加以說明:①%:表示格式說明的起始符號,不可缺少。②-:
完全解析線程池ThreadPool原理&使用
ati maximum adf 斷線 sched 源碼 調用 executor 線程池 目錄
1. 簡介
2. 工作原理
2.1 核心參數
線程池中有6個核心參數,具體如下
上述6個參數的配置 決定了 線程池的功能,具體設置時機 = 創建 線程池類對
EventBus 3.0: 入門使用及其使用 完全解析
ring 接收 ret .get parent tro eve cte idt 前言
EventBus是greenrobot再Android平臺發布的以訂閱-發布模式為核心的開源庫。
EventBus翻譯過來是事件總線意思。可以這樣理解:一個個(event)發送到總線上,
Android Fragment 真正的完全解析(上)
watermark 展示 near 主界面 ddt comm 講解 超級 pro 版權聲明:本文為博主原創文章,未經博主允許不得轉載。 https://blog.csdn.net/lmj623565791/article/details/37970961
轉載請標明出處: