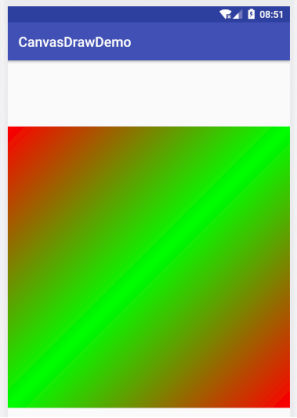
Android繪圖之LinearGradient線性漸變(9)
1 linearGradient簡介
linearGradient線性漸變,會用到Paint的setShader,Shader 被稱為著色器,在opengl中這個概念經常被用到,android中的shader主要用來給影象著色,Shader在繪製過程中會返回橫向重要的顏色組,Paint設定shader後,繪製時會從shader中獲取顏色,也就是需要shader告訴畫筆某處的顏色值。
Shader 具體實現類包括:
BitmapShader,ComposeShader,LinearGradient,RadialGradient,SweepGradient
https://blog.csdn.net/u010126792/article/details/83787779
LinearGradient兩種建構函式:
/**
* Create a shader that draws a linear gradient along a line.
*
* @param x0 The x-coordinate for the start of the gradient line
* @param y0 The y-coordinate for the start of the gradient line
* @param x1 The x-coordinate for the end of the gradient line
* @param y1 The y-coordinate for the end of the gradient line
* @param color0 The color at the start of the gradient line.
* @param color1 The color at the end of the gradient line.
* @param tile The Shader tiling mode
*/ 引數說明:
(x0,y0):漸變起始點座標
(x1,y1):漸變結束點座標
color0:漸變開始點顏色,16進位制的顏色表示,必須要帶有透明度
color1:漸變結束顏色
colors:漸變陣列
positions:位置陣列,position的取值範圍[0,1],作用是指定某個位置的顏色值,如果傳null,漸變就線性變化。
tile:用於指定控制元件區域大於指定的漸變區域時,空白區域的顏色填充方法。
- CLAMP邊緣拉伸,為被shader覆蓋區域,使用shader邊界顏色進行填充
-REPEAT 在水平和垂直兩個方向上重複,相鄰影象沒有間隙
-MIRROR以映象的方式在水平和垂直兩個方向上重複,相鄰影象有間隙
第一個建構函式可以指定兩個顏色之間的漸變,第二個建構函式可以指定多個顏色之間的漸變,線性漸變不但可以程式碼實現還可以xml檔案實現,這裡只講解程式碼實現方式。
2 兩種顏色的線性漸變
只需要設定開始結束點座標,開始顏色,結束顏色。
例項程式碼:
mPaint = new Paint();
mPaint.setColor(Color.BLUE);
mPaint.setAntiAlias(true);
mPaint.setStrokeWidth(3);
mPaint.setStyle(Paint.Style.FILL);
mPaint.setTextSize(20);

LinearGradient linearGradient = new LinearGradient(getWidth(),400,0,0,Color.RED,Color.GREEN, Shader.TileMode.CLAMP);
mPaint.setShader(linearGradient);
canvas.drawRect(0,0,getWidth(),400,mPaint);
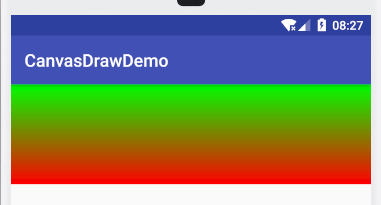
xml中設定漸變可以通過設定angle角度來改變漸變的開始結束,可以設定從上到下,從下到上,從左到右,從右到左,程式碼中如何設定呢?
3 如何通過座標設定漸變方向:
通過座標可以輕鬆實現,漸變方向的控制:
(0,0)->(0,400)從上到下
(0,400)->(0,0) 從下到上
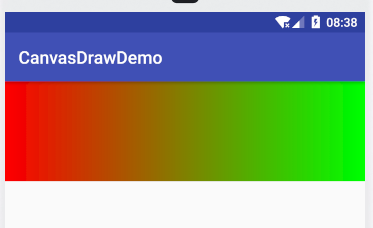
0,0)->(getMeasuredWidth(),0) 表示從左到右
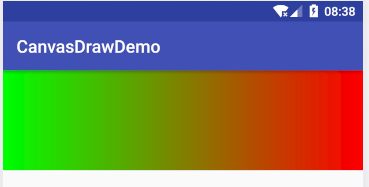
(getMeasuredWidth(),0)->(0,0) 表示從右到左
0,0)-> (getMeasuredWidth(),getMeasuredHeight()) 斜角,從左上角到右下角
從左到右:
從右到左:
** 漸變填充顏色總結**
-
要實現從上到下需要設定shader開始結束點座標為左上角到左下角或右上角到右下角座標。
-
要實現從下到上需要設定shader開始結束點座標為左下角到左上角或右下角到右上角。
-
要實現從左到右需要設定shader開始結束點座標為左上角到右上角或者左下角到右下角。
-
要實現從右到左需要設定shader開始結束座標為右上角到左上角或者右下角到左下角。
-
要實現對角shader,需要設定開始結束點座標左上角到右下角。
4 多顏色填充 colors,positions陣列引數講解
LinearGradient(float x0, float y0, float x1, float y1, @NonNull @ColorInt int colors[], @Nullable float positions[], @NonNull TileMode tile) ;
positions為null時,線性填充,和沒有positions陣列的建構函式效果一樣。
Positions陣列中值為0-1,0表示開始繪製點,1表示結束點,0.5對應中間點等等。陣列中位置資訊對應顏色陣列中的顏色。
//例如
int [] colors = {Color.RED,Color.GREEN, Color.BLUE};
float[] position = {0f, 0.3f, 1.0f};
上面position[0]對應陣列中的第一個RED,0.3f的位置對應顏色中的GREEN,1.0f的位置對應顏色中的BLUE,所以從0-0.3的位置是從RED到GREEN的漸變,從0.3到1.0的位置的顏色漸變是GREEN到BLUE。
int [] colors = {Color.RED,Color.GREEN, Color.BLUE};
float[] position = {0f, 0.3f, 1.0f};
LinearGradient linearGradient = new LinearGradient(0,0,getMeasuredWidth(),0,colors,position, Shader.TileMode.CLAMP);

mPaint.setShader(linearGradient);
canvas.drawRect(0,0,getMeasuredWidth(),getMeasuredHeight(),mPaint);

如果把0.3改成0.7,

5 利用LinearGradient實現變色字型
利用設定了變色shader的畫筆,就可以畫出變色字型:
 int [] colors = {Color.RED,Color.GREEN, Color.BLUE};
 float[] position = {0f, 0.7f, 1.0f};
 LinearGradient linearGradient = new LinearGradient(0,0,getMeasuredWidth(),0,colors,position, Shader.TileMode.CLAMP);

 mPaint.setShader(linearGradient);
// canvas.drawRect(0,0,getMeasuredWidth(),getMeasuredHeight(),mPaint);
 canvas.drawText("Android繪圖小糊塗",0,getMeasuredHeight()/2,mPaint);

如何讓字型顏色不停地變動:
Shader 可以設定matrix變換,利用translate不停地移動shader,實現漸變效果,下面的例項不能用於生產環境,我只是寫個例子,後面會開文章講解可用於生產的漸變。
int [] colors = {Color.BLACK,Color.RED, Color.BLUE,Color.BLACK};
Rect rect = new Rect();
mPaint.getTextBounds(str,0,str.length(), rect);
int fontWidth = rect.width();
linearGradient = new LinearGradient(0,0,-fontWidth+10,0,colors,null, Shader.TileMode.CLAMP);
Matrix matrix = new Matrix();
matrix.setTranslate(tran,0);
linearGradient.setLocalMatrix(matrix);
tran = (tran + advance) ;
if (tran >= fontWidth*2){
   tran = 0;
}
mPaint.setShader(linearGradient);
canvas.drawText(str,0,getMeasuredHeight()/2,mPaint);
invalidate();

TileMode 邊緣填充模式
如果shader的大小小於view的大小時如何繪製其他沒有被shader覆蓋的區域?
跟最後一個引數有關,
-CLAMP
邊緣拉伸,利用邊緣的顏色,填充剩餘部分
-REPEAT
在水平和垂直兩個方向上重複,相鄰影象沒有間隙,重複shader
-MIRROR
以映象的方式在水平和垂直兩個方向上重複,相鄰影象有間隙,鏡面shader
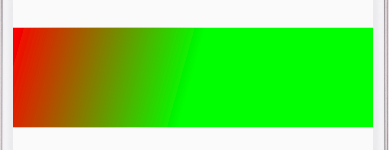
LinearGradient linearGradient = new LinearGradient(0,0,getMeasuredWidth()/2,getMeasuredHeight()/2,Color.RED,Color.GREEN, Shader.TileMode.CLAMP);
mPaint.setShader(linearGradient);
canvas.drawRect(0,0,getMeasuredWidth(),getMeasuredHeight(),mPaint);
CLAMP:
REPEAT:

MIRROR:

如果想要從對角線設定shader,圖形最好是正方形這樣比較好看設定:
@Override
protected void onMeasure(int widthMeasureSpec, int heightMeasureSpec) {
    super.onMeasure(widthMeasureSpec, heightMeasureSpec);
   int width =  MeasureSpec.getSize(widthMeasureSpec);
    setMeasuredDimension(width,width);
}

@Override
protected void onDraw(Canvas canvas) {
    super.onDraw(canvas);
    LinearGradient linearGradient = new LinearGradient(0,0,getMeasuredWidth()/2,getMeasuredHeight()/2,Color.RED,Color.GREEN, Shader.TileMode.MIRROR);
    mPaint.setShader(linearGradient);
    canvas.drawRect(0,0,getMeasuredWidth(),getMeasuredHeight(),mPaint);
}
