
自定義EditText的使用(一鍵刪除)|ListView item中多edittext問題
在實際開發的時候,應用的登入介面和註冊介面通常會用到這個,我說的就是EditText末尾處的那個叉號,當輸入EditText中的內容不符合自己的意願,想全部刪除的時候,可以點選那個叉號實現一鍵刪除EditText裡面的全部內容。效果圖如下:
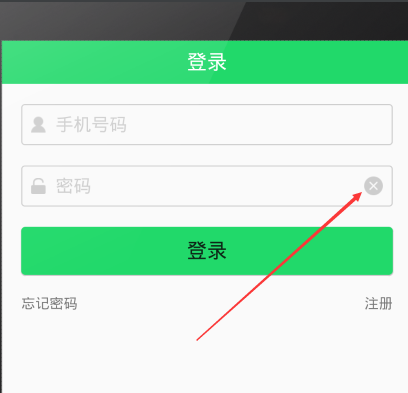
當然,EditText裡的內容為null的時候,這個叉號是不能顯示的,只有輸入內容才允許顯示。
有些人會有疑問,包括我一開始的時候也是,為啥要用自定義?直接在xml裡設定圖片資源,先隱藏,再判斷當EditText不為null的時候再將叉號顯示出來,不也能實現這樣的效果?
答案是:確實也能實現效果,但是沒有考慮到複用性。你想想,一個應用的登入介面和註冊介面可能會有很多EditText,然後每一個EditText你都需要在xml設定好圖片資源先隱藏,然後再判斷是不是null,而且還得響應點選事件,程式碼量會不會很大,是不是在重複一些沒必要的程式碼?
所以,用到自定義EditText,這樣的好處就是,不僅在當前專案可以用,以後在別的專案,遇到這個需求的時候,也可以拿過來直接用,起到了完美封裝的作用~~
OK了!廢話不多說了!自定義EditText程式碼如下:
public class MyEditText extends EditText implements View.OnFocusChangeListener , TextWatcher {
private Drawable mClearDrawable;
public MyEditText(Context context) {
this ——————————————————————————————————————————————————————————
下面看一下小程式中是如何實現的。也很簡單,不解釋。清空的功能主要就是動態傳遞一個空字串過去就行了 哈哈哈~
wxml
<view class='input_container'>
  <image class='icon_search' src='../../image/icon_search.png' bindtap='searchContent'></image>
  <input placeholder='輸入內容' bindinput='getValue' value='{{inputValue}}' confirm-type='search' bindconfirm='search'></input>
  <image class='icon_delete' src='../../image/icon_delete.png' bindtap='clearValue' hidden='{{!showDeleteIcon}}' ></image>
</view>
wxss:
.input_container {
  display: -webkit-flex;
  display: flex;
  height: 24px;
  border: 1px solid #ccc;
  align-items: center;
  margin: 20px;
  padding-left: 10px;
  padding-top: 4px;
  padding-bottom: 4px;
}

.icon_search {
  width: 20px;
  height: 20px;
  margin-right: 6px;
}

input {
  height: 20px;
  flex: 1;
  font-size: 14px;
}

.icon_delete {
  width: 20px;
  height: 20px;
  padding-right: 20px;
}
js:
var value = '';
Page({

  /**
   * 頁面的初始資料
   */
  data: {
    showDeleteIcon: false,//是否顯示叉號圖示
    inputValue: ''//input中的值
  },

  //判斷輸入框是否有值
  getValue: function (e) {
    value = e.detail.value
    if (value != '') {
      this.setData({
        showDeleteIcon: true
      });
    } else {
      this.setData({
        showDeleteIcon: false
      });
    }
  },

  //清空輸入框中的值
  clearValue: function () {
    this.setData({
      inputValue: '',
      showDeleteIcon: false
    });
  },

  //搜尋
  search:function(e){
      wx.showToast({
        title: e.detail.value,
      })
  },
})
效果圖如下:

——————————————————————————————————————————————————————————————
下面說一下ListView item項中多edittext的問題,下面以一個Edittext為例進行說明。多個同理。
有時候,我們專案需求會遇到ListView中多edittext同時提交的需求。當用到ListView複用上下滾動時,難免會出現輸入框已經輸入過的內容出現錯亂的情況。
主要就是在adapter的getView()中資料繫結的地方進行設定:
        //繫結資料
        final ThemeTalkerBean bean = list.get(position);
        //為了儲存已經輸入過的資訊,需要先清除監聽
        if (item.et_talker_name.getTag() instanceof TextWatcher) {
            item.et_talker_name.removeTextChangedListener((TextWatcher) item.et_talker_name.getTag());
        }


        TextWatcher talkerWatcher = new TextWatcher() {
            @Override
            public void beforeTextChanged(CharSequence s, int start, int count, int after) {
            }

            @Override
            public void onTextChanged(CharSequence s, int start, int before, int count) {
            }

            @Override
            public void afterTextChanged(Editable s) {
                if (TextUtils.isEmpty(s)) {
                    bean.setTalkerName("");
                } else {
                    bean.setTalkerName(s.toString());
                }
            }
        };
        item.et_talker_name.addTextChangedListener(talkerWatcher);
        item.et_talker_name.setTag(talkerWatcher);
ThemeTalkerBean 這個bean就是用來儲存每個item中edittext輸入的內容的。最好提交的時候,提交bean裡面的資訊就行了。