[3] ffmpeg基礎知識以及使用示例
日期:2016.10.1
作者:isshe
github:github.com/isshe
郵箱:[email protected]
ffmpeg的基礎知識
ffmpeg的庫
- avdecoc: 編解碼。
- avformat: 封裝格式的處理(flv,avi,mov)
- swscale: 視訊畫素資料格式轉換(常用於解碼後視訊的裁剪)。
- avutil: 工具庫。
- avfilter: 濾鏡特效處理。
- avdevice: 各種裝置的輸入輸出。
- postproc: 後加工。
- swresample: 音訊取樣資料格式轉換。
前面四個是最常用的
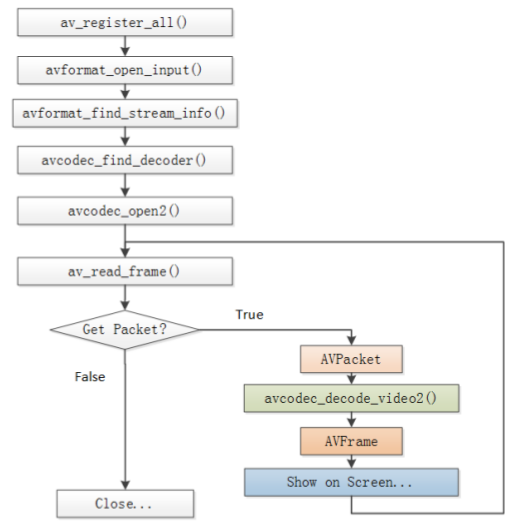
ffmpeg的執行流程

* avcodec_decode_open2()這個函式是解碼函式, 最主要的一個函式。
* 圖中解碼流程是:獲取一個pakcet, 然後呼叫解碼函式,把AVPacket結構中的data轉換為AVFrame結構的data。
* AVPacket結構儲存一幀壓縮的編碼資料。
* AVFrame結構儲存一幀解碼後的畫素資料(對音訊則是取樣資料)
* AVFrame結構的元素data是雙重指標,YUV資料來說包含data[0],data[1],data[2]分別存Y、U、V資料,注意每幀中U、V資料是Y資料的四分之一大小(對420P來說)。『Y:亮度資料, U,V:色差資料,由於人的眼睛對亮度更敏感,故而YUV資料中存更多的Y而減少UV的資料。當只有Y資料的時候,顯示為黑白』
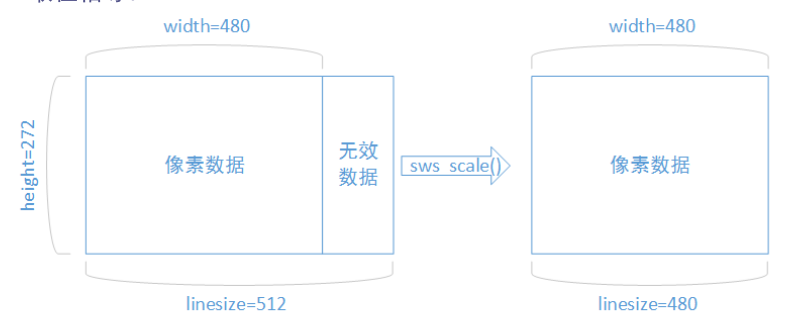
* 解碼出來的資料可能函式無效畫素。需要用sws_scale()函式處理(大概也可自編寫函式處理)
* 如圖:
*
* ffmpeg的函式簡介:待更新(不定期更新)
ffmpeg解碼相關資料結構

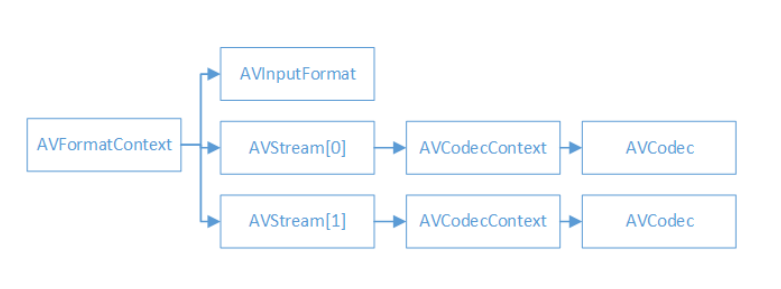
* AVFormatContext是一個統籌全域性的結構, 包含一些視訊檔名,視訊時長,視訊位元速率等封裝格式資訊。
* AVInputFormat包含一些具體的視訊格式資訊,每種視訊格式對應一個這個結構。
* 一般來說視訊檔案有兩個流:視訊流和音訊流。有幾個流就有幾個AVStream資料結構, 一般視訊流的index==0(也有其他情況), AVStream在AVFormatContext中是一個雙重指標。
* AVCodecContext包含畫素等編解碼資訊(對於視訊)。
* AVCodec每種視/音訊對應一個該結構體(例如h264).
* ffmpeg相關資料結構:待更新(不定期更新)
使用示例
程式碼:
- 程式碼中列印相關結構資訊的函式,刪減了。
- 函式的呼叫流程如前所述。
- 需要注意,什麼地方是什麼資料。裸流資料在哪裡輸出,YUV資料在哪裡輸出。
- 輸出YUV資料要注意Y資料是UV的4倍,data有3個。
- 找視訊流的時候,需要一個一個流遍歷,雖然一般index==0的那個是,但是也有例外。 *
#include <stdio.h>
//#include <libavformat/avformat.h>

#define __STDC_CONSTANT_MACROS
extern "C"
{
#include <libavcodec/avcodec.h>
#include <libavformat/avformat.h>
#include <libswscale/swscale.h>     //裁剪
}

//輸入和輸出的檔名,解碼前的資料放H264檔案中,解碼後放YUV檔案中
#define FILENAME            "cuc_ieschool.flv"
#define FILENAME_YUV        "cuc_ieschool_512x288.yuv"
#define FILENAME_H264       "cuc_ieschool_512x288.H264"
#define FILENAME_INFO       "cuc_ieschool.info"

void print_AVFormatContext_info(AVFormatContext *pFormatCtx, FILE *file_stream);

int main(int argc, char *argv[])
{

     AVFormatContext    *pFormatCtx;        //統籌結構,儲存封裝格式相關資訊
     AVCodecContext     *pCodecCtx;         //儲存視/音訊編解碼相關資訊
     AVCodec            *pCodec;            //每種編解碼器對應一個結構體
     AVFrame            *pFrame;            //解碼後的結構
     AVFrame            *pFrameYUV;
     AVPacket           *pPacket;           //解碼前
     struct SwsContext  *img_convert_ctx;   //標頭檔案只有一行,但是實際上這個結構體十分複雜
     int                i = 0;
     int                video_index = 0;     //為了檢查哪個流是視訊流,儲存流陣列下標
     int                y_size = 0;         //
     int                ret = 0;            //
     int                got_picture = 0;    //
     char               filename[256] = FILENAME;  //
     int                frame_cnt;          //幀數計算
     uint8_t            *out_buffer;        //???
     FILE               *fp = NULL;
     FILE               *YUVfp = NULL;

     if (argc == 2)
     {
          memcpy(filename, argv[1], strlen(argv[1])+1);
     }
     else if (argc > 2)
     {
         printf("Usage: ./*.out video_filename");
     }

     av_register_all();         //註冊所有元件

     avformat_network_init();   //初始化網路,貌似暫時沒用到,可以試試刪除

     pFormatCtx = avformat_alloc_context(); //分配記憶體

     //開啟檔案, 注意第一個引數是指標的指標
     if (avformat_open_input(&pFormatCtx, filename, NULL, NULL) != 0)
     {
          printf("Couldn't open input stream.\n");
          return (-1);
     }

     //獲取流資訊
     if (avformat_find_stream_info(pFormatCtx, NULL) < 0)
     {
          printf("Couldn't find stream info\n");
          return (-1);
     }

     //找出視訊流, nb_streams表示視訊中有幾種流
     video_index = -1;
     for (i = 0; i < pFormatCtx->nb_streams; i++)
     {
          if (pFormatCtx->streams[i]->codec->codec_type == AVMEDIA_TYPE_VIDEO)
          {
              video_index = i;
              break;
          }
     }
     if (-1 == video_index)
     {
          printf("Couldn't find a video stream\n");
          return (-1);
     }

     //複製編解碼的資訊到編解碼的結構AVCodecContext結構中,
     //一方面為了操作結構中資料方便(不需要每次都從AVFormatContext結構開始一個一個指向)
     //另一方面方便函式的呼叫
     pCodecCtx = pFormatCtx->streams[video_index]->codec;    //可以檢視原始碼avformat.h中定義的結構

     //找到一個和視訊流對應的解碼器
     pCodec = avcodec_find_decoder(pCodecCtx->codec_id);
     if (NULL == pCodec)
     {
          printf("Couldn't found a decoder\n");
          return (-1);
     }

     //開啟解碼器
     if (avcodec_open2(pCodecCtx, pCodec, NULL) < 0)
     {
          printf("Couldn't open decoder\n");
          return (-1);
     }

     //輸出一些想要輸出的資訊
     fp = stdout;
     fp = fopen(FILENAME_INFO, "w+");
     if (fp == NULL)
     {
         fprintf(stderr, "fopen error\n");
         return (-1);
     }

     //輸出結構中的資訊以更瞭解這些結構。這裡程式碼只示例一個。
     print_AVFormatContext_info(pFormatCtx, fp);

     //輸出視訊檔案資訊
     printf("------------------------file infomation-----------------------------\n");
     av_dump_format(pFormatCtx, 0, filename, 0);
     printf("--------------------------------------------------------------------\n");

     pFrame     = av_frame_alloc();
     pFrameYUV  = av_frame_alloc();
     out_buffer = (uint8_t *)av_malloc(avpicture_get_size(AV_PIX_FMT_YUV420P, pCodecCtx->width, pCodecCtx->height));
     avpicture_fill((AVPicture *)pFrameYUV, out_buffer,
             AV_PIX_FMT_YUV420P, pCodecCtx->width, pCodecCtx->height);

     //???
     img_convert_ctx = sws_getContext(pCodecCtx->width, pCodecCtx->height,
             pCodecCtx->pix_fmt, pCodecCtx->width, pCodecCtx->height,
             AV_PIX_FMT_YUV420P, SWS_BICUBIC, NULL, NULL, NULL);

     pPacket = (AVPacket *)av_malloc(sizeof(AVPacket));
     frame_cnt = 0;         //幀數計算嗎?

     //開啟檔案
     fp = fopen(FILENAME_H264, "w+");
     if (fp == NULL)
     {
         fprintf(stderr, "h264 fopen error\n");
         return (-1);
     }

     YUVfp = fopen(FILENAME_YUV, "w+");
     if (NULL == YUVfp)
     {
         fprintf(stderr, "YUV fopen error\n");
         return (-1);
     }

     while(av_read_frame(pFormatCtx, pPacket) >= 0)
     {
          if (pPacket->stream_index == video_index)
          {
              //這裡可以輸出H264馬流資訊,這裡是解碼前
              fwrite(pPacket->data, pPacket->size, 1, fp);

              //解碼
              ret = avcodec_decode_video2(pCodecCtx, pFrame, &got_picture, pPacket);
              if (ret < 0)
              {
                   printf("Decode fail\n");
                   return (-1);
              }

              if (got_picture == 0)
              {
                   printf("get picture error\n");
              }
              else
              {
                  //調整解碼出來的影象,解碼出來的可能含有填充的資訊。
                  sws_scale(img_convert_ctx, (const uint8_t * const *)pFrame->data,
                          pFrame->linesize, 0, pCodecCtx->height,
                          pFrameYUV->data, pFrameYUV->linesize);
//                  printf("Decoded frame index: %d\n", frame_cnt);

                  // 已經解碼,可以輸出YUV的資訊
                  // 這個data是一個數組,需要注意!一般3個:代表Y、U、V
                  // !!!!!!!!!!!!!!!!!!!!!!!!!!!!!!!!!!!!
                  fwrite(pFrameYUV->data[0], 1, pCodecCtx->width * pCodecCtx->height, YUVfp);
                  fwrite(pFrameYUV->data[1], 1, pCodecCtx->width * pCodecCtx->height / 4, YUVfp);
                  fwrite(pFrameYUV->data[2], 1, pCodecCtx->width * pCodecCtx->height / 4, YUVfp);
                  frame_cnt++;
              }
          }
          av_free_packet(pPacket);
     }

     printf("Decoded frame count: %d\n", frame_cnt);

     fclose(fp);
     fclose(YUVfp);
     sws_freeContext(img_convert_ctx);
     av_frame_free(&pFrameYUV);
     av_frame_free(&pFrame);
     avcodec_close(pCodecCtx);
     avformat_close_input(&pFormatCtx);

     return 0;
}

void print_AVFormatContext_info(AVFormatContext *pFormatCtx, FILE *file_stream)
{
     fprintf(file_stream, "-------------------------AVFormatContext--------------------------\n");
     fprintf(file_stream, "ctx_flags = %d\n"
             "nb_streams = %u\n"
             "filename = %s\n"
             "start_time = %d\n"
             "duration = %d\n"
             "bit_rate = %d\n"
             "packet_size = %u\n"
             "max_delay = %d\n"
             "flags = %d\n"
             "probesize = %d\n"
             "key = %d\n"
             "keylen = %d\n"
             "nb_programs = %d\n",
             pFormatCtx->ctx_flags, pFormatCtx->nb_streams,
             pFormatCtx->filename, pFormatCtx->start_time,
             pFormatCtx->duration, pFormatCtx->bit_rate,
             pFormatCtx->packet_size, pFormatCtx->max_delay,
             pFormatCtx->flags, pFormatCtx->probesize,
             pFormatCtx->key, pFormatCtx->keylen, pFormatCtx->nb_programs);
     fprintf(file_stream, "------------------------------------------------------------------\n");
}
編譯
- 這個要注意,ubuntu下弄了好久。
- 這裡要用g++, 因為用到的庫x265中,用gcc編不過。
- 這份程式碼有很多警告,暫未處理。
g++ ffmpeg_decoder.c -o ffmpeg_decoder.out -O2 -Wall -g \
 -lavformat -lavcodec -lavformat -lavutil -lswresample -lswscale \
 -lx264 -lx265 -lvpx -lmp3lame -lopus -lfdk-aac -lX11 -lva -lvdpau -lva-drm \
-lva-x11 -lvorbisenc -lvorbis -ltheoraenc -ltheoradec -ldl -lm -lpthread -lz- ubuntu16.04中需要包含這個庫才能不出現“未定義的引用”。
結果
相關結構的資訊存到.info檔案,裸流資料存到h264檔案,解碼後資料存yuv檔案。

