
人工智慧實踐:Tensorflow筆記(一)

import tensorflow as tf
a=tf.constant([1.0,2.0])
b=tf.constant([3.0,4.0])
result=a+b
print(result)
#Tensor("add:0", shape=(2,), dtype=float32)

import tensorflow as tf
a=tf.constant([[1.0,2.0]]) #定義一個2 階張量等於[[1.0,2.0]]
b=tf.constant([[3.0],[4.0]])#定義一個2 階張量等於[[3.0],[4.0]]
result=tf.matmul(a,b)#實現xw 矩陣乘法
with tf.Session() as sess:
    print(sess.run(result))
#[[ 11.]]

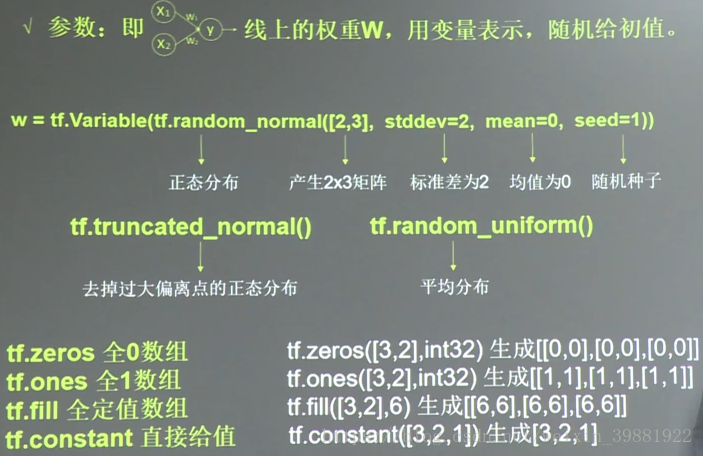

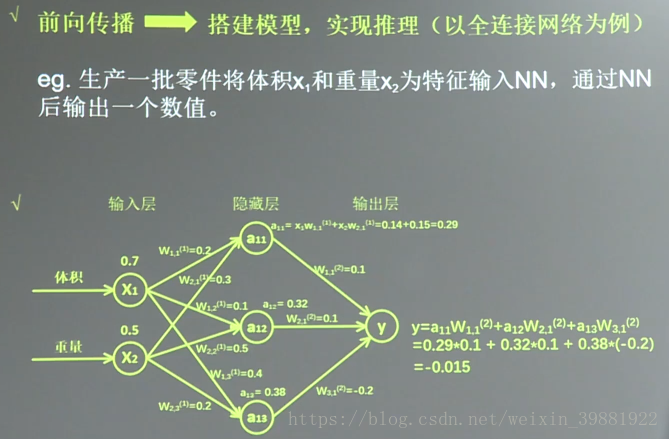
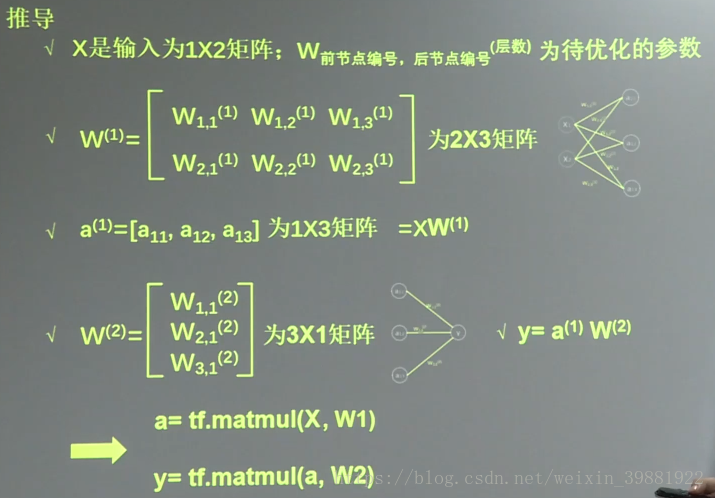
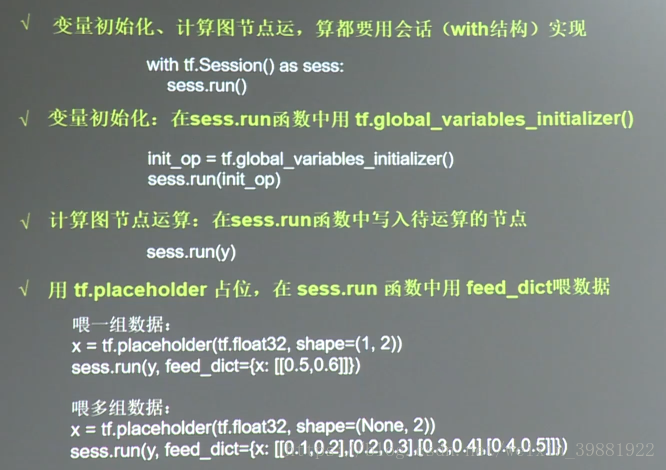
#前向傳播
import tensorflow as tf
#用placeholder實現輸入定義(sess.run中喂一組資料)
x=tf.placeholder(tf.float32,shape=(1,2))
w1=tf.Variable(tf.random_normal([2,3],stddev=1,seed=1))
w2=tf.Variable(tf.random_normal([3,1],stddev=1,seed=1))

#定義向前傳播的過程
a=tf.matmul(x,w1)
y=tf.matmul(a,w2)

#用會話計算結果
with tf.Session() as sess:
    init=tf.global_variables_initializer()
    sess.run(init)

    print('w1:\n', sess.run(w1))
    print('w2:\n', sess.run(w2))
    print('y:',sess.run(y,feed_dict={x:[[0.7,0.5]]}))

'''
w1:
 [[-0.81131822  1.48459876  0.06532937]
 [-2.4427042   0.0992484   0.59122431]]
w2:
 [[-0.81131822]
 [ 1.48459876]
 [ 0.06532937]]
y: [[ 3.0904665]]
'''
#向前傳播
import tensorflow as tf
x=tf.constant([[0.7,0.5]])
w1=tf.Variable(tf.random_normal([2,3],stddev=1,seed=1))
w2=tf.Variable(tf.random_normal([3,1],stddev=1,seed=1))

#定義向前傳播的過程
a=tf.matmul(x,w1)
y=tf.matmul(a,w2)

#用會話計算結果
with tf.Session() as sess:
    init=tf.global_variables_initializer()
    sess.run(init)

    print('w1:\n',sess.run(w1))
    print('w2:\n', sess.run(w2))

    print('a:\n', sess.run(a))
    print('y:\n',sess.run(y))

'''
w1:
 [[-0.81131822  1.48459876  0.06532937]
 [-2.4427042   0.0992484   0.59122431]]
w2:
 [[-0.81131822]
 [ 1.48459876]
 [ 0.06532937]]
a:
 [[-1.78927493  1.08884335  0.34134272]]
y:
 [[ 3.0904665]]
'''
import tensorflow as tf
import numpy as np
BATCH_SIZE=8
SEED=23455
#基於seed產生隨機數
rdm=np.random.RandomState(SEED)
#從X這個32行2列的矩陣中 取出一行 判斷如果和小於1 給Y賦值1 如果和不小於1 給Y賦值0
#作為輸入資料集的標籤(正確答案)
X=rdm.rand(32,2)
Y_=[[int((x0+x1)<1)] for (x0,x1) in X]
print ("X:\n",X)
print ("Y_:\n",Y_)
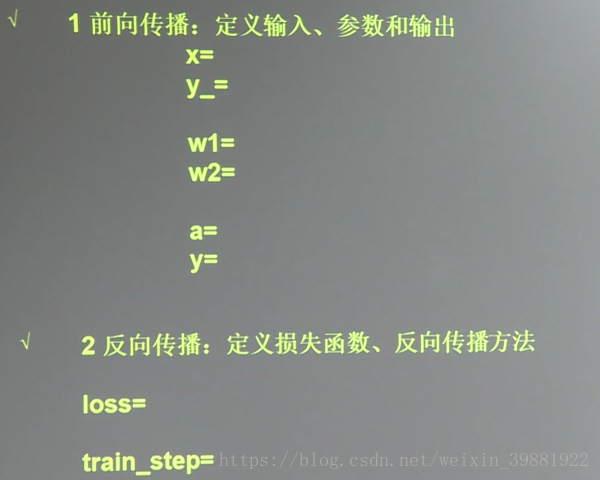
x=tf.placeholder(tf.float32,shape=(None,2))
y_=tf.placeholder(tf.float32,shape=(None,1))
w1=tf.Variable(tf.random_normal([2,3],stddev=1,seed=1))
w2=tf.Variable(tf.random_normal([3,1],stddev=1,seed=1))
a=tf.matmul(x,w1)
y=tf.matmul(a,w2)
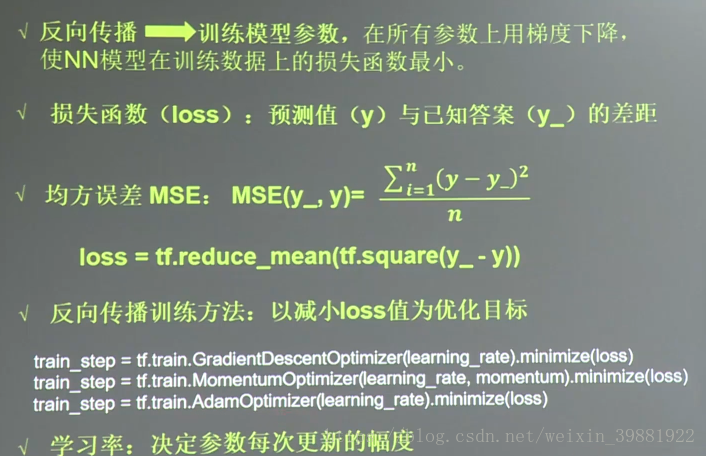
loss=tf.reduce_mean(tf.square(y_-y))
train_step=tf.train.AdamOptimizer(0.001).minimize(loss)
with tf.Session() as sess:
init=tf.global_variables_initializer()
sess.run(init)
print('w1:\n', sess.run(w1))
print('w2:\n', sess.run(w2))
#訓練模型
step=3000
for i in range(step):
start=(i*BATCH_SIZE)%32
end=start+BATCH_SIZE
sess.run(train_step,feed_dict={x:X[start:end],y_:Y_[start:end]})
if i%500==0:
total_loss=sess.run(loss,feed_dict={x:X,y_:Y_})
print("After %d training steps, loss_mse on all data is %g" % (i, total_loss))
print('w1:\n', sess.run(w1))
print('w2:\n', sess.run(w2))
'''
X:
[[ 0.83494319 0.11482951]
[ 0.66899751 0.46594987]
[ 0.60181666 0.58838408]
[ 0.31836656 0.20502072]
[ 0.87043944 0.02679395]
[ 0.41539811 0.43938369]
[ 0.68635684 0.24833404]
[ 0.97315228 0.68541849]
[ 0.03081617 0.89479913]
[ 0.24665715 0.28584862]
[ 0.31375667 0.47718349]
[ 0.56689254 0.77079148]
[ 0.7321604 0.35828963]
[ 0.15724842 0.94294584]
[ 0.34933722 0.84634483]
[ 0.50304053 0.81299619]
[ 0.23869886 0.9895604 ]
[ 0.4636501 0.32531094]
[ 0.36510487 0.97365522]
[ 0.73350238 0.83833013]
[ 0.61810158 0.12580353]
[ 0.59274817 0.18779828]
[ 0.87150299 0.34679501]
[ 0.25883219 0.50002932]
[ 0.75690948 0.83429824]
[ 0.29316649 0.05646578]
[ 0.10409134 0.88235166]
[ 0.06727785 0.57784761]
[ 0.38492705 0.48384792]
[ 0.69234428 0.19687348]
[ 0.42783492 0.73416985]
[ 0.09696069 0.04883936]]
Y_:
[[1], [0], [0], [1], [1], [1], [1], [0], [1], [1], [1], [0], [0], [0], [0], [0], [0], [1], [0], [0], [1], [1], [0], [1], [0], [1], [1], [1], [1], [1], [0], [1]]
w1:
[[-0.81131822 1.48459876 0.06532937]
[-2.4427042 0.0992484 0.59122431]]
w2:
[[-0.81131822]
[ 1.48459876]
[ 0.06532937]]
After 0 training steps, loss_mse on all data is 5.20999
After 500 training steps, loss_mse on all data is 0.617026
After 1000 training steps, loss_mse on all data is 0.392288
After 1500 training steps, loss_mse on all data is 0.386432
After 2000 training steps, loss_mse on all data is 0.384254
After 2500 training steps, loss_mse on all data is 0.383676
w1:
[[-0.40074909 1.02251101 1.00135291]
[-2.13084817 -0.23977895 1.12739885]]
w2:
[[-0.4457432 ]
[ 1.04927158]
[-0.5386759 ]]
'''

相關推薦
人工智慧實踐:Tensorflow筆記(一)
import tensorflow as tf a=tf.constant([1.0,2.0]) b=tf.constant([3.0,4.0]) result=a+b print(result) #Tensor("add:0", shape=(2,), dtype=floa
人工智慧實踐:Tensorflow筆記(完整版)
入門課程,比較基礎 第一講 帶著大家梳理人工智慧領域的基本概念:比如什麼是人工智慧、什麼機器學習、什麼是深度學習,他們的發展歷史是什麼,能用他們做什麼。課後,助教會帶領大家安裝Ubuntu系統、Python直譯器 和 Tensorflow環境,把同學們的電腦進行改造
中國大學MOOC-人工智慧實踐:Tensorflow筆記-課程筆記 Chapter5
學習課程時的個人筆記記錄。具體課程情況可以點選連結檢視。(這裡推一波中國大學MOOC,很好的學習平臺,質量高,種類全,想要學習的話很有用的)** 本篇是第五章的學習筆記,第四章的可以點選我閱讀. 前三章的可以點選我閱讀. Chapter 5 全連線網路基礎
人工智慧實踐:TensorFlow筆記學習(四)—— 神經網路優化
神經網路優化 大綱4.1 損失函式4.2 學習率4.3 滑動平均4.4 正則化4.5 神經網路搭建八股目標掌握神經網路優化方法4.1 損失函式神經元模型:用數學公式表示為:,f為啟用函式。神經網路是以神經元為基本單元構成的。啟用函式:引入非線性啟用因素,提高模型的表達力。常用
[ MOOC課程學習 ] 人工智慧實踐:Tensorflow筆記_CH7_2 Lenet-5程式碼講解
Lenet-5程式碼講解 Lenet 神經網路是 Yann LeCun 等人在 1998 年提出的,該神經網路充分考慮影象的相關性。 1. Lenet 神經網路結構為: 1.輸入為 32*32*1 的圖片大小,為單通道的輸入; 2.進行卷積,卷積核大
人工智慧實踐:TensorFlow筆記學習(七)—— 卷積神經網路基礎
大綱7.1 卷積神經網路7.2 lenet5程式碼講解目標掌握卷積神經網路的搭建方法7.1 卷積神經網路全連線 NN:每個神經元與前後相鄰層的每一個神經元都有連線關係,輸入是特徵,輸出為預測的結果。引數個數:(前層X後層+後層) 一張解析度僅僅是28x28的黑白影象,就有
人工智慧實踐:TensorFlow筆記學習(五)—— 全連線網路基礎
MNIST資料集輸出手寫數字識別準確率大綱5.1 MNIST資料集5.2 模組化搭建神經網路5.3 手寫數字識別準確率輸出目標利用MNIST資料集鞏固模組化搭建神經網路的八股,實踐前向傳播和反向傳播過程,編寫測試程式輸出手寫數字識別準確率。5.1 MNIST資料集MNIST資
[ MOOC課程學習 ] 人工智慧實踐:Tensorflow筆記_CH6_2 製作資料集
製作資料集 tfrecords 檔案: (1) tfrecords: 是一種二進位制檔案,可先將圖片和標籤製作成該格式的檔案。使用 tfrecords 進行資料讀取,會提高記憶體利用率。 (2) tf.train.Example: 用來儲存訓練資料。訓練
20180929 北京大學 人工智能實踐:Tensorflow筆記
智能 ima 16px class 技術 flow spa get ont 北京大學 人工智能實踐:Tensorflow筆記 https://www.bilibili.com/video/av22530538/?p=13
20180929 北京大學 人工智能實踐:Tensorflow筆記03
鏈接 mage 圖片 flow bubuko video image 人工 bsp 更改的程序部分如下: 另: 難?????????????見鏈接: https://www.bilibili.com/video/av22530
20180929 北京大學 人工智能實踐:Tensorflow筆記06
.com 分享 inf 智能 flow 人工智能 圖片 北京 技術分享 20180929 北京大學 人工智能實踐:Tensorflow筆記06
20180929 北京大學 人工智能實踐:Tensorflow筆記07
分享圖片 9.png nbsp 實踐 tensor src 17. http info (完)20180929 北京大學 人工智能實踐:Tensorflow筆記07
機器學習筆記(九):Tensorflow 實戰一 (Tensorflow入門)
1 - TsensorFlow計算模型 ——計算圖 1.1- 計算圖的概念 計算圖是TensorFlow中最基本的一個概念,TensorFlow中的所有計算都會被轉化為計算圖上的節點。 在TensorFlow中,張量可以簡單地理解為多為陣列。如果說TensorFlow的第一個詞T
人工智慧:Tensorflow筆記-Ubuntu入門基礎(1)
檢視當前路徑: pwd 查檔當前目錄下的內容: ls 在當前目錄下新建資料夾:mkdir python (意思是在當前目錄下新建名為python的資料夾) 進入某個目錄:cd 目錄名 ,例如:cd python,即進入了剛才新建
Tensorflow筆記一
ons 控制 ted 推斷 選擇 rect 類型 con 函數 Tensorlfow中的計算是通過一個有向圖directed graph或則計算圖computation graph來實現的。 將每一個運算操作operation作為一個節點node,節點之間通過邊edge
tf.nn.pool()使用例子:TensorFlow對一維資料進行池化
tf.nn.pool()使用例子: 在tensorflow中對一維訊號進行池化操作時使用,輸入資料的維度為三維[batch , in_width, in_channels]。 原文連結: https://www.dotnetperls.com/pool-tensorflow
Android直播入門實踐:動手搭建一套簡單的直播系統
轉載自:http://www.52im.net/thread-1154-1-1.html 1、前言 實時視訊直播是這兩年非常火的技術形態,已經滲透到教育、線上互娛等各種業務場景中。但要搭建一套實時視訊直播系統,並非易事,當然相關的直播技術理論在論壇的其它文章裡已經寫的非常詳細,本文不再展開。
演算法工程師修仙之路:TensorFlow(一)
TensorFlow 入門 TensorFlow 計算模型一一計算圖 計算圖的概念 計算圖是 TensorFlow 中最基本的一個概念, TensorFlow 中的所有計算都會被轉化為計算圖上的節點 。 Tensor 就是張量,在 TensorFlow
人工智慧實踐Tensorflow筆記:Tensorflow框架-3
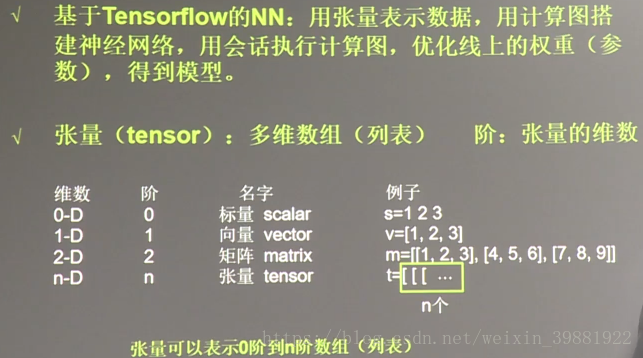
基於 Tensorflow 的 NN: 用張量表示資料,用計算圖搭建神經網路,用會話執行計算圖,優化線上的權重(引數),得到模型。 張量tensor: 張量就是多維陣列(列表),用“階”表示張量的維度。 0 階張量稱作 標量scalar 1 階張
人工智慧實踐Tensorflow筆記:人工智慧概述-1
一些基本概念 人工智慧:機器模擬人的意識和思維 機器學習: 是一種統計學方法,計算機利用已有資料,得出某種模型,再利用此模型預測結果 特點:隨經驗的增加,效果會變好 舉例: 決策樹模型 機器學習三要素:資料、演算法、算力 深度學習:深層次神經