Thrift入門及Java例項
一、概述
Thrift是一個軟體框架,用來進行可擴充套件且跨語言的服務的開發。它結合了功能強大的軟體堆疊和程式碼生成引擎,以構建在 C++, Java,
Python, PHP, Ruby, Erlang, Perl, Haskell, C#, Cocoa, JavaScript, Node.js, Smalltalk, and OCaml 等等程式語言間無縫結合的、高效的服務。
Thrift最初由facebook開發,07年四月開放原始碼,08年5月進入apache孵化器。thrift允許你定義一個簡單的定義檔案中的資料型別和服務介面。以作為輸入檔案,編譯器生成程式碼用來方便地生成RPC客戶端和伺服器通訊的無縫跨程式語言。【來自百度百科】
二、下載依賴(Maven)
1、在pom.xml 中新增如下內容:
<span style="white-space:pre">		</span><dependency>
			<groupId>org.apache.thrift</groupId>
			<artifactId>libthrift</artifactId>
			<version>0.9.3</version>
		</dependency>
		<dependency>
			<groupId>org.slf4j</groupId>
			<artifactId>slf4j-log4j12</artifactId>
			<version>1.7.12</version>
		</dependency>
三、基本概念以及實現步驟
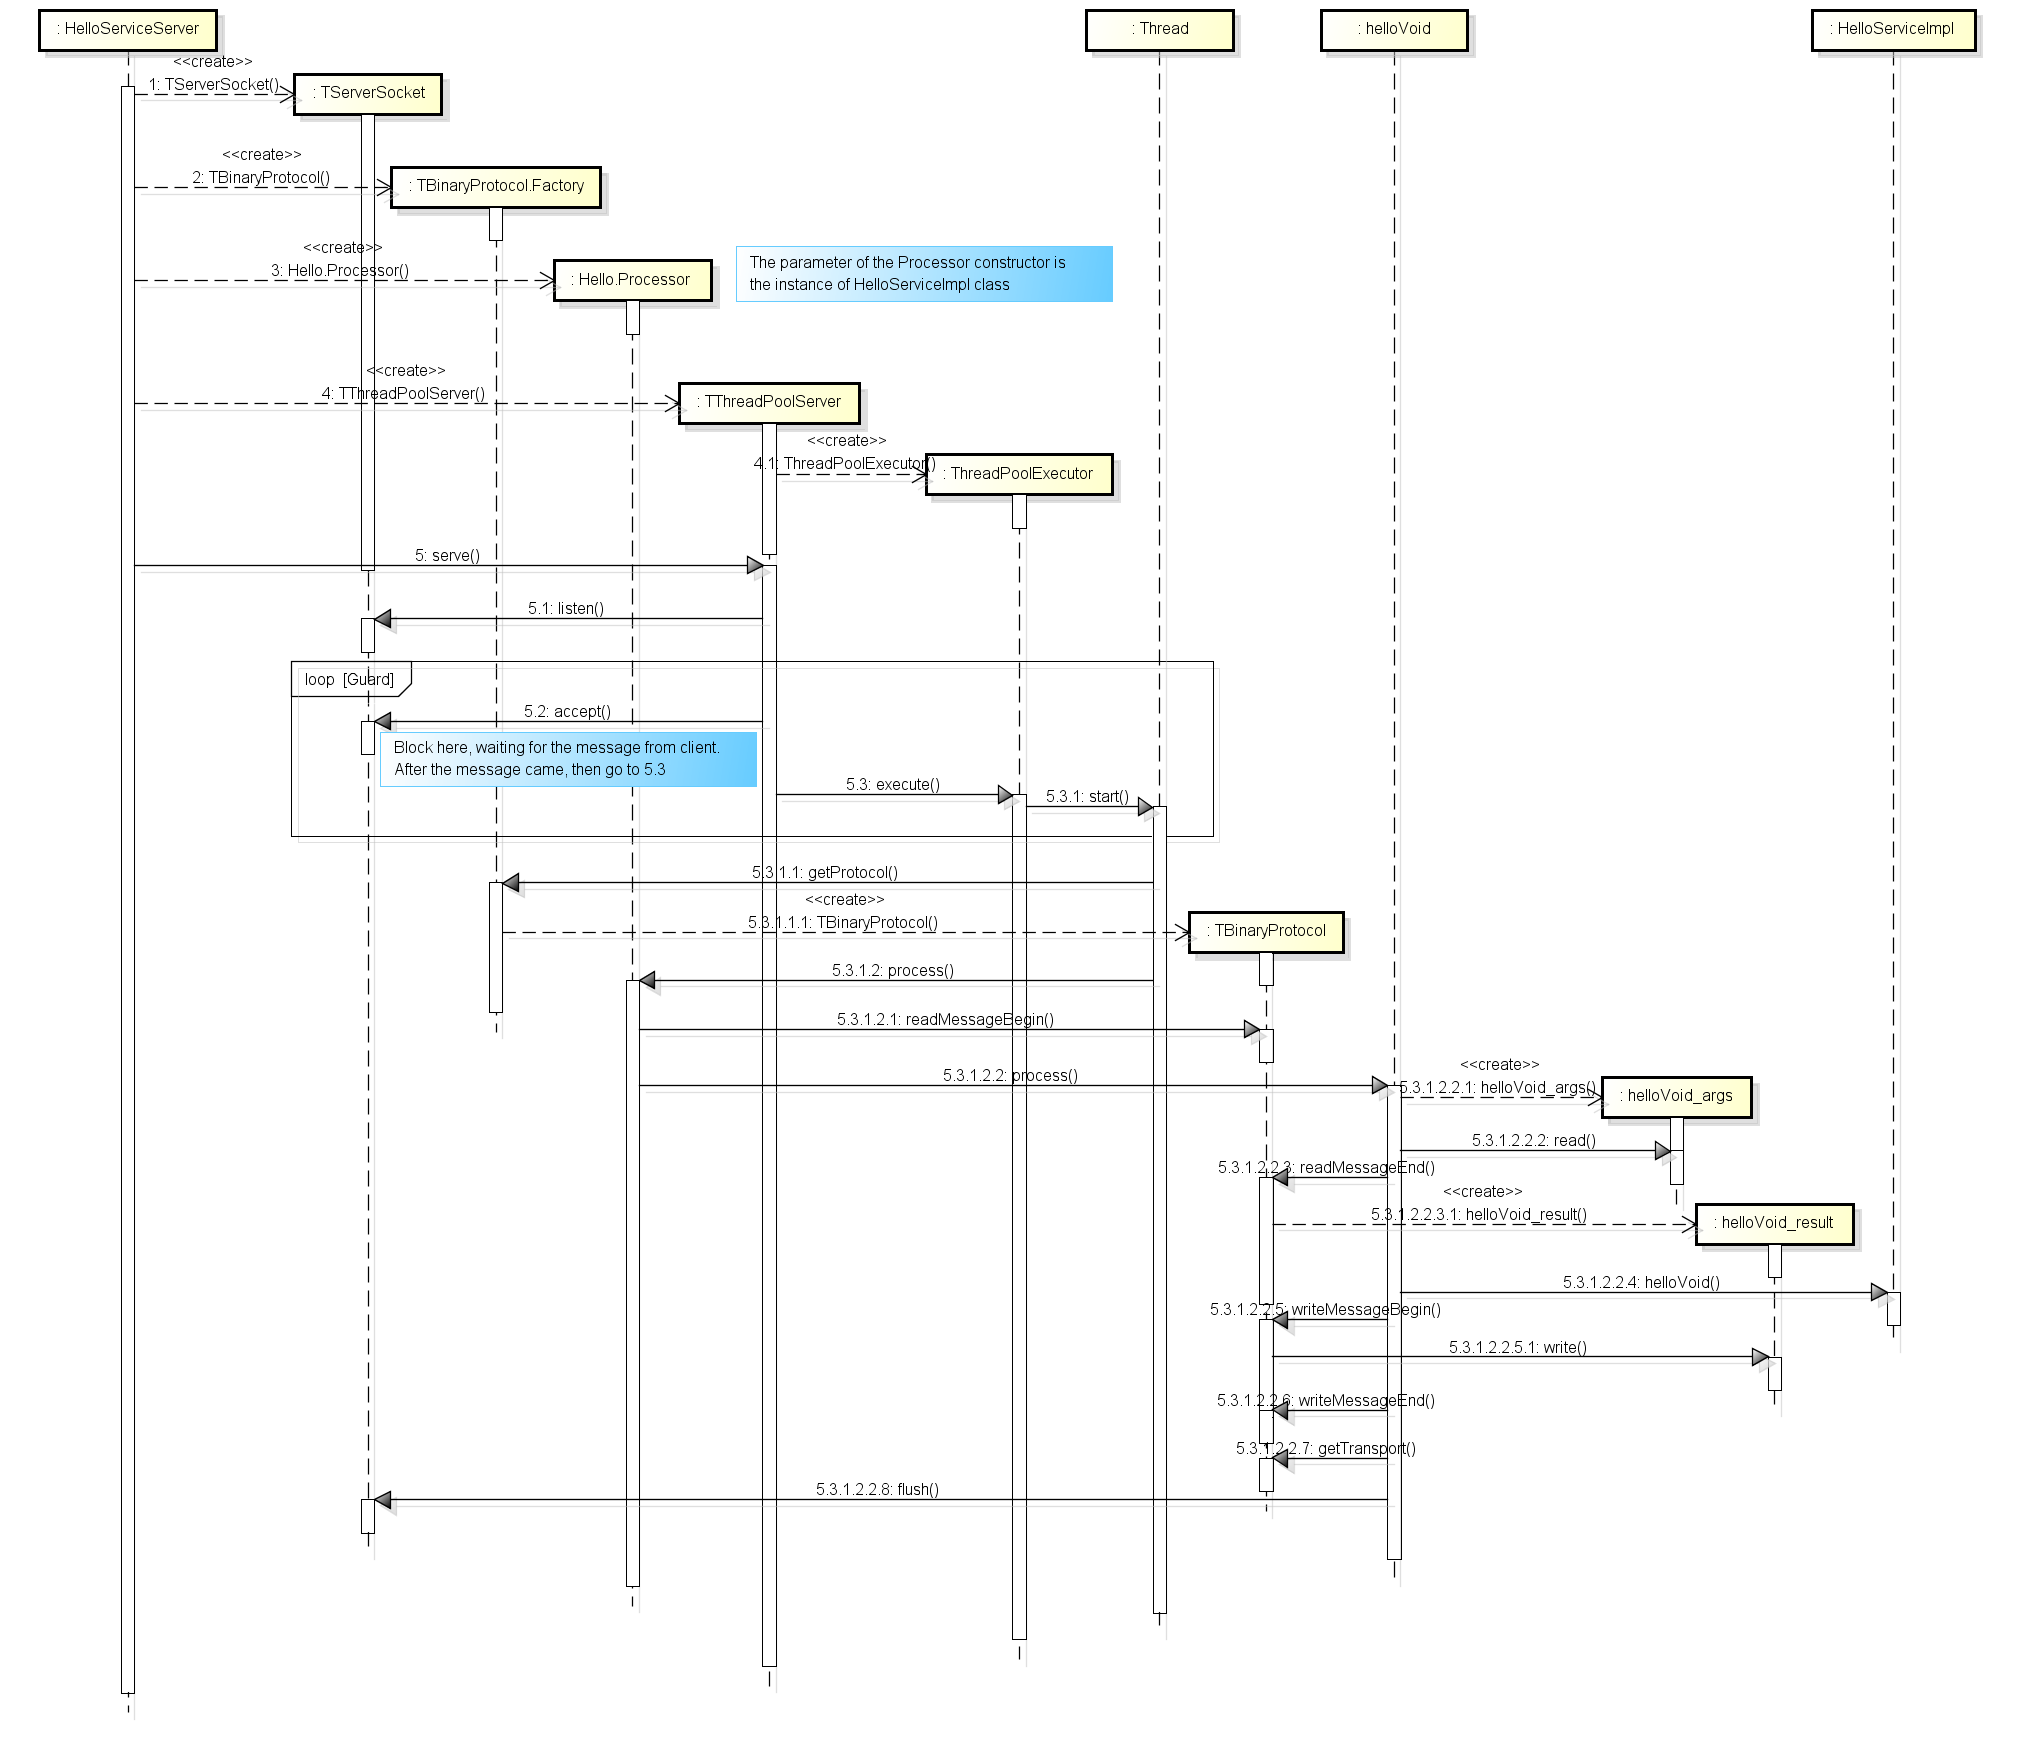
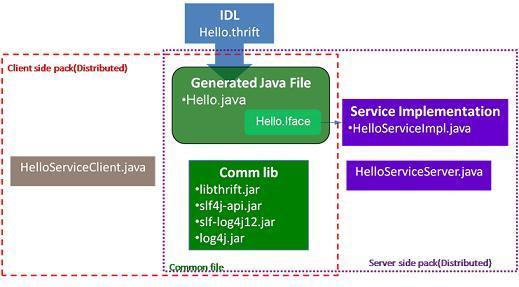
幾張圖片說明thrift整個流程:
架構圖:
服務端
客戶端
部署圖
注意:圖片來源網際網路
1、資料傳輸協議
TBinaryProtocol : 二進位制格式.
TCompactProtocol : 壓縮格式
TJSONProtocol : JSON格式
TSimpleJSONProtocol : 提供JSON只寫協議, 生成的檔案很容易通過指令碼語言解析注意:客戶端和服務端的協議要一致。
2、服務端
實現服務處理介面impl
建立TProcessor
建立TServerTransport
建立TProtocol
建立TServer
啟動Server
3、客戶端
建立Transport
建立TProtocol
基於TTransport和TProtocol建立 Client
呼叫Client的相應方法
四、例項
1、thrift檔案建立,並在檔案中定義需要的介面方法
namespace java com.jmust.thrift.demo

service  HelloWorldService {
  string sayHello(1:string username)
}
2、執行thrift-0.9.3.exe生成程式碼
thrift-0.9.3.exe -r -gen java ./demoHello.thrift<project xmlns="http://maven.apache.org/POM/4.0.0" xmlns:xsi="http://www.w3.org/2001/XMLSchema-instance"
xsi:schemaLocation="http://maven.apache.org/POM/4.0.0 http://maven.apache.org/xsd/maven-4.0.0.xsd">
<modelVersion>4.0.0</modelVersion>
<groupId>com.jmust.thrift</groupId>
<artifactId>thrift-service</artifactId>
<version>1.0.0</version>
<packaging>jar</packaging>
<name>thrift-service</name>
<url>http://maven.apache.org</url>
<properties>
<project.build.sourceEncoding>UTF-8</project.build.sourceEncoding>
</properties>
<dependencies>
<dependency>
<groupId>junit</groupId>
<artifactId>junit</artifactId>
<version>3.8.1</version>
<scope>test</scope>
</dependency>
<dependency>
<groupId>org.apache.thrift</groupId>
<artifactId>libthrift</artifactId>
<version>0.9.3</version>
</dependency>
<dependency>
<groupId>org.slf4j</groupId>
<artifactId>slf4j-log4j12</artifactId>
<version>1.7.12</version>
</dependency>
</dependencies>
<build>
<plugins>
<plugin>
<groupId>org.apache.maven.plugins</groupId>
<artifactId>maven-compiler-plugin</artifactId>
<version>2.3.2</version>
<configuration>
<source>1.7</source>
<target>1.7</target>
<encoding>${project.build.sourceEncoding}</encoding>
</configuration>
</plugin>
<plugin>
<groupId>org.apache.maven.plugins</groupId>
<artifactId>maven-resources-plugin</artifactId>
<version>2.4.3</version>
<executions>
<execution>
<phase>compile</phase>
</execution>
</executions>
<configuration>
<encoding>${project.build.sourceEncoding}</encoding>
</configuration>
</plugin>
<plugin>
<groupId>org.apache.maven.plugins</groupId>
<artifactId>maven-source-plugin</artifactId>
<version>2.4</version>
<executions>
<execution>
<phase>deploy</phase>
<goals>
<goal>jar</goal>
</goals>
</execution>
</executions>
</plugin>
<plugin>
<groupId>org.apache.maven.plugins</groupId>
<artifactId>maven-deploy-plugin</artifactId>
<version>2.8.2</version>
<configuration>
<skip>false</skip>
</configuration>
</plugin>
<plugin>
<groupId>org.apache.maven.plugins</groupId>
<artifactId>maven-javadoc-plugin</artifactId>
<version>2.10.3</version>
<configuration>
<aggregate>true</aggregate>
</configuration>
</plugin>
<plugin>
<groupId>org.apache.maven.plugins</groupId>
<artifactId>maven-surefire-plugin</artifactId>
<version>2.7.2</version>
<configuration>
<skip>false</skip>
</configuration>
</plugin>
<plugin>
<groupId>org.codehaus.mojo</groupId>
<artifactId>cobertura-maven-plugin</artifactId>
<version>2.7</version>
</plugin>
<plugin>
<groupId>org.apache.maven.plugins</groupId>
<artifactId>maven-jar-plugin</artifactId>
<version>2.3.1</version>
<configuration>
<archive>
<manifest>
<addClasspath>true</addClasspath>
<classpathPrefix>lib/</classpathPrefix>
</manifest>
<manifestEntries>
<Class-Path>.</Class-Path>
<Built-By>JMUST</Built-By>
<Bundle-ManifestVersion>2</Bundle-ManifestVersion>
<Bundle-Name>${project.groupId}.${project.ArtifactId}</Bundle-Name>
<Bundle-SymbolicName>${project.groupId}.${project.ArtifactId}</Bundle-SymbolicName>
<Bundle-Version>${project.version}</Bundle-Version>
<Bundle-Vendor>${project.groupId}</Bundle-Vendor>
<Export-Package>com.jmust.thrift.service;version=${project.version}
</Export-Package>
<Import-Package>
javax.annotation,org.slf4j,org.apache.thrift,org.apache.thrift.async,org.apache.thrift.scheme,org.apache.thrift.protocol,org.apache.thrift.server.AbstractNonblockingServer
</Import-Package>
</manifestEntries>
</archive>
</configuration>
</plugin>
</plugins>
</build>
</project>
4、再建立一個實現以上服務maven專案(thrift-demo),pom.xml檔案只需要引入
<span style="white-space:pre">		</span><dependency>
			<groupId>org.apache.thrift</groupId>
			<artifactId>libthrift</artifactId>
			<version>0.9.3</version>
		</dependency>
		<dependency>
			<groupId>org.slf4j</groupId>
			<artifactId>slf4j-log4j12</artifactId>
			<version>1.7.12</version>
		</dependency>
		<dependency>
			<groupId>com.jmust.thrift</groupId>
			<artifactId>thrift-service</artifactId>
			<version>1.0.0</version>
		</dependency>
4.1、實現介面Iface
package com.jmust.thrift.impl;

import org.apache.thrift.TException;

import com.jmust.thrift.service.HelloWorldService.Iface;

/**
 *
 * @author LK
 *
 */
public class HelloWorldImpl implements Iface
{

	public HelloWorldImpl(){

	}

	public String sayHello(String username) throws TException {
		return "Hi," + username + " welcome to my blog www.jmust.com";
	}

}
5、根據協議去實現服務端
5.1、TSimpleServer服務端-----簡單的單執行緒服務模型,一般用於測試
package com.jmust.thrift.demo;


import org.apache.thrift.TProcessor;
import org.apache.thrift.protocol.TBinaryProtocol;
import org.apache.thrift.server.TServer;
import org.apache.thrift.server.TServer.Args;
import org.apache.thrift.server.TSimpleServer;
import org.apache.thrift.transport.TServerSocket;

import com.jmust.thrift.impl.HelloWorldImpl;
import com.jmust.thrift.service.HelloWorldService.Iface;
import com.jmust.thrift.service.HelloWorldService.Processor;

/**
 * 單執行緒服務模型,一般用於測試  TSimpleServer服務端
 * @author LK
 *
 */
public class HelloTSimpleServerDemo {

	public static final int SERVER_PORT = 8090;

	public void startServer() {
		try {
			System.out.println("HelloWorld TSimpleServer start ....");

			TProcessor tprocessor = new Processor<Iface>(
					new HelloWorldImpl());
			// 簡單的單執行緒服務模型,一般用於測試
			TServerSocket serverTransport = new TServerSocket(SERVER_PORT);
			Args tArgs = new Args(serverTransport);
			tArgs.processor(tprocessor);
			tArgs.protocolFactory(new TBinaryProtocol.Factory());
			TServer server = new TSimpleServer(tArgs);
			server.serve();

		} catch (Exception e) {
			System.out.println("Server start error!!!");
			e.printStackTrace();
		}
	}

	/**
	 * @param args
	 */
	public static void main(String[] args) {
		HelloTSimpleServerDemo server = new HelloTSimpleServerDemo();
		server.startServer();
	}
}
5.2、TThreadPoolServer 服務模型 ------執行緒池服務模型,使用標準的阻塞式IO,預先建立一組執行緒處理請求
package com.jmust.thrift.demo;


import org.apache.thrift.TProcessor;
import org.apache.thrift.protocol.TBinaryProtocol;
import org.apache.thrift.server.TServer;
import org.apache.thrift.server.TThreadPoolServer;
import org.apache.thrift.server.TThreadPoolServer.Args;
import org.apache.thrift.transport.TServerSocket;

import com.jmust.thrift.impl.HelloWorldImpl;
import com.jmust.thrift.service.HelloWorldService.Iface;
import com.jmust.thrift.service.HelloWorldService.Processor;

/**
 * 執行緒池服務模型,使用標準的阻塞式IO,預先建立一組執行緒處理請求    TThreadPoolServer 服務模型
 * @author LK
 *
 */
public class HelloTThreadPoolServerDemo {

	public static final int SERVER_PORT = 8090;

	public void startServer() {
		try {
			System.out.println("HelloWorld TThreadPoolServer start ....");

			TProcessor tprocessor = new Processor<Iface>(
					new HelloWorldImpl());
			TServerSocket serverTransport = new TServerSocket(SERVER_PORT);
			//TThreadPoolServer 執行緒池服務模型
			Args ttpsArgs = new Args(
					 serverTransport);
			ttpsArgs.processor(tprocessor);
			ttpsArgs.protocolFactory(new TBinaryProtocol.Factory());
			//執行緒池服務模型,使用標準的阻塞式IO,預先建立一組執行緒處理請求。
			TServer server = new TThreadPoolServer(ttpsArgs);
			server.serve();
		} catch (Exception e) {
			System.out.println("Server start error!!!");
			e.printStackTrace();
		}
	}

	/**
	 * @param args
	 */
	public static void main(String[] args) {
		HelloTThreadPoolServerDemo server = new HelloTThreadPoolServerDemo();
		server.startServer();
	}
}
5.3、TNonblockingServer 服務模型 -------使用非阻塞式IO,服務端和客戶端需要指定 TFramedTransport 資料傳輸的方式
package com.jmust.thrift.demo;


import org.apache.thrift.TProcessor;
import org.apache.thrift.protocol.TCompactProtocol;
import org.apache.thrift.server.TNonblockingServer;
import org.apache.thrift.server.TNonblockingServer.Args;
import org.apache.thrift.server.TServer;
import org.apache.thrift.transport.TFramedTransport;
import org.apache.thrift.transport.TNonblockingServerSocket;

import com.jmust.thrift.impl.HelloWorldImpl;
import com.jmust.thrift.service.HelloWorldService.Iface;
import com.jmust.thrift.service.HelloWorldService.Processor;

/**
 * 使用非阻塞式IO,服務端和客戶端需要指定 TFramedTransport 資料傳輸的方式    TNonblockingServer 服務模型
 * @author LK
 *
 */
public class HelloTNonblockingServerDemo {

	public static final int SERVER_PORT = 8090;
	public void startServer() {
		try {
			System.out.println("HelloWorld TNonblockingServer start ....");

			TProcessor tprocessor = new Processor<Iface>(
					new HelloWorldImpl());
			TNonblockingServerSocket tnbSocketTransport = new TNonblockingServerSocket(SERVER_PORT);
			Args tnbArgs = new Args(tnbSocketTransport);
			tnbArgs.processor(tprocessor);
			tnbArgs.transportFactory(new TFramedTransport.Factory());
			tnbArgs.protocolFactory(new TCompactProtocol.Factory());
			TServer server = new TNonblockingServer(tnbArgs);
			server.serve();

		} catch (Exception e) {
			System.out.println("Server start error!!!");
			e.printStackTrace();
		}
	}

	/**
	 * @param args
	 */
	public static void main(String[] args) {
		HelloTNonblockingServerDemo server = new HelloTNonblockingServerDemo();
		server.startServer();
	}
}
5.4、THsHaServer服務模型 -------半同步半非同步的服務端模型,需要指定為: TFramedTransport 資料傳輸的方式
package com.jmust.thrift.demo;


import org.apache.thrift.TProcessor;
import org.apache.thrift.protocol.TBinaryProtocol;
import org.apache.thrift.server.THsHaServer;
import org.apache.thrift.server.THsHaServer.Args;
import org.apache.thrift.server.TServer;
import org.apache.thrift.transport.TFramedTransport;
import org.apache.thrift.transport.TNonblockingServerSocket;

import com.jmust.thrift.impl.HelloWorldImpl;
import com.jmust.thrift.service.HelloWorldService.Iface;
import com.jmust.thrift.service.HelloWorldService.Processor;

/**
 * 半同步半非同步的服務端模型,需要指定為: TFramedTransport 資料傳輸的方式  THsHaServer服務模型
 * @author LK
 *
 */
public class HelloTHsHaServerDemo {

	public static final int SERVER_PORT = 8090;
	public void startServer() {
		try {
			System.out.println("HelloWorld THsHaServer start ....");

			TProcessor tprocessor = new Processor<Iface>(
					new HelloWorldImpl());
			TNonblockingServerSocket tnbSocketTransport = new TNonblockingServerSocket(SERVER_PORT);
			Args args = new Args(tnbSocketTransport);
			args.processor(tprocessor);
			args.transportFactory(new TFramedTransport.Factory());
			args.protocolFactory(new TBinaryProtocol.Factory());
			TServer server = new THsHaServer(args);
			server.serve();

		} catch (Exception e) {
			System.out.println("Server start error!!!");
			e.printStackTrace();
		}
	}

	/**
	 * @param args
	 */
	public static void main(String[] args) {
		HelloTHsHaServerDemo server = new HelloTHsHaServerDemo();
		server.startServer();
	}
}
6、客戶端實現
6.1、同步
package com.jmust.thrift.demo;

import org.apache.thrift.TException;
import org.apache.thrift.protocol.TBinaryProtocol;
import org.apache.thrift.protocol.TProtocol;
import org.apache.thrift.transport.TFramedTransport;
import org.apache.thrift.transport.TSocket;
import org.apache.thrift.transport.TTransport;
import org.apache.thrift.transport.TTransportException;

import com.jmust.thrift.service.HelloWorldService.Client;

/**
 *
 * @author LK
 *
 */
public class HelloClientDemo {
	public static final String SERVER_IP = "localhost";
	public static final int SERVER_PORT = 8090;
	public static final int TIMEOUT = 30000;

	/**
	 *
	 * @param userName
	 */
	public void startClient(String userName) {
		TTransport transport = null;
		try {
			//transport = new TSocket(SERVER_IP, SERVER_PORT, TIMEOUT);
			transport = new TFramedTransport(new TSocket(SERVER_IP, SERVER_PORT, TIMEOUT));
			// 協議要和服務端一致
			TProtocol protocol = new TBinaryProtocol(transport);
			//TProtocol protocol = new TCompactProtocol(transport);
			// TProtocol protocol = new TJSONProtocol(transport);
			Client client = new Client(protocol);
			transport.open();
			String result = client.sayHello(userName);
			System.out.println("Thrify client result =: " + result);
		} catch (TTransportException e) {
			e.printStackTrace();
		} catch (TException e) {
			e.printStackTrace();
		} finally {
			if (null != transport) {
				transport.close();
			}
		}
	}

	/**
	 * @param args
	 */
	public static void main(String[] args) {
		HelloClientDemo client = new HelloClientDemo();
		client.startClient("lvk");

	}
}
6.2、非同步
package com.jmust.thrift.demo;

import java.util.concurrent.CountDownLatch;
import java.util.concurrent.TimeUnit;

import org.apache.thrift.TException;
import org.apache.thrift.async.AsyncMethodCallback;
import org.apache.thrift.async.TAsyncClientManager;
import org.apache.thrift.protocol.TCompactProtocol;
import org.apache.thrift.protocol.TProtocolFactory;
import org.apache.thrift.transport.TNonblockingSocket;
import org.apache.thrift.transport.TNonblockingTransport;

import com.jmust.thrift.service.HelloWorldService.AsyncClient;
import com.jmust.thrift.service.HelloWorldService.AsyncClient.sayHello_call;

/**
 * 非同步客戶端
 * @author LK
 *
 */
public class HelloAsynClientDemo {
	public static final String SERVER_IP = "localhost";
	public static final int SERVER_PORT = 8090;
	public static final int TIMEOUT = 30000;

	/**
	 *
	 * @param userName
	 */
	public void startClient(String userName) {
		try {
			TAsyncClientManager clientManager = new TAsyncClientManager();
			TNonblockingTransport transport = new TNonblockingSocket(SERVER_IP, SERVER_PORT, TIMEOUT);
			TProtocolFactory tprotocol = new TCompactProtocol.Factory();
			AsyncClient asyncClient = new AsyncClient(tprotocol, clientManager, transport);
			System.out.println("Client start .....");

			CountDownLatch latch = new CountDownLatch(1);
			AsynCallback callBack = new AsynCallback(latch);
			System.out.println("call method sayHello start ...");
			asyncClient.sayHello(userName, callBack);
			System.out.println("call method sayHello .... end");
			boolean wait = latch.await(30, TimeUnit.SECONDS);
			System.out.println("latch.await =:" + wait);

		} catch (Exception e) {
			e.printStackTrace();
		}
		System.out.println("startClient end.");
	}

	public class AsynCallback implements AsyncMethodCallback<sayHello_call>{
		private CountDownLatch latch;

		public AsynCallback(CountDownLatch latch) {
			this.latch = latch;
		}
		public void onComplete(sayHello_call response) {
			System.out.println("onComplete");
			try {
				// Thread.sleep(1000L * 1);
				System.out.println("AsynCall result =:"
						+ response.getResult().toString());
			} catch (TException e) {
				e.printStackTrace();
			} catch (Exception e) {
				e.printStackTrace();
			} finally {
				latch.countDown();
			}
		}
		public void onError(Exception exception) {
			System.out.println("onError :" + exception.getMessage());
			latch.countDown();
		}
	}
	/**
	 * @param args
	 */
	public static void main(String[] args) {
		HelloAsynClientDemo client = new HelloAsynClientDemo();
		client.startClient("lvk");
	}
}
7.、測試步驟
先執行服務端,讓後再執行客戶端,看看是否輸出預計結果。
完畢!
相關推薦
Thrift入門及Java例項
一、概述 Thrift是一個軟體框架,用來進行可擴充套件且跨語言的服務的開發。它結合了功能強大的軟體堆疊和程式碼生成引擎,以構建在 C++, Java, Python, PHP, Ruby, Erlang, Perl, Haskell, C#, Cocoa, JavaSc
Thrift入門初探--thrift安裝及java入門例項
公司的一些平臺服務框架底層封裝了thrift提供服務,最近專案不是很緊,於是研究了一下,剛剛入門,理解得不深,寫這篇博文來整理一下思路. 什麼是thrift? 簡單來說,是Facebook公佈的一款開源跨語言的RPC框架. 那麼問題來了. 什麼是RPC框架?
Thrift——入門Demo(Java)
概述 Thrift最初由Facebook研發,主要用於各個服務之間的RPC通訊。 Thrift是一個典型的CS(客戶端/服務端)結構,客戶端和服務端可以使用不同的語言開發。 那麼它是如何實現使用不同的語言開發呢?答案:用一種中間語言來關聯客戶端和服務端
[Thrift]Apache Thrift入門Java例項
1. 概述 Apache Thrift 是 Facebook 實現的一種高效的、支援多種程式語言的遠端服務呼叫的框架。本文將從 Java 開發人員角度詳細介紹 Apache Thrift 的架構、開發和部署,並且針對不同的傳輸協議和服務型別給出相應的 Java 例項,同
Java例項 Part5:面向物件入門
目錄 Part5:面向物件入門 Example01:成員變數的初始化值 Example02:單例模式的應用 -----懶漢式 -----餓漢式 Example03:漢諾塔問題的求解 Example04:兩隻完全相同的寵
少走彎路,JAVA入門及學習路線,給程式設計師的建議
今天LZ是打算來點乾貨,因此咱們就不說一些學習方法和技巧了,直接來談每個階段要學習的內容甚至是一些書籍。這一部分的內容,同樣適用於一些希望轉行到Java的同學。 在大家看之前,LZ要先宣告兩點。 1、由於LZ本人是Java後端開發出身,因此所推薦的學習內容是Java Web和Java後端開發的路
分散式、微服務架構Spring Boot入門及例項介紹
spring boot入門 -- 介紹和第一個例子 “越來越多的企業選擇使用spring boot 開發系統,spring boot牛在什麼地方?難不難學?心動不如行動,讓我們一起開始學習吧!” 使用Spring boot ,可以輕鬆的建立獨立執行的程式,非常容易構建獨立的服務元件,是實現
[Hadoop 2] 常用 Java API 及應用例項
1 開啟 Eclipse,開始建立專案,選擇頂部選單 File->New->Java Project,建立名為 HadoopTest 專案,如下圖: 2 為專案載入所需要的 jar 包。 如何獲取 jar 包: Java API 所在的 jar 包都在已經
scrapy簡單入門及例項講解(一)
初識Scrapy Scrapy是一個用於Web網站抓取的應用框架,輸出的結構化資料可以廣泛用於各類程式,比如:資料探勘、資料處理、資料存檔等 儘管Scrapy是為Web抓取設計的,但也可以用於從API中提取資料 通過一個例項認識spider 為了快速認識S
Java入門系列:例項講解ArrayList用法
1.ArrayList建構函式 ArrayList類支援3個構造方法。 Arraylist() 這個構造方法構造了一個空的連結串列。 ArrayList(Collection<? extends E> c) 這個構造方法構造了一個包含指定元素集合的連結串列,
Scrapy簡單入門及例項講解
Scrapy是一個為了爬取網站資料,提取結構性資料而編寫的應用框架。 其可以應用在資料探勘,資訊處理或儲存歷史資料等一系列的程式中。其最初是為了頁面抓取 (更確切來說, 網路抓取 )所設計的, 也可以應用在獲取API所返回的資料(例如 Amazon Associa
Java學習筆記:前言(Java入門及推薦一本Java教材)
Java入門及推薦一本Java教材 開始學習Java了,學習了一陣子,但只是看書、除錯程式,沒有留下什麼記錄。恰好我也有朋友要學Java。索性我就把Java學習過程中,技術方面的經歷寫出來。方便朋友和大家參考。這些文章不會是固定的。即使以前的文章,如果發現有
Java多型性理解,好處及精典例項
核心:1、多型就是指程式中定義的引用變數所指向的具體型別和通過該引用變數發出的方法呼叫在編譯時並不確定,而是在程式執行期間才確定,即一個引用變數倒底會指向哪個類的例項物件,該引用變數發出的方法呼叫到底是哪個類中實現的方法,必須在由程式執行期間才能決定。因為在程式執行時才確定具
Java反射及使用例項
反射的概述 JAVA反射機制是在執行狀態中,對於任意一個類,都能夠知道這個類的所有屬性和方法;對於任意一個物件,都能夠呼叫它的任意一個方法和屬性;這種動態獲取的資訊以及動態呼叫物件的方法的功能稱為ja
RabbitMQ訊息佇列入門篇(環境配置+Java例項+基礎概念)
一、訊息佇列使用場景或者其好處 訊息佇列一般是在專案中,將一些無需即時返回且耗時的操作提取出來,進行了非同步處理,而這種非同步處理的方式大大的節省了伺服器的請求響應時間,從而提高了系統的吞吐量。 在專案啟動之初來預測將來專案會碰到什麼需求,是極其困難的。訊息
Python爬蟲的簡單入門及實用的例項(1)
一.PYthon爬蟲的介紹及應用 利用爬蟲可以進行資料探勘,比如可以爬取別人的網頁,收集有用的資料進行整合和劃分,簡單的就是用程式爬取網頁上的所有圖片並儲存在自己新建的資料夾內,還有可以爬社交網站的自拍圖,將幾十萬張的圖片合在一起,就知道大眾的模樣。也可以將爬取的
Java集合-08HashMap原始碼解析及使用例項
HashMap 簡介 HahMap是基於hash表的Map介面實現。該實現提供所有可選的對映操作,且允許key和value為null。同時 它不是執行緒安全以及不能保證有序。初始容量(initial capacity)和載入因子(initial capacity)是影響 HashMap的兩個因素。容量
Java技術_每天掌握一種設計模式(002)_使用場景及簡單例項(建立型:單例模式)
1.模式描述 一個類有且僅有一個例項,並且自行例項化並向整個系統提供。 2.模式作用 保證某個類在系統中只有一個例項物件,對於特殊需求來說非常必要。 限制了例項個數有利於GC的回收。
Java技術_每天掌握一種設計模式(006)_使用場景及簡單例項(建立型:原型模式)
1.模式描述 用原型例項指定建立物件的種類,並且通過拷貝來建立新的物件。 2.模式作用 可以一定程度上解耦,消費者和物件的構造過程隔離開,物件如何構造與消費者完全無關。 可以一定程度提升效率,複雜物件的構造往往需要較長的時間(中間可能會進行復雜運算或者資料庫
Scrapy簡單入門及例項講解與安裝
Scrapy是一個為了爬取網站資料,提取結構性資料而編寫的應用框架。 其可以應用在資料探勘,資訊處理或儲存歷史資料等一系列的程式中。其最初是為了頁面抓取 (更確切來說, 網路抓取 )所設計的, 也可以應用在獲取API所返回的資料(例如 Amazon Associate


