tensorflow實現影象識別
學完了ng深度學習第四課,複習一遍程式碼。
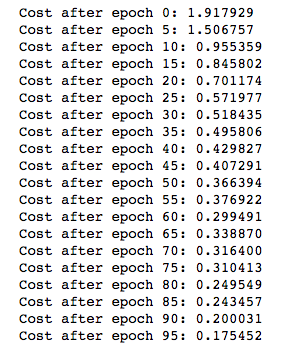
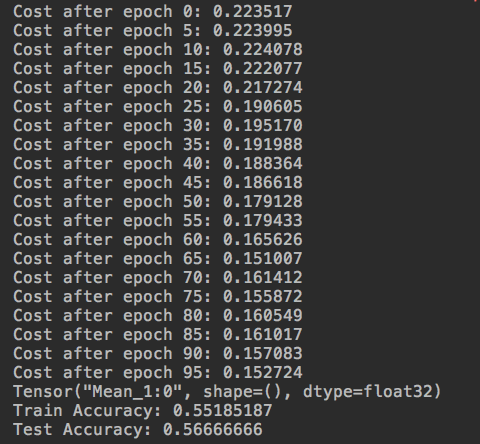
今天寫第一週的作業---用tensorflow框架訓練深層網路實現影象識別,程式碼寫完後問題出來啦(問題已找出,用紅色字型標出)
ng的準確率:
我的準確率:
代價函式的初始值以及訓練過程中的變化情況也很不一樣,檢查了程式碼是一樣的。應該還是哪部分的程式碼出了問題,之前寫別的程式碼也出現過類似的情況,當時是因為w的初始化公式不一樣造成的。這裡是什麼問題暫時沒檢查出來,先放在這裡。
import math
import numpy as np
import h5py
import matplotlib.pyplot as plt
import tensorflow as tf

def load_dataset():
    train_dataset = h5py.File('datasets/train_signs.h5', "r")
    train_set_x_orig = np.array(train_dataset["train_set_x"][:])  # your train set features
    train_set_y_orig = np.array(train_dataset["train_set_y"][:])  # your train set labels

    test_dataset = h5py.File('datasets/test_signs.h5', "r")
    test_set_x_orig = np.array(test_dataset["test_set_x"][:])  # your test set features
    test_set_y_orig = np.array(test_dataset["test_set_y"][:])  # your test set labels

    classes = np.array(test_dataset["list_classes"][:])  # the list of classes

    train_set_y_orig = train_set_y_orig.reshape((1, train_set_y_orig.shape[0]))
    test_set_y_orig = test_set_y_orig.reshape((1, test_set_y_orig.shape[0]))

    return train_set_x_orig, train_set_y_orig, test_set_x_orig, test_set_y_orig, classes

# create a list of random mini  batches from (X,Y)
def random_mini_batches(X,Y,mini_batch_size = 64):
    # X---(m,Hi,Wi,Ci)
    # Y---(m,n_y) value 0 or 1
    m = X.shape[0]
    mini_batches = []

    # step 1: shuffle (X,Y)
    permutation = list(np.random.permutation(m))
    shuffled_X = X[permutation, :, :, :]
    shuffled_Y = Y[permutation, :]

    # step 2: partition (shuffled_X,shuffled_Y).minus the end case.
    num_complete_minibatchs = math.floor(m/mini_batch_size)

    for k in range(0, num_complete_minibatchs):
        mini_batch_X = shuffled_X[k*mini_batch_size:k*mini_batch_size+mini_batch_size, :, :, :]
        mini_batch_Y = shuffled_Y[k*mini_batch_size:k*mini_batch_size+mini_batch_size, :]

        mini_batch = (mini_batch_X, mini_batch_Y)
        mini_batches.append(mini_batch)
#(原來是這裡的縮排失誤,按這種寫法,只用了訓練集的一部分資料,得出的結果對訓練集和測試集的準確率當然就很差了。)
        # handling the end case (last mini_batch <mini_batch_size)
        if m % mini_batch_size != 0:
            mini_batch_X = shuffled_X[num_complete_minibatchs*mini_batch_size:m, :, :, :]
            mini_batch_Y = shuffled_Y[num_complete_minibatchs*mini_batch_size:m, :]
            mini_batch = (mini_batch_X, mini_batch_Y)
            mini_batches.append(mini_batch)

        return mini_batches

# 定義onehot陣列
def convert_to_one_hot(Y, C):
    #先將Y轉換成一行數,再將陣列中指定位置的數置為1
    Y = np.eye(C)[Y.reshape(-1)].T
    return Y


X_train_orig, Y_train_orig, X_test_orig, Y_test_orig, classes = load_dataset()

X_train = X_train_orig/255.
X_test = X_test_orig/255.
Y_train = convert_to_one_hot(Y_train_orig, 6).T
Y_test = convert_to_one_hot(Y_test_orig, 6).T


def create_placeholders(n_H0, n_W0, n_C0, n_y):
    # Creates the placeholders for the tensorflow session
    X = tf.placeholder(tf.float32, shape=[None, n_H0, n_W0, n_C0])
    Y = tf.placeholder(tf.float32, shape=[None, n_y])

    return X, Y


def initialize_parameters():
    W1 = tf.get_variable("W1", shape=[4, 4, 3, 8], initializer=tf.contrib.layers.xavier_initializer(seed=0))
    W2 = tf.get_variable("W2", shape=[2, 2, 8, 16], initializer=tf.contrib.layers.xavier_initializer(seed=0))

    parameters = {"W1": W1, "W2": W2}

    return parameters

# Implements the forward propagation for the model:
# CONV2D -> RELU -> MAXPOOL -> CONV2D -> RELU -> MAXPOOL -> FLATTEN -> FULLYCONNECTED
def forward_propagation(X,parameters):

    W1 = parameters['W1']
    W2 = parameters['W2']

    # CONV2D: stride of 1, padding 'SAME'
    Z1 = tf.nn.conv2d(X, W1, strides=[1, 1, 1, 1], padding='SAME')
    # RELU
    A1 = tf.nn.relu(Z1)
    # MAXPOOL: window 8x8, sride 8, padding 'SAME'
    P1 = tf.nn.max_pool(A1, ksize=[1, 8, 8, 1], strides=[1, 8, 8, 1], padding='SAME')
    # CONV2D: filters W2, stride 1, padding 'SAME'
    Z2 = tf.nn.conv2d(P1, W2, strides=[1, 1, 1, 1], padding='SAME')
    # RELU
    A2 = tf.nn.relu(Z2)
    # MAXPOOL: window 4x4, stride 4, padding 'SAME'
    P2 = tf.nn.max_pool(A2, ksize=[1, 4, 4, 1], strides=[1, 4, 4, 1], padding='SAME')
    # FLATTEN
    P2 = tf.contrib.layers.flatten(P2)
    # FULLY-CONNECTED without non-linear activation function (not not call softmax).
    # 6 neurons in output layer. Hint: one of the arguments should be "activation_fn=None"
    Z3 = tf.contrib.layers.fully_connected(P2, num_outputs=6, activation_fn=None)

    return Z3


def compute_cost(Z3, Y):

    cost = tf.reduce_mean(tf.nn.softmax_cross_entropy_with_logits(logits=Z3, labels=Y))

    return cost


def model(X_train, Y_train, X_test, Y_test, learning_rate=0.009, num_epochs=100, minibatch_size=64, print_cost=True):
    # Implements a three-layer ConvNet in Tensorflow:
    # CONV2D -> RELU -> MAXPOOL -> CONV2D -> RELU -> MAXPOOL -> FLATTEN -> FULLYCONNECTED
    # X_train - - training set, of shape(None, 64, 64, 3)
    # Y_train - - test set, of shape(None, n_y=6)
    # X_test - - training set, of shape(None, 64, 64, 3)
    # Y_test - - test set, of shape(None, n_y=6)

    (m, n_H0, n_W0, n_C0) = X_train.shape
    n_y = Y_train.shape[1]
    costs = []

    # Create placeholders of the correct shape
    X, Y = create_placeholders(n_H0, n_W0, n_C0, n_y)

    # initialize parameters
    parameters = initialize_parameters()

    # forward propagation : build the forward propagation in the tensorflow graph
    Z3 = forward_propagation(X, parameters)

    # cost function
    cost = compute_cost(Z3, Y)

    # backpropagation
    optimizer = tf.train.AdamOptimizer(learning_rate=learning_rate).minimize(cost)

    # initial all the variables globally
    init = tf.global_variables_initializer()

    with tf.Session() as sess:

        sess.run(init)

        for epoch in range(num_epochs):

            minibatch_cost = 0.
            num_minibatches = int(m / minibatch_size)
            minibatches = random_mini_batches(X_train, Y_train, minibatch_size)

            for minibatch in minibatches:

                (minibatch_X, minibatch_Y) = minibatch

                _, temp_cost = sess.run([optimizer, cost], feed_dict = {X : minibatch_X, Y : minibatch_Y})

                minibatch_cost += temp_cost / num_minibatches

            # print the cost every epoch
            if print_cost == True and epoch % 5 == 0:
                print ("Cost after epoch %i: %f" % (epoch, minibatch_cost))
            if print_cost == True and epoch % 1 == 0:
                costs.append(minibatch_cost)

        # plot the cost
        plt.plot(np.squeeze(costs))
        plt.ylabel('cost')
        plt.xlabel('iterations (per tens)')
        plt.title("Learning rate = " + str(learning_rate))
        plt.show()

        # calculate the correct predictions
        predict_op = tf.argmax(Z3, 1)  # 對Z3矩陣按列計算最大值 (0表示行,1表示列)
        correct_prediction = tf.equal(predict_op, tf.argmax(Y, 1))

        # calculate accuracy on the test set
        accuracy = tf.reduce_mean(tf.cast(correct_prediction, "float"))  # 求均值
        print(accuracy)
        train_accuracy = accuracy.eval({X: X_train, Y: Y_train})  # eval執行計算圖,類似於run
        test_accuracy = accuracy.eval({X: X_test, Y: Y_test})
        print("Train Accuracy:", train_accuracy)
        print("Test Accuracy:", test_accuracy)

        return train_accuracy, test_accuracy, parameters

# test
_, _, parameters = model(X_train, Y_train, X_test, Y_test)
相關推薦
Python使用tensorflow實現影象識別(貓狗大戰)-01
Python使用tensorflow實現影象識別(貓狗大戰)-01 import_data.py import tensorflow as tf import numpy as np import os #引入tensorflow、numpy、os 三個第三方模組 img_widt
Python使用tensorflow實現影象識別(貓狗大戰)-02
import tensorflow as tf def inference(images, batch_size, n_classes): # cov1, shape = [kernel size, kernel size, channels, ke
tensorflow實現影象識別
學完了ng深度學習第四課,複習一遍程式碼。今天寫第一週的作業---用tensorflow框架訓練深層網路實現影象識別,程式碼寫完後問題出來啦(問題已找出,用紅色字型標出)ng的準確率:我的準確率:代價函式的初始值以及訓練過程中的變化情況也很不一樣,檢查了程式碼是一樣的。應該還
用TensorFlow基於最近鄰域法實現影象識別
1、匯入程式設計庫 import random import numpy as np import tensorflow as tf import matplotlib.pyplot as plt from PIL import Image from tens
基於 TensorFlow 的影象識別(R實現)
提到機器學習,深度學習這些,大家都會立馬想起Python。但R的實力也不容小覷。今天就用R來演示一個基於TensorFlow的影象識別的例子。如果你想執行這些程式碼,就必須先安裝配置好TensorFlow,我是在Linux系統上面執行的。如何配置TensorFlow儘量看看官
TensorFlow學習--AlexNet實現&影象識別
AlexNet主要技術點 AlexNet使用的主要技術: 1. 使用ReLU作為CNN的啟用函式,解決了Sigmoid在較深網路中的梯度彌散問題(vanishing gradient problem). 2. 訓練時使用Dropout隨機忽略一部分神經
用101000張食物圖片實現影象識別(資料的獲取與處理)-python-tensorflow框架
前段時間,日劇《輪到你了》大火,作為程式設計師的我,看到了另外一個程式設計師—二階堂,他的生活作息,以及飲食規律,讓我感同身受,最讓我感觸的是他做的AI聊天機器人,AI菜品分析機器人,AI罪犯分析。 這讓作為程式設計師的我突然萌生了一股攀比和一種激情,我也得做一個出來(小聲bb,都得嘗試下)
94、tensorflow實現語音識別0,1,2,3,4,5,6,7,8,9
結果 test amp building pre cti fun ner edi ‘‘‘ Created on 2017年7月23日 @author: weizhen ‘‘‘ #導入庫 from __future__ import division,print_func
Tensorflow實現LSTM識別MINIST
growth 輸入 應該 訓練 run 類別 out 運行 port import tensorflow as tf import numpy as np from tensorflow.contrib import rnn from tensorflow.examples
教你用TensorFlow做影象識別
弱者用淚水安慰自己,強者用汗水磨練自己。 上一篇文章裡面講了使用TensorFlow做手寫數字影象識別,這篇文章算是它的進階篇吧,在本篇文章中將會講解如何使用TensorFlow識別多種類圖片。本次使用的資料集是CIFAR-10,這是一個比較經典的資料集,可以去百度一下它的官網
從零開始學caffe(七):利用GoogleNet實現影象識別
一、準備模型 在這裡,我們利用已經訓練好的Googlenet進行物體影象的識別,進入Googlenet的GitHub地址,進入models資料夾,選擇Googlenet 點選Googlenet的模型下載地址下載該模型到電腦中。 模型結構 在這裡,我們利用之前講
基於mtcnn/facenet/tensorflow實現人臉識別登入系統
git地址:github.com/chenlinzhon… 本文主要介紹了系統涉及的人臉檢測與識別的詳細方法,該系統基於python2.7.10/opencv2/tensorflow1.7.0環境,實現了從攝像頭讀取視訊,檢測人臉,識別人臉的功能 由於模型檔案過大,git無法上傳,整個專案放在百度雲盤,地址
從零開始學caffe(九):在Windows下實現影象識別
本系列文章主要介紹了在win10系統下caffe的安裝編譯,運用CPU和GPU完成簡單的小專案,文章之間具有一定延續性。 step1:準備資料集 資料集是進行深度學習的第一步,在這裡我們從以下五個連結中下載所需要的資料集: animal flower plane hou
從0到1:神經網路實現影象識別(中)
”. . . we may have knowledge of the past and cannot control it; we may control the future but have no knowledge of it.” — Claude Shannon 1959
從0到1:神經網路實現影象識別(上)
紙上得來終覺淺,絕知此事要躬行。 “神經網路”是“機器學習”的利器之一,常用演算法在TensorFlow、MXNet計算框架上,有很好的支援。 為了更好的理解與使用這件利器,我們可以不借助計算框架,從零開始,一步步構建模型,實現學習演算法,並在一個影象識別資料集上,訓練這個模型,再驗證模型預
TensorFlow實現人臉識別(4)--------對人臉樣本進行訓練,儲存人臉識別模型
經過前面幾章的介紹,我們以及可以得到處理好的訓練樣本影象,在本節中將對這些影象進行訓練。主要利用到的是keras。 一、構建Dataset類 1.1 init 完成初始化工作 def __init__(self,path_name):
Java 使用 Tess4J 實現影象識別
最近需要用Java做一個影象識別的東西,查了一些資料,在此寫一個基於Tess4J的教程,方便其他人蔘考和使用。其實做影象識別,也可以使用TESSERACT-OCR來實現,但是該方式需要下載軟體,在電腦上安裝環境,移植性不高,使用Tess4J只需要下載相關Jar包,匯入專案,再
Tensorflow實現影象分割——FCN模型
轉載自:http://blog.csdn.net/scutjy2015/article/details/70230379 導讀:本專案是基於論文《語義分割全卷積網路的Tensorflow實現》的基礎上實現的,該實現主要是基於論文作者給的參考程式碼。該模型應用於麻省理工學
OpenCV實現影象識別
最近參加了一個機器人比賽,本人負責影象識別和串列埠通訊方面的任務工作。串列埠通訊的教程可以見我的部落格;下面主要總結一下我對影象識別的整個學習過程。 開發環境 Mac OS Xcode C++ OpenCV 2.4.12 思考過程 實現影象識別
TensorFlow實現人臉識別(5)-------利用訓練好的模型實時進行人臉檢測
經過前面複雜的操作,訓練出來對於某一個人的識別模型。本文將利用該模型對於開啟的視訊或者攝像頭實時的識別該人。 讀取視訊 ==> 識別人臉 ==> 繪製標誌 程式碼如下: #-*- coding:UTF-8 -*- import tensor


