【Android自定義控制元件】密碼輸入框+數字鍵盤的實現
阿新 • • 發佈:2019-01-24
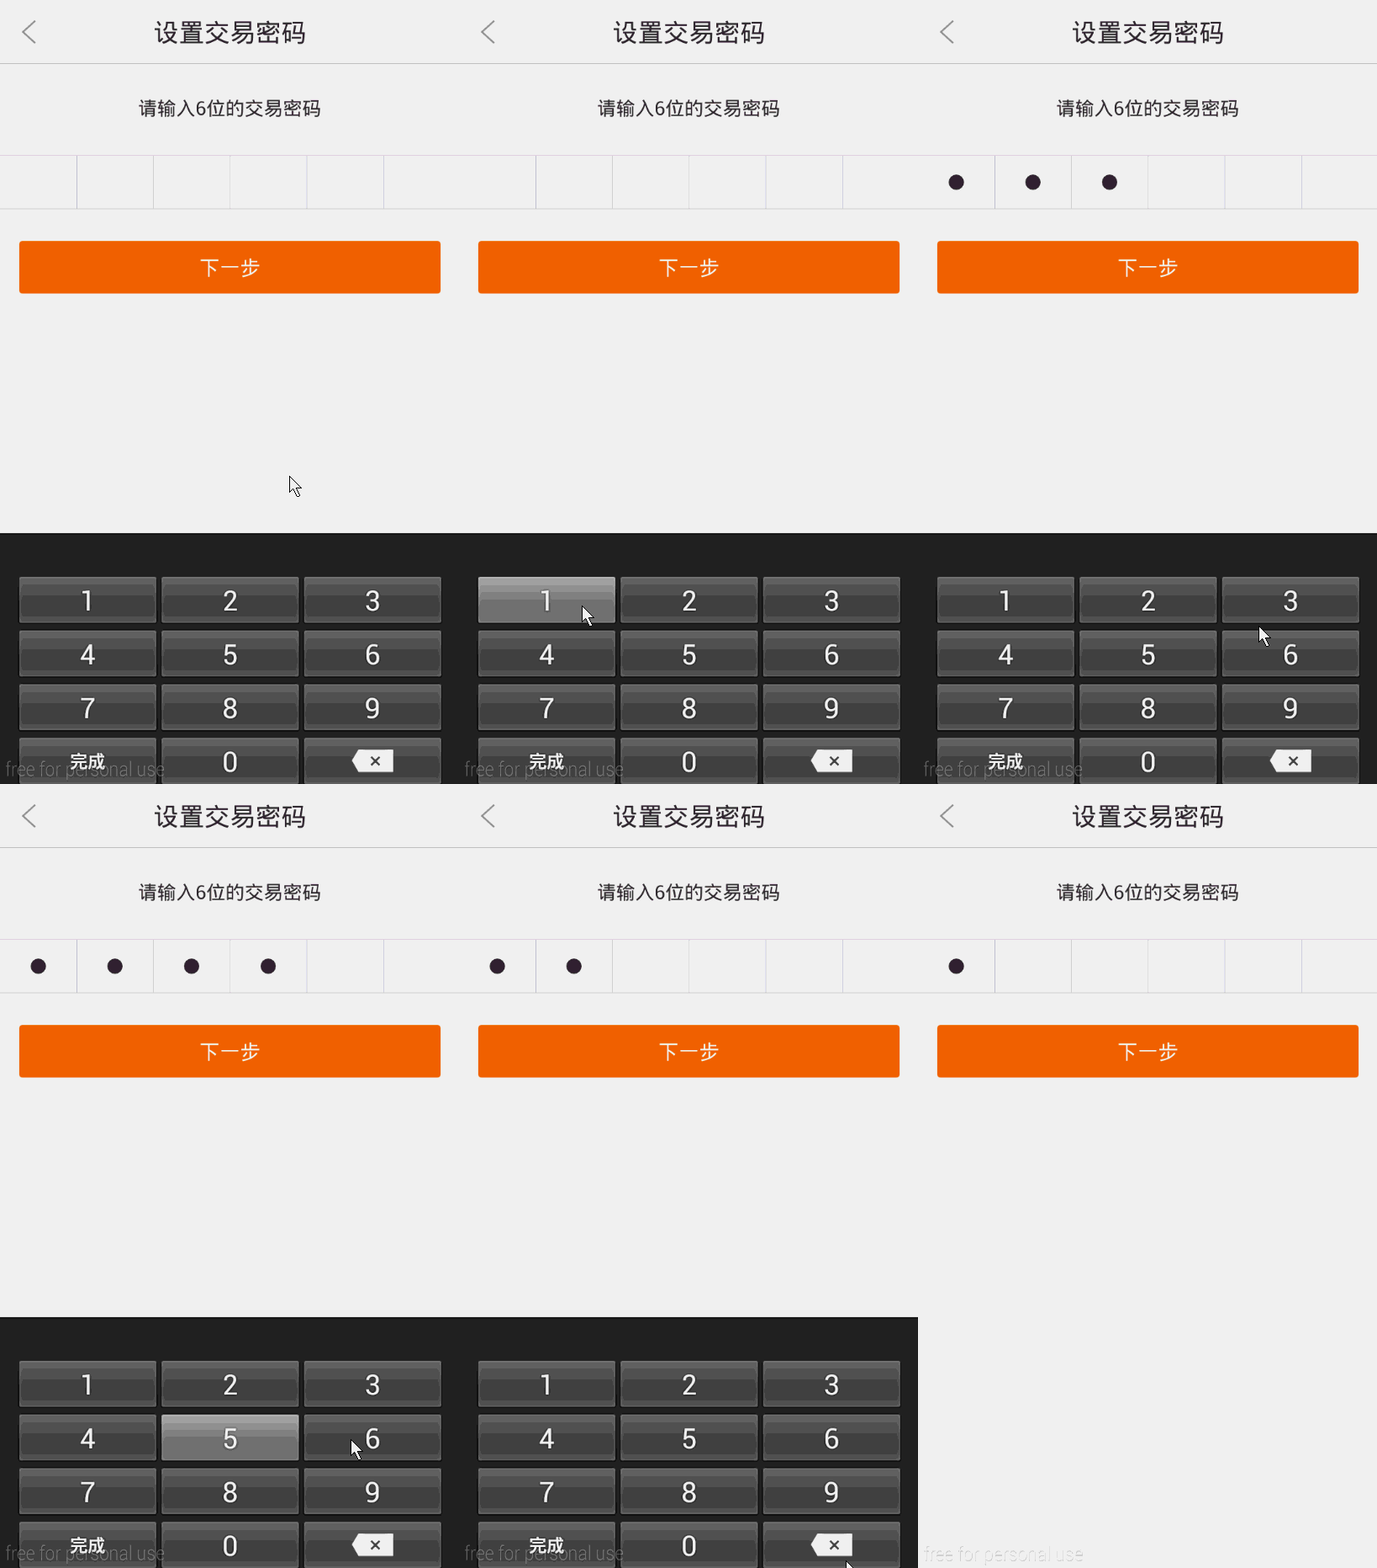
因專案需要,實現了一個自定義的密輸入框和自定義數字鍵盤,用作使用者支付密碼設定介面。先上效果圖如下,方格樣式,以及點選空白處隱藏軟鍵盤。
控制元件實現清單:
1)集成於EditText的輸入框控制元件:PasswordInputView.java
2)數字鍵盤工具類:NumKeyboardUtil.java
3)xml檔案:number.xml
4)attrs樣式
5)layout檔案
具體內容:
PasswordInputView.java
import android.content.Context;
import android.content.res.Resources;
import NumKeyboardUtil
import android.app.Activity;
import android.content.Context;
import android.inputmethodservice.Keyboard;
import android.inputmethodservice.KeyboardView;
import android.inputmethodservice.KeyboardView.OnKeyboardActionListener;
import android.text.Editable;
import android.view.View;

import com.acoe.demo.R; // 小白注意,這裡匯入自己專案的R檔案,根據實際情況寫
import com.acoe.demo.widget.PasswordInputView; // 這裡匯入上面定義的控制元件

/**
 * 數字軟鍵盤工具類
 */
public class NumKeyboardUtil {
    private KeyboardView keyboardView;
    private Keyboard k;// 數字鍵盤
    private PasswordInputView ed;

    public NumKeyboardUtil(Activity act, Context ctx, PasswordInputView edit) {
        this.ed = edit;
        k = new Keyboard(ctx, R.xml.number);
        keyboardView = (KeyboardView) act.findViewById(R.id.keyboard_view);
        keyboardView.setKeyboard(k);
        keyboardView.setEnabled(true);
        keyboardView.setPreviewEnabled(true);
        keyboardView.setOnKeyboardActionListener(listener);
    }

    private OnKeyboardActionListener listener = new OnKeyboardActionListener() {
        @Override
        public void swipeUp() {
        }

        @Override
        public void swipeRight() {
        }

        @Override
        public void swipeLeft() {
        }

        @Override
        public void swipeDown() {
        }

        @Override
        public void onText(CharSequence text) {
        }

        @Override
        public void onRelease(int primaryCode) {
        }

        @Override
        public void onPress(int primaryCode) {
        }
        //一些特殊操作按鍵的codes是固定的比如完成、回退等
        @Override
        public void onKey(int primaryCode, int[] keyCodes) {
                Editable editable = ed.getText();
                int start = ed.getSelectionStart();
                if (primaryCode == Keyboard.KEYCODE_DELETE) {// 回退
                        if (editable != null && editable.length() > 0) {
                                if (start > 0) {
                                        editable.delete(start - 1, start);
                                }
                        }
                }else if (primaryCode == Keyboard.KEYCODE_CANCEL) {// 完成
                    hideKeyboard();
                } else { //將要輸入的數字現在編輯框中
                        editable.insert(start, Character.toString((char) primaryCode));
                }
        }
    };

    public void showKeyboard() {
        keyboardView.setVisibility(View.VISIBLE);
    }

    public void hideKeyboard() {
        keyboardView.setVisibility(View.GONE);
    }

    public int getKeyboardVisible() {
        return keyboardView.getVisibility();
    }
}
number.xml
注意該檔案需要放在專案下的res目錄下的xml目錄(沒有就建個)裡面
<?xml version="1.0" encoding="utf-8"?>
<Keyboard xmlns:android="http://schemas.android.com/apk/res/android"
    android:horizontalGap="0px"
    android:keyHeight="42dip"
    android:keyWidth="31%p"
    android:verticalGap="0px" >

    <Row>
        <Key
            android:codes="49"
            android:keyLabel="1" />
        <Key
            android:codes="50"
            android:keyLabel="2" />
        <Key
            android:codes="51"
            android:keyLabel="3" />
    </Row>

    <Row>
        <Key
            android:codes="52"
            android:keyLabel="4" />
        <Key
            android:codes="53"
            android:keyLabel="5" />
        <Key
            android:codes="54"
            android:keyLabel="6" />
    </Row>

    <Row>
        <Key
            android:codes="55"
            android:keyLabel="7" />
        <Key
            android:codes="56"
            android:keyLabel="8" />
        <Key
            android:codes="57"
            android:keyLabel="9" />
    </Row>

    <Row>
        <Key
            android:codes="-3"
            android:keyLabel="完成" />
        <Key
            android:codes="48"
            android:keyLabel="0" />
        <Key
            android:codes="-5"
            android:keyIcon="@drawable/sym_keyboard_delete" />
    </Row>

</Keyboard>
attrs.xml裡面的樣式:
<!-- 支付密碼輸入框 -->
    <declare-styleable name="PasswordInputView">
        <attr name="borderWidth" format="dimension"/>
        <attr name="borderColor" format="color"/>
        <attr name="borderRadius" format="dimension"/>
        <attr name="passwordLength" format="integer"/>
        <attr name="passwordWidth" format="dimension"/>
        <attr name="passwordColor" format="color"/>
        <attr name="passwordRadius" format="dimension"/>
    </declare-styleable>
佈局程式碼:
實際使用的話,只需要將PasswordInputView和
<?xml version="1.0" encoding="utf-8"?>
<RelativeLayout xmlns:android="http://schemas.android.com/apk/res/android"
    android:layout_width="match_parent"
    android:layout_height="match_parent"
    android:background="@color/main_bg_color" >

    <include
        android:id="@+id/title_ll"
        layout="@layout/common_actionbar"/>

    <TextView
        android:id="@+id/trader_pwd_set_tips_textview"
        style="@style/normal_text_style"
        android:layout_below="@+id/title_ll"
        android:layout_marginTop="25dip"
        android:layout_centerHorizontal="true"
        android:text="@string/trade_pwd_set_tips_text" />

    <ImageView
        android:id="@+id/line1_imageview"
        style="@style/line_horizontal_style"
        android:layout_below="@+id/trader_pwd_set_tips_textview"
        android:layout_marginTop="26dip"
        android:contentDescription="@string/content_description" />

    <com.acoe.demo.widget.PasswordInputView
        android:id="@+id/trader_pwd_set_pwd_edittext"
        android:layout_width="match_parent"
        android:layout_height="41dip"
        android:layout_below="@+id/line1_imageview"
        android:maxLength="6"
        android:background="@android:color/white" />

    <ImageView
        android:id="@+id/line2_imageview"
        style="@style/line_horizontal_style"
        android:layout_below="@+id/trader_pwd_set_pwd_edittext"
        android:contentDescription="@string/content_description" />

    <Button
        android:id="@+id/trader_pwd_set_next_button"
        style="@style/main_button_style"
        android:layout_below="@+id/line2_imageview"
        android:layout_marginTop="25dip"
        android:text="@string/trade_pwd_set_next_text" />

    <android.inputmethodservice.KeyboardView
        android:id="@+id/keyboard_view"
        android:layout_width="match_parent"
        android:layout_height="240dip"
        android:layout_alignParentBottom="true"
        android:paddingTop="30dip"
        android:paddingLeft="13dip"
        android:paddingRight="13dip"
        android:focusable="true"
        android:focusableInTouchMode="true"
        android:visibility="invisible"/>

</RelativeLayout>
Activity程式碼片段:
//=======在Activity成員變數中宣告部分程式碼=======
/** 控制元件 */
    private PasswordInputView edtPwd;

//=======在Activity例項化控制元件部分程式碼=======
// 初始化控制元件
        edtPwd = (PasswordInputView) findViewById(R.id.trader_pwd_set_pwd_edittext);
        edtPwd.setInputType(InputType.TYPE_NULL); // 遮蔽系統軟鍵盤
// 自定義軟鍵盤
        if (keyboardUtil == null) keyboardUtil = new NumKeyboardUtil(this, this, edtPwd);
        edtPwd.setOnTouchListener(new OnTouchListener() {
            @Override
            public boolean onTouch(View v, MotionEvent event) {
                keyboardUtil.showKeyboard();
                return false;
            }
        });

//=======在Activity中重寫onTouchEvent()方法,實現點選空白處隱藏軟鍵盤=======
@Override
    public boolean onTouchEvent(MotionEvent event) {
        if(event.getAction() == MotionEvent.ACTION_DOWN){
             if(getCurrentFocus()!=null && getCurrentFocus().getWindowToken()!=null){
                 keyboardUtil.hideKeyboard();
             }
        }
        return super.onTouchEvent(event);
    }
ps:如果把該密碼輸入框和其他型別輸入框並用時要注意兩者之間焦點變化時將系統軟鍵盤和自定義的數字鍵盤隱藏,我的做法是給密碼輸入框繫結OnFacusChangeListener事件,來控制就好。如下:
edtPwd.setOnFocusChangeListener(new OnFocusChangeListener() {
            @Override
            public void onFocusChange(View v, boolean hasFocus) {
                if (hasFocus) {
                    // 如果系統鍵盤是彈出狀態,先隱藏
                    ((InputMethodManager) getSystemService(INPUT_METHOD_SERVICE))
                    .hideSoftInputFromWindow(getCurrentFocus()
                    .getWindowToken(),
                    InputMethodManager.HIDE_NOT_ALWAYS);
                    keyboardUtil.showKeyboard();
                } else {
                    keyboardUtil.hideKeyboard();
                }
            }
        });
