使用NPM + Webpack進行前端開發的示例
阿新 • • 發佈:2019-01-29
最近在使用Webpack來幫助進行前端開發,覺得這個東西的確挺好用。所以用一個簡單的示例記錄一下,供他人以及自己以後的參考。
這篇文章不是Webpack的教程貼,也不分析Webpack的優缺點,只是簡單的記錄我自己覺得還不錯的一套用法,在閱讀本文前,讀者需要對NPM以及Webpack有個基礎的瞭解。
1.專案結構
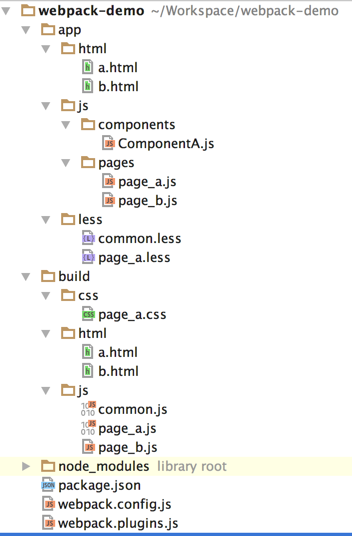
專案名稱叫webpack-demo。
原始碼目錄是app,下面有三個資料夾,js,less(當然你也可以使用postcss或者sass等),以及html。
package.json是npm中的包管理配置檔案,webpack.config.js是webpack預設的配置檔案,webpack.plugin.js則是我為了使webpack.config.js看起來更清晰而提取出的一些配置內容,顧名思義是提取出了外掛的配置。
node_modules是執行npm install後依賴包的安裝目錄。
build資料夾則是最終專案編譯後的結果,其中的JS和CSS是webpack根據原始碼中的依賴自動生成的一個個bundle檔案,而html則是原封不動的從app中複製過去的。
二、配置分析
1.package.json
{
  "name": "webpack-demo",
  "version": "1.0.0",
  "description": "",
  "scripts": {
    "product": "webpack",
    "dev": "webpack"
  },
  "dependencies": {
    "jquery": "^3.1.0"
  },
  "devDependencies": {
    "clean-webpack-plugin": "^0.1.10",
    "copy-webpack-plugin": "^3.0.1",
    "css-loader": "^0.23.1",
    "extract-text-webpack-plugin": "^1.0.1",
    "less": "^2.7.1",
    "less-loader": "^2.2.3",
    "style-loader": "^0.13.1",
    "webpack": "^1.13.1",
    "webpack-merge": "^0.14.1"
  }
}
這裡面主要的就是scripts和兩個dependencies。之所以要分product和dev兩個script,是用來區分生產和開發兩種環境,這關係到webpack中的配置。
兩個dependencies的內容就是開發和執行時所依賴的包,對這兩個東西不太清楚的讀者可以參考stackoverflow上的回答。
2.webpack配置
webpack.config.js
根據註釋大概可以知道配置是怎麼工作的: dev和product打包都需要的操作: 對每個頁面的入口檔案及其依賴打包成一個bundle;對路徑做一些alias,方便js中的依賴;提取各個頁面的公共依賴作為common;複製html;編譯less。(當然還可以加上jshint等更多的功能) 對於dev,加上sourcemap用於debug;對於product,做minify的處理。 為了使配置結構更清晰,我提取了外掛配置的部分到單獨的webpack.plugins.js中。/** * Created by hshen on 8/15/16. */ // Define paths const path = require('path'); const PATHS = { app: path.join(__dirname, 'app'), build: path.join(__dirname, 'build') }; // A tool to merge config object const merge = require('webpack-merge'); // Configuration for plugins const plugins = require('./webpack.plugins'); // Common configuration for production and dev const common = merge( { entry: { page_a: path.join(PATHS.app,'js','pages','page_a.js'), page_b: path.join(PATHS.app,'js','pages','page_b.js') }, output: { path: path.join(PATHS.build,'js'), filename: '[name].js', chunkFilename: '[chunkhash].js' }, resolve: { root: [ PATHS.app ], alias: { js: 'js', css: 'less' }, extensions: ['', '.js'] } }, plugins.clean(PATHS.build), plugins.copy(), plugins.extractCommon('common.js'), plugins.less() ); var config = null; // Detect the branch where npm is running on switch(process.env.npm_lifecycle_event) { case 'product': config = merge( common, plugins.minify() ); break; case 'dev': default: config = merge( common, // Set source map for debug { devtool: 'source-map' } ); break; } module.exports = config;
webpack.plugins.js
/**
 * Created by hshen on 8/15/16.
 */
const webpack = require('webpack');

exports.minify = function () {
    return {
        plugins: [
            new webpack.optimize.UglifyJsPlugin({
                // Don't beautify output (enable for neater output)
                beautify: false,
                // Eliminate comments
                comments: false,
                compress: {
                    warnings: false,
                    // Drop `console` statements
                    drop_console: true
                }
            })
        ]
    };
}

// Clean a specific folder
exports.clean = function (path) {
    const CleanWebpackPlugin = require('clean-webpack-plugin');

    return  {
        plugins: [
            new CleanWebpackPlugin([path], {
                // Without `root` CleanWebpackPlugin won't point to our
                // project and will fail to work.
                root: process.cwd()
            })
        ]
    };
}

exports.extractCommon = function (name) {
    return {
        plugins: [
            new webpack.optimize.CommonsChunkPlugin(name)
        ]
    };
}

exports.copy = function () {
    const path = require('path');
    const PATHS = {
        app: path.join(__dirname, 'app'),
        build: path.join(__dirname, 'build')
    };
    const CopyWebpackPlugin = require('copy-webpack-plugin');

    return {
        plugins: [
            new CopyWebpackPlugin([
                { from: path.join(PATHS.app,'html'), to: path.join(PATHS.build,'html')},
            ], {
                ignore: [

                ],
                // By default, we only copy modified files during
                // a watch or webpack-dev-server build. Setting this
                // to `true` copies all files.
                copyUnmodified: true
            })
        ]
    };
}

exports.less = function () {
    var ExtractTextPlugin = require("extract-text-webpack-plugin");
    var extractLESS = new ExtractTextPlugin('../css/[name].css',{allChunks: true});

    return {
        module: {
            loaders: [
                {
                    test: /\.less$/,
                    exclude: /node_modules/,
                    loader:  extractLESS.extract("style-loader", "css-loader!less-loader") }
            ]
        },
        plugins: [
            extractLESS
        ]
    };
};
三、原始檔分析
a.html
<!DOCTYPE html>
<html>
<head>
    <meta charset="UTF-8">
    <title>Webpack demo a</title>
    <link href="../css/page_a.css" rel="stylesheet" type="text/css">
</head>
<body>

<script type="text/javascript" src="../js/common.js"></script>
<script type="text/javascript" src="../js/page_a.js"></script>
</body>
</html>page_a.js
/**
 * Created by hshen on 8/15/16.
 */

var $ = require('jquery');
var component = require('js/components/ComponentA');
require('css/page_a.less');

$('body').append(component);

