
自定義View例項(三)----滑動刻度尺與流式佈局
最近在系統學習自定義View這一塊的知識,前面幾篇基本都是理論知識,這篇部落格著重從實戰來加強對自定義View的理解與運用。實現的兩種效果,分別代表自定義View與自定義ViewGroup。
先上效果圖:
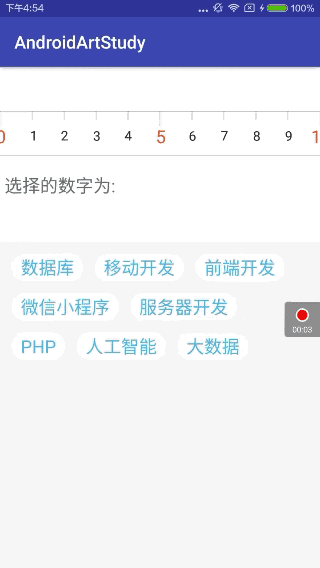
上面的是一個可以滑動的刻度尺,支援快速滑動,選擇的數字也會顯示在下方;下面的是一個經典的流式佈局,會根據文字長度自動進行佈局。一起看看怎麼實現的吧:
一.準備工作
1.佈局檔案
<?xml version="1.0" encoding="utf-8"?>
<LinearLayout xmlns:android="http://schemas.android.com/apk/res/android" 從上到下的線性佈局,依次是滑動刻度尺,數字TextView,流式佈局,以及設定了一些自定義的屬性。
2.自定義滑動刻度尺的初始準備
    public MySelectView(Context context) {
        this(context, null);
    }

    public MySelectView(Context context, AttributeSet attrs) {
        this(context, attrs, 0);
    }

    public MySelectView(Context context, AttributeSet attrs, int defStyleAttr) {
        super(context, attrs, defStyleAttr);


        //獲取我們自定義的樣式屬性
        TypedArray array = context.getTheme().obtainStyledAttributes(attrs, R.styleable.MySelectView, defStyleAttr, 0);
        int n = array.getIndexCount();
        for (int i = 0; i < n; i++) {
            int attr = array.getIndex(i);
            switch (attr) {
                case R.styleable.MySelectView_lineColor:
                    // 預設顏色設定為黑色
                    lineColor = array.getColor(attr, Color.BLACK);
                    break;
                case R.styleable.MySelectView_textColor:
                    textColor = array.getColor(attr, Color.BLACK);
                    break;
                case R.styleable.MySelectView_textSize:
                    // 預設設定為16sp,TypeValue也可以把sp轉化為px
                    textSize = array.getDimensionPixelSize(attr, (int) TypedValue.applyDimension(
                            TypedValue.COMPLEX_UNIT_SP, 16, getResources().getDisplayMetrics()));
                    break;
            }
        }


        array.recycle();
        init();
    }

    public void init() {
        mPaint = new Paint();
        mPaint.setAntiAlias(true);
        bigBound = new Rect();
        smallBound = new Rect();
    }


    public void setmStartWidth(int mStartWidth) {
        this.mStartWidth = mStartWidth;
    }

    @Override
    protected void onMeasure(int widthMeasureSpec, int heightMeasureSpec) {
        super.onMeasure(widthMeasureSpec, heightMeasureSpec);

        int width;
        int height;
        int widthSize = MeasureSpec.getSize(widthMeasureSpec);
        int heightSize = MeasureSpec.getSize(heightMeasureSpec);
        int widthMode = MeasureSpec.getMode(widthMeasureSpec);
        int heightMode = MeasureSpec.getMode(heightMeasureSpec);

        if (widthMode == MeasureSpec.EXACTLY) {
            width = widthSize;
        } else {
            width = widthSize * 1 / 2;
        }
        if (heightMode == MeasureSpec.EXACTLY) {
            height = heightSize;
        } else {
            height = heightSize * 1 / 2;
        }

        setMeasuredDimension(width, height);

    }


    @Override
    protected void onLayout(boolean changed, int left, int top, int right, int bottom) {
        super.onLayout(changed, left, top, right, bottom);
        mWidth = getWidth();
        mHeight = getHeight();
        mStartWidth = 0;
    }
初始化自定義控制元件,獲取自定義控制元件的樣式屬性,初始化相關工具,重寫onMeasure()測量自定義控制元件大小,重寫onLayout()獲取自定義控制元件寬高。
二.自定義滑動刻度尺的實現
1.重寫onDraw()方法繪製刻度尺
    @Override
    protected void onDraw(Canvas canvas) {
        super.onDraw(canvas);
        mPaint.setColor(lineColor);
        //畫背景
        canvas.drawLine(0, 0, mWidth, 0, mPaint);
        canvas.drawLine(0, mHeight, mWidth, mHeight, mPaint);

        //畫數字
        for (int i = 0; i < 1000; i++) {
            if (i % 5 == 0) {
                mPaint.setColor(textColor);
                canvas.drawLine(mStartWidth, 0, mStartWidth, getHeight() / 3, mPaint);
                mPaint.setTextSize(textSize);
                mPaint.getTextBounds(String.valueOf(i), 0, String.valueOf(i).length(), bigBound);
                canvas.drawText(String.valueOf(i), mStartWidth - bigBound.width() / 2, getHeight() / 2 + bigBound.height() * 3 / 4, mPaint);
            } else {
                mPaint.setColor(lineColor);
                mPaint.setTextSize(textSize - 15);
                canvas.drawLine(mStartWidth, 0, mStartWidth, getHeight() / 5, mPaint);
                mPaint.getTextBounds(String.valueOf(i), 0, String.valueOf(i).length(), smallBound);
                canvas.drawText(String.valueOf(i), mStartWidth - smallBound.width() / 2, getHeight() / 2 + smallBound.height() * 3 / 4, mPaint);
            }
            mStartWidth += mWidth / 10;
        }
        //畫中間刻度線
        mPaint.setColor(textColor);
        canvas.drawLine(mWidth / 2, 0, mWidth / 2, getHeight() / 3, mPaint);
    }
繪製背景的兩條實線,繪製中間的數字,繪製中間的刻度線。
2.重寫onTouchEvent()方法處理滑動事件
    @Override
    public boolean onTouchEvent(MotionEvent event) {


        if (velocityTracker == null) {
            velocityTracker = VelocityTracker.obtain();
        }
        velocityTracker.addMovement(event);

        int x = (int) event.getX();
        switch (event.getAction()) {

            case MotionEvent.ACTION_DOWN:
                xDown = x;
                break;
            case MotionEvent.ACTION_MOVE:
                xMove = x;
                mStartWidth = xScroll + (xMove - xDown);
                invalidate();
                int numberScroll = (int) Math.round(Double.valueOf(mStartWidth) / Double.valueOf(mWidth / 10));
                listener.getNumber(Math.abs(numberScroll - 5));
                break;
            case MotionEvent.ACTION_UP:
                xUp = x;
                xScroll = xScroll + (xUp - xDown);
                //處理快速滑動
                velocityTracker.computeCurrentVelocity(1000);
                int scrollX = (int) velocityTracker.getXVelocity();
                xScroll = xScroll + scrollX;
                ValueAnimator walkAnimator = ValueAnimator.ofInt(mStartWidth, xScroll);
                walkAnimator.addUpdateListener(new ValueAnimator.AnimatorUpdateListener() {
                    @Override
                    public void onAnimationUpdate(ValueAnimator animation) {
                        mStartWidth = (int) animation.getAnimatedValue();
                        invalidate();
                    }
                });
                walkAnimator.setDuration(500);
                walkAnimator.start();
                walkAnimator.addListener(new Animator.AnimatorListener() {
                    @Override
                    public void onAnimationStart(Animator animation) {

                    }

                    @Override
                    public void onAnimationEnd(Animator animation) {

                        //處理慣性滑動
                        int endX = xScroll % (mWidth / 10);
                        if (Math.abs(endX) < mWidth / 20) {
                            xScroll = xScroll - endX;
                            mStartWidth = xScroll;
                            invalidate();
                        } else {
                            xScroll = xScroll + (Math.abs(endX) - mWidth / 10);
                            mStartWidth = xScroll;
                            invalidate();
                        }
                    }

                    @Override
                    public void onAnimationCancel(Animator animation) {

                    }

                    @Override
                    public void onAnimationRepeat(Animator animation) {

                    }
                });
                int number = (int) Math.round(Double.valueOf(xScroll) / Double.valueOf(mWidth / 10));
                listener.getNumber(Math.abs(number - 5));
                break;
        }
        return true;
    }
這一塊是整個自定義滑動刻度尺的重點,慢慢分析一下:
初始化VelocityTracker,並且把要追蹤的MotionEvent註冊到VelocityTracker的監聽中,用來跟蹤觸控式螢幕事件,主要用來處理滑動刻度尺的快速滑動。
MotionEvent.ACTION_DOWN: 獲取水平方向X的座標
MotionEvent.ACTION_MOVE: 獲取水平方向滑動的距離,然後不斷改變繪製的開始位置,再呼叫invalidate()來進行重繪,達到滑動的效果。後面兩句程式碼是為了讓下面顯示的數字能夠實時更新,介面回撥。
MotionEvent.ACTION_UP:
1.獲取滑動到總距離。
2.處理快速滑動,首先獲取1秒內X方向所滑動畫素值,然後確定最終滑動的位置。通過一個屬性動畫,不斷改變繪製的開始位置,再呼叫invalidate()來進行重繪,達到快速滑動的效果。
3.處理慣性滑動,仔細檢視效果圖你會發現,當最後滑動的終點位置不足一半時,會自動滑動到前一個位置;當最後滑動的終點位置超過一半時,會自動滑動到下一個位置。這裡其實就是在動畫結束的時候,進行判斷,然後呼叫invalidate()來進行重繪,達到慣性滑動的效果。
4.最後兩句程式碼是為了讓下面顯示的數字最終能夠實時更新,介面回撥。
三.自定義流式佈局的實現
    @Override
    public ViewGroup.LayoutParams generateLayoutParams(AttributeSet attrs) {
        return new MarginLayoutParams(getContext(), attrs);
    }

    @Override
    protected void onMeasure(int widthMeasureSpec, int heightMeasureSpec) {

        int sizeWidth = MeasureSpec.getSize(widthMeasureSpec);
        int sizeHeight = MeasureSpec.getSize(heightMeasureSpec);

        // 計算出所有的childView的寬和高
        for (int i = 0; i < getChildCount(); i++) {
            View childView = getChildAt(i);
            measureChild(childView, widthMeasureSpec, heightMeasureSpec);
        }
        setMeasuredDimension(sizeWidth, sizeHeight);
    }

    @Override
    protected void onLayout(boolean changed, int l, int t, int r, int b) {
        int left = 0;
        int top = 0;
        for (int i = 0; i < getChildCount(); i++) {
            View childView = getChildAt(i);
            MarginLayoutParams params = (MarginLayoutParams) childView.getLayoutParams();
            int lc = left + params.leftMargin;
            int rc = childView.getMeasuredWidth() + lc;
            int tc = top + params.topMargin;
            int bc = childView.getMeasuredHeight() + tc;
            childView.layout(lc, tc, rc, bc);
            //超過寬度則換行
            if (rc + childView.getMeasuredWidth() > getMeasuredWidth()) {
                left = 0;
                top = bc;
            } else {
                left = rc;
            }
        }
    }
1.重寫generateLayoutParams()方法返回MarginLayoutParams的例項,使自定義的流式佈局能夠支援margin屬性
2.重寫onDraw()方法計算出所有的childView的寬和高以及測量模式,並且設定自己的寬高
3.重寫onLayout()方法對所有childView進行定位(設定childView的繪製區域),並且根據childView的寬度進行自動換行。
具體使用:
    public void init() {

        stringList.add("資料庫");
        stringList.add("移動開發");
        stringList.add("前端開發");
        stringList.add("微信小程式");
        stringList.add("伺服器開發");
        stringList.add("PHP");
        stringList.add("人工智慧");
        stringList.add("大資料");
        mySelectView = (MySelectView) findViewById(R.id.my_selectview);
        myFlowLayout = (MyFlowLayout) findViewById(R.id.my_flowlayout);
        for (String textView : stringList) {
            LinearLayout.LayoutParams params = new LinearLayout.LayoutParams(LinearLayout.LayoutParams.WRAP_CONTENT,
                    LinearLayout.LayoutParams.WRAP_CONTENT);
            params.setMargins(40, 40, 40, 40);
            TextView showText = new TextView(this);
            showText.setLayoutParams(params);
            showText.setTextColor(getResources().getColor(R.color.text_color));
            showText.setTextSize(20);
            showText.setText(textView);
            showText.setBackground(getResources().getDrawable(R.drawable.flag_01));
            myFlowLayout.addView(showText);
        }
        numberTxt = (TextView) findViewById(R.id.number_txt);
        mySelectView.setListener(this);
    }
將需要設定的文字動態新增到我們的流式佈局中去即可,自定義的流式佈局會自動根據新增文字的大小進行佈局,達到最後的效果。
關於自定義View的一些細節可以參考之前的部落格:
下一篇自定義View再見~~~