CSS設計表格(下)--PHP讀取XML並用表格顯示
阿新 • • 發佈:2019-02-10
前言
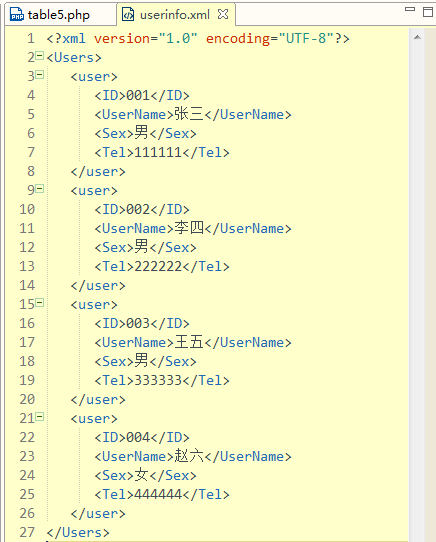
在剛開始的時候,我說過這個表格準備用於後臺顯示使用者資訊等,既然是後臺,就少不了和資料庫及後臺語言(比如PHP)打交道,比如我通過PHP讀取資料庫資訊並顯示。本節內容為了簡單起見,以XML檔案代替資料庫的儲存功能,將使用者資訊存放於XML檔案內,如下userinfo.xml
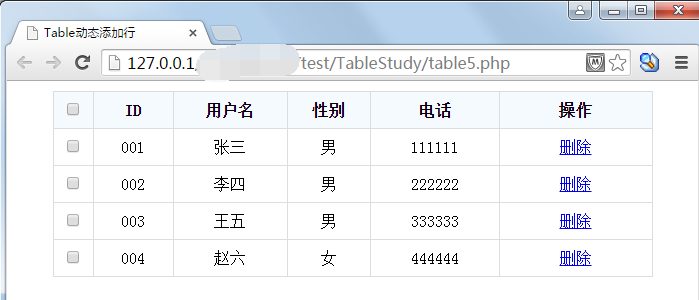
將其讀取顯示到表格效果如下
工程示例程式碼點此下載
示例程式碼
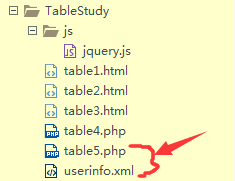
本節的示例程式碼工程如下
這個工程是在上節基礎上的建立的,本節用到的只有table5.php和userinfo.xml。下面直接上程式碼
table5.php內容
<?php
	//使用者資訊陣列
	$user_array = array(
		array(
		'ID' => '001',
		'UserName' => '張三',
		'Sex' => '男',
		'Tel' => '111111',
		),
		array(
		'ID' => '002',
		'UserName' => '李四',
		'Sex' => '男',
		'Tel' => '222222',
		),
		array(
		'ID' => '003',
		'UserName' => '王五',
		'Sex' => '男',
		'Tel' => '333333',
		),
		array(
		'ID' => '004',
		'UserName' => '趙六',
		'Sex' => '女',
		'Tel' => '444444',
		)
	);

	$xml = new  XMLWriter();
	$xml->openUri("userinfo.xml");
	$xml->setIndentString('   ');
	$xml->setIndent(TRUE);
	$xml->startDocument('1.0','utf-8');

	//開始建立檔案
	$xml->startElement('Users');

	foreach($user_array as $user){
		$xml->startElement('user');
		if(is_array($user)){
			foreach ($user as $key => $row) {
				$xml->startElement($key);

				$xml->text($row);
				$xml->endElement();
			}
		}
		$xml->endElement();
	}
	$xml->endElement();
	$xml->endDocument();
	$xml->flush();

?>
<!DOCTYPE html>
<html>
	<head>
		<meta charset="utf-8">
		<title>Table動態新增行</title>
		<style type="text/css">
			body{margin: 0;}
			.main{
				width: 600px;
				margin-top: 10px;
				margin-left:auto;
				margin-right:auto;
			}
			.table{width: 100%;background-color: transparent;border-collapse:collapse;border-spacing:0}
			.table th,.table td{padding:8px;line-height:20px;text-align: center;}
			.table-border{border-top:1px solid #ddd;}
			.table-border th,.table-border td{border-bottom: 1px solid #ddd;}
			.table-bg thead{background-color: #f5fafe;}
			.tableselected{background-color: #f5fafe;}
			.table-bordered{border:1px solid #ddd;border-collapse:separate;*border-collapse:collapse;border-left:0}
			.table-bordered th,.table-bordered td{border-left:1px solid #ddd}
			.table-border.table-bordered{border-bottom:0}
			.table-hover tbody tr:hover td{background-color:#f5f5f5}
		</style>
	</head>
	<body>
		<div class="main" >
			<table class="table table-border table-bordered table-bg  table-hover">
				<thead>
					<tr>
						<th width="25"><input type="checkbox" name="" value="" ></th>
						<th width="75">ID</th>
						<th width="120">使用者名稱</th>
						<th width="80">性別</th>
						<th width="130">電話</th>
						<th width="170">操作</th>
					</tr>
				</thead>
				<tbody>
					<?php
						$doc = new DOMDocument();
						$doc->load("userinfo.xml");
						$users = $doc->getElementsByTagName("user");


						foreach($users as $user)
						{

							$ids = $user->getElementsByTagName("ID");
							$id = $ids->item(0)->nodeValue;

							$usernames = $user->getElementsByTagName("UserName");
							$username = $usernames->item(0)->nodeValue;

							$sexs = $user->getElementsByTagName("Sex");
							$sex = $sexs->item(0)->nodeValue;

							$tels = $user->getElementsByTagName("Tel");
							$tel = $tels->item(0)->nodeValue;
					?>
							<tr>
							<td><input type="checkbox" value="1" name=""></td>
							<td><?php echo $id; ?></td>
							<td><?php echo $username; ?></td>
							<td><?php echo $sex; ?></td>
							<td><?php echo $tel; ?></td>
							<td ><a title="刪除" onClick="article_del(this)" href="javascript:;">刪除</a></td>
							</tr>

					<?php
						}
					?>
				</tbody>
			</table>

		</div>

		<script type="text/javascript" src="js/jquery.js"></script>
		<script type="text/javascript">
			/*checkbox全選*/
			$("table thead th input:checkbox").on(
				"click" ,
				function(){
					$(this).closest("table").find("tr > td:first-child input:checkbox").prop("checked",$(this).prop("checked"));

				}
			);
			$("table tbody tr input:checkbox").on("click",
				function(){
					var ischeck = $(this).prop("checked");
					if(ischeck == false)
					{
						$(this).closest("table").find("tr > th:first-child input:checkbox").prop("checked",$(this).prop("checked"));
					}
				}
			);

			/*刪除*/
			function article_del(obj){
				var res = confirm('確認要刪除嗎?');
				if(res == true)
				{
					$(obj).parents("tr").remove();
				}
			}

		</script>
	</body>
</html>
上述程式碼的頭部的主要作用是生成使用者資訊userinfo.xml檔案,一旦生成好之後,可以直接將其去掉。
結語
本章內容就不細緻講解了,不懂得私信我。通過本節也可以學習PHP建立和讀取XML文件的知識。下一節準備寫點web前端的知識,關於網站導航欄的。


