
Disruptor—核心概念及體驗
本文基於最新的3.4.2的版本文件進行翻譯,翻譯自:
https://github.com/LMAX-Exchange/disruptor/wiki/Introduction
https://github.com/LMAX-Exchange/disruptor/wiki/Getting-Started
Disruptor簡介
最好的方法去理解Disruptor就是將它和容易理解並且相似的佇列,例如BlockingQueue。Disruptor其實就像一個佇列一樣,用於在不同的執行緒之間遷移資料,但是Disruptor也實現了一些其他佇列沒有的特性,如:
- 同一個“事件”可以有多個消費者,消費者之間既可以並行處理,也可以相互依賴形成處理的先後次序(形成一個依賴圖);
- 預分配用於儲存事件內容的記憶體空間;
- 針對極高的效能目標而實現的極度優化和無鎖的設計;
Disruptor核心架構元件
- Ring Buffer:Ring Buffer在3.0版本以前被認為是Disruptor的核心元件,但是在之後的版本中只是負責儲存和更新資料。在一些高階使用案例中使用者也能進行自定義
- Sequence:Disruptor使用一組Sequence來作為一個手段來標識特定的元件的處理進度( RingBuffer/Consumer )。每個消費者和Disruptor本身都會維護一個Sequence。雖然一個 AtomicLong 也可以用於標識進度,但定義 Sequence 來負責該問題還有另一個目的,那就是防止不同的 Sequence 之間的CPU快取偽共享(Flase Sharing)問題。
- Sequencer:Sequencer是Disruptor的真正核心。此介面有兩個實現類 SingleProducerSequencer、MultiProducerSequencer ,它們定義在生產者和消費者之間快速、正確地傳遞資料的併發演算法。
- Sequence Barrier:保持Sequencer和Consumer依賴的其它Consumer的 Sequence 的引用。除此之外還定義了決定 Consumer 是否還有可處理的事件的邏輯。
- Wait Strategy:Wait Strategy決定了一個消費者怎麼等待生產者將事件(Event)放入Disruptor中。
- Event:從生產者到消費者傳遞的資料叫做Event。它不是一個被 Disruptor 定義的特定型別,而是由 Disruptor 的使用者定義並指定。
- EventProcessor:持有特定的消費者的Sequence,並且擁有一個主事件迴圈(main event loop)用於處理Disruptor的事件。其中BatchEventProcessor是其具體實現,實現了事件迴圈(event loop),並且會回撥到實現了EventHandler的已使用過的例項中。
- EventHandler:由使用者實現的介面,用於處理事件,是 Consumer 的真正實現
- Producer:生產者,只是泛指呼叫 Disruptor 釋出事件的使用者程式碼,Disruptor 沒有定義特定介面或型別。
事件廣播(Multicast Events)
這是Disruptor和佇列最大的區別。當你有多個消費者監聽了一個Disruptor,所有的事件將會被髮布到所有的消費者中,相比之下佇列的一個事件只能被髮到一個消費者中。Disruptor這一特性被用來需要對同一資料進行多個並行操作的情況。如在LMAX系統中有三個操作可以同時進行:日誌(將資料持久到日誌檔案中),複製(將資料傳送到其他的機器上,以確保存在資料遠端副本),業務邏輯處理。也可以使用WokrerPool來並行處理不同的事件。
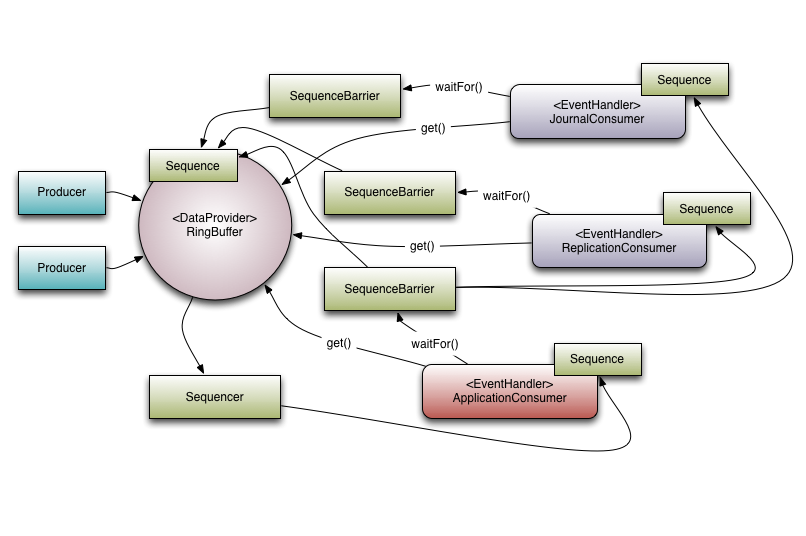
消費者依賴關係圖(Consumer Dependency Graph)
為了支援真實世界中的業務並行處理流程,Disruptor提供了多個消費者之間的協助功能。回到上面的LMAX的例子,我們可以讓日誌處理和遠端副本賦值先執行完之後再執行業務處理流程,這個功能被稱之為gating。gating發生在兩種場景中。第一,我們需要確保生產者不要超過消費者。通過呼叫RingBuffer.addGatingConsumers()增加相關的消費者至Disruptor來完成。第二,就是之前所說的場景,通過構造包含需要必須先完成的消費者的Sequence的SequenceBarrier來實現。
引用上面的例子來說,有三個消費者監聽來自RingBuffer的事件。這裡有一個依賴關係圖。ApplicationConsumer依賴JournalConsumer和ReplicationConsumer。這個意味著JournalConsumer和ReplicationConsumer可以自由的併發執行。依賴關係可以看成是從ApplicationConsumer的SequenceBarrier到JournalConsumer和ReplicationConsumer的Sequence的連線。還有一點值得關注,Sequencer與下游的消費者之間的關係。它的角色是確保釋出不會包裹RingBuffer。為此,所有下游消費者的Sequence不能比ring buffer的Sequence小且不能比ring buffer 的大小小。因為ApplicationConsumers的Sequence是確保比JournalConsumer和ReplicationConsumer的Sequence小或等於,所以Sequencer只需要檢查ApplicationConsumers的Sequence。在更為普遍的應用場景中,Sequencer只需要意識到消費者樹中的葉子節點的的Sequence即可。
事件預分配(Event Preallocation)
Disruptor的一個目標之一是被用在低延遲的環境中。在一個低延遲系統中有必要去減少和降低記憶體的佔用。在基於Java的系統中,需要減少由於GC導致的停頓次數(在低延遲的C/C++系統中,由於記憶體分配器的爭用,大量的記憶體分配也會導致問題)。
為了滿足這點,使用者可以在Disruptor中為事件預分配記憶體。所以EventFactory是使用者來提供,並且Disruptor的Ring Buffer每個entry中都會被呼叫。當將新的資料釋出到Disruptor中時,Disruptor的API將會允許使用者持有所構造的物件,以便使用者可以呼叫這些物件的方法和更新欄位到這些物件中。Disruptor將確保這些操作是執行緒安全。
可選擇的無鎖
無鎖演算法實現的Disruptor的所有記憶體可見性和正確性都使用記憶體屏障和CAS操作實現。只僅僅一個場景BlockingWaitStrategy中使用到了lock。而這僅僅是為了使用Condition,以便消費者執行緒能被park住當在等待一個新的事件到來的時候。許多低延遲系統都使用自旋(busy-wait)來避免使用Condition造成的抖動。但是自旋(busy-wait)的數量變多時將會導致效能的下降,特別是CPU資源嚴重受限的情況下。例如,在虛擬環境中的Web伺服器。
Disruptor使用
我們使用一個簡單的例子來體驗一下Disruptor。生產者會傳遞一個long型別的值到消費者,消費者接受到這個值後會打印出這個值。
定義Event
public class LongEvent
{
    private long value;

    public void set(long value)
    {
        this.value = value;
    }
}
為了使用Disruptor的記憶體預分配event,我們需要定義一個EventFactory:
import com.lmax.disruptor.EventFactory;

public class LongEventFactory implements EventFactory<LongEvent>
{
    public LongEvent newInstance()
    {
        return new LongEvent();
    }
}
為了讓消費者處理這些事件,所以我們這裡定義一個事件處理器,負責列印event:
import com.lmax.disruptor.EventHandler;

public class LongEventHandler implements EventHandler<LongEvent>
{
    public void onEvent(LongEvent event, long sequence, boolean endOfBatch)
    {
        System.out.println("Event: " + event);
    }
}
使用Translators釋出事件
在Disruptor的3.0版本中,由於加入了豐富的Lambda風格的API,可以用來幫組開發人員簡化流程。所以在3.0版本後首選使用Event Publisher/Event Translator來發布事件。
import com.lmax.disruptor.RingBuffer;
import com.lmax.disruptor.EventTranslatorOneArg;

public class LongEventProducerWithTranslator
{
    private final RingBuffer<LongEvent> ringBuffer;

    public LongEventProducerWithTranslator(RingBuffer<LongEvent> ringBuffer)
    {
        this.ringBuffer = ringBuffer;
    }

    private static final EventTranslatorOneArg<LongEvent, ByteBuffer> TRANSLATOR =
        new EventTranslatorOneArg<LongEvent, ByteBuffer>()
        {
            public void translateTo(LongEvent event, long sequence, ByteBuffer bb)
            {
                event.set(bb.getLong(0));
            }
        };

    public void onData(ByteBuffer bb)
    {
        ringBuffer.publishEvent(TRANSLATOR, bb);
    }
}
這種方法的另一個優點是可以將translator程式碼放入一個單獨的類中,並且可以輕鬆地對它們進行獨立的單元測試。
使用過時的API釋出事件
import com.lmax.disruptor.RingBuffer;

public class LongEventProducer
{
    private final RingBuffer<LongEvent> ringBuffer;

    public LongEventProducer(RingBuffer<LongEvent> ringBuffer)
    {
        this.ringBuffer = ringBuffer;
    }

    public void onData(ByteBuffer bb)
    {
        long sequence = ringBuffer.next();  // Grab the next sequence
        try
        {
            LongEvent event = ringBuffer.get(sequence); // Get the entry in the Disruptor
                                                        // for the sequence
            event.set(bb.getLong(0));  // Fill with data
        }
        finally
        {
            ringBuffer.publish(sequence);
        }
    }
}
這裡我們需要把釋出包裹在try/finally程式碼塊中。如果某個請求的 sequence 未被提交,將會堵塞後續的釋出操作或者其它的 producer。特別地在多生產中如果沒有提交Sequence,那麼會造成消費者停滯,導致只能重啟消費者才能恢復。
整合
import com.lmax.disruptor.dsl.Disruptor;
import com.lmax.disruptor.RingBuffer;
import com.lmax.disruptor.util.DaemonThreadFactory;
import java.nio.ByteBuffer;

public class LongEventMain
{
    public static void main(String[] args) throws Exception
    {
        // The factory for the event
        LongEventFactory factory = new LongEventFactory();

        // Specify the size of the ring buffer, must be power of 2.
        int bufferSize = 1024;

        // Construct the Disruptor
        Disruptor<LongEvent> disruptor = new Disruptor<>(factory, bufferSize, DaemonThreadFactory.INSTANCE);

        // Connect the handler
        disruptor.handleEventsWith(new LongEventHandler());

        // Start the Disruptor, starts all threads running
        disruptor.start();

        // Get the ring buffer from the Disruptor to be used for publishing.
        RingBuffer<LongEvent> ringBuffer = disruptor.getRingBuffer();

        LongEventProducer producer = new LongEventProducer(ringBuffer);

        ByteBuffer bb = ByteBuffer.allocate(8);
        for (long l = 0; true; l++)
        {
            bb.putLong(0, l);
            producer.onData(bb);
            Thread.sleep(1000);
        }
    }
}
我們也可以使用Java 8的函數語言程式設計來寫這個例子:
import com.lmax.disruptor.dsl.Disruptor;
import com.lmax.disruptor.RingBuffer;
import com.lmax.disruptor.util.DaemonThreadFactory;
import java.nio.ByteBuffer;

public class LongEventMain
{
    public static void main(String[] args) throws Exception
    {
        // Specify the size of the ring buffer, must be power of 2.
        int bufferSize = 1024;

        // Construct the Disruptor
        Disruptor<LongEvent> disruptor = new Disruptor<>(LongEvent::new, bufferSize, DaemonThreadFactory.INSTANCE);

        // Connect the handler
        disruptor.handleEventsWith((event, sequence, endOfBatch) -> System.out.println("Event: " + event));

        // Start the Disruptor, starts all threads running
        disruptor.start();

        // Get the ring buffer from the Disruptor to be used for publishing.
        RingBuffer<LongEvent> ringBuffer = disruptor.getRingBuffer();

        ByteBuffer bb = ByteBuffer.allocate(8);
        for (long l = 0; true; l++)
        {
            bb.putLong(0, l);
            ringBuffer.publishEvent((event, sequence, buffer) -> event.set(buffer.getLong(0)), bb);
            Thread.sleep(1000);
        }
    }
}
使用函數語言程式設計我們可以發現很多的類都不需要了,如:handler,translator等。
上面的程式碼還可以再簡化一下:
ByteBuffer bb = ByteBuffer.allocate(8);
for (long l = 0; true; l++)
{
    bb.putLong(0, l);
    ringBuffer.publishEvent((event, sequence) -> event.set(bb.getLong(0)));
    Thread.sleep(1000);
}不過這樣將例項化一個物件去持有ByteBuffer bb變數傳入lambda的值。這會產生不必要的垃圾。因此,如果要求低GC壓力,則應首選將引數傳遞給lambda的呼叫。
提升效能的兩個引數
如果想要讓Disruptor擁有更好的效能這裡有兩個選項可以調整,wait strategy 和 producer的型別。
單生產者 vs 多生產者
最好的方法在併發環境下提高效能是堅持單獨寫原則( Single Writer Principle)。如果你的業務場景中只有一個執行緒寫入資料到Disruptor,那麼你可以設定成單生產者來提升效能:
public class LongEventMain
{
    public static void main(String[] args) throws Exception
    {
        //.....
        // Construct the Disruptor with a SingleProducerSequencer
        Disruptor<LongEvent> disruptor = new Disruptor(
            factory, bufferSize, DaemonThreadFactory.INSTANCE, ProducerType.SINGLE, new BlockingWaitStrategy());
        //.....
    }
}
效能測試:
Multiple Producer
Run 0, Disruptor=26,553,372 ops/sec
Run 1, Disruptor=28,727,377 ops/sec
Run 2, Disruptor=29,806,259 ops/sec
Run 3, Disruptor=29,717,682 ops/sec
Run 4, Disruptor=28,818,443 ops/sec
Run 5, Disruptor=29,103,608 ops/sec
Run 6, Disruptor=29,239,766 ops/sec
Single Producer
Run 0, Disruptor=89,365,504 ops/sec
Run 1, Disruptor=77,579,519 ops/sec
Run 2, Disruptor=78,678,206 ops/sec
Run 3, Disruptor=80,840,743 ops/sec
Run 4, Disruptor=81,037,277 ops/sec
Run 5, Disruptor=81,168,831 ops/sec
Run 6, Disruptor=81,699,346 ops/sec
等待策略
BlockingWaitStrategy
Disruptor的預設策略是BlockingWaitStrategy。在BlockingWaitStrategy內部是使用鎖和condition來控制執行緒的喚醒。BlockingWaitStrategy是最低效的策略,但其對CPU的消耗最小並且在各種不同部署環境中能提供更加一致的效能表現
SleepingWaitStrategy
SleepingWaitStrategy 的效能表現跟 BlockingWaitStrategy 差不多,對 CPU 的消耗也類似,但其對生產者執行緒的影響最小,通過使用LockSupport.parkNanos(1)來實現迴圈等待。一般來說Linux系統會暫停一個執行緒約60µs,這樣做的好處是,生產執行緒不需要採取任何其他行動就可以增加適當的計數器,也不需要花費時間訊號通知條件變數。但是,在生產者執行緒和使用者執行緒之間移動事件的平均延遲會更高。它在不需要低延遲並且對生產執行緒的影響較小的情況最好。一個常見的用例是非同步日誌記錄。
YieldingWaitStrategy
YieldingWaitStrategy是可以使用在低延遲系統的策略之一。YieldingWaitStrategy將自旋以等待序列增加到適當的值。在迴圈體內,將呼叫Thread.yield(),以允許其他排隊的執行緒執行。在要求極高效能且事件處理線數小於 CPU 邏輯核心數的場景中,推薦使用此策略;例如,CPU開啟超執行緒的特性。
BusySpinWaitStrategy
效能最好,適合用於低延遲的系統。在要求極高效能且事件處理執行緒數小於CPU邏輯核心樹的場景中,推薦使用此策略;例如,CPU開啟超執行緒的特性。
清除Ring Buffer中的物件
通過Disruptor傳遞資料時,物件的生存期可能比預期的更長。為避免發生這種情況,可能需要在處理事件後清除事件。如果只有一個事件處理程式,則需要在處理器中清除對應的物件。如果您有一連串的事件處理程式,則可能需要在該鏈的末尾放置一個特定的處理程式來處理清除物件。
class ObjectEvent<T>
{
T val;
void clear()
{
val = null;
}
}
public class ClearingEventHandler<T> implements EventHandler<ObjectEvent<T>>
{
public void onEvent(ObjectEvent<T> event, long sequence, boolean endOfBatch)
{
// Failing to call clear here will result in the
// object associated with the event to live until
// it is overwritten once the ring buffer has wrapped
// around to the beginning.
event.clear();
}
}
public static void main(String[] args)
{
Disruptor<ObjectEvent<String>> disruptor = new Disruptor<>(
() -> ObjectEvent<String>(), bufferSize, DaemonThreadFactory.INSTANCE);
disruptor
.handleEventsWith(new ProcessingEventHandler())
.then(new ClearingObjectHandler());
}