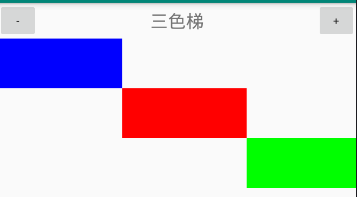
簡單邏輯實現三色階梯
阿新 • • 發佈:2018-12-20
最近發現一個很有意思的三色階梯,翻了下部落格感覺寫的都太過於複雜,畢竟只是玩一下組合式自定義控制元件嗎,
所以我就寫了這篇特別簡單有能寫出來的三色階梯
效果:

自定義view的程式碼
/**
 * date:2018/12/2
 * author:王加輝(家輝輝輝)
 * function:階梯狀自定義view
 */
public class ThreeColorView extends ViewGroup {

    public ThreeColorView(Context context) {
        this(context,null);
    }

    public ThreeColorView(Context context, AttributeSet attrs) {
        this(context, attrs,0);
    }

    public ThreeColorView(Context context, AttributeSet attrs, int defStyleAttr) {
        super(context, attrs, defStyleAttr);
    }

    @Override//測量
    protected void onMeasure(int widthMeasureSpec, int heightMeasureSpec) {
        super.onMeasure(widthMeasureSpec, heightMeasureSpec);

        //遍歷所有子view去測量自己
        measureChildren(widthMeasureSpec,heightMeasureSpec);
    }

    //佈局
    @Override
    protected void onLayout(boolean changed, int l, int t, int r, int b) {

        //獲取子佈局的數量
        int count = getChildCount();
        //初始化寬度和高度
        int startWidth = 0;
        int startHeight = 0;

        for (int i=0; i<count; i++){
            //獲取當前view
            View v = getChildAt(i);
            //為view設定框
            v.layout(startWidth,startHeight,startWidth+v.getMeasuredWidth(),startHeight+v.getMeasuredHeight());
            //呈階梯排列
            if ((i+1)%3==0) {
                //初始化寬
                startWidth=0;
            }else {
                //對width進行賦值
                startWidth += v.getMeasuredWidth();
            }
            //對高進行賦值
            startHeight += v.getMeasuredHeight();
        }
    }

}
佈局:
<LinearLayout xmlns:android="http://schemas.android.com/apk/res/android"
    xmlns:app="http://schemas.android.com/apk/res-auto"
    xmlns:tools="http://schemas.android.com/tools"
    android:layout_width="match_parent"
    android:layout_height="match_parent"
    tools:context=".MainActivity"
    android:orientation="vertical">

    <LinearLayout
        android:orientation="horizontal"
        android:layout_width="match_parent"
        android:layout_height="wrap_content">
        <Button
            android:id="@+id/btn_delete"
            android:layout_weight="1"
            android:layout_width="wrap_content"
            android:layout_height="wrap_content"
            android:text="-"/>
        <TextView
            android:layout_weight="3"
            android:layout_width="match_parent"
            android:layout_height="match_parent"
            android:textSize="24dp"
            android:gravity="center"
            android:text="三色梯"/>
        <Button
            android:id="@+id/btn_add"
            android:layout_weight="1"
            android:layout_width="wrap_content"
            android:layout_height="wrap_content"
            android:text="+"/>
    </LinearLayout>

    <com.wjh.test.view.ThreeColorView
        android:id="@+id/myview"
        android:layout_width="match_parent"
        android:layout_height="match_parent"/>

</LinearLayout>
MainActivity程式碼:
public class MainActivity extends AppCompatActivity implements View.OnClickListener {

    private Button btn_delete;
    private Button btn_add;
    private ThreeColorView myview;
    private int i = 0 ;

    @Override
    protected void onCreate(Bundle savedInstanceState) {
        super.onCreate(savedInstanceState);
        setContentView(R.layout.activity_main);
        initView();

    }

    private void initView() {
        btn_delete = (Button) findViewById(R.id.btn_delete);
        btn_add = (Button) findViewById(R.id.btn_add);
        myview = (ThreeColorView) findViewById(R.id.myview);

        btn_delete.setOnClickListener(this);
        btn_add.setOnClickListener(this);
    }


    @Override
    public void onClick(View v) {
        //每次點選都能重新定位
        i++;
        //動態建立TextView
        final TextView text= new TextView(this);
        //設定寬高
        text.setWidth(250);
        text.setHeight(100);
        //text.setText(" 條目"+i);
        //text.setTextColor(Color.WHITE);//字型顏色白色
        //定義階梯
        if((i+1)%3==0){
            text.setBackgroundColor(Color.RED);//背景顏色綠色2
        }else if ((i+1)%3==1){
            text.setBackgroundColor(Color.GREEN);//背景顏色藍色3
        }else if ((i+1)%3==2){
            text.setBackgroundColor(Color.BLUE);//背景顏色紅色1
        }
        //新增view
        myview.addView(text);


        /**
         * 左上角點選刪除
         */
        btn_delete.setOnClickListener(new View.OnClickListener() {
            @Override
            public void onClick(View view) {
                //刪除view
                myview.removeView(text);
            }
        });
    }
}
