SSD( Single Shot MultiBox Detector)關鍵原始碼解析
1,多尺度特徵圖檢測網路結構;
2,anchor boxes生成;
3,ground truth預處理;
4,目標函式;
5,總結
<img src="https://pic2.zhimg.com/v2-d0252b7d1408105470b88ceb45054725_b.png" data-rawwidth="1031" data-rawheight="686" class="origin_image zh-lightbox-thumb" width="1031" data-original="https://pic2.zhimg.com/v2-d0252b7d1408105470b88ceb45054725_r.png">
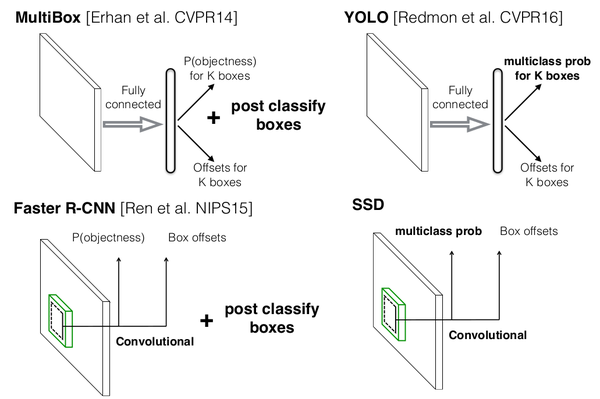
圖0-1 SSD與MultiBox,Faster R-CNN,YOLO原理(此圖來源於作者在eccv2016的PPT)
<img src="https://pic2.zhimg.com/v2-0213e22e8b0d96f8854e82d796c83a71_b.png" class="content_image">
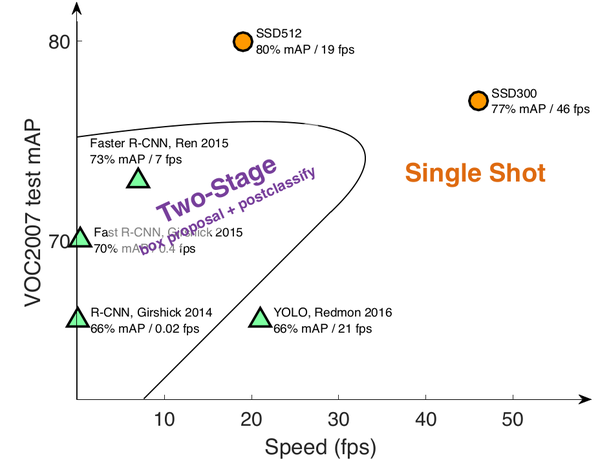
圖0-2 SSD檢測速度與精確度。(此圖來源於作者在eccv2016的PPT)
1 多尺度特徵圖檢測網路結構
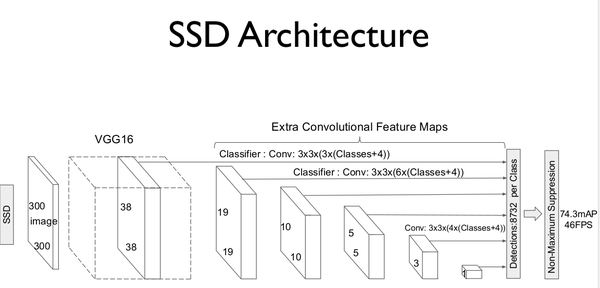
SSD的網路模型如圖1-1所示。<img src="https://pic1.zhimg.com/v2-7f7f3c99d20df97455e8bcfce7876d30_b.png" data-rawwidth="1152" data-rawheight="553" class="origin_image zh-lightbox-thumb" width="1152" data-original="https://pic1.zhimg.com/v2-7f7f3c99d20df97455e8bcfce7876d30_r.png">
圖1-1 SSD模型結構。(此圖來源於原論文)
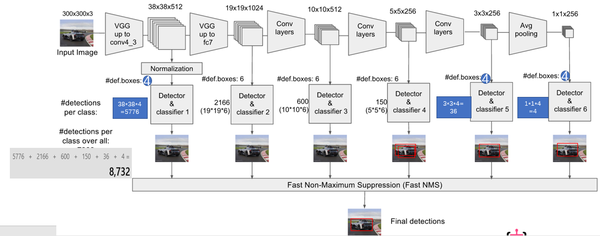
模型建立原始碼包含於ssd_vgg_300.py中。模型多尺度特徵圖檢測如圖1-2所示。模型選擇的特徵圖包括:38×38(block4),19×19(block7),10×10(block8),5×5(block9),3×3(block10),1×1(block11)。對於每張特徵圖,生成採用3×3卷積生成 預設框的四個偏移位置和21個類別的置信度。比如block7,預設框(def boxes)數目為6,每個預設框包含4個偏移位置和21個類別置信度(4+21)。因此,block7的最後輸出為(19*19)*6*(4+21)。
<img src="https://pic1.zhimg.com/v2-5964f6dff6dbbd435336cde9e5dfc988_b.png" class="content_image">
圖1-2 多尺度特徵取樣(此圖來源:知乎專欄)
其中,初始化引數如下:
    """
    Implementation of the SSD VGG-based 300 network.

    The default features layers with 300x300 image input are:
      conv4 ==> 38 x 38
      conv7 ==> 19 x 19
      conv8 ==> 10 x 10
      conv9 ==> 5 x 5
      conv10 ==> 3 x 3
      conv11 ==> 1 x 1
    The default image size used to train this network is 300x300.
    """
    default_params = SSDParams(
        img_shape=(300, 300),#輸入尺寸
        num_classes=21,#預測類別20+1=21(20類加背景)
        #獲取feature map層
        feat_layers=['block4', 'block7', 'block8', 'block9', 'block10', 'block11'],
        feat_shapes=[(38, 38), (19, 19), (10, 10), (5, 5), (3, 3), (1, 1)],

        anchor_size_bounds=[0.15, 0.90],
        #anchor boxes的大小
        anchor_sizes=[(21., 45.),
                      (45., 99.),
                      (99., 153.),
                      (153., 207.),
                      (207., 261.),
                      (261., 315.)],
        #anchor boxes的aspect ratios
        anchor_ratios=[[2, .5],
                       [2, .5, 3, 1./3],
                       [2, .5, 3, 1./3],
                       [2, .5, 3, 1./3],
                       [2, .5],
                       [2, .5]],
        anchor_steps=[8, 16, 32, 64, 100, 300],#anchor的層
        anchor_offset=0.5,#補償閥值0.5
        normalizations=[20, -1, -1, -1, -1, -1],#該特徵層是否正則,大於零即正則;小於零則否
        prior_scaling=[0.1, 0.1, 0.2, 0.2]
        )
建立模型程式碼如下,作者採用了TensorFlow-Slim(類似於keras的高層庫)來建立網路模型,詳細內容可以參考TensorFlow-Slim網頁。
#建立ssd網路函式
def ssd_net(inputs,
            num_classes=21,
            feat_layers=SSDNet.default_params.feat_layers,
            anchor_sizes=SSDNet.default_params.anchor_sizes,
            anchor_ratios=SSDNet.default_params.anchor_ratios,
            normalizations=SSDNet.default_params.normalizations,
            is_training=True,
            dropout_keep_prob=0.5,
            prediction_fn=slim.softmax,
            reuse=None,
            scope='ssd_300_vgg'):
    """SSD net definition.
    """
    # End_points collect relevant activations for external use.
    #用於收集每一層輸出結果
    end_points = {}
    #採用slim建立vgg網路,網路結構參考文章內的結構圖
    with tf.variable_scope(scope, 'ssd_300_vgg', [inputs], reuse=reuse):
        # Original VGG-16 blocks.
        net = slim.repeat(inputs, 2, slim.conv2d, 64, [3, 3], scope='conv1')
        end_points['block1'] = net
        net = slim.max_pool2d(net, [2, 2], scope='pool1')
        # Block 2.
        net = slim.repeat(net, 2, slim.conv2d, 128, [3, 3], scope='conv2')
        end_points['block2'] = net
        net = slim.max_pool2d(net, [2, 2], scope='pool2')
        # Block 3.
        net = slim.repeat(net, 3, slim.conv2d, 256, [3, 3], scope='conv3')
        end_points['block3'] = net
        net = slim.max_pool2d(net, [2, 2], scope='pool3')
        # Block 4.
        net = slim.repeat(net, 3, slim.conv2d, 512, [3, 3], scope='conv4')
        end_points['block4'] = net
        net = slim.max_pool2d(net, [2, 2], scope='pool4')
        # Block 5.
        net = slim.repeat(net, 3, slim.conv2d, 512, [3, 3], scope='conv5')
        end_points['block5'] = net
        net = slim.max_pool2d(net, [3, 3], 1, scope='pool5')#max pool

        #外加的SSD層
        # Additional SSD blocks.
        # Block 6: let's dilate the hell out of it!
        #輸出shape為19×19×1024
        net = slim.conv2d(net, 1024, [3, 3], rate=6, scope='conv6')
        end_points['block6'] = net
        # Block 7: 1x1 conv. Because the fuck.
        #卷積核為1×1
        net = slim.conv2d(net, 1024, [1, 1], scope='conv7')
        end_points['block7'] = net

        # Block 8/9/10/11: 1x1 and 3x3 convolutions stride 2 (except lasts).
        end_point = 'block8'
        with tf.variable_scope(end_point):
            net = slim.conv2d(net, 256, [1, 1], scope='conv1x1')
            net = slim.conv2d(net, 512, [3, 3], stride=2, scope='conv3x3')
        end_points[end_point] = net
        end_point = 'block9'
        with tf.variable_scope(end_point):
            net = slim.conv2d(net, 128, [1, 1], scope='conv1x1')
            net = slim.conv2d(net, 256, [3, 3], stride=2, scope='conv3x3')
        end_points[end_point] = net
        end_point = 'block10'
        with tf.variable_scope(end_point):
            net = slim.conv2d(net, 128, [1, 1], scope='conv1x1')
            net = slim.conv2d(net, 256, [3, 3], scope='conv3x3', padding='VALID')
        end_points[end_point] = net
        end_point = 'block11'
        with tf.variable_scope(end_point):
            net = slim.conv2d(net, 128, [1, 1], scope='conv1x1')
            net = slim.conv2d(net, 256, [3, 3], scope='conv3x3', padding='VALID')
        end_points[end_point] = net

        # Prediction and localisations layers.
        #預測和定位
        predictions = []
        logits = []
        localisations = []
        for i, layer in enumerate(feat_layers):
            with tf.variable_scope(layer + '_box'):
                #接受特徵層的輸出,生成類別和位置預測
                p, l = ssd_multibox_layer(end_points[layer],
                                          num_classes,
                                          anchor_sizes[i],
                                          anchor_ratios[i],
                                          normalizations[i])
            #把每一層的預測收集
            predictions.append(prediction_fn(p))#prediction_fn為softmax,預測類別
            logits.append(p)#概率
            localisations.append(l)#預測位置資訊

        return predictions, localisations, logits, end_points
2 anchor box生成
對每一張特徵圖,按照不同的大小(scale) 和長寬比(ratio) 生成生成k個預設框(default boxes),原理圖如圖2-1所示(此圖中,預設框數目k=6,其中5×5的紅色點代表特徵圖,因此:5*5*6 = 150 個boxes)。
每個預設框大小計算公式為:,其中,m為特徵圖數目,
為最底層特徵圖大小(原論文中值為0.2,程式碼中為0.15),
為最頂層特徵圖預設框大小(原論文中為0.9,程式碼中為0.9)。
每個預設框長寬比根據比例值計算,原論文中比例值為,因此,每個預設框的寬為
,高為
。對於比例為1的預設框,額外新增一個比例為
的預設框。最終,每張特徵圖中的每個點生成6個預設框。每個預設框中心設定為
,其中,
為第k個特徵圖尺寸。
<img src="https://pic4.zhimg.com/v2-e128c01e26456fa24502e2c05bf46e1b_b.png" class="content_image"> <img src="https://pic3.zhimg.com/v2-e6f0dd799661fff724853435b976a82e_b.png" class="content_image"> <img src="https://pic3.zhimg.com/v2-64a521f37e62fe79c9b5d11746eb6686_b.png" class="content_image">
圖2-1 anchor box生成示意圖(此圖來源於知乎專欄)
原始碼中,預設框生成函式為ssd_anchor_one_layer(),程式碼如下:
#生成一層的anchor boxes
def ssd_anchor_one_layer(img_shape,#原始影象shape
                         feat_shape,#特徵圖shape
                         sizes,#預設的box size
                         ratios,#aspect 比例
                         step,#anchor的層
                         offset=0.5,
                         dtype=np.float32):
    """Computer SSD default anchor boxes for one feature layer.

    Determine the relative position grid of the centers, and the relative
    width and height.

    Arguments:
      feat_shape: Feature shape, used for computing relative position grids;
      size: Absolute reference sizes;
      ratios: Ratios to use on these features;
      img_shape: Image shape, used for computing height, width relatively to the
        former;
      offset: Grid offset.

    Return:
      y, x, h, w: Relative x and y grids, and height and width.
    """
    # Compute the position grid: simple way.
    # y, x = np.mgrid[0:feat_shape[0], 0:feat_shape[1]]
    # y = (y.astype(dtype) + offset) / feat_shape[0]
    # x = (x.astype(dtype) + offset) / feat_shape[1]
    # Weird SSD-Caffe computation using steps values...

    """
    #測試中,引數如下
    feat_shapes=[(38, 38), (19, 19), (10, 10), (5, 5), (3, 3), (1, 1)]
    anchor_sizes=[(21., 45.),
                      (45., 99.),
                      (99., 153.),
                      (153., 207.),
                      (207., 261.),
                      (261., 315.)]
    anchor_ratios=[[2, .5],
                       [2, .5, 3, 1./3],
                       [2, .5, 3, 1./3],
                       [2, .5, 3, 1./3],
                       [2, .5],
                       [2, .5]]
    anchor_steps=[8, 16, 32, 64, 100, 300]


    offset=0.5

    dtype=np.float32

    feat_shape=feat_shapes[0]
    step=anchor_steps[0]
    """
    #測試中,y和x的shape為(38,38)(38,38)
    #y的值為
    #array([[ 0,  0,  0, ...,  0,  0,  0],
     #  [ 1,  1,  1, ...,  1,  1,  1],
    # [ 2,  2,  2, ...,  2,  2,  2],
    #   ...,
     #  [35, 35, 35, ..., 35, 35, 35],
    #  [36, 36, 36, ..., 36, 36, 36],
     #  [37, 37, 37, ..., 37, 37, 37]])
    y, x = np.mgrid[0:feat_shape[0], 0:feat_shape[1]]
    #測試中y=(y+0.5)×8/300,x=(x+0.5)×8/300
    y = (y.astype(dtype) + offset) * step / img_shape[0]
    x = (x.astype(dtype) + offset) * step / img_shape[1]

    #擴充套件維度,維度為(38,38,1)
    # Expand dims to support easy broadcasting.
    y = np.expand_dims(y, axis=-1)
    x = np.expand_dims(x, axis=-1)

    # Compute relative height and width.
    # Tries to follow the original implementation of SSD for the order.
    #數值為2+2
    num_anchors = len(sizes) + len(ratios)
    #shape為(4,)
    h = np.zeros((num_anchors, ), dtype=dtype)
    w = np.zeros((num_anchors, ), dtype=dtype)
    # Add first anchor boxes with ratio=1.
    #測試中,h[0]=21/300,w[0]=21/300?
    h[0] = sizes[0] / img_shape[0]
    w[0] = sizes[0] / img_shape[1]
    di = 1
    if len(sizes) > 1:
        #h[1]=sqrt(21*45)/300
        h[1] = math.sqrt(sizes[0] * sizes[1]) / img_shape[0]
        w[1] = math.sqrt(sizes[0] * sizes[1]) / img_shape[1]
        di += 1
    for i, r in enumerate(ratios):
        h[i+di] = sizes[0] / img_shape[0] / math.sqrt(r)
        w[i+di] = sizes[0] / img_shape[1] * math.sqrt(r)
    #測試中,y和x shape為(38,38,1)
    #h和w的shape為(4,)
    return y, x, h, w
3 ground truth預處理
訓練過程中,首先需要將label資訊(ground truth box,ground truth category)進行預處理,將其對應到相應的預設框上。根據預設框和ground truth box的jaccard 重疊來尋找對應的預設框。文章中選取了jaccard重疊超過0.5的預設框為正樣本,其它為負樣本。
原始碼ground truth預處理程式碼位於ssd_common.py檔案中,關鍵程式碼如下:
#label和bbox編碼函式
def tf_ssd_bboxes_encode_layer(labels,#ground truth標籤,1D tensor
                               bboxes,#N×4 Tensor(float)
                               anchors_layer,#anchors,為list
                               matching_threshold=0.5,#閥值
                               prior_scaling=[0.1, 0.1, 0.2, 0.2],#縮放
                               dtype=tf.float32):
    """Encode groundtruth labels and bounding boxes using SSD anchors from
    one layer.

    Arguments:
      labels: 1D Tensor(int64) containing groundtruth labels;
      bboxes: Nx4 Tensor(float) with bboxes relative coordinates;
      anchors_layer: Numpy array with layer anchors;
      matching_threshold: Threshold for positive match with groundtruth bboxes;
      prior_scaling: Scaling of encoded coordinates.

    Return:
      (target_labels, target_localizations, target_scores): Target Tensors.
    """
    # Anchors coordinates and volume.
    #獲取anchors層
    yref, xref, href, wref = anchors_layer
    ymin = yref - href / 2.
    xmin = xref - wref / 2.
    ymax = yref + href / 2.
    xmax = xref + wref / 2.
    #xmax的shape為((38, 38, 1), (38, 38, 1), (4,), (4,))
(38, 38, 4)
    #體積
    vol_anchors = (xmax - xmin) * (ymax - ymin)

    # Initialize tensors...
    shape = (yref.shape[0], yref.shape[1], href.size)
    feat_labels = tf.zeros(shape, dtype=tf.int64)
    feat_scores = tf.zeros(shape, dtype=dtype)
    #shape為(38,38,4)
    feat_ymin = tf.zeros(shape, dtype=dtype)
    feat_xmin = tf.zeros(shape, dtype=dtype)
    feat_ymax = tf.ones(shape, dtype=dtype)
    feat_xmax = tf.ones(shape, dtype=dtype)

    #計算jaccard重合
    def jaccard_with_anchors(bbox):
        """Compute jaccard score a box and the anchors.
        """
        # Intersection bbox and volume.
        int_ymin = tf.maximum(ymin, bbox[0])
        int_xmin = tf.maximum(xmin, bbox[1])
        int_ymax = tf.minimum(ymax, bbox[2])
        int_xmax = tf.minimum(xmax, bbox[3])
        h = tf.maximum(int_ymax - int_ymin, 0.)
        w = tf.maximum(int_xmax - int_xmin, 0.)

        # Volumes.
        inter_vol = h * w
        union_vol = vol_anchors - inter_vol \
            + (bbox[2] - bbox[0]) * (bbox[3] - bbox[1])
        jaccard = tf.div(inter_vol, union_vol)
        return jaccard
    #條件函式
    def condition(i, feat_labels, feat_scores,
                  feat_ymin, feat_xmin, feat_ymax, feat_xmax):
        """Condition: check label index.
        """
        #tf.less函式 Returns the truth value of (x < y) element-wise.
        r = tf.less(i, tf.shape(labels))
        return r[0]
    #主體
    def body(i, feat_labels, feat_scores,
             feat_ymin, feat_xmin, feat_ymax, feat_xmax):
        """Body: update feature labels, scores and bboxes.
        Follow the original SSD paper for that purpose:
          - assign values when jaccard > 0.5;
          - only update if beat the score of other bboxes.
        """
        # Jaccard score.
        label = labels[i]
        bbox = bboxes[i]
        scores = jaccard_with_anchors(bbox)#計算jaccard重合值

        # 'Boolean' mask.
        #tf.greater函式返回大於的布林值
        mask = tf.logical_and(tf.greater(scores, matching_threshold),
                              tf.greater(scores, feat_scores))
        imask = tf.cast(mask, tf.int64)
        fmask = tf.cast(mask, dtype)
        # Update values using mask.
        feat_labels = imask * label + (1 - imask) * feat_labels
        feat_scores = tf.select(mask, scores, feat_scores)

        feat_ymin = fmask * bbox[0] + (1 - fmask) * feat_ymin
        feat_xmin = fmask * bbox[1] + (1 - fmask) * feat_xmin
        feat_ymax = fmask * bbox[2] + (1 - fmask) * feat_ymax
        feat_xmax = fmask * bbox[3] + (1 - fmask) * feat_xmax
        return [i+1, feat_labels, feat_scores,
                feat_ymin, feat_xmin, feat_ymax, feat_xmax]
    # Main loop definition.
    i = 0
    [i, feat_labels, feat_scores,
     feat_ymin, feat_xmin,
     feat_ymax, feat_xmax] = tf.while_loo
